
Trying Out Lightroom 4 Beta

Well it is here – it’s been almost two years since Lightroom 3 came out so the new version is ready for testing. Anyone can download it to beta test and it will be available for use until March 31, 2012. So give it a try – it now edits video. Adobe has replaced the Recover and Fill Light with Shadows and Whites sliders giving a much improved result. The Adjustment Brush and Gradient now have the same choices as the Basic Panel sliders so you can localize changes to particular parts of the image – this is a big upgrade IMHO. Clarity slider no long gives halos when set over 80 – another great enhancement. They now have a Book module where you can design your own photo books and a Map module to help with CPS classifying. There is soft-proofing for your images before printing to see how they will look when printed, and in the Print module, there are Brightness and Contrast sliders to help with the conversion from monitor to print media. Guess there are lots of other little things going on in the new version, but I have not had time to do a complete run through. The biggest drawback as far as I can tell is that the presets do now work great from Lightroom 3 because of the slider changes in the Basic Panel – this will take a while to adjust your old ones over to the new version. Otherwise it seems to be a great new upgrade. So far plug-ins seem to working – the image of above used OnOne’s Perfect Layers plug-in and it ran fine in Lightroom 4 beta. (The texture is Shadowhouse Creations Oil Painting 3.)
Download the beta version of Adobe Lightroom 4
Two great resources for information about the new features are :
Launch Center – Lightroom 4 from NAPP featuring Scott Kelby and Matt Kloskowski (Owner of Killer Lightroom Tips blog)
Introduction to Lightroom 4 Beta from Adobe featuring Julieanne Kost (One of my favorite gurus)
This program is definitely worth taking a look at if you do photography or Photoshop much at all. I love this program – the simplicity of the layout makes it very easy to use. Download the free beta version and see what you think! Once I get a chance to try out all the new features, I will report back – I am a Lightroom nut too!…..Digital Lady Syd
Calendar Template for 2012

Above is another example of using the calendar template I created last year – the instructions are very easy to follow. Link over to my “Free Calendar Template” blog to download my calendar template and the calendar pdf file, and follow the easy steps. It prints out on an 8 1/2 inch X 11 inch sheet. (On Friday I will post how to do this in Elements – the same process except for copying the layer mask which is a copy and paste effort.)
For this calendar, I added a light colored gradient background instead of using a solid color. This was done by adding a New Layer on top and selecting the Gradient Tool. In the Options Bar, select your gradient, in this case it was from Muted Gradients Graphix1 – Muted 8, click first icon Linear, use Normal Mode at 100% opacity with Dither and Transparency checked. Copy the Layer Mask from the Color Fill 2 layer by clicking on the layer mask and ALT + Drag up to the top gradient layer. The bird image was taken at the St. Augustine Alligator Farm Zoological Park’s Rookery, one of the best places to take pictures of birds in the Spring, and a texture from Ash was used (not sure they are available anymore, but click on the Textures category on right to find many more wonderful texture sites). A 3 stroke gray line was added around the inside and outside of the template by adding a Layer Style to the top gradient layer.
This calendar template makes for a great present. It can also give you a chance to show off your latest artistic endeavor. Give it a try!…..Digital Lady Syd
Digital Lady Syd Related Blogs:
Free Calendar Template
Free Calendar Template for Use with Elements
Create Calendar Photoshop Templates
Colorful Blown Out Look Lightroom and Adobe Camera Raw Preset
Why I Love OnOne’s Perfect Layers!

OnOne’s Perfect Layers plug-in was used to add the texture to this image. It could have been done in Photoshop just as easily (and a lot of people say this), but the reasons I like Perfect Layers is that:
(1) you just have to click a button to get rid of a texture you are trying and do not like;
(2) just load a new texture to apply and add several others if you want. Much easier that placing a texture from Bridge and then going to the Layers Panel to try different blend modes.
(3) can create several virtual copies with different effects in Lightroom and bring them all into Perfect Layers as one file with lined up layers where the blend modes can be changed, textures added, and areas masked out. Major cool!
(4) even though it is not a Smart Object, when you open the PSD file in Photoshop, all the layers created in Perfect Layers are in place and reconstructed right there.
I am all for doing things faster and better and Perfect Layers does just that. I am not sure I have created a bad texturized image since getting this program. And that is why I Love Perfect Layers!
The image is of a building in Stirling, Scotland. The beautiful texture is provided free by ShadowHouse Creations and is called Oil Painting One (it has a nice short tutorial with the download that is very good also.) An OnOne PhotoFrame called acid burned controlled 05 was added and the image sampled to get a matching frame color.
Give Perfect Layers a try if you use Adobe Lightroom – can download a trial of Perfect Layers by clicking on the OnOne Perfect Photo Suite link on the side. Until Later…..Digital Lady Syd
Digital Lady Syd’s Related Posts:
“Perfect” Perfect Layers
Clarifying Clarity! Adobe Camera Raw and Lightroom Quick Trick
New Plug-In for Lightroom
Topaz Lens Effect’s Artistic Flair!

This is a real Tidbit – just playing around in Topaz Lens Effects. I have not used this plug-in as much as I thought I would so I decided to try some things on a so-so image. Overall I am really happy with the results from using this plug-in. Three Lens Effects were applied in this order: Vignette with a lighter dark edge centered on the blue cover over the door; Lens – Motion using Zoom in the Motion Blur section – centered again on the top of the door and the Motion Amount adjusted from there; and Filter – Dual Tone with the Region A having a fairly strong Yellow Cast and Region B using a small Magenta Cast (you can see this in the image), and adjusting the image Contrast and Saturation sliders. Back in Photoshop, a layer mask was added to the Lens Effects layer and black painted in to bring back the clean lines of of the door area – the Sharpen Tool was then applied. The orange brick and blue canvas awning were brought out using a Selective Color Adjustment Layer and a Curves Adjustment Layer. An OnOne PhotoFrame was added (see sidebar for website link). A Shadowhouse Creations Used Canvas 4 texture was added to give it the darker canvas feel (check out the textures at this site – they are all free and great!). A final Curves Adjustment Layer was added and the layer mask converted to black (highlight mask and press CTRL + I) and white painted to increase contrast on the door area.
Here are the layers I used to create this image to help you see how it all goes together.

I really loved the final result – but definitely it has more of an artistic feel than realistic. Try this plug-in and see if you can get some interesting results too……Digital Lady Syd
See related Digital Lady Syd’s blogs on Topaz Lens Effects:
Little Nighttime Fun from Topaz!
Topaz Lens Effects Plug-in
Elements & CS5 Friday: Adding a Texture for a Totally New Look to an Image
Friday blogs are going to be for Adobe Photoshop Elements along with some techniques crossing over with Adobe Photoshop CS5. I realize there is a huge group of digital fanatics out there using the quite capable little sister to CS5. So let’s start.
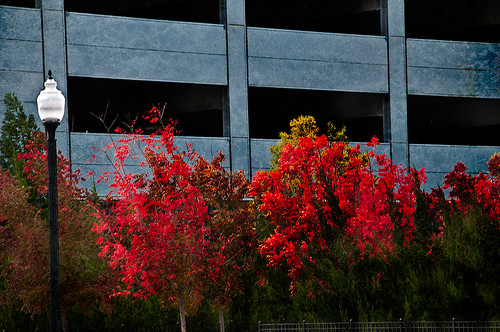 |
Unfortunately these beautiful trees are in a very run-down part of the city and located in front of a parking garage. I guess my point is that just because something is not in a gorgeous settng, it can make a really nice image with just a little effort. Hover over the image to see what the original image looked like.
To achieve this nice effect, all that was done is to add an interesting texture image as a layer on top of your basic picture. In this case, a really grungy looking texture creates this wonderful effect on the building and in the tree colors. This free texture is from Shadowhouse Creations and is called You’d Be Surprised – download it here. This is one of the best texture sites I have found on the internet – beautiful textures all for free!
Here are the steps required to create this look:
1. Open your image in Photoshop Elements (or CS5).
2. Clean up any areas that need to be touched up using the Clone Stamp Tool or Content Aware Healing Brush.
3. Go to File -> Open and navigate to the downloaded texture, in this case You’d Be Surprised, to open in Elements (or CS5) as a separate image.
4. Select image (CTRL + A), copy (CTRL + C) and then go to the original image and paste (CTRL +V) into the file which now puts the new image on top of your image. Close the texture image without saving.
5. Since the texture is probably too small to cover your image, we will use a Free Transform (CTRL+T) to expand the image – just drag the corners out to completely cover the original layer underneath.
6. Change the texture layer to Overlay Blend Mode at the top of the Layers Panel (click on down arrow to the right of Normal).
7. (Optional Step) If certain areas would look better without the texture, highlight this layer and click the Add a Mask icon (2nd icon over from left at bottom of the Layers Panel). This adds a white layer mask – click on it in the Layers Panel and paint with a black soft brush set to 50% opacity. Paint into areas you do not want the texture affecting.
For this image, the lamppost and light were painted out in black along with a little bit of the red leaves in the trees to increase the color range in the leaves, and some of the dark green bushes to add some lighter highlights for interest.
8. (Optional Step) To sharpen parts of the image to make certain areas stand out, click on the Create a New Layer icon (1st icon at the bottom of the Layers Panel and 6th icon from left for CS5). Select the Sharpen Tool (it is nested with the Blur Tool and Smudge Tool – 3rd icon from the bottom on the Tool Bar or 11 from bottom for CS5) and leave the top options set to the default settings except check Sample All Layers. On this new layer, with a soft edged brush paint over the objects you want to sharpen – since the brush is set to a default Strength of 50%, go over the object a few times to build up a really sharp effect. Watch out for artifacts if too much is applied. The nice thing is, since this sharpening is on its own layer, it can be deleted and started over or the opacity can be reduced if too much is added.
In the image above, just the lamppost and light and a few of the top red and yellow leaves were sharpened.
You are done! And this texture creates a very beautiful look. Look at some of the other images Shadowhouse Creations used with this texture at the download site link above.
Well I hope you enjoyed this blog – I did. I love working with textures and this workflow can be used over and over again to achieve some beautiful results using any texture. Have Fun Creating!…..Digital Lady Syd
Just Another Topaz Black & White Effect Example

This image was taken at Edinburgh Castle in Scotland. I just keep playing around and finding new looks for images. The cannon and opening were selected and placed on their own layer, then a white layer was added below it, and a texture from ShadowHouse Creations Another Mixed Bag Texture Set (some really beautiful free textures on this site) was added. On several layers above and below using different colors from the image, various brush marks were added using Gorjuss Grunge Again brushes (unfortunately these are no long available), some really nice brushes to add a bit of color and detail. Create a composite and duplicate this layer. Next use the Topaz Black and White plug-in with the Opalotype Collection Effect and Yellow Lilac preset as a start. A lot of changes were made in the Conversion and Finishing Touches panels and Detail and Burn brushes were used to emphasize the stone. (See my Fun Photoshop Blog “Topaz B&W Effects Plug-in – a Real Winner!) and Tidbits Blog “Topaz B&W Effects vs. Nik’s Silver Efex Pro” for more information on this plug-in.) The plug-in layer was set to 52% opacity back in Photoshop. A Curves Adjustment Layer was added and some sharpening applied. It was a really fun image to do.
Hope you got an idea for creating a little different effect with this plug-in…..Digital Lady Syd
Brushing up on Circles!

Well, for some reason I felt a little inspired and decided to play around with some really nice circle brushes. I know I have seen a similar look in some of the images sold in discount stores. With a couple textures added, a very nice grunge look can be achieved, and the best part is that you can choose your own colors to get the feel you want.
If you are interested in the circle brushes, both sets can be downloaded from Ar-Bent-Ing called 10 Dripping Photoshop Circle Brushes and 15 Grunge Circle Brushes. A couple textures, one from Shadowhouse Creations, were added, some layer styles to the brush layers, and basically that is it. Not real hard and a lot of fun! (Digital Lady Syd’s Rule No. 2) ……Digital Lady Syd
Digital Lady Syd’s Rule No. 3: Look Back at What You Have Done

This week I was working on my Fun Photoshop Blog (Getting to the Art of the Matter) which entailed adding 38 images into a template. I wanted a certain feel to the images I was going to add so I decided to go back and review some of my older work. I discovered there were many techniques I have used quite effectively in the past and had totally forgotten about – it added a whole new perspective to what I have been working on recently. And some of the effects I did not think were that great a few years ago, I now think turned out quite nice.
The image above is one of these cases when I was just learning about how to apply textures. This image involved just adding Matt’s Old Texture as a layer, set to Multiply blend mode, lower the opacity, and with a layer mask, paint out where the texture should not be. Pretty quick and uncomplicated but the results were really nice.
Guess it is just good to see where you have been so you can see where you are going. Next time you are stuck, take a few minutes and go back to see what was going on when you were first working on images. You might get a new inspiration that will help get you back on track (like I did)!…..Digital Lady Syd
Fixing up a Boring Picture
When you need a twist for an average looking image, try a texture or two to give it a new look. Here is a fairly average looking water tank image from Madison, Mississippi, that I shot because for some reason I love to photograph them. Hover over the image to see the before shot (only electrical lines had been removed at this point).
 |
I was really pleased with the results. I found some beautiful vintage oil painting textures from a site called Shadowhouse Creations. This site has some wonderful resources so check it out when you have a chance. I applied the first two textures to my image, both layers set to Hard Light at 80% opacity. Added layer masks to clean up where the texture was too harsh. Painted in using my SJ-Cloud Brush Set – Brush #1 and some birds. That’s it.
I love the way Photoshop can make anything look great by just using a little creativity! Try it out!……..Digital Lady Syd
(BTW-For more information on textures, check out my Fun Photoshop Blog called “Adding a Texture for Flair!” )
Digital Lady Syd’s Rule No. 1: Take the Time to Experiment!
For my first blog “tidbit,” I thought I would show an example of using in Photoshop the Plugin Galaxy Instant Mirror effect. Sometimes you get some really interesting results using this filter on an image that did not look like much originally.

See my entry on Photoshop Fun blog called “Instant Mirror and Quick Mirror for Photoshop.”
Digital Lady Syd’s Photoshop Rule No. 1:
When stuck and not sure where to go next in Photoshop, EXPERIMENT.


