
A Photoshop Still Life
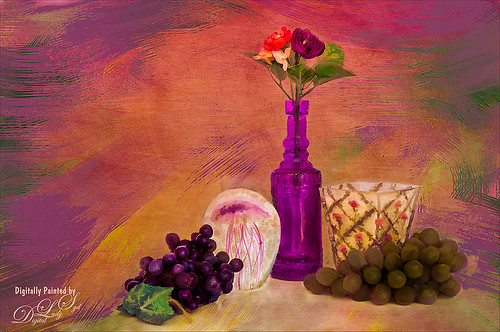
Enjoyed painting in Photoshop this set up still life I put together. Topaz (see sidebar for website link) photoFXLabs was used to add the Painted Works Texture and on separate layers above, the mixer brushes were used. The final texture was placed on top and was Jai Johnson ‘s watermelon-wall set to Soft Light. In the Layer Styles dialog, the Blend If Underlying Layer black tab was set to 88 to get the glowing effect. Nik Viveza 2 was used to direct the focal point, a Levels Adjustment Layer and Curves Adjustment Layer were used to finish it off. I really enjoyed painting this image…..Digital Lady Syd
Pretty in Pink! with Topaz Clarity

I do love to photograph my gerberas – they are always so pretty. This time I really changed them up. I think they are as pretty in pink as they were in yellow! So I was really just playing around in Topaz (see sidebar for website link) photoFXlab just to see if the new Topaz Clarity plug-in would work nicely with it. I didn’t even keep track of the changes I made exactly in Clarity, but I did use the Hue/Sat/Lum section to turn the flowers pink. I just kept fooling around with the sliders until I got a color I liked – used the Overall sliders on each of these sections and also adjusted the Clarity section too. Back in photoFXlab, adjusted the Dynamics slider a little to the right. Created a +From Stack Layer and opened up Topaz Simplify 5 where the Paint 5 preset was applied. Back in photoFXlab, the Mask tab was selected and the centers of the flowers were painted back so the detail from the Clarity layer remained. Exited the plug-in and did some basic flower clean up. Created a couple New Layers and used two of my free Cloud Brushes (Brush 6 and 9) to add some interest to the background. Added a Curves Adjustment Layer and evened out some of the petal color. Then added 2 Lil’ Owls Color Bokeh Grunge Set (see sidebar for website link)-2 overlay to the image (set to Normal at 100% opacity). Next the text was added using the free font Ruthie. Kim Klassen‘s Square 3 border was added last and set to 52%. The last step added another Curves Adjustment Layer to enhance overall contrast. That was it. I just love playing with my flowers in Photoshop!…..Digital Lady Syd
PS: Check out my Fun Photoshop How to Create an Overlay Out of a Texture blog to see the frame it was put in.
Digital Lady Syd Related Blogs:
Digital Lady Syd Reviews Topaz Clarity
Topaz Simplify Artistic Workflow
Digital Lady Syd’s Review of Topaz photoFXlab v1.1
Some Vintage Zinnias

Just playing with my Zinnias. I was trying to a vintage, wallpaper feel behind them. I actually opened Topaz (see sidebar for website link) photoFXlab from Lightroom. Here are the steps completed: Applied Topaz Clarity – SJ Illustrative Look – with a few adjustments, duplicated layer, set Dynamics slider to 9 and Saturation -17, duplicated layer, enter Topaz Adjust and apply my Rick Sammon Spicify Soft Artsy, back in photoFXlab the Adjustments settings stayed on this layer, duplicated layer, duplicate layer, in B&W Effects applied SJ_Quad_DkB_GR_Yel_Wh preset, an exited the plug-in to Photoshop. Just a few steps here. Guess what I am trying to show is that there is a lot of versatility here with photoFXlab. Once in Photoshop some clean up was done and French Kiss Studio Selections 3 White Wash texture was applied (I use this texture a lot and it is in a very reasonably priced set). On the white was I used Brush Lovers Art Flowers 2000 (liked the brush best when applied directly to the French Kiss WhiteWash texture – just looked better). This brush was set up as a preset – had to select the dark red color 4e322e and dark green color 3c3e38. In the Brush Panel I turned on Shape Dynamics, Scattering and Smoothing, Size 394 px, Spacing 434% and then Color Dynamics was added and size changed to 201 px. A layer mask was added to the layer to lightly brush out texture from the flower, but leaving a little to keep the grain intact. A Curves Adjustment Layer was clipped to the texture to bring out the cool texture a little bit more. 2 Lil’ Owls Studio Color Bokeh Grunge Set 4 (see sidebar for website link) was applied at 50% opacity and in the layer style, the Blend If This Layer’s white tab was set to 164. The last step involved adding two New Layers where just a couple strokes were applied, one layer using green and one the dark red color to add a little grunge feel to the image. The brush used was Nakatoni Custom Brushes texture brush (does not appear to be available anymore but any soft grunge brush would do). The preset settings are listed below. ….Digital Lady Syd
Here are the plug-in preset settings used if you are interested:
Topaz Clarity SJ Illustrative Look settings: If you would like the illustrative look, here are settings: in Clarity Section – Dynamics: Micro Contrast 1.00, Low Contrast 0.28, Medium Contrast -0.50, and High Contrast 0.06; Tone Level: Black Level 0.61, Midtones 0.14, and White Level 0.72; and in Hue/Sat/Lum Section – Hue: Only Red 0.16, Yellow -0.05, and Green -0.17 were adjusted; Sat: only Green -0.22 and Overall -0.45 were adjusted; and Lum: Only Orange 0.36, Yellow 0.89, Green -0.91, Aqua 0.30, and Blue -0.09 were adjusted.
Topaz Adjust Rick Sammon Spicify Soft Artsy settings: Adaptive Exposure section: Adaptive Exposure 0.50, Regions 25, Contrast -0.56, Brightness -0.13, Protect Highlights 0.03, and Protect Shadows 0.03; Details section: Strength 0.87, Detail Boost 1.15, Threshold 0.12, Radius 25.00, and Sharpen 1.01; Color section: Adaptive Saturation 0.33, Color Regions 10, Saturation 1.00, Saturation Boost 1.00, and Hue 0.00; and Noise section: Suppression 3.24, Amount 0.51, and check Use Topaz DeNoise.
Topaz B&W Effects SJ Quad DkB_Gr_Yel_Wh settings: Quad Tone: Color 1 Region: Color (R1/G1/B12) and set to 15.08, Color Region 2: Color (R63/G78/B85) and set to 143.9, Color Region 3: Color (R216/G211/B129) and set to 227.5, and Color Region 4: Color (R255/G254/B237) and set to 255.0: and Transparency: Overall Transparency 1.00.
InstaTone Sunset

Wanted to change up the look of all the 24th Annual Native American Festival images I took so using Topaz (see sidebar for website link) photoFXlab’s InstaTone feature, I got this beautiful sunset look. Basically I went into the InstaTone tab’s 500 px website and applied a beautiful yellow and gold tone from Men on Fire image by Uwe Braun at 68% layer opacity. Then a preset I created using Topaz Adjust’s Spicify was applied that gives a slight illustrated look. (Here are the settings if you want them: Adapt exp +.30/25/-0.71/-0.76/0.02/0.04; Details +1.24/1.15/ 0.12/24.67/1.98; Color +0.33/10/0.89/1.92/0.00; and Noise +1.47/0.22.) Next I cleaned up signs and spots in the image (should have done this first but oh well!). 2 Lil’ Owls Enchanted texture 4 (see sidebar for website link) was added from their Texture Workshop E-Book bundle was applied as a PNG file frame next and a dark brown Color Adjustment Layer was clipped to the frame to apply it. I had to paint in a few areas around the trees that were too light on a separate layer using a low opacity brush and sampling from the near colors. Took awhile to complete but really like the changed look. I can imagine this image at an Indian campsite in the past…..Digital Lady Syd
Digital Lady Syd’s Related Blogs:
InstaTone in photoFXlabs – Great Fun and Great Results!
Topaz DeNoise 5 and InstaTone
A Fairytale Gazebo

As promised, here is a totally different rendition of the same image I posted earlier. (See Where Am I?) This was just plain fun to do. Below are the boring details – it actually took me along time and a lot of manipulating to get this result but I really love how it turned out. The soft diffused look really adds the fairytale quality to the image. Bottom line, just keep playing with an image and you can come up with some surprising results…..Digital Lady Syd
Basically I got the crazy pastel colors by applying Nik Viveza 2 (here are the settings which produced a rather green and pinkish layer: Brightness 86%, Contrast 100%, Saturation 86%, Structure 100%, Shadow Adjustments -100, Warmth -2%, Red 17%, Green -9%, Blue 22%, and Hue 39 degrees). Then Control Points were added in various areas to adjust tweak the color. A composite layer was created (CTRL+ALT+SHIFT+E) as the top layer. This layer was duplicated and Topaz (see sidebar for website link) photoFXlab was opened. What I listed in my Photoshop note attached to the image is in parentheses. (Duplicate layer. Plug-ins Tab was selected and Black & White Effects was opened. Used my SJ White Flower settings preset which has these settings: Basic Exposure – Contrast 0.16, Brightness -.04, Boost Blacks -.12, and Boost Whites .20; Adaptive Exposure – Adaptive Exposure 0.26, Regions 8, Protect Highlights .06, Protect Shadows .02, Detail 1.80, and Detail Boost .96; Color Sensitivity – Yellow .22, Green -.04, Cyan .01, and Blue .01; Quad Tone – Color Region 1 Black and slider at 0.00, Color Region 2 Red 23/Green 25/Blue 86 at 119.4, Color Region 3 Red 113/Green 150/Blue 170 at 187.8, and Color Region 4 White at 255.0; and Transparency 1.00. Diffusion section was checked and Softness was set to .75, Diffusion to .60, and Diffusion Transition to .50. Local Adjustments mask was set to Detail brush and the gazebo and columns were painted over. Then the B&W Effects plug-in was exited. Stamp From Stack button was pressed and in the Adjustments tab Dynamics slider was set to 29. Another From Stack button was created and from the Plug-ins Tab, Topaz Adjust 5 was opened where Painting Venice preset was applied with no changes. Once back in photoFXlab the Mask tab was opened and the effect was painted out once again from the gazebo and columns.) The changes were applied and the image was back in Photoshop. The yellows in the front bushes and trees was too bright, so a Image -> Adjustments -> Replace Color was selected using a light purple color. A Color Balance Adjustment Layer was clipped to the Replace Color layer and the purple colors were further enhanced. Next a brush was created to make purple to pink sparkles for the bushes and trees. (Brush settings were: Hard Round Brush – Size 20 px, Spacing 141, Shape Dynamics Size Jitter 25, Scattering 944%, and Color Dynamics Brightness Jitter 50%.) Used a light color (#917eb5) color and a darker color (#5e5098) of purple and painted around trees and bushes – then added a layer mask to remove from areas the lights got scattered over. A clean up layer was created to clean up some of the harsh that showed up in unexpected places. My SJ Snow1 Overlay was applied at 61% opacity. A composite layer was added on top and duplicated. The top layer was changed to Multiply. A layer mask was added and the cupola was painted back in white for emphasis. A Curves Adjustment Layer was added to add contrast to the cupola. The sky was selected and put on its own layer and converted to a bluish purple sky by clipping a light purple Color Fill Adjustment Layer to it. Next a Grunge Border line was applied around the image in a dark purple color.
Beautiful Feathers!

These beautiful feathers were from the 24th Annual Native American Festival held in Ormond Beach, Florida. Totally enjoyed looking at the many exhibits and vendor tents, and the shows were very entertaining. This image is of a display of feather hair bungies that was in a vendor tent. Very little treatment was done to the image. The biggest change in Lightroom was changing the aspect ratio to a square crop. A few Basic sliders were adjusted before opening Photoshop. First the image was taken into Topaz (see sidebar for website link) photoFXlab where the layer was duplicated and in the Effects tab, Black and White Albumen – Chocolate was applied (this is actually a preset in the Black and White Effects plug-in). Next in the Adjustment Tab, Saturation was set to 2, Exposure to -0.05, Contrast to -5, and Dynamics 25. The top layer was set to 52% opacity and a Color Blend Mode. Once back in Photoshop, Topaz Detail 3 was opened and the Overall Medium Detail preset applied. A black layer mask was added and with a soft white low opacity brush, only areas I wanted really sharpened were painted back in. Then a little clean up to smooth the background was done. I really like the soft looking feathers in this image. What a fun place to take pictures – and not much processing needed afterwards!…..Digital Lady Syd
Adding Texture to a Landscape

Usually I use my own images to alter, but I found this beautiful texture image of old buildings in Porto, Portugal, from Mayang’s Free Textures (scroll down a ways in link to see original) and it seemed like a good candidate to see what I could do with some more textures to enhance it some. Click their link to see the original image and lots of others that can be used for personal use.
This image was first processed using Topaz (see sidebar for website link) photoFXlab. First duplicated the layer. On top layer the Black & White Effects plug-in was opened and Hand Tinted Chiffon was selected with Transparency set to 1.00 and Vignette Strength to .45. After applying the plug-in, back in photoFXlab this layer was set to Linear Light at 100%. A +From Stamp layer was created and these Adjustment tab sliders set: Tint -8, Saturation 17, and Dynamics -28. Next exited to Photoshop where some clean up was done and French Kiss Artiste Collection Fantasie texture was applied. Two Hue/Saturation Adjustments Layers were added with black filled layer masks – the red-orange color needed to be adjusted and the greens above the buildings were off. These areas were painted back in the masks to create the correct tone in the image. An Ash texture (no long available – but Shadowhouse Creations has a very similar texture called ArtGrunge 5 which would give a very similar effect) and it was set to Hard Light blend mode at 45%. A hazy feel was added to the image by adding a Levels Adjustment Layer and just moving the Output Level black tab to 80. A Curves Adjustment Layer was added next to just slightly add contrast. This image had a very low resolution on it so I created a composite layer on top (CTRL+ALT+SHIFT+E) and went to Image -> Image Size and checked the Resample Image box and set the resolution to 240, leaving the size alone. The last step was adding my Mid Size Double Edge Frame layer style – sampled colors in the image for frame colors. I was really pleased with how painterly this image turned out. It is a little different from creating a flower type texture image, but you can really add some creative aspects with a little experimenting. And thank you Mayang.com for supplying such a interesting image to work with!….Digital Lady Syd
Vintage Toy Processing

This image is of a really cute 6-year old that I met at the 39th Annual Turkey Run at the Daytona International Speedway who graciously agreed to pose for me. These vintage toys bring back a jolt from years past! Amazing you can still buy them! This image was processed in Lightroom using a Gritty Preset by Michael Rather from the True Grit Video – I use this preset a lot for this type of look. Then I increased the orange and red saturation a little to get the colors to pop. An adjustment brush set to Sharpen and Clarity was added to sharpen the lettering and detail on the toys only. In Photoshop Topaz (see sidebar for website link) photoFXlab was opened and from the Effects tab, the Retro Style I from Topaz Adjust 5 was applied. My favorite Adjustment tab brush Dynamics was increased along with the Sharpness. Then using the Masks tab, the effect was removed from the boy’s face. The layer was then set to Darken blend mode at 88% opacity. Back in Photoshop a High Pass Filter set to 8 and Soft Light blend mode was used to sharpen the photo. The last step involved adding French Kiss’s Glorious Grunge Edging free overlay with some of the lines removed in the center so as not to be distracting. The last step was using Nik Viveza2 (all time favorite plug-in) to direct the eye to the cute kid and toys. That’s it!…..Digital Lady Syd
Digital Lady Syd Related Blogs:
Trying Out Some New Techniques!
Digital Lady Syd’s Review of Topaz photoFXlab v1.1
Using photoFXlab v1.1
Using Topaz photoFXlab to Replace Skies
Topaz DeNoise 5 and InstaTone

This image had an ISO of 2500 – that is really high for me but I actually took this shot from a moving tour bus – it is the Pulteney Bridge over the Avon River near Bath in England. The basic workflow involved running Topaz (see sidebar for website link) DeNoise first – must be sure that the Sharpening and Noise Reduction sliders are set to 0 in Lightroom or Adobe Camera Raw so you are not applying noise correction twice. I usually apply DeNoise on it’s own layer – that way it can be selectively removed if it is too soft in some places. The Overall Strength was set to 17. Topaz cautions about overdoing this or it will lose detail and edges will be soft. The Detail Recovery slider was set to 19. That was all that was needed. In Topaz photoFXlab, the new plug-in interface, the InstaTone tab was selected and the tones from a 500 px image called Nobody by shachar levcovich turned this image into an old English look. Topaz Simplify 4 was added and my BuzSim Modified preset was applied – this is one I had created in Simplify 3 but I still love it. (Selected BuzSim and changed: Simplify panel – Simplify Size to .15, and Edges panel: Edge Type Color Edge Fine and Edge Strength to 1.50.) Back in Photoshop a vignette was added to focus on the bridge and ShadowHouse Creations Scratch Overlay Texture set to Overlay with the center painted out in black in the layer mask so the texture basically frames the image. Now I have a beautiful vintage feel but not overly painterly. I can imagine the beautiful bridge looking like this a long time ago. Beautiful place!…..Digital Lady Syd
Digital Lady Syd Related Blogs:
Digital Lady Syd Reviews Topaz DeNoise 5
InstaTone in photoFXlabs – Great Fun and Great Results!
Digital Lady Syd’s Review of Topaz photoFXlab v1.1
Digital Lady Syd Reviews Topaz Simplify 4
Clowning Around with Topaz!
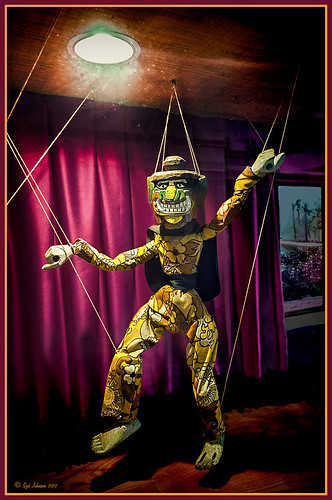 |
Here is another one of the beautiful puppets that lined the one-mile walkway between hotel accommodations and restaurants at the Hilton Waikaloa Village on the Big Island in Hawaii. To see original unprocessed raw file, hover over image. The image was first processed in Lightroom and opened up directly into the new Topaz photoFXlab (see sidebar for website link). Inside the plug-in the layer was duplicated and Adjustment tab sliders set using the wonderful Dynamics slider at 34. A stamped layer was created and the Plugin tab Black and White Effects preset (see my blog Hibiscus Flowers – I Love to Photograph Them! for settings) was applied to get a more calm darker feeling to the image. Back in photoFXlab the layer was set to the Darken blend mode. Another stamped layer was created and the Detail brush set to maximum strength was used to sharpen up the puppet only. Exit and the changes appeared on a TIFF copy back in Lightroom. Since I now had two Tiff files, they were highlighted to Edit In – > Open as Layers in Photoshop. The Topaz adjusted layer on top was set to 89% opacity. The difficulty with processing this image involved the terrible glass reflections. I decided that I needed something more so I opened up just Topaz Adjust and added a vignette effect just on the upper clown and light area – a little detail was added overall also. Back in Photoshop the image definitely need some noise reduction so Topaz DeNoise 5 was opened and the Overall Strength set to .18 – that’s all it needed! Next a Curves Adjustment Layer was added to darken some of the reflection – the clown was painted out to give more of a spotlight effect to it. A vignette was created around the image and selectively painted areas to further distract from the glass issue. A High Pass filter set to Overlay blend mode was used to sharpen the image – a black mask was added and the clown painted back to just sharpen that area. The last step was adding my Layer Style frame (see my blog Digital Lady Syd’s Free Layer Style Frames). There was also a lot of clean up on this image – more than I normally do. It amazes me how a pretty plain image can be brought to life by using several of Topaz’s wonderful plug-ins!…..Digital Lady Syd
Digital Lady Syd Related Blogs:
Using photoFXlab v1.1
InstaTone in photoFXlabs – Great Fun and Great Results!


