
Building a Home
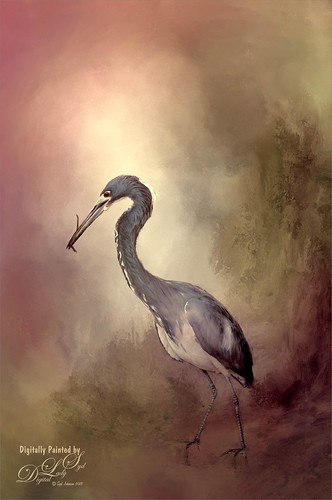
This beautiful Tri-Colored Heron was posing at the St. Augustine Alligator Farm Rookery, where he was actually building a nest as seen by the twig in his mouth. These birds are all over Florida and I probably see one at least once a day. This image used the same techniques from my recent blog called How to Get a Painterly Effect for Wildlife and Birds, especially as done with the Wood Stork image. This time two of my Painter textures were combined to get the sort of magical background effect. Topaz (see sidebar for website link) Adjust’s Summer preset was applied to a stamped (CTRL+ALT+SHIFT+E) version on top and on another stamped version Topaz Lens Effects Toy Camera Memories preset was applied. The Saturation was actually reduced a little in this section. It was pretty much the same workflow, just trying different textures and painting the bird on several layers. I really love my birds!…..Digital Lady Syd
Where Am I?
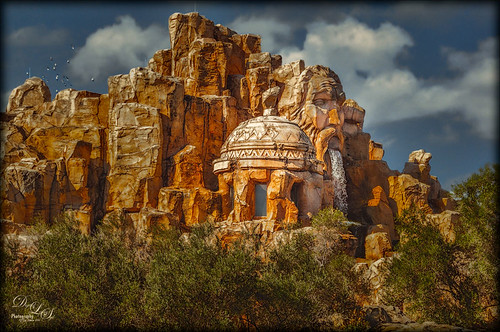
Loved the result of this interesting structure taken at Universal Studios in Orlando, Florida, that houses a The Eighth Voyage of Sindbad Stunt Show. This image originally had a really ugly sky in it, so I added one of my skies I took over the Intracoastal Waterway when sailing – much nicer looking with clouds! The birds were actually in the photo. Refine Edge was used to get a nice demarcation between the new sky and the rocks. Topaz (see sidebar for website) Detail 3, Topaz ReStyle using Orange Orchard preset, and Topaz Adjust using French Countryside preset were all applied. In Photoshop the Camera Raw Radial Filter was used to direct to the dome as the focal point. That was it. One of my favorite images from the day!…..Digital Lady Syd
Some Vintage Zinnias

Just playing with my Zinnias. I was trying to a vintage, wallpaper feel behind them. I actually opened Topaz (see sidebar for website link) photoFXlab from Lightroom. Here are the steps completed: Applied Topaz Clarity – SJ Illustrative Look – with a few adjustments, duplicated layer, set Dynamics slider to 9 and Saturation -17, duplicated layer, enter Topaz Adjust and apply my Rick Sammon Spicify Soft Artsy, back in photoFXlab the Adjustments settings stayed on this layer, duplicated layer, duplicate layer, in B&W Effects applied SJ_Quad_DkB_GR_Yel_Wh preset, an exited the plug-in to Photoshop. Just a few steps here. Guess what I am trying to show is that there is a lot of versatility here with photoFXlab. Once in Photoshop some clean up was done and French Kiss Studio Selections 3 White Wash texture was applied (I use this texture a lot and it is in a very reasonably priced set). On the white was I used Brush Lovers Art Flowers 2000 (liked the brush best when applied directly to the French Kiss WhiteWash texture – just looked better). This brush was set up as a preset – had to select the dark red color 4e322e and dark green color 3c3e38. In the Brush Panel I turned on Shape Dynamics, Scattering and Smoothing, Size 394 px, Spacing 434% and then Color Dynamics was added and size changed to 201 px. A layer mask was added to the layer to lightly brush out texture from the flower, but leaving a little to keep the grain intact. A Curves Adjustment Layer was clipped to the texture to bring out the cool texture a little bit more. 2 Lil’ Owls Studio Color Bokeh Grunge Set 4 (see sidebar for website link) was applied at 50% opacity and in the layer style, the Blend If This Layer’s white tab was set to 164. The last step involved adding two New Layers where just a couple strokes were applied, one layer using green and one the dark red color to add a little grunge feel to the image. The brush used was Nakatoni Custom Brushes texture brush (does not appear to be available anymore but any soft grunge brush would do). The preset settings are listed below. ….Digital Lady Syd
Here are the plug-in preset settings used if you are interested:
Topaz Clarity SJ Illustrative Look settings: If you would like the illustrative look, here are settings: in Clarity Section – Dynamics: Micro Contrast 1.00, Low Contrast 0.28, Medium Contrast -0.50, and High Contrast 0.06; Tone Level: Black Level 0.61, Midtones 0.14, and White Level 0.72; and in Hue/Sat/Lum Section – Hue: Only Red 0.16, Yellow -0.05, and Green -0.17 were adjusted; Sat: only Green -0.22 and Overall -0.45 were adjusted; and Lum: Only Orange 0.36, Yellow 0.89, Green -0.91, Aqua 0.30, and Blue -0.09 were adjusted.
Topaz Adjust Rick Sammon Spicify Soft Artsy settings: Adaptive Exposure section: Adaptive Exposure 0.50, Regions 25, Contrast -0.56, Brightness -0.13, Protect Highlights 0.03, and Protect Shadows 0.03; Details section: Strength 0.87, Detail Boost 1.15, Threshold 0.12, Radius 25.00, and Sharpen 1.01; Color section: Adaptive Saturation 0.33, Color Regions 10, Saturation 1.00, Saturation Boost 1.00, and Hue 0.00; and Noise section: Suppression 3.24, Amount 0.51, and check Use Topaz DeNoise.
Topaz B&W Effects SJ Quad DkB_Gr_Yel_Wh settings: Quad Tone: Color 1 Region: Color (R1/G1/B12) and set to 15.08, Color Region 2: Color (R63/G78/B85) and set to 143.9, Color Region 3: Color (R216/G211/B129) and set to 227.5, and Color Region 4: Color (R255/G254/B237) and set to 255.0: and Transparency: Overall Transparency 1.00.
Windsor Castle
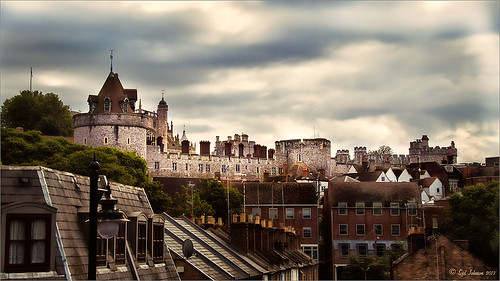
Here is another example of an image that used a Curves Adjustment Layer to adjust the color of the stone in this image of Windsor Castle in England. It turned too brown due to a filter treatment applied to the total image – Topaz (see sidebar for website link) Adjust 5’s French Countryside preset was applied to the image once it was brought into Photoshop – this preset is one of my very favorites but it definitely has a very brown tone to it. Nik Viveza 2 was applied next to selectively sharpen parts of the image. A regular Curves Adjustment Layer was added to increase the contrast in the image. Next another Curves Adjustment Layer was added and this time the Blue Channel Curve was adjusted to get rid of some of the yellow tones in the stone. The Layer Mask was filled with black and just the castle stonework was painted back in with a low opacity soft white brush. That is it! I love the final result – it really gives a different perspective on how large this castle really is!…..Digital Lady Syd
Digital Lady Syd’s Related Blogs:
Using Curves Adjustment Layers to Get Rid of Shadows and Highlights
I Didn’t Know That! Curves Adjustment Layers
The Kiddie Tractor Revived!

Riding my toy tractor may be the first recollection I have. Since I grew up practically in the middle of a corn field (although my parents were not farmers), my first ride-on toy was a tractor exactly like this one. It was my favorite toy and I put miles on it! I did not have a tricycle, just a tractor. I had to get a picture when I went to the 39th Annual Turkey Run in Daytona Beach, Florida, last fall. Looks like we are missing a pedal here.
Used my basic Camera Raw steps (see How to Use Adobe Camera Raw (ACR) or Lightroom 4 Quickly) in Lightroom 4. Next Topaz (see sidebar for website link) Detail 3 was applied using Overall Detail Medium II preset first, and then the Soft and Dreamy II preset was applied. The tractor was painted back in a layer mask so just the background was softened. On a duplicated layer Topaz Adjust 5’s Low Key II preset with Transparency slider set to .28 was applied to the layer. A Hue/Saturation Adjustment Layer was used to desaturate the greens and yellows. 2 Lil’ Owls (see sidebar for website link) Workbook Bonus Texture 16 was added at 85% opacity. A High Pass Sharpening effect set to 8 pixels was applied and a final Curves Adjustment Layer for added contrast and give a nice orange color to the tractor was added. Lots of fun to work on something from your childhood……Digital Lady Syd
A Fairytale Gazebo

As promised, here is a totally different rendition of the same image I posted earlier. (See Where Am I?) This was just plain fun to do. Below are the boring details – it actually took me along time and a lot of manipulating to get this result but I really love how it turned out. The soft diffused look really adds the fairytale quality to the image. Bottom line, just keep playing with an image and you can come up with some surprising results…..Digital Lady Syd
Basically I got the crazy pastel colors by applying Nik Viveza 2 (here are the settings which produced a rather green and pinkish layer: Brightness 86%, Contrast 100%, Saturation 86%, Structure 100%, Shadow Adjustments -100, Warmth -2%, Red 17%, Green -9%, Blue 22%, and Hue 39 degrees). Then Control Points were added in various areas to adjust tweak the color. A composite layer was created (CTRL+ALT+SHIFT+E) as the top layer. This layer was duplicated and Topaz (see sidebar for website link) photoFXlab was opened. What I listed in my Photoshop note attached to the image is in parentheses. (Duplicate layer. Plug-ins Tab was selected and Black & White Effects was opened. Used my SJ White Flower settings preset which has these settings: Basic Exposure – Contrast 0.16, Brightness -.04, Boost Blacks -.12, and Boost Whites .20; Adaptive Exposure – Adaptive Exposure 0.26, Regions 8, Protect Highlights .06, Protect Shadows .02, Detail 1.80, and Detail Boost .96; Color Sensitivity – Yellow .22, Green -.04, Cyan .01, and Blue .01; Quad Tone – Color Region 1 Black and slider at 0.00, Color Region 2 Red 23/Green 25/Blue 86 at 119.4, Color Region 3 Red 113/Green 150/Blue 170 at 187.8, and Color Region 4 White at 255.0; and Transparency 1.00. Diffusion section was checked and Softness was set to .75, Diffusion to .60, and Diffusion Transition to .50. Local Adjustments mask was set to Detail brush and the gazebo and columns were painted over. Then the B&W Effects plug-in was exited. Stamp From Stack button was pressed and in the Adjustments tab Dynamics slider was set to 29. Another From Stack button was created and from the Plug-ins Tab, Topaz Adjust 5 was opened where Painting Venice preset was applied with no changes. Once back in photoFXlab the Mask tab was opened and the effect was painted out once again from the gazebo and columns.) The changes were applied and the image was back in Photoshop. The yellows in the front bushes and trees was too bright, so a Image -> Adjustments -> Replace Color was selected using a light purple color. A Color Balance Adjustment Layer was clipped to the Replace Color layer and the purple colors were further enhanced. Next a brush was created to make purple to pink sparkles for the bushes and trees. (Brush settings were: Hard Round Brush – Size 20 px, Spacing 141, Shape Dynamics Size Jitter 25, Scattering 944%, and Color Dynamics Brightness Jitter 50%.) Used a light color (#917eb5) color and a darker color (#5e5098) of purple and painted around trees and bushes – then added a layer mask to remove from areas the lights got scattered over. A clean up layer was created to clean up some of the harsh that showed up in unexpected places. My SJ Snow1 Overlay was applied at 61% opacity. A composite layer was added on top and duplicated. The top layer was changed to Multiply. A layer mask was added and the cupola was painted back in white for emphasis. A Curves Adjustment Layer was added to add contrast to the cupola. The sky was selected and put on its own layer and converted to a bluish purple sky by clipping a light purple Color Fill Adjustment Layer to it. Next a Grunge Border line was applied around the image in a dark purple color.
EPCOT Texturized

Was looking at some of my older work and came across one of my first texture images from three years ago. I really liked the treatment of this image so I thought I would try to reconstruct how I did it. A very different workflow was used. When the Lightroom adjusted image was opened in Photoshop, I did some clean up to remove some tourist heads. Then Topaz (see sidebar for website link) Adjust’s Spicify preset was applied. Next Nik Silver Efex Pro Antique Plate preset (pretty close to SEP2’s Antique Plate II) was added and set to 42% opacity. Ash Texture 25 was added (it’s a shame but they are no longer available, but Isabelle Lafrance free Decemberpack1 texture 1 has a very similar look) and set to Overlay at 100% opacity. Back into Silver Efex Pro where the Neutral preset was applied – layer was set to Screen at 51%. Next a Curves Adjustment Layer was added using a slight S curve to enhance contrast. Topaz Simplify was applied using the basic BuzSim preset. The last step used OnOne’s (see sidebar for website link) PhotoFrame Dave Cross 15 set to 72% opacity – the PhotoFrames are no long available in the newest release but many are incorporated in the new Perfect Effects 4 module. The final result is really nice – I am going to experiment some more using these plug-ins to enhance my texture effects…..Digital Lady Syd
Christmas Wreaths at SeaWorld

For this wonderful holiday, thought I would show this pretty image of wreaths from SeaWorld Orlando. Just a little basic processing in Lightroom before taking the image into Photoshop. Topaz (see sidebar for website link) Adjust 5’s High Key preset was applied with the Overall Transparency set to .24. Next Topaz Detail 3 was applied using the HDR Enhancement II preset. French Kiss’s Artiste Chamante texture was applied and set to Overlay at 100% opacity. My free Snow1 Overlay was next applied and set to 75% opacity. French Kiss’s Glorious Grunge Edging Overlay was applied next and a Solid Color Adjustment Layer set to a light pink was added. Since the edging did not seem to show up real well, it was duplicated along with the Adjustment Layer. That was all that was done and I love the final effect – the umbrella really added to the shot. Hope all are having a wonderful week!…..Digital Lady Syd
Vintage Toy Processing

This image is of a really cute 6-year old that I met at the 39th Annual Turkey Run at the Daytona International Speedway who graciously agreed to pose for me. These vintage toys bring back a jolt from years past! Amazing you can still buy them! This image was processed in Lightroom using a Gritty Preset by Michael Rather from the True Grit Video – I use this preset a lot for this type of look. Then I increased the orange and red saturation a little to get the colors to pop. An adjustment brush set to Sharpen and Clarity was added to sharpen the lettering and detail on the toys only. In Photoshop Topaz (see sidebar for website link) photoFXlab was opened and from the Effects tab, the Retro Style I from Topaz Adjust 5 was applied. My favorite Adjustment tab brush Dynamics was increased along with the Sharpness. Then using the Masks tab, the effect was removed from the boy’s face. The layer was then set to Darken blend mode at 88% opacity. Back in Photoshop a High Pass Filter set to 8 and Soft Light blend mode was used to sharpen the photo. The last step involved adding French Kiss’s Glorious Grunge Edging free overlay with some of the lines removed in the center so as not to be distracting. The last step was using Nik Viveza2 (all time favorite plug-in) to direct the eye to the cute kid and toys. That’s it!…..Digital Lady Syd
Digital Lady Syd Related Blogs:
Trying Out Some New Techniques!
Digital Lady Syd’s Review of Topaz photoFXlab v1.1
Using photoFXlab v1.1
Using Topaz photoFXlab to Replace Skies
Orange Flower Fun!

Just felt like posting a pretty autumn looking flower – these are called Orange Spark Symphony (Osteospermum hybrid) which are also called Mimosa Sunset – very confusing and very unusual! Topaz (see sidebar for website link) Adjust 5 was used with the Retro IV preset applied. ShadowHouse Creations OldPhoto2 texture was used and set to Soft Light Blend Mode. That is it! I love these daisies!…..Digital Lady Syd
Digital Lady Syd’s Related Blogs:
Digital Lady Syd’s Review of Topaz Adjust 5!
Cafe Alcazar and Vintage Topaz Adjust
Topaz Adjust Using Painting Venice Preset – Beautiful Effect!

I love how this image ended up with a beautiful soft artistic look – for the image above I used Topaz Adjust (see sidebar for website link) Painting Venice preset with no adjustments made. I have not used this preset before but really love the results. A very similar effect was obtained by using Topaz Simplify’s BuzSim preset (reduced the Simplify Size to 0.10 and increased the Saturation Boost to 1.56) – I could not see a big difference when I tried this. If you would like to compare the images, the Simplify image is in my Fun Photoshop Blog Using Topaz Simplify for That Artistic Feel! blog.The people were painted out just a bit to bring their body lines and kayaks in focus a little more. Using my blog Smoothing Out Those Waterfalls, the Motion Blur filter in Photoshop was set to an Angle of -82 and a Distance of 48. This image was taken at the Hilton Waikoloa Village on the Big Island in Hawaii. Beautiful place to visit……Digital Lady Syd
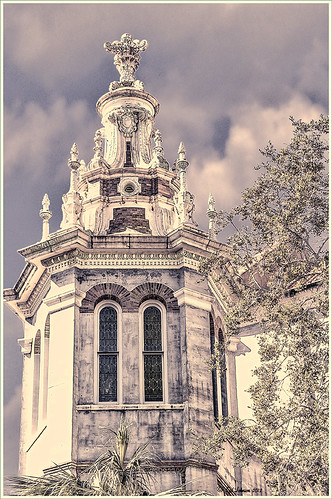
Topaz Adjust’s French Countryside Preset – Beautiful!
 |
Thought I would do another Before and After where I show what one of my favorite presets in Topaz Adjust 5 (see sidebar for website link) looks like when applied. This image was taken in full light and I really took the image as a test shot before visiting some of the wonderful historic sites in St. Augustine, Florida. I really love steeples and cupolas on buildings. I had a hard time deciding what to do with it – it was a hand-held three HDR image. I processed it in Photoshop’s Merge to HDR Pro, only checking the Remove ghosts box before exiting to Photoshop (hover over image to see the tone-mapped image). Some image clean up was done, and two curves adjustment layers, one for contrast and one for color tone, were added since the image was not processed in Lightroom or Camera Raw. After much experimentation, I finally settled on using Topaz Adjust 5 and the French Countryside preset. It seems to soften the image just enough, yet retains some detail in the image – the trick is to adjust the Detail tab’s Threshold slider to bring back some of the details. Then I added Caleb Kimbrough Summer 4 Texture – one of my favorite textures to add the red and green tones into the image for that warm feel. (Also check out his site for many other wonderful textures.) The image took on a totally different feel. Try this preset if you have Adjust…..Digital Lady Syd
Digital Lady Syd Related Blogs:
Why I Love Topaz Adjust!
Topaz Adjust 5 Is Here! First Look!
Making An Ordinary Image Your Own
Cafe Alcazar and Vintage Topaz Adjust

Here is an image of the Cafe Alcazar that is located in the old swimming pool area of the current Lightner Museum (old Hotel Alcazar) in St. Augustine, Florida – one of the best places to grab lunch if you are in the city. I did very little to this image but apply a Topaz Adjust preset called Daylight to Tungsten II which gave the browns the rich tones, sharpened using my LAB sharpening method and added a Curves Adjustment Layer to increase contrast. Topaz Labs did a nice video on their Film and Vintage Effects with Adjust, B&W Effects and Lens Effects that does a good job of explaining how to get this look. I really love the feel of this image – gives a little of that vintage effect the historic location instills……Digital Lady Syd
Digital Lady Syd Related Blogs:
Where Am I? (Cafe Alcazar)
Unsharp Mask Filter In LAB Mode
I Didn’t Know That! Curves Adjustment Layers
Quad Tones in Topaz Black and White Effects Plug-in
Creating a JPG From a Video in Lightroom 4

This whale came to visit the catamaran while I was whale watching (through Hawaii Ocean Sports) – I guess this is unheard of that a whale would come so close to the boat and hang out for 5 minutes like this guy did. Everybody on the boat including the boat personnel were going crazy as the whale would swim under the boat to the opposite side and then swim back under to the other side. He was so close you could almost touch him! He came up at the back of the boat and then turned around and raised his tail at the boat as he left. What a trip! Using my Sony Handycam HDR-XR500V video camera, I was able to get some nice video of the whale although it was hard to be at the right place at the right time with so many people around. What is really nice is that now Lightroom 4 has a limited video editing function. You can actually scrub through your video and select a frame that can be saved as a JPEG (click to open the square to the right of the video timeline and select Capture Frame) which can then be edited in both Lightroom and Photoshop. That is how I got this image.
The Exposure, Highlights, Shadows, and Blacks sliders all had to be reduced and the Contrast was increased to get a good image of his face. In Photoshop Topaz Adjust was opened using the Film Collection Effect Vintage Grunge IV preset. The Detail Strength was lessened a bit, the Warmth slider moved warmer a little, Grain and Vignette turned off, and Transparency slider set to o.25. Back in Photoshop a Hue Saturation Adjustment Layer was added to slightly desaturate and change the Hue in the Red tones on the whale. A Curves Adjustment Layer was added to improve contrast. Not bad for a fairly low resolution image. If you like Lightroom and have some video clips, you should take a look and see if you can use some of the frames you captured to add to your photo collection…..Digital Lady Syd
Topaz Lens Effect Tilt & Shift with a Zoom!

These are a few of the kayaks that can be rented at the Waikoloa Beach Marriott Resort and Spa on the Big Island in Hawaii. I was listening to a webinar presented by Nicole Paschal at Topaz Labs called “Isolating Subjects with Lens Effects” – this webinar should be posted soon at Topaz Labs-YouTube. She presented six or seven different ways to use selective focus on your images using this plug-in.
For this image Topaz Adjust (see sidebar for website link) was first applied just to brighten up the image a little – added the Spicify preset. Next Topaz Lens Effects was opened. Nicole really likes to use the Camera Tilt & Shift effect to selectively isolate her subjects. That is what is applied here. The Tilt Shift Adjustment were set to: Focus Area Width to 0.20, Transition to 0.59, Blur Amount to 0.08 and Angle to 0.89 so that the blur runs across the back of the kayaks. The Image Adjustments were set to Brightness 0.11, Contrast 0.15 and Saturation to 0.03. In the Distortion Adjustments section, Tangential was clicked, and a 1.89 Distortion Scale was applied – this cropped the image centering it on the Tilt Shift Adjustments Blur point in Focus Area section. Each time the blur point is moved, you get a different result. This image ended up with the Effect Position at 560, 612.
There are several other effects discussed in this webinar which are fun to try. Listen to the webinar for more good tips. The above effect may give some very interesting results on different types of images. I will definitely be checking this out…..Digital Lady Syd
Digital Lady Syd Related Blogs:
Topaz Lens Effects Plug-In
Topaz Simplify and Lens Effects Saves an Image!
Combining Plug-ins – Double the Effect!
Topaz Lens Effect’s Artistic Flair!
I Didn’t Know That! Export Layers to Files in Photoshop
 |
Every now and then I run into a situation where I want to take one of the layers I am working on in Photoshop and save it down as a separate file. Now it is possible to delete all the files and rename the file, etc., etc., etc. but this can take a while to do and it could cause you to lose the file you are working on if you get careless. This week I wanted one of the sky images I had imported into my image a while back to use again and to put in my Sky folder since I like it. (Hover over image to see sky image created from layer in psd file.) I found out there is a little known script sitting in Photoshop that will accomplish just what I wanted to do in just seconds.
Steps to Export Layer(s) to Files in Photoshop:
1. In your image, turn off all layers you do not want to create images of by clicking on the eyeballs on the left of the each layer in the Layers Panel. (To do this quickly, you can highlight the layer you want to export to a file and ALT+Click on the eyeball – all the other layers are turned off immediately.)
2. Go to File -> Scripts -> Export Layers to Files.
3. The Export Layers to Files dialog appears. Fill out as shown. Be sure to capture all the check boxes or you will get image files for each layer in your file.

4. Click Run and that’s it – really quick and easy!
The image is of the Flagler Presbyterian Church in St. Augustine, Florida, where Henry Flagler and his family are buried. Topaz Adjust 5 and Topaz Black and White Effects were used on this image (see sidebar for website link). The sky is the one I moved in from an image I took on the International Coastal Waterway near St. Augustine while sailing.
Give this script a try next time you want to break apart an image…..Digital Lady Syd
Some of My Favorite Plug-Ins
|
I am starting to sort through all the plug-ins that are out there and slowly figuring out what really works for my workflow. This is a really hard process since there are so many great plug-ins and some of them give very similar results. I have blogged on this many times showing how the same images look with the various plug-in effects.
I started working on this image – not one I was totally in love with, but the old Flagler Presbyterian Church is so beautiful to look at that I wanted to create that sensation in the image. I began by manipulating the file in Topaz Adjust 5 (see link to website in sidebar) and hit the “Get Lucky” button just for the heck of it – and this really cool illustrated look appeared that I was not sure what to do with it. (Hover over image to see the Topaz 5 illustrated image.) I decided it needed a new sky so I opened up OnOne’s Perfect Mask (see website link in sidebar) and added a sky I had placed below the image. This plug-in is the best one I have found for replacing skies quickly – check out the little holes in the trees where the sky peaks through. Next several different effects were tried but none made me go “Wow” — that is until I decided to go into the Topaz Black and White Effects plug-in (see link to website in sidebar). It took no time at all – in fact I started with the same settings from my “My Office Friend Ted” image which was a totally different type of image. A few things were adjusted but it still was not quite right. Back in Photoshop a Color Balance Adjustment Layer was added to bring out the blues in the sky a bit more to get the right look. Now it looks like I remember it – but it took some effort. Luckily, I had a plug-in that gave me a great start.
I guess I can honestly say I still love both Topaz Adjust and Black and White Effects – they do have that versatility to turn an okay image around. Definitely great plug-ins and reasonably priced too! And OnOne Perfect Mask is the best for skies – still figuring this plug-in out for other types of selections. I hope to have a page set up soon on which plug-ins have made it into my workflow……Digital Lady Syd
Digital Lady Syd Related Blogs:
Topaz Plug-Ins – Same Image Trying Each!
Same Image – Different Plug-In
Using Topaz Adjust 5 and Color Efex Pro 4 with Photoshop Elements
Since I began showing some of the things you can do in Photoshop Elements, I thought I would show how you can get really great results adding plug-ins to the program. They work the same in Photoshop CS5 and Elements. This is a really good deal for Elements users since it gives you some features you cannot do in the program itself. For example, Topaz Adjust 5 has a Curve Tool where tonal contrast can be added to image there is you need it.
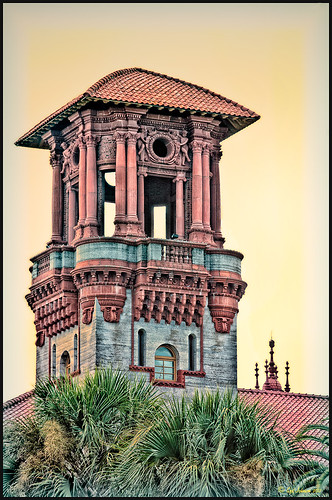 |
The image is one of the towers of the old Hotel Alcazar (now St. Augustine’s City Hall and Lightner Museum). Hover over the picture to see the original shot. To begin with, I was not happy with the washed out sky – not a hint of color in it!
1. Once in Photoshop Elements, you can immediately go into NIK Color Efex Pro 4 because this plug-in creates its own layer to make changes to. Go to Filter -> NIK – > Color Efex Pro 4. After lots of experimentation (which is really nice since if you mess up, there is a History panel on the left so you can go back to where you started), a new Flagler Tower recipe was created stacking these 5 filters: High Key, Film Efex: Vintage (using Film Type 7), Brilliance/Warmth, Vignette, and Detail Extractor in this order. Not a lot of changes were made to the sliders.
2. Duplicate this layer and name Topaz Adjust 5.
3. Open the Filter the same way as above. In Adjust a preset created in an earlier version was applied that was called Sunset on Building. I cannot tell you how it was created since it was done some time ago in an earlier version. Unfortunately it is very hard to tell which preset you started with in Topaz (as opposed to NIK) – you just have to save what you like. I did use the Curve Tool in the Global Adjustments section to make the contrast in the image better.
4. Back in Photoshop the layer was changed to the Darken Blend Mode.
Do take the time to check out these two plug-ins, especially the Topaz Adjust 5 plug-in (see right sidebar for Topaz Adjust 4 to link to website) – it was the first one I bought and I have not regretted it. Topaz is known for their reasonable prices in the plug-in world and once you buy their plug-ins, you get their upgrades for free! No one does that! And NIK’s Color Efex Pro 4 may be the best plug-in ever developed! And do not forget to try the combinations of your plug-ins – sometimes the results are incredible!
I hope this gives everyone an idea on how easy it is to use plug-ins, and most plug-ins compatible with Photoshop CS5 are also compatible with Elements. They usually have reasonable trial periods so you should see if this will take your Photoshop expression to a new level. I know it does for me!…..Digital Lady Syd
Digital Lady Syd’s Related Blogs:
Digital Lady Syd’s Review of Topaz Adjust 5
Topaz Adjust 5 is Here! First Look!
The New Film Efex-Vintage Filter From NIK CEP 4
NIK Color Efex Pro 4 – Digital Lady Syd’s Review!
Combining Plug-ins – Double the Effect!
Psuedo HDR Using NIK Color Efex Pro!
Why I Love Topaz Adjust!
Topaz Adjust 5 Is Here! First Look!
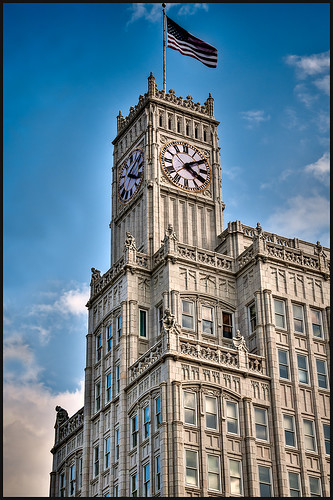 |
Topaz Adjust 5 was just released and here is my first attempt at using it. Hover over the image to see the original HDR image. (Click on sidebar Topaz 4 to go to website.) The interface has been greatly expanded to look like their very popular new plug-in Topaz Black and White Effects. This is a big improvement and I really enjoyed working with the new version of the plug-in. If you own an earlier version of Topaz Adjust, you are entitled to a free upgrade. If not, try out the trial and see what you think. They have added over 100 new presets and also included all of the ones from Topaz Adjust 4. A histogram has been added along with a really nice new Local Adjustment brush called Brush Out where the effect can be removed and a small mask shows how much is being removed (similar to Adobe Camera Raw or Lightroom’s Adjustment Brush). In the image above, it was created as a Photomatix 4 HDR using 3 images, then brought into Photoshop and processed in Topaz Adjust 5. Just a subtle sunlight feel was placed on the building. (See my blog “Quad Tones in Topaz Black and White Effects Plug-in” for colors used to create the soft sunlight effect in the Tone section.) There are so many choices and the image could be made to look more vivid and moody.
The image above is of the Lamar Life Insurance Building tower with beautiful gargoyles all around it in Jackson, Mississippi. It is a very striking looking building even in this day and age and the clock tower can be seen almost everywhere in the city. Below is a copy of a postcard from 1924 when it was built showing this beautiful building, thanks to Bill Badzo’s Flickr site. He states this about the building “…a close observation reveals it as nothing less than a scaled-down version of New York City’s Woolworth Building.” Interesting observation!

Give this new plug-in a try when you get a chance – you will not be disappointed. Lots of fun ahead of you…..Digital Lady Syd
Digital Lady Syd’s Related Blogs:
Digital Lady Syd’s Review of Topaz Adjust 5!
Little Nighttime Fun from Topaz!
Why I Love Topaz Adjust!
Combining Plug-ins – Double the Effect!


