
Tiny Bubbles
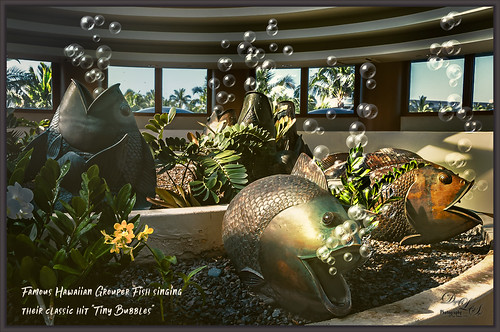
Been thinking about Hawaii’s Big Island getting hit by a hurricane and knowing how awful that is. Decided to post an image taken at the Hilton Waikoloa Village a while back at the Waters Edge Breakfast Buffet. These bubble blowers may not be grouper fish, but they are pretty close. It was a lot of fun to a do something with a little humor in it. This image was post processed using On1 (see sidebar for website link) Photo Raw 2018 Effects using the Dynamic Contrast, Sharpening, HDR Look, and Color Enhancer filters – I can really see improvements with this program. Some bubbles were created using a Lisa Cagney trick. Nik Viveza 2 was used so all the bubbles would show up. PS Color Lookup Table using the Foggy Night preset at 33% layer opacity was applied. Then a Gradient Fill Adjustment Layer beige to tan gradient at 36% layer opacity was applied. A couple Spotlight Effect layers were used to apply a little lightening and darkening effect. The text is Soak Up the Sun Script Bold. That was it. These guys always made me smile when we went to breakfast!…..Digital Lady Syd
Pink Carnation
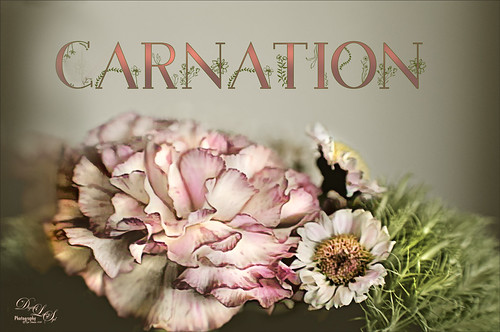
Image taken from a grouping I received for my birthday. I love carnations and they photograph so beautifully. Not much done with this image – used On1 Photo Raw 2018 (see sidebar for website link) Effects default settings for the Dynamic Contrast and the Sharpening effects. Then on a stamped layer Topaz Studio (see sidebar for website link) AI ReMix Adjustment was applied using the Parting Ways swatch and set to an opacity of 0.64. On another stamped layer, a Dodge Brush set to Range Highlights and Exposure 33% and just the light areas were dabbed – it gives a very natural effect. A spotlight effect layer was created to just emphasize the whites. My favorite thing about this image is the free font by Blossom by Chimerique. A Layer Style using the Stroke set to a green and 3 pixels, and an Outer Glow set to the same green color and Opacity of 86%. The text layer was duplicated and rasterized (right click and select Rasterize Text (not Rasterize Layer Style). Then with the same Dodge brush, the tops of the text were painted to lighten a little – really cool subtle effect. This was a lot of fun to do!…..Digital Lady Syd
Bird on the Prowl
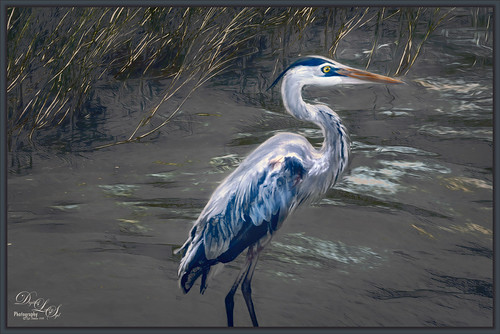
This Blue Heron image which was taken at Mount Dora, Florida, looks a little scraggly and I wonder if he has just gotten his adult plumage. That actually made it a little hard to post-process the image, so I decided to help him along a little bit with a few strokes of the Mixer brushes in Photoshop. Used On1 Photo Raw 2018 Effects (see sidebar for website link) to sharpen him up a little (the Dynamic Contrast and Sharpen filters at default settings does wonders on an image). Then on a stamped layer used Topaz Studio (see sidebar for website link) to get a more interesting background (used Impression with Chalk Smudge II along with Precision Contrast to just the background and AI ReMix for the more modern looking edges in the water). Added my favorite Color Lookup preset – Foggy Night at 78% opacity. From here it was just adding layers to clean him up a little. It was fun to do one of my favorite bird subjects again!…..Digital Lady Syd
Little Hidden Tree
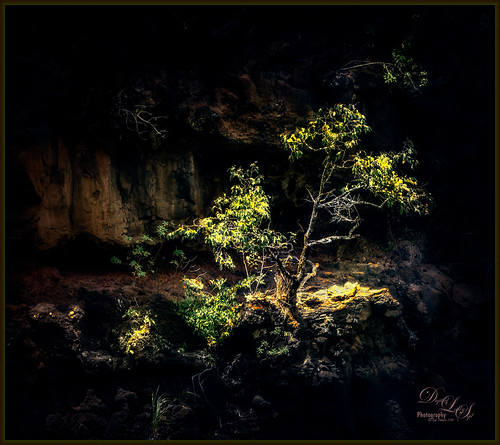
This little tree was growing on the side of the hill almost right behind the waterfall at Waimea Falls in Oahu, Hawaii. Lovely place to visit! Had lots of fun just trying out the different Photoshop plug-ins: Used On1 Photo Raw 2018 Effects to sharpen with the Dynamic Contrast filter, Luminar 2018 using their Golden Hour, Adjustable Gradient, Image Radiance and Dodge & Burn filters, and Topaz ReStyle’s Regal Blue Shades preset. See sidebar for links to all three plug-ins. Added a Black and White Adjustment Layer to fine tune the colors (See How to Use a Black & White Adjustment Layer to See Contrast in an Image blog) and a spotlight effect on the yellow leaves (see How to Add a Spot of Light blog). That was about it!…..Digital Lady Syd
King Bladud’s Pig
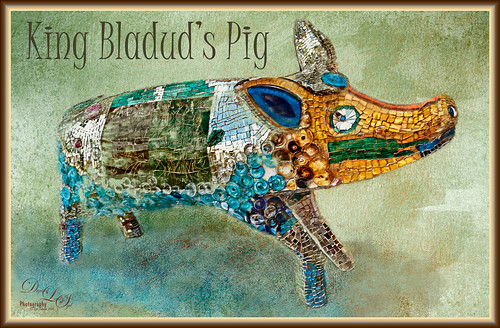
This little pig has an interesting story since the image was taken way back in 2008 when the Town of Bath in England was having a public art event to celebrate Bath’s origins and artists. King Bladud’s (cc863 BC) Pig (this is the pigs actual name and was created by Annette Martin) is one of 106 pigs that were on display all over the city (I only saw a few) and they were sold at auction to raise money for the benefit of Bath’s Two Tunnels Project.
The post-processing was minimal in Lightroom, just some Basic slider adjustments. In Photoshop, On1 Photo Raw Effects 2018 was used to sharpen the image (Dynamic Contrast filter, Sharpening filter and HDR Look filter – all just applied to the pig only with a mask). Lucis Pro filter was also used on further sharpen the pig. Next a texture by French Kiss (see sidebar for website link) called Color Wash Sage was added and a layer mask was used to paint the pig through the texture with a black brush. A New Layer was added and a shadow was painted in under the pig with a darker blue tone. Another texture by French Kiss called Redstrake was added and set to Color Burn blend mode at 65% Fill Opacity. Nik Viveza 2 was added to add a little vignetting. A text layer was added using a font called Juice ITC. Last step added one of my layer style frames (see my How to Create a Quick Layer Style Border or Frame blog). Wish I had taken more pics of these beautiful pigs!…..Digital Lady Syd
A Bird and His Reflection
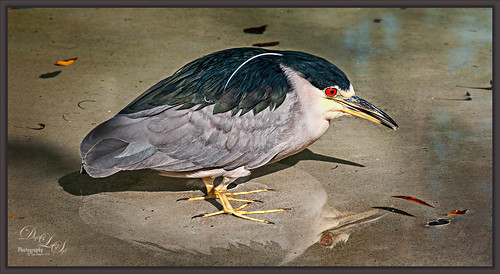
This little Black Crowned Night Heron at the Jacksonville Zoo had a pretty interesting reflection in the shallow wet water. And that eye – not even touched up – just bright red! I really love photographing birds just being birds! And not much was done with this image – in Lightroom applied the Modern 10 profile. In Photoshop On1 Photo Raw 2018 Effects (see sidebar for website link) was opened and the Dynamic Contrast filter was applied to just the bird (masked out the background), Sharpening filter, and the HDR Look filter to just parts of the bird (masking out other areas again). Nik Viveza was opened and used to adjust the tones for the focal point in the bird. A vignette was created around the heron. Last step added a layer style frame and that was it. Pretty easy to do!…..Digital Lady Syd
Stately Portrait
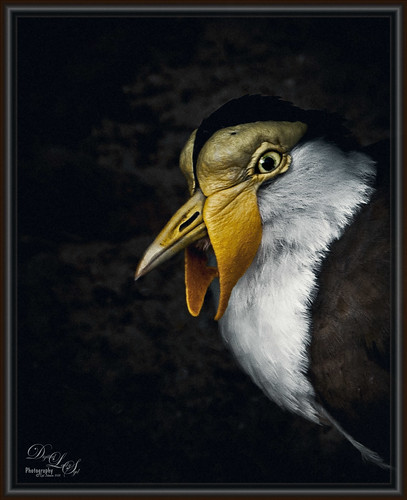
Loved the way this bird looks so stately. I actually started this image in Lightroom using Serge Ramelli’s Black and White Contrast Contrast yellow orange-light photo preset from his Urban Look set . I am major hooked on On1 Photo Raw 2018 (see sidebar for website link) Effect’s Dramatic Contrast filter used with the Sharpening filter. On both filters used a layer mask so only the bird was affected. Back in PS used a Red Channel Luminance Curves Adjustment Layer. (See my How To use a Red Channel to Create a Nice Blended Image Effect blog.) Next a Color Lookup Adjustment Layer using the Foggy Night preset set to 32% was added. On a stamped layer (CTRL+ALT+SHIFT+E) used Topaz (see sidebar for website link) DeNoise 6 and painted in areas that needed attention, mainly around the face. An Exposure Adjustment Layer was used on the eye and set to 88%. (See my The Eyes Have It – How to Make Them Pop in an Image blog.) A Digital Grain Layer was added over the whole image. Last step was to finish up with one of my frames (see my How to Create a Quick Layer Style Border or Frame blog). I love my birds!…..Digital Lady Syd
Ponce de Leon Hotel
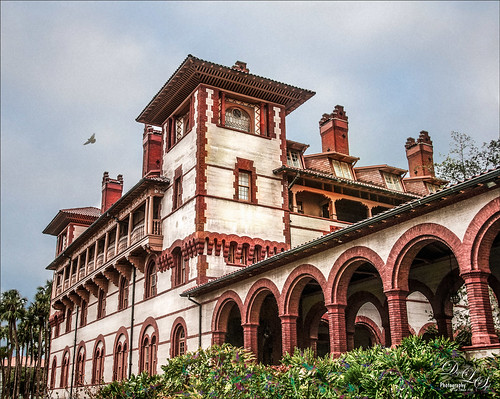
This is an image of Flagler College, or the now defunct Ponce de Leon Hotel that Henry Flagler built back in 1890. It is one of the most striking things to see in St. Augustine, Florida. And they do have tours a couple times a day which is well worth the expense as you get to the see the Tiffany stained glass windows and some of the original rooms with decor from the era. This image was mainly post-processed using On1 Photo Raw 2018 Effects (see sidebar for website link) to add the warmth, replace the gray sky, and add some sharpness to the image. Enough for blogging today……Digital Lady Syd
Beautiful Hibiscus
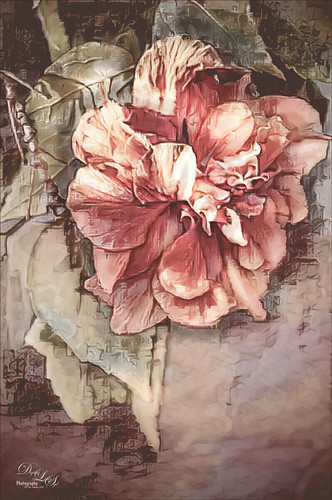
Had fun with this image. This is one of my peach hibiscus that I turned into a beautiful coral color. Used On1 (see sidebar for website link) Photo Raw 2018 Effects Dynamic Contrast on parts of the image by using the filter’s mask, and Sharpening filter. In Photoshop painted on the layer to fill in areas that were blown out. Added a Texture from Melissa Gallo Paints called Garden Canvas (from her Painting with Photoshop Workshop – excellent course and comes with some great brushes) at 26% layer opacity. Duplicated it and set Blend If Underlying Layer white tab split to 30/60. Three colored spotlight effects were painted on the petals. On a stamped layer, Topaz (see sidebar for website link) Studio was opened and the AI ReMix adjustment applied twice and Dehaze adjustment once. The image had a really bright red and orange effect color. Nik Viveza was opened to add some focus. Then applied my SJ Nastalgia profile (from a preset) in Camera Raw Filter. (See my How to Create Profiles in ACR from LR Presets and some PS LUT Files blog for info on this.) Now the colors are this pretty pink color. A couple layer of painting and burning and that was it. …..Digital Lady Syd
Statue of Queen Anne
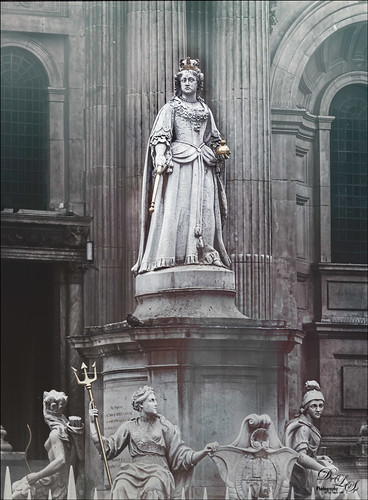
I was pretty pleased with how this image of the statue of Queen Anne in St. Paul’s Churchyard in London turned out as the RAW file was not too great. I actually did a lot of the toning in On1 (see sidebar for website link) Photo Raw 2018 Effects module using the Tone Enhancer, Sunrise, and Dynamic Contrast filters – I am finding I really like the Dynamic Contrast filter for sharpening up the images. It did a really good job on the statue. In Topaz Studio (see sidebar for website link) two textures were added on the image. Used Blake Rudis’s 5 Tone Heat Map to adjust the tone. The Foggy Night preset in the Color Lookup Adjustment Layer was set to 23% on a layer on top. Nik Viveza 2 was used to brighten the Queen up a little. A little reddish tone was used to give a vintage feel to the image. Lots of fun to try these different filters together……Digital Lady Syd
Harvesting Orange
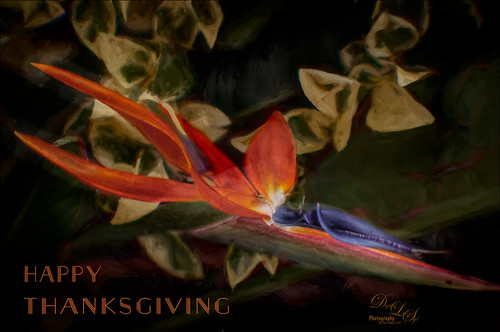
Wishing everyone a very Happy Thanksgiving in the US with this perfectly colored Bird of Paradise bloom that was growing in my front yard. Used setting from Urban Walk 15 Vintage Street preset in Lightroom. In Photoshop just practiced some of the things I have been learning about the various plug-ins filters. This image used Topaz Studio’s (see sidebar for website link) Impression default with some slider changes including the Painting Progress slider at 0.60 – then painted out most of the effect off the flower. Then the Precision Contrast filter was applied at 0.84 opacity and the Lighting Shadow set way down to give it a very dark background. Back in PS, On1 Photo Raw 2018 (see sidebar for website link) Effects was opened and their Glow Filter Orton Hear a Who preset at 75% opacity and the Noise Reduction filter Shadows preset was applied. A little burning was done on a layer above to emphasize some of the flower lines a little. (See my How to Create a Subtle Dodge and Burn Effect blog.) Some selective sharpening was done with a 50% gray layer and painting was done on the flowers using my SJ Pastel 3 Brush (see my How to Create my Favorite Brush blog). On a layer on top, a Spotlight Effect was created on the flower (see my How to Add a Spot of Light blog). The last step added the text using Naive Deco Sans font. Enjoy the holiday!…..Digital Lady Syd


