
Abandoned Texaco Station
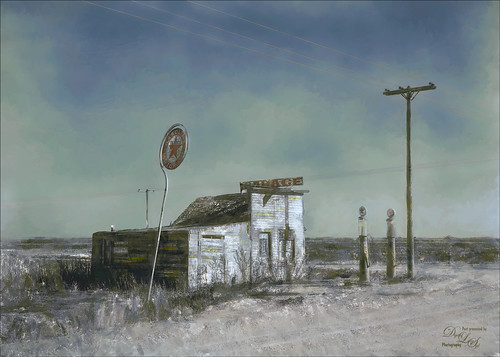
I found this image of an abandoned gas station in 1937 on Highway No. 2 in western North Dakota at Shorpy’s Historic Photo Archive but downloaded the original as a tif file from the Library of Congress. Seemed like a perfect candidate for colorizing in the new Topaz (see sidebar for website link) Studio. When working with these vintage black and white images, you always need to first adjust the resolution and resize it in Photoshop by going to Image -> Image Size command – set to a resolution of 300 by unchecking the Resample button, inserting 300, then rechecking the button to change the size. Next duplicated the layer in PS and opened up Topaz (see sidebar for website link) Studio and selected my SJ Colorize Black and White Image preset (it is up on the Community Site). Then added: Reduce Noise Adjustment and painted out the foreground in a mask so it only affected the sky; Dehaze Adjustment set to a Strength of 0.39 and Suppress Artifacts to 0.82; and Impression Adjustment using the Default settings changing the Stroke type to Stroke 09 and set the Painting Progress slider to 0.27. Back in Photoshop just did my normal workflow although it took a little more work. Used Nik Viveza 2 to adjust the overall image and several painting layers to smooth out the sky. Lots of fun here!…..Digital Lady Syd
Feeding Egret
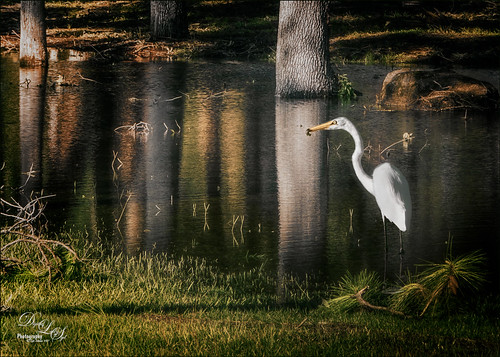
This image was taken in my neighborhood soon after Hurricane Irma visited recently. This is just standing water from the large amount of water received from the storm – it has now almost completely evaporated. Needless to say the birds loved it!
Note much done to this image – most of the processing was done in Topaz Studio, the new free interface for the Topaz plug-ins. (See my Introducing the Free Topaz Studio blog) I am still trying to figure out how to use all the adjustment settings. (Here are the settings used: Basic Adjustment – Exp -0.22, Clarity 0.28, Shadow 0.52, Highlight -0.16, Sat 0.29, Precision Contrast – Micro 0.30, Low 0.10, Medium -0.11, High -0.30, Shadow -0.35, Sat -0.22, Vibrant -0.79, and Color Contrast -0.37; and Radiance 0.28 opacity, Strength 0.11 and Fade 0.38.) A Red Luminosity Curves Adjustment Layer was applied. (See my How to Use a Red Channel to Create a Nice Blended Image Effect blog.) Last step involved using a Selective Color Adjustment Layer and reducing the brightness of the over-powering Yellows. …..Digital Lady Syd
I’m Just a Little Kitty Cat
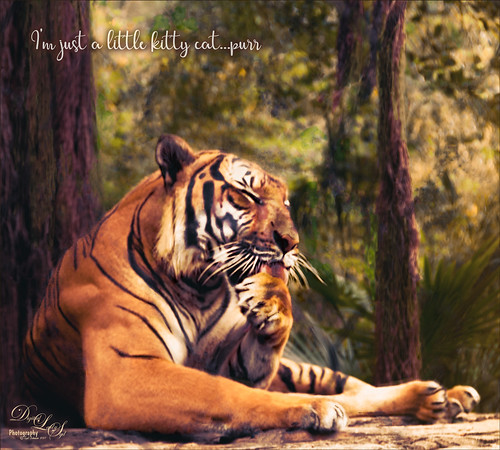
I just love to photograph the big cats – they are so interesting and beautiful! This tiger image had fencing all over it and the Healing Brush in Topaz Studio (see sidebar for website link) actually took almost all of it out of the image – I was totally surprised. They have just recently added it into the program. For me to get it to work well a very small size of 0.03 was used and by dragging the brush first over the color that you want added in, it tends to fill in with that color. Then just a Curves Adjustment Layer for color adjustment and then a Levels Adjustment Layer for contrast correction for a bit of a vintage matte feel. A Color Look Up Table set to the TealOrangePlusContrast preset and the opacity to 29%. Topaz Detail was used to sharpen the face. A Red Luminosity Curve was used to add a little more contrast. A left side yellow-orange light leak was added to the image to lighten it up a little. Created a composite layer on top (CTRL+ALT+SHIFT+E), made it a Smart Object (right click on menu and select), and opened the Camera Raw Filter. Went to the HSL sliders and adjusted mainly the orange and yellow colors in all the sections to get the tiger color and background just right. Last step was to add the text – used the Streetlight script font. What a cool tiger!…..Digital Lady Syd
On the Prowl
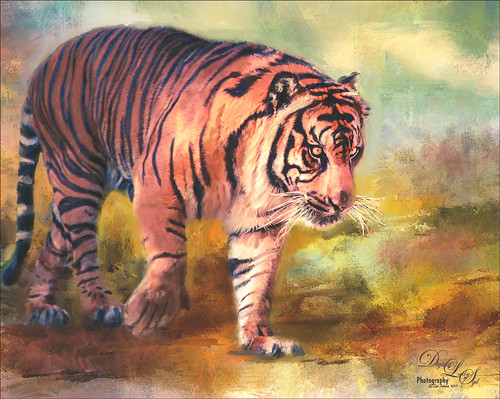
Felt an urge to paint one of my favorite subjects – the large cats. This beautiful Malayan Tiger was romping around at the Jacksonville Zoo, and definitely not stopping for a photo op. Luckily I spotted him and took the shot. (Okay – he was in his enclosure.) So this followed my basic painting workflow. In Lightroom a crop was performed and Serge Ramelli’s Bad Weather Basic preset was used and then adjusted. In Photoshop Topaz (see sidebar for website link to free program) Studio’s Sharpening Lens Blur filter was used to sharpen the image overall. Then one of my Corel painted textures was added underneath the tiger along with Jai Johnson’s Explorations (10) texture that was set to Linear Light blend mode and 55% layer opacity. On the Tiger layer, a black layer mask was created and the tiger painted and further defined in the Select and Mask panel. After than, just a lot of painting. One of the Mixer brushes that worked well on this image was a free one from Adobe called Munch-Round Ratty and was set to 45 pixels. to create a nice blend when painted over the edges of the tiger body. Several layers of both regular brushes and mixers to paint him in. An Exposure Adjustment Layer was used for the eyes, and Nik Viveza 2 was used to draw eye to his head. Finished off with a Curves Adjustment Layer to bring back contrast. It was a lot of to paint again!…..Digital Lady Syd
Looking for Love
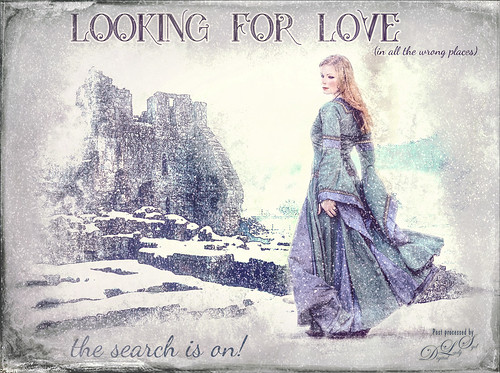
Sometimes it fun to just do something different! This actually took a lot of tweaking to get that romance novel or poster effect. Corey Barker offered one of his tutorials, Quick Hollywood – Inspired Illustrated Effect, for free so off I went. This is not quite what Corey’s poster looked like, but it still has a bit of that old movie magic. Several of the tips from his video were used which is how the illustrative look was created. The girl is called Wayra 11 from Liam Stock and the castle in ruins is called Winter Wonder stock 36 by Tigg, both at DeviantArt – must thank them for allowing the use of their images. Actually used Topaz Studio’s Basic Adjustment and Bloom Adjustment. Nik Viveza 2 was used to adjust the focal points in the image. Love the font called Star Full Inline which has eyeballs in it. The other font is called Dancing Script OT. Had to paint the face a little and added light fog on castle from Topaz Lens Effects. Used my snow effect called Snow1 Overlay and painted it off the foreground. On another layer, used Corey’s Particle Universal brush for snow on the girl and throughout. Last step was Topaz Texture Effects were the border was added. I think it is too hot right now and I am thinking of winter!…..Digital Lady Syd


