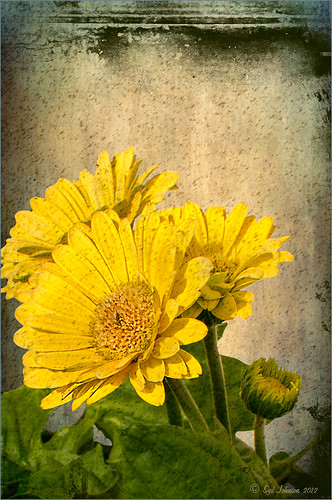
Anything Photoshop or Photography

Latest

Keeping Focus Where You Want It Using Focal Point 2 and Color Fill Adjustment Layer

The above was shot in the early evening in the Lagoon Area at the Hilton Waikoloa Village – very near the Dolphin Learning Center. This is an HDR image processed in Nik’s HDR Efex Pro using three images. In my last blog OnOne’s Focal Point 2 (see sidebar for OnOne’s website link) was shown on a beautiful flower shot (see “Let’s Focus on OnOne’s Focus Point 2 – Nice Little Plug-in!“).

This time I wanted to show how pretty it works on a landscape. The Focus Bug was used to keep the lounge chairs in focus and the Focus Brush was used to keep the thatched umbrella in focus. Also a very nice dark vignette was added from inside the plug-in.

Here is a little tip on how to keep your highlights under control. In this case to keep the water highlights from becoming too dominant in the evening image, a Color Fill Adjustment Layer in any color was added, the layer masked filled with black (click on layer mask thumbnail and press backspace to fill with black), and then by double clicking on the adjustment layer color swatch, a dark blue color from the image water area was sampled so the fill color matches it. In the black layer mask, paint back with a very soft low opacity brush (between 10 and 30%) the areas you want darkened, in this case mainly the water areas around the lounge chairs – this is just a very subtle adjustment.

The last step involved adding a Curves Adjustment Layer to give a little darker feel to the image. That was it. To see the tonemapped image before the plug-in and color fill layers were added, hover over the image.

Give Focal Point 2 a try if you get chance (if you buy fine art photographer Vincent Versace’s book, “Welcome to Oz 2.0: A Cinematic Approach to Digital Still Photography with Photoshop,” the Focal Point 2 plug-in is a free download from the book which has good reviews. Also try using a Color Fill Adjustment Layer to reduce out-of-control highlights. It is a very simple technique that works very effectively!….Digital Lady Syd

Let’s Focus on OnOne’s Focus Point 2 – Nice Little Plug-in!


These beautiful pink and white orchids were captured at the Hawaii Tropical Botanical Garden on the Big Island in Hawaii – they had a huge assortment of orchids in their Orchid Island exhibit, many varieties I had never seen before! If you look closely, you will see a tiny white spider web connecting the blossoms.

On this image I used OnOne’s Focal Point 2 – a really wonderful plug-in that is part of the OnOne Perfect Photo Suite 6.0 (see sidebar for website link). I had not used it before but after listening to OnOne’s short video called “Selectively Draw the Viewer’s Eyes Where You Want It To Go” (scroll down to 1/9/12), it proved to be very easy to apply and quite effective. It uses the Focus Bug technology like its other products, and the effect can be painted in or out with the Focus Brush. A soft blurred vignette can easily be added also. ShadowHouse Creations Pseudo Film Scratches Texture Heavily Scratched 2 was added with the layer set to Divide which gave the bright splotches of color throughout the image. The Sharpen Tool was used to selectively sharpen the forward edges of the flowers, and a composite layer (CTRL+SHIFT+ALT+E) was created on top to add a Layer Style. In this case, an oldie but goodie layer style from a book I bought years ago called “Adobe Photoshop 7 One-Click Wow!” by Jack Davis and Linnea Dayton was added using Wow Frame 09. The cool thing about this little book is that is shows what all the styles look like when applied. These styles are also included on the accompanying DVD to my favorite Photoshop Book “Photoshop CS3/CS4 WOW! Book” by Linnea Dayton and Christen Gillespie, where the original book is basically reproduced in the Appendices. Give Focal Point a try if you like this type of effect – very easy to use and gives very dramatic portrait or landscape effects also…..Digital Lady Syd

OnOne’s Perfect Effect Landscape Tips


This week I used one of OnOne’s quick video tips for their Perfect Photo Suite 6 (see sidebar for website link) called “Bring Out the Most Detail Out of Your Landscape” (need to go to the 12/21/11 video to find) where they give you some great settings for a starting point to adjusting your landscape images in Perfect Effect and Focal Point. These beautiful trees were growing on the Big Island in Hawaii. Only Perfect Effects was applied to this image and the Red color range in the Color Enhancer effect to bring out the pink in the flowers. I got a little over the top with the frame, but I liked the effect so I used it – it is PhotoFrame Taufer Texture 07 in darkish green at 61% opacity. If you have Perfect Photo Suite 6, or just Perfect Effects, check out this video and the numerous others that are listed. I have been learning lots by going through them – much better than reading the manuals. Thanks OnOne!…..Digital Lady Syd

Digital Lady Syd Related Blogs:
Another OnOne Perfect Effects Pix-Got To Love It!
Digital Lady Syd’s Review of OnOne Perfect Effects
Pseudo HDR in OnOne Perfect Effects

Abstract Feel Using the Motion Blur Filter


This image of bamboo shoots uses the Photoshop Motion Blur filter to get the interesting background. The basic idea came from a recent tutorial called “Creating an Abstract Landscape” by Curt Fleenor Photography. (A similar result was created in my blog called “Trying Out the Minimalist Look?” that uses a slightly different approach.) In this case, a gradient map, using an olive to mauve colored gradient, was added on top to give the interesting background colors instead of the really bright yellow and green from the original shot. The bamboo trees were selected with a layer mask just as the tutorial describes. A sun flare was painted on a layer using Obsidian Dawn’s light-beams burst 5 brush. The filter does give a nice abstract background. Anyway, it was just fun to do something a little creative…..Digital Lady Syd

Topaz Star Effects on a Wildflower?

I found these beautiful wildflowers on the side of an overlook just outside of Hilo on the Big Island in Hawaii. It was no larger than my thumbnail. For those of you who like to identify flowers, I believe this is called a Sensitive Briar, Littleleaf Sensitive-briar – Mimosa microphylla, a member of the pea family and the leaves will close up when touched. Here is a great description of these little flowers that I am not sure I was supposed to find in Hawaii.

To process this image, a Nik Color Recipe Detail + Vignette by Matt Kloskowski was used and a Classical Soft Focus filter was added at the bottom. Then it was processed in Viveza to sharpen the center and soften the green leaves in the background (move the Structure slider to the left to soften the edges). Next the image was taken into Topaz Star Effects where my SJ Small Stars preset was applied. (To create these tiny stars the following settings were used: Traditional Star Type; Main Adjustments – Threshold 0, Luminance 0.10, Size 0.20, Angle 75, Number of Points 12, and Spread 0.20; Color Adjustments – Saturation 0.80, Temperature 0.69 and others at 0; and Additional Effects – Glow 0.64 and others 0 – I like to start with effect a lot when using this plug-in.) The stars were hidden around everything but the flower tips. I was surprised how it really made the points of the flower pop. Finally OnOne PhotoFrame toner scratch 21 in a dark purple was added. Wow – once again I used many of my favorite plug-ins to get a really sharp pretty image!…..Digital Lady Syd

Where Am I?


Believe it or not, this is an image of Haleakala volcano popping through the clouds, which is on the Hawaiian Island of Maui approximately 30 miles away, but I am standing at the summit of Mauna Kea volcano on the Big Island. Two dozen telescopes including the large Keck Telescope are located to the right of this shot. The height is at 13,796 feet and the air is a little thin – had to take a 4-wheel drive jeep on a very bumpy and steep gravel road to get to the top. There is also snow on the banks behind me. I loved the way the clouds look so fluffy and light.

Very little processing was done with this image other than a Curves Adjustment Layer and the Nik Color Efex Pro 4 Diamond Head recipe  downloaded from Nik Presets and Recipes page.

Definitely try to get to this site if you are on the Big Island – the views are breathtaking and sometimes you do not have the cloud cover as shown above…..Digital Lady Syd

More Texture Fun!

I did a Fun Photoshop Blog called Tips for Flower Textures last week and I thought I would show another example. Yellow is a very powerful color and it is not different for this image. Once again the texture opacities and blend modes are varied to get this effect. Hover over the image to see how the photo looks with just a few Lightroom adjustments applied. To create this look, the following steps were followed:
1. Duplicate the original layer.
2. Select the background with the Quick Selection Tool and then click the layer mask icon to create a mask that will remove the background.
3. Next a texture by ShadowHouse Creations called In the Beginning was copies and placed under the selected flower layer to create a new background set to Normal Blend Mode at 100% opacity.
4. ShadowHouse Creations texture Photo-Tints Orange Overlay was moved on top of the flowers and was set to Vivid Light Blend Mode and 52% opacity. A Layer Mask was added and the center of the yellow flowers was softly painted out so the orange color is only on the tips.
5. A Hue/Saturation Adjustment Layer was clipped (3rd icon at bottom of adjustment layer) to the layer and Master was set to Hue +22, Saturation -26 and Lightness +35 to soften the redness.
6. ShadowHouse Creations texture You’d Be Surprised was applied next and set to Color Dodge Blend Mode at 35% opacity. A Layer Mask was applied to the center of the front flower.
7. Sharpen Tool was used on the flowers only.
8. To get the grunge spots, Florabella’s Snow 3 (the link is to her Facebook page with the free download on the left side)was applied and set to Subtract Blend Mode at 37% opacity.
9. The last step involves adding OnOne’s PhotoFrame Taufer Texture 10 – link to OnOne software is on the right. They simply have the best frames!

I hope you will try to add some textures to your photos. As you can see, the original photo was not anything really exceptional, but with a few free downloadable textures, the whole look changes. And do not be afraid to try different blend modes – I love the way the snow texture turns into a more grunge look with the Subtract Blend Mode. Check out my related blogs below for more beautiful textures to download…..Digital Lady Syd

Digital Lady Syd Related Blogs:
Tips for Flower Textures
Adding a Texture for Flair
Elements & CS5 Friday: Adding a Texture for a Totally New Look to an Image
Fixing Up a Boring Picture

I Didn’t Know That! Export Layers to Files in Photoshop

Every now and then I run into a situation where I want to take one of the layers I am working on in Photoshop and save it down as a separate file. Now it is possible to delete all the files and rename the file, etc., etc., etc. but this can take a while to do and it could cause you to lose the file you are working on if you get careless. This week I wanted one of the sky images I had imported into my image a while back to use again and to put in my Sky folder since I like it. (Hover over image to see sky image created from layer in psd file.) I found out there is a little known script sitting in Photoshop that will accomplish just what I wanted to do in just seconds.

Steps to Export Layer(s) to Files in Photoshop:

1.  In your image, turn off all layers you do not want to create images of by clicking on the eyeballs on the left of the each layer in the Layers Panel. (To do this quickly, you can highlight the layer you want to export to a file and ALT+Click on the eyeball – all the other layers are turned off immediately.)
2.  Go to File -> Scripts -> Export Layers to Files.
3. The Export Layers to Files dialog appears. Fill out as shown. Be sure to capture all the check boxes or you will get image files for each layer in your file.

4.  Click Run and that’s it – really quick and easy!

The image is of the Flagler Presbyterian Church in St. Augustine, Florida, where Henry Flagler and his family are buried. Topaz Adjust 5 and Topaz Black and White Effects were used on this image (see sidebar for website link). The sky is the one I moved in from an image I took on the International Coastal Waterway near St. Augustine while sailing.

Give this script a try next time you want to break apart an image…..Digital Lady Syd

Topaz Star Effects on a Nature Scene

A warm glow feel was created in Topaz Star Effects (see sidebar for website link) to give a very nice soft brightening in your image. If you hover over the image, you can see the difference adding the plug-in at these settings. Very subtle but nice. In this case the sun was setting and there was a soft glow on the tree and bird already but the Star Effects emphasized it by the star placement in the plug-in. A preset was created (I named it SJ Softening Effect) using these settings for this effect:  Star Settings – Traditional Star; Main Adjustments – Threshold 0, Luminosity 0, Size 0.12, Angle 75.00, Number of Points 12, and Spread 0.20; Color Adjustments – Saturation 0.80, Temperature 0.69, Rainbow Strength 0, and Rainbow Frequency 0; and Additional Effects – Secondary Points 0, Glow 0.64 and Ring Flare 0. If the effect seems too strong, adjust the Size down and be sure to brush out any stars that appear in the wrong places. A soft vignette was placed around the final image.

Give this new plug-in a try – it can give a nice soft feel to an image……Digital Lady Syd

Digital Lady Syd Related Blogs:
Trying Out Topaz Star Effects
Combining Plug-ins for More Image Interest

The Macro Shot


Recently I have been working on my Macro photography, especially since I have had some beautiful flowers on my porch due to the warm winter we are having in Florida this year. One of my favorite blogs is by Mike Moats called Tiny Landscapes where he gives some great advice on taking and processing macro images. A few things I am starting to try and the above chrysanthemums are the result of one of my efforts. A 60 mm Nikkor macro lens was used at F/19 at 1/20 to 1/350 sec. A Bower 0.5 x High Resolution Digital Lens with Macro was added to the lens. I created an HDR image from five shots which is how I got the large dynamic range in the photo. After that the processing was in Nik Color Efex Pro 4 using Tonal Contrast, Detail Extractor and High Key filter effects and Viveza 2. This is the basic workflow Mike Moats uses and it works very well on macro photos. My original shot was taken with a white background but I just did not like the way it looked. Mike says if you do not like the background feel, crop tight, which is what I did. I hope to try out some of his other tips in the near future – it is a lot of fun to take those close up shots…..Digital Lady Syd