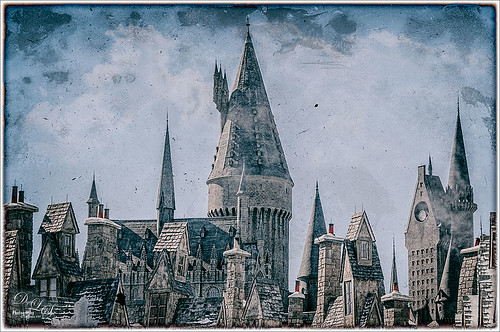
Having some fun here with two of my favorite filters in Photoshop. This is just an image of the tops of the Wizarding World of Harry Potter at Universal Studio in Orlando, Florida. Did basic slider adjustments in Lightroom, then in Photoshop applied Topaz (see sidebar for website link) Detail 3 to sharpen. Added a couple clouds from my free Cloud Brush Set, and applied Nik’s Analog Efex Pro plug-in to get the real vintage feel. Used Puppet Warp twice to try and straighten the towers which are not straight no matter what, but I wanted the big one in the middle straight looking. (See my Straightening with Puppet Warp! blog.) Added a layer style to create the framing. That was it……Digital Lady Syd

Latest
Where Am I?
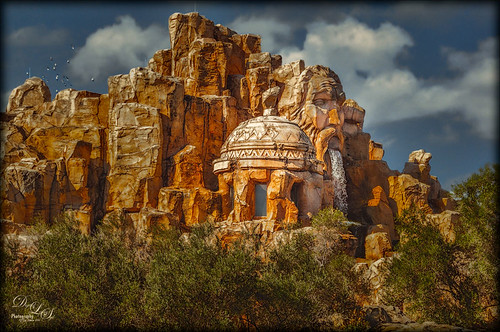
Loved the result of this interesting structure taken at Universal Studios in Orlando, Florida, that houses a The Eighth Voyage of Sindbad Stunt Show. This image originally had a really ugly sky in it, so I added one of my skies I took over the Intracoastal Waterway when sailing – much nicer looking with clouds! The birds were actually in the photo. Refine Edge was used to get a nice demarcation between the new sky and the rocks. Topaz (see sidebar for website) Detail 3, Topaz ReStyle using Orange Orchard preset, and Topaz Adjust using French Countryside preset were all applied. In Photoshop the Camera Raw Radial Filter was used to direct to the dome as the focal point. That was it. One of my favorite images from the day!…..Digital Lady Syd
A Splash of Color
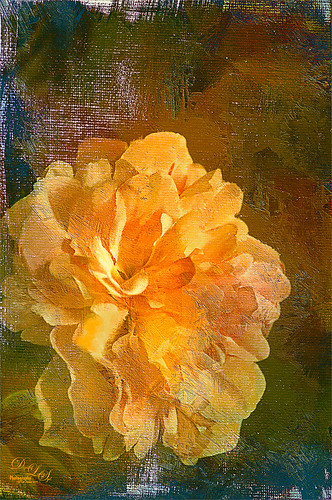
Love the texture on this flower. Lightroom basic changes, Topaz (see sidebar for website link) Detail 3 for sharpening the focal point, Mixer Brush painting on flower – Fays Signature Pastel Blender 02 on image above, Curves Adjust Layer for contrast, Painted Texture‘s Dark Naples Yellow texture twice using Linear Light and Multiply blend modes. A composite layer (CTRL+SHIFTS+ALT+E) was created and turned into a Smart Object. In the Smart Object the blend if This Layer dark tab was adjusted so I could let a little color through. A turquoise blue Color Fill Layer was added underneath the Smart Object so the color shows through. High Pass Sharpening was the last step. I love the colors in this texture!….Digital Lady Syd
Driftwood Eagle
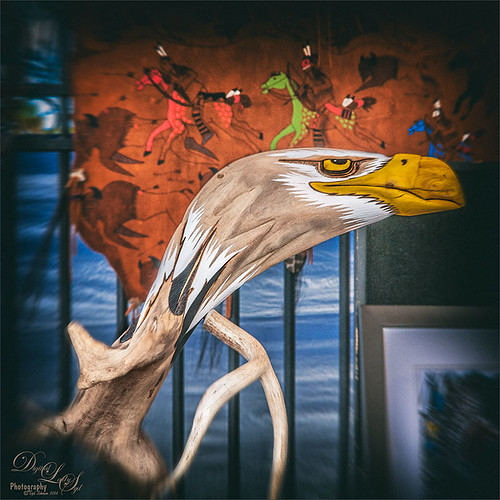
I loved this beautiful piece of art that one of the vendors was selling at the 2014 Native American Festival in Ormond Beach, Florida, recently. The image just seemed to say Nik Analog Efex Pro to me, so this filter was applied as a Smart Object. In the filter the Basic Adjustments, Lens Distortion, Zoom & Rotate Blur, Lens Vignette, and Film Type were selected. Then back in Photoshop, the actual face and part of the wood body were painted back in the filter mask. A Curves Adjustment Layer with a slight S-curve was added on top and that was it. Love the color in this image – really reminds me of the festival……Digital Lady Syd
Wishing I Was Back in Hawaii
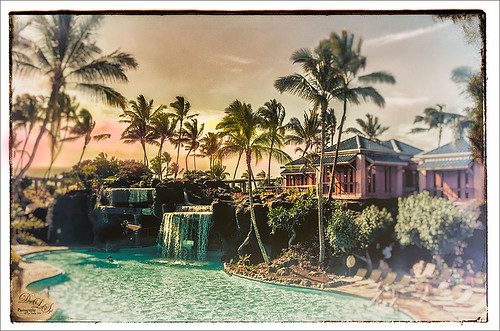
Wishing I was back in Hawaii – been a while. Taken at the Hilton Waikoloa Village on the Big Island – really fun place to stay. I just love the what Nik’s Analog Efex Pro does to give a nice vintage feel. Otherwise just a little clean up here and adding some contrast using Curves Adjustment Layer……Digital Lady Syd
A Dreamy Rose!
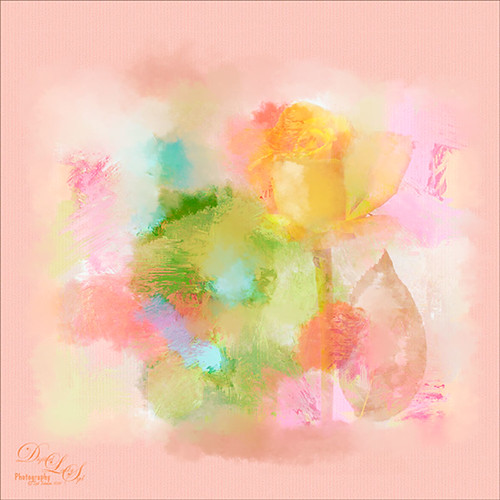
Really enjoyed making this image. This yellow rose, a free image from stock.xchng by MEJones, was used to begin my painting. Painted Textures Parisian Pool texture was used. The edges of various splotches of color on individual layers were blended in using a Mixer Brush – not sure which one, but the Adobe Chalk Brush with a Shape Dynamics set to 19% would work fine. This brush can be used both as a regular brush and a Mixer Brush. The Camera Raw Filter was used to adjust the color using the HSL sliders. A Curves Adjustment Layer was used to add a little contrast. That was it but lots of fun to do!…..Digital Lady Syd
Some Crazy Painting!
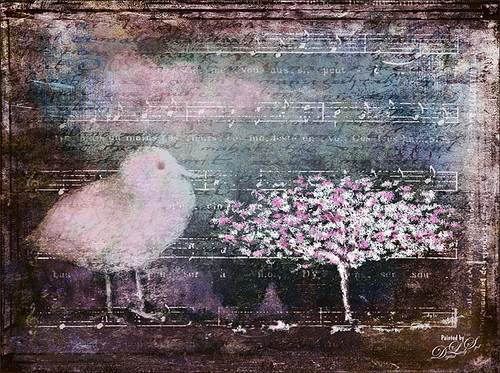
Just having some fun with this image. A while back I did a blog on creative work called How to Create an Image from Nothing. This image was created in a very similar. This image totally combined painting in both Photoshop and Painter. I am finding I like some of the brushes in Painter better than those in Photoshop, but I am better at blending my images in Photoshop. Therefore I keep bringing in things created in Painter into Photoshop and put it all together. Not sure I will ever be able to reconcile the two programs, but at least I am getting my own technique. This image background was French Kiss Studio 3 White Wash – my favorite white texture. Two of 2 Lil’ Owls Studios (see sidebar for website link) Textures were used, the border is from ViVa Penmanship Mask 3, and the music from Kim Klassen Music and Script brushes from her Test Kitchen. Topaz (see sidebar for website link) ReStyle was used to create the beautiful final colors in the image. My free SJ Clouds 1 and 8 are also in this image. The chicken is a Painter brush by Karen Sperling called birdies. Rather crazy effect but lots of fun to do!…..Digital Lady Syd
A Nice Illustrative Look

Another image that required a lot of adjustments but lots of fun to post-process. These Savannah homes had cars and trees and all sorts of things in the way so it is amazing that it turned out looking as good as has. I guess that is why I love Lightroom and Photoshop – it is so fun to see what you can do to an image!
Nothing special in Lightroom – just the basics. Next used Topaz (see sidebar for website link) Black & White Effects 2 to give a bit of an illustrative look to the image and to add a pretty vignette and border. Alien Skin Snap Art 4‘s Pastel Portrait – soft preset was applied and set to 60% layer opacity. Used a Selective Color Adjustment Layer to get the color adjusted. The Puppet Warp Tool was used to slightly spread the roof from the bottom on the right side as it was a little distorted. That was it but it seemed to take a while. Still, the final result turned out so nice…..Digital Lady Syd
Painting for Spring
Enjoying learning to use Photoshop to paint. Painted the flower using a Pastel Mixer Brush, then on another layer painted out the background and created a green background with same brush. Added some Mixer Brush splotches of color to add some light interest to the background. Added a Curves Adjustment Layer for contrast and that was it. I really love the spring-like colors!…..Digital Lady Syd
Dainty Little Violet
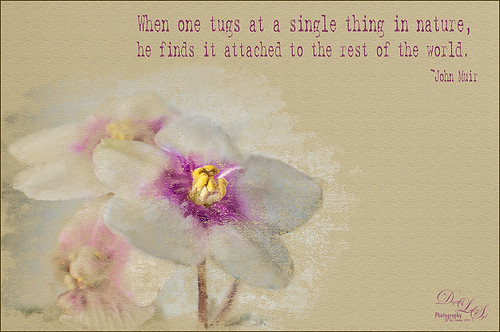 Just playing in Photoshop. This was a photo I took of my blooming violets a while back. Mainly just a little mixer brushing and the Texturizer Filter in Photoshop. The font is Batik Regular. This is just too much fun!…..Digital Lady Syd
Digital Lady Syd Related Blogs:
Learning to Paint in Photoshop
Topaz Labs AI Gigapixel
Check out AI Gigapixel stand-alone software for upsizing your images. It’s incredible! And it can now be used as a plugin when in Photoshop. Also Topaz Labs Photo AI has some great sharpening and denoise tools along with Photo Video AI.

Luminar Neo
Click here to visit Luminar for more info and check out their new AI Filters.

GRUT BRUSHES – Photoshop Brushes for Digital Artists
Click here to visit GrutBrushes.com
And be sure to check out his Free Brush of the Week and Brush Sampler! These are the best brushes you can find!

Topaz Studio 2 and Legacy Topaz Labs Filters
Unfortunately Topaz Studio 2 and other Topaz Lab filters are no longer available for sale as of 2020. If you had bought these filters and would like to put them back on, here is a link to the Legacy Apps where they can be downloaded again. Below is an example of the wonderful Remix AI Filter from Studio 2. The wonderful Impression still works fine in Photoshop right now along with Adjust (all versions), ReStyle, and even PhotoFXLab!

On1 Photo Raw
Wonderful software to use as a substitute for or plugin with Photoshop. Many great filter effects and lots of AI capabilities!
