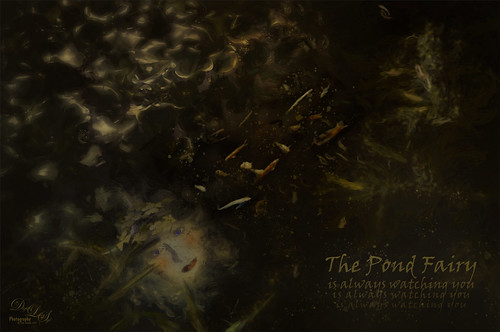
The Pond Fairy was a lot of fun to create. The original image was a lily pad pond image taken at the Ormond Memorial Art Museum and Gardens. The sun appeared in the water as a brilliant white glare where the face is located. The fairy face is made from a brush I created from a model’s face. Corel Painter’s ParticleShop Photoshop plug-in was opened and the Cluster brush set to a bright yellow with the Glow checked and was painted on the plant on the left side and little on the tips of the lily pads. A texture from 2 Lil Owl (see sidebar for website link) called Mosaic Set Aqua Grunge – this is one of her best sets in my opinion – was applied and set to Subtract blend mode at 19%layer opacity. Topaz (see sidebar for website link) Lens Effects was opened and the Diffusion filter was applied to really soften up her face and some of the sharp lily lines. Then it was removed in part of the image with a layer mask. Topaz Restyle was opened and a preset was made of the image at this point. Then the actual image sliders were changed to get a little bit different color palette. This is a great way to get the colors just like you want them, especially if they are pretty close to what you like. The other presets just did not work with this image. (See my How to Use a Topaz ReStyle Trick for Improving Your Image blog for how to do this.) A few splats were placed on a New Layer to give a little fairy dust and water bubble look. On a composite layer on top (CTRL+ALT+SHIFT+E) and opened Nik Color Efex Pro 4 – used Detail Extractor, Glamour Glow and Midnight filters. This layer was set to Multiply blend mode and 24% layer opacity. A group was created for the face layers where the eyes, cheeks and lips were painted. Also the clover hat was added to her image here. This was from my favorite object site – PixelSquid. The fish are from an image taken in Hawaii at the Hilton Waikoloa Village. It was layered on top of the water lily image, then free transformed to fit the pond area. A Black and White Adjustment Layer and Levels Adjustment Layer were set to get the correct tone and color in them. A layer mask was used to fine tune the fish into the area. Nik Viveza 2 was opened to adjust the focus. The text is a free font called Viner Hand ITC. Quite a few steps but lots of fun. So next time you look into a pond, check out The Pond Fairy who will be watching you…..Digital Lady Syd

Latest
Bird in Paradise
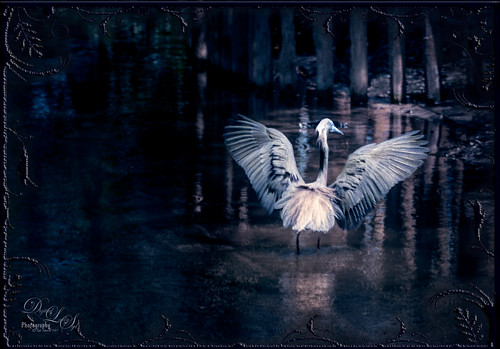
This male Tri-colored Egret is actually retrieving nesting material for his beautiful red-eyed female from a few posts ago. He would fly into the water, find a stick, run back to the nest, give it mate, then take off again to the same spot. I thought he was rather brave since there are alligators in the water at the St. Augustine Alligator Farm Rookery. This image was not altered as far as what the setting looked like – just added a couple textures, darkened down the image, and finished up with Nik Viveza 2 to even everything out. He definitely had a beautiful wing spread. The frame is from Shadowhouse Creations – Borders CM1 set (could not find a link) where the frame was taken into Select -> Color Range and just the frame was selected. Then placed on its own layer (CTRL+J), bottom layer deleted, and saved as PNG file. Now it can be placed on any image using any color or patterns. A Bevel and Emboss and Satin Layer Styles were used to give a dark wrought iron effect. Overall it turned out to look like a pretty serene place to be!…..Digital Lady Syd
An Urgent Plea
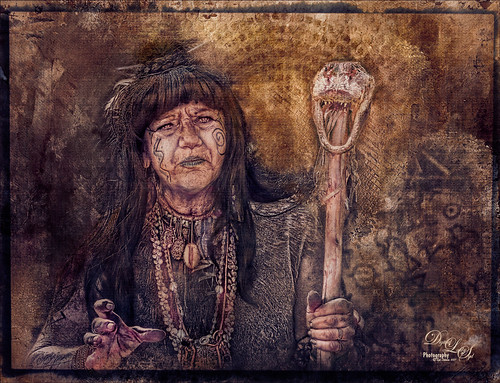
This is a lovely Native American woman I met at the recent Ormond Beach Native American Festival. She was actually doing a little presentation to the students from the local elementary schools on Native American traditions. I wish I could remember which was her tribe, but I would bet she is or was a teacher – very entertaining for the kids, and us adult kids too. Her expression reminded me of the past plight of the American tribes, and liked the fact that she represented how a female member would be attired. I can honestly say this image took me forever to finalize – just could not pull the whole look together. Finally the right textures fell into place and ended up just using my basic Photoshop workflow. Lucis Pro added the detail as an almost hyper-effect mode. Topaz (see sidebar for website link) ReStyle was used to get an interesting color palette and Topaz Texture Effects 2’s Fudge Brownie preset gave the vintage feel to the image. Then several clean up layers and of course, Nik Viveza 2 to draw attention to the face and the Alligator stick (hum). Needless to say, the kids loved that artifact. Just one image but three textures from 2 Lil Owls (see sidebar for website link) and one from Kim Klassen were used to get the final effect. Overall it turned out pretty much like I wanted…..Digital Lady Sy
An Army Tortoise
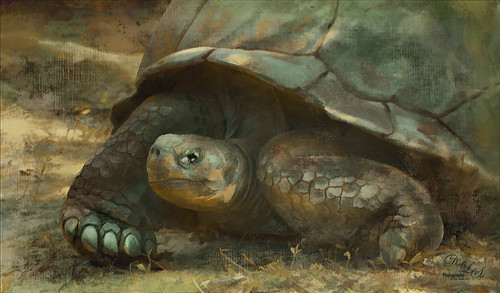
I have visited the St. Augustine Alligator Farm many times over the past few years and for some reason, these huge Galapagos Tortoises always catch my eye. They always look the same and are not particularly colorful, but for some reason this image caught my attention as it looks like he is wearing an Army camouflage helmet on his back. I just could not pass up the chance to try it out, so here my Army Tortoise – I think he really has a bit of a military expression on his face.
Just my basic workflow using Topaz Clarity to sharpen him up a bit, Topaz (see sidebar for website link) Simplify using a preset created from Serge Ramelli’s video called How To Turn a Photo into a Cartoon with Topaz Simplify 4.0, a Selective Color Adjustment Layer to turn the blue tones in his shell to green, Nik Viveza 2 to even out the edges, a Lighten and Darken Curves Adjustment Layer to slightly dodge and burn the image. 2 Lil Owls (see sidebar for website link) Mosaic Set Benoit textures was added and set to Multiply blend mode, and her Mosaic Set darcy grunge texture was set to Screen blend mode. For this texture the Blend If This Layer white tab slider was split and set to 90/128 to give the pattern effect just on the outside of the image. On a New Layer set to Overlay, a couple large round soft strokes were made to act as a spotlight on his face and part of his shell. A little clean up was done to finish up. I really think he looks so much more interesting now!….Digital Lady Syd
Poising for a Portrait
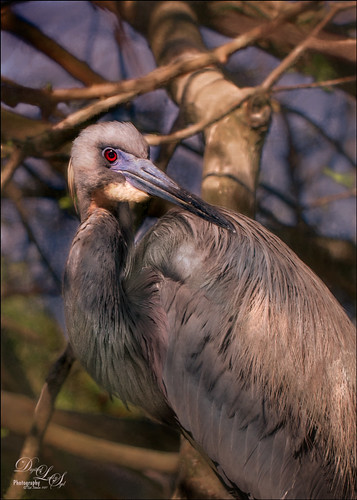
This beautiful Tricolored Heron is waiting for her mate to return to the nest with more nest ingredients. I could not believe how beautiful her eyes were! And where is her neck – how does she do this? The image had lots of shadows on her feathers that had to be removed – used both Lightroom’s Adjustment Brush set with the Saturation way down and clarity up to retain the feather structure, and then in Photoshop used a little cloning on the feathers. On a stamped layer (CTRL+ALT+SHIFT+E) Topaz (see sidebar for website link) Clarity was applied to pull out the feather details more – the background was painted out in a layer mask. (For Clarity settings, see below.) On another stamped layer Topaz Impression 2’s Jai Johnson’s Oil Glaze Light Original Color for noise removal preset was applied. (Need to try this preset if you shoot bird and wildlife photography – see her preset settings in her video In the Digital Studio January 6, 2017). Darken and Lighten Curves Adjustment Layers were created and the layer masks were filled with black. (See my How to Use Curves Adjustment Layers to Dodge and Burn an Image blog.) Areas that needed either adjustment were painted back. A Red Channel Luminosity Curve Adjustment Layer was created. (See my How to Use a Red Channel to Create a Nice Blended Image Effect blog.) Then an orange Solid Color Fill Adjustment Layer was applied at 19% layer opacity to warm up the image slightly using the mask to remove areas that were too warm. Finished up with Nik Viveza 2 to add a little vignette and drive focus to the bird’s eye. I just love the expression of this lovely lady…..Digital Lady Syd
Here are the basic Clarity settings used for my SJ Scottish Landscape: Clarity Section – Dynamics: Micro Contrast 0.73, Low Contrast 0.33, Medium Contrast 0; and High Contrast -0.34; Tone: Black Level 0.69, Midtones 0.02, and White Level -0.34; Hue/Sat/Lum Section – Hue Red 0.13, Orange 0.11, Green 0.33, and Aqua -0.36; Sat Red 0.19, Orange 0.14, Green -0.31, and Blue -0.19; and Lum Red 0.59, Orange 0.16, Yellow -0.02, and Green -0.37; all not listed colors were set to 0. For this image, changed Medium Contrast to 0.70, set all Hues to 0, and changed these Lum settings to: Orange 0.39 and Yellow -0.87.
Soaring into Summer
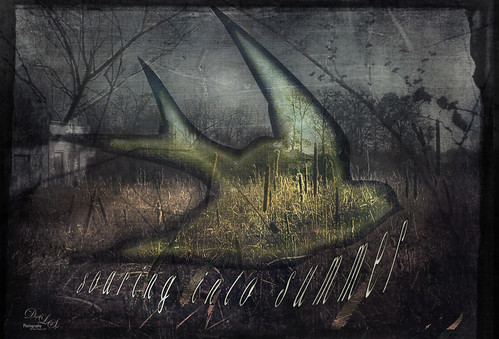
This image is a composite from a couple different photos and several textures. I have never tried any real grunge effect so this is quite a change for me. Basically lots of layering and adjustment layers to pull this together. The original image was taken across the street from my old home on Lake Wawasee (click to see the webcam) in Indiana and was a huge marsh of Pussy Willows at this time. Two 2 Lil Owls (see sidebar for website link) – Ancient 1 and Jewel Chalks 19. The font is Nomah Script and was warped to fit the bird. The bird is from Photoshop Creative magazine No. 12, and the foreground contains Midnightstouch Grasslands 3. Topaz (see sidebar for website link) ReStyle to get a better color adjustment. From Shorpy’s (my favorite vintage image site) an Abandoned Garage on Highway No. 2 in western North Dakota in October 1937. A layer mask was used to blend it in the background. A dark border was added and Nik Viveza 2 was used to adjust the final lighting effect. Lots of work on this one and I hope it conveys the effect I wanted of a bird soaring over the field and adding an element of warmth to the rather drab image……Digital Lady Syd
Teasing the Bird Paparazzi
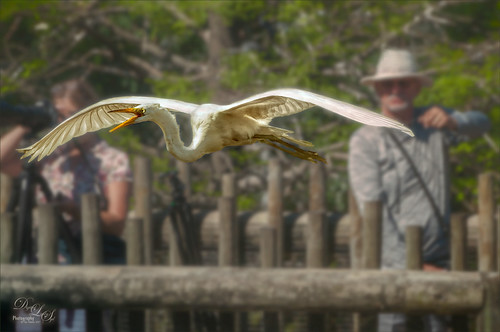
This beautiful snowy egret looks like he is having a great time showing off in front of the large group of photographers trying to get him centered in the cameras. I thought this was one of the funniest images I have taken at the St. Augustine Alligator Farm Rookery. Added Gaussian Blur to the whole image at Radius 12.5 and painted back the bird. The whole background was just too busy and the photographers way too distinct. On just the bird a little Topaz Clarity was used to bring out the detail in the bird’s wings especially. Used an Exposure Adjustment Layer to sharpen the eye. Then Topaz ReStyle’s First Steps preset was applied. Used Nik Viveza 2 to balance out the color in the image and on the birds wings. A Red Channel Luminosity Curves Adjustment Layer finished up the image. It was a little tricky to not over-sharpen the bird to keep it from looking like a composite. I had to spend a lot of time just toning down the edges to blend into the overall background. Still like the image…..Digital Lady Syd
Building a Nest for the Future
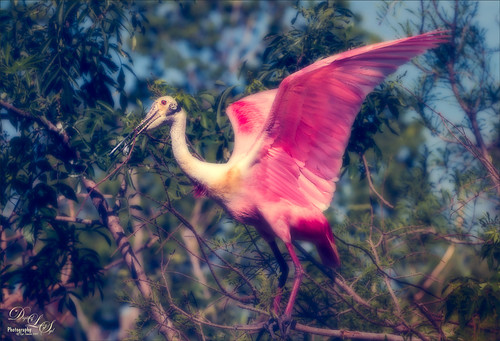
One of my favorite birds to photograph, partly because they are so funny. This Roseate Spoonbill had to work pretty hard to get the branch broken off the tree limb so his mate could add it to the nest at the St. Augustine Alligator Farm Rookery. The couples work very hard together getting it all just right. This guy was in such a busy background that I had to figure out a way to calm it down. Decided to go with a bit of a glamour look to soften the whole image down thanks to Sebastian Michael‘s action. (If you took his course, the link is in a recent e-mail.) I hope I get to find this guys nest and see the chicks that will be hatching soon. ….Digital Lady Syd
Have a Good Day!

Spent a good part of Sunday going through the wonderful videos by Sebastian Michaels on Typography. They are available when you buy the Somerset Digital Studio magazine for Spring 2017 and there is lots of info on this tricky subject. The above is what I created after listening to a couple hours on how to do this – lots of fun. The number of fonts is a bit excessive but many belong to a similar class of fonts. I was mainly practicing how to incorporate different fonts with different techniques. (Some of the fonts were free and a few I own and are as listed: CF Anarchy, Dancing Script OT, Mistral, Fuse, 1942 report, DomCasual BT, Angelic War, Naive Deco Sans, Blackoak Std, Catalina Avalon Sans, Blackboard, and Trajan Pro in case you might want to download one of them.) The tree on the side is Tree-169 brush by Midnightstouch. The really nice swirl is from missm-flourishes-sample brush 2/312 size. I believe there are 37 Layers and 5 Groups in this little creation using lots of layer styles, colors, and adjustments layers, and even Topaz (see sidebar for website link) Impression 2 (Cartoon Your Critter preset). The original background texture is one I created in Photoshop using a beautiful cross-hatching effect with a brush from Just Jamee Summertime 2012 Brush Sampler 4 brush and a Bevel & Emboss layer style and using two different colors, then smoothing out parts with Gruts FX Cloud Billoway brush. Most of the fonts were obtained for free on the internet. Overall a very interesting way to spend a day!…..Digital Lady Syd
St. Giles Cathedral Entranceway

This image of St. Giles Cathedral in Edinburgh, Scotland is of the West Doorway and contains many interesting carvings that were done by John Rhind in 1884. I am still trying to figure out who the sculptures are of – they represent historical people of Scotland – the middle guy is named Alexander, maybe the king who erected the first church at this location in 1120. Also the Gargoyle surprised me as he was rather prominent in the image (they are used as waterspouts and protect the church from evil spirits). I still wonder who all the people are that are just carved faces in the wall. The workflow is basically the same one used in the my Adding a Creating Painting Effect Fun Photoshop Blog. Lucis Pro was used to sharpen it up a bit. Topaz (see sidebar for website link) Impression’s Abstract Settings Blake Rudis set to 63% layer opacity. A white layer with many parts painted out in a mask. A frame was added with a Pattern Adjustment Layer clipped to give the soft pink tones. Some clean up, a little dodging and burning, and Nik Viveza 2 to finish off. Would love to get back to Scotland and see who all these carvings are. ….. Digital Lady Syd
Topaz Labs AI Gigapixel
Check out AI Gigapixel stand-alone software for upsizing your images. It’s incredible! And it can now be used as a plugin when in Photoshop. Also Topaz Labs Photo AI has some great sharpening and denoise tools along with Photo Video AI.

Luminar Neo
Click here to visit Luminar for more info and check out their new AI Filters.

GRUT BRUSHES – Photoshop Brushes for Digital Artists
Click here to visit GrutBrushes.com
And be sure to check out his Free Brush of the Week and Brush Sampler! These are the best brushes you can find!

Topaz Studio 2 and Legacy Topaz Labs Filters
Unfortunately Topaz Studio 2 and other Topaz Lab filters are no longer available for sale as of 2020. If you had bought these filters and would like to put them back on, here is a link to the Legacy Apps where they can be downloaded again. Below is an example of the wonderful Remix AI Filter from Studio 2. The wonderful Impression still works fine in Photoshop right now along with Adjust (all versions), ReStyle, and even PhotoFXLab!

On1 Photo Raw
Wonderful software to use as a substitute for or plugin with Photoshop. Many great filter effects and lots of AI capabilities!
