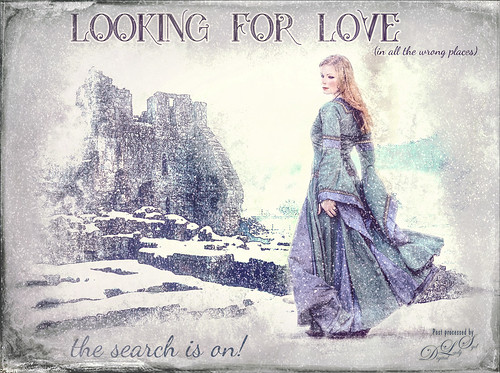
Sometimes it fun to just do something different! This actually took a lot of tweaking to get that romance novel or poster effect. Corey Barker offered one of his tutorials, Quick Hollywood – Inspired Illustrated Effect, for free so off I went. This is not quite what Corey’s poster looked like, but it still has a bit of that old movie magic. Several of the tips from his video were used which is how the illustrative look was created. The girl is called Wayra 11 from Liam Stock and the castle in ruins is called Winter Wonder stock 36 by Tigg, both at DeviantArt – must thank them for allowing the use of their images. Actually used Topaz Studio’s Basic Adjustment and Bloom Adjustment. Nik Viveza 2 was used to adjust the focal points in the image. Love the font called Star Full Inline which has eyeballs in it. The other font is called Dancing Script OT. Had to paint the face a little and added light fog on castle from Topaz Lens Effects. Used my snow effect called Snow1 Overlay and painted it off the foreground. On another layer, used Corey’s Particle Universal brush for snow on the girl and throughout. Last step was Topaz Texture Effects were the border was added. I think it is too hot right now and I am thinking of winter!…..Digital Lady Syd

Latest
Hiding Out at the Rookery
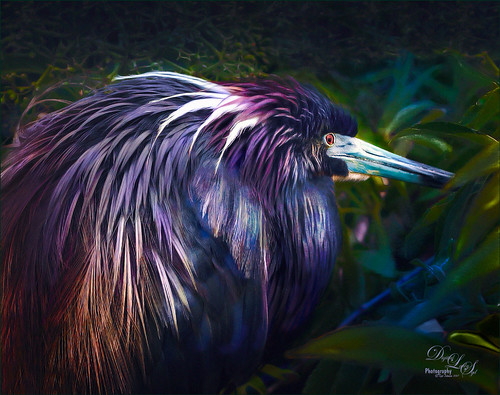
This Tricolored Heron was trying to be inconspicuous which meant I had to take his picture. He really did not want my attention at the St. Augustine Alligator Farm Rookery. Therefore he now has a beautiful bright-colored plumage to show off. Felt like getting back to my favorite type of Photoshop – painting and adding a few filters. I have done so many Tri-Colored Herons that adding the extreme color effect was fun to try. A technique by Glyn Dewis was presented in his How to Retouch a Dog Portrait video where he duplicates the background twice. On the first he applies PS Reduce Noise twice using just the Strength slider set to 10 and 4. On the top layer he applied a PS High Pass filter set to just 1 pixel to bring back sharpness. These layers were then grouped. It gives a very subtle painterly feel and gives a good place to start by smoothing over the background. On a couple layers on top, several blobs of color were added on the bird to make him more color. The layer opacity was set to around 50% and Overlay and Vivid Light blend modes. Had to clean up the background and fill in some holes. On a stamped layer (CTRL+ALT+SHIFT+E) the Camera Raw Filter was opened where several Radial Filters were used to direct light. On another New Layer new hair was painted in to fill out the color on the birds lower body. A Selective Color Adjustment Layer was used to add a bluish tint into the image. On a clean up layer, some of the too sharp leaves were painted to soften their effect. Then on two stamped layers, Topaz (see sidebar for website link) ReStyle was applied using on one layer the Rum Purple preset (set to Multiply blend mode at 45% layer opacity) and the Wedgewood Blue and Tan preset (set to 55% layer opacity) on the other. A layer mask was added to the Wedgewood layer and parts of the bird were painted back even more. An Exposure Adjustment Layer was used to sharpen the eye. On a New Layer set to Overlay blend mode and 71% layer opacity, a Spotlight effect was created to emphasize the face a little more. Nik Viveza 2 was used to further enhance the focal point. A subtle vignette using How to Create a Subtle Vignette blog was added. Last step involved adding a Lens Blur Noise effect on a stamped layer (see my 10 Now so Well Known Photoshop Tips blog – first tip). That was it. Got to love these beautiful herons!…..Digital Lady Syd
Fog Rolling In
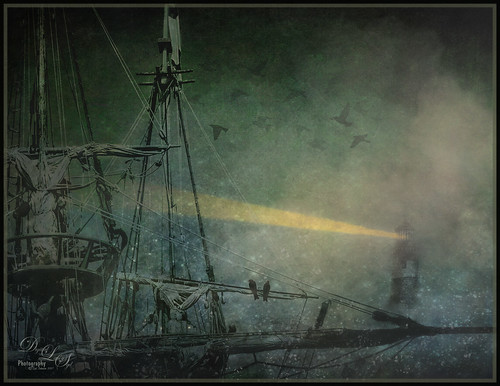
This image was created using several elements and textures – just a lot of fun to do! I have been sailing when the fog comes rolling in and I wanted that eerie feeling when it happens. The original boat element is one I took in London several years ago – it is an actual replica of the Golden Hinde – Sir Francis Drake’s galleon he sailed in 1578. In Lightroom the ship image had been converted to black and white before opening in PS. Next a New Document was created in PS and this image was loaded into it. The ship image was cropped and moved to the left side. Next Distressed Textures’s The Artist’s Palette Moody Earthtone texture was placed underneath at 25% opacity, and a Hue/Saturation Adjustment Layer was set above to make the texture less saturated and more of a blue-green tone. A Levels Adjustment Layer was clipped to the ship image (ALT+click between the layers). The lighthouse was added using some old clip-art from the Old Fashioned Nautical Illustrations book (#371). On a New Layer Obsidian Dawn’s Light Beam set Lighthouse Beam 1 was applied at 51% opacity. On another New Layer Lavender Designs Birds Nest Brush was applied – the two birds sitting on the sails. Jai Johnson’s Flybirds png2 was placed on another New Layer at 27% opacity – a layer mask was added and some of the birds were painted out. Then in the Properties Panel, the Density was set to 61% and Feather to 2.3 so the look like they are disappearing in the fog. Four Adjustment Layers were added: Hue/Sat for the yellow in the beam, Color Lookup Pastel 8 Hues set to 25% opacity, Levels to add contrast back, and another Color Lookup at 69% opacity using Blake Rudis’s preset Vintage Baby Blue. On another New Layer set to 26% opacity I used my old Cloud Text & Smoke Brush to add in more fog and haze. Using the Adobe Paper Texture Pro already supplied textures, 3 were stacked: Brush Rose set to Overlay at 67% opacity, Caspian set to Overlay 89%, and Touchtone set to Difference at 25% opacity. A Curves Adjustment Layer set to Luminosity blend mode and 61% opacity and was added to put contrast back into the image. Felt something was missing so I added 2 Lil’ Owls (see sidebar for website link) texture Cosmos 14 set to Multiply blend mode and 67% layer opacity – her star textures are some of my favorites! On a New Layer some of the spots from the texture below were painted out using my SJ Pastel 3 brush (see my How to Create My Favorite Brush blog). Topaz (see sidebar for website link) Lens Effects Fog filter was applied and set to the bottom right corner – in PS it was set to 66% layer opacity. Add a Red Channel Luminosity Curve. Then Nik Viveza 2 was opened and the final focal point was adjusted. I decided that I just did not like the way the fog looked, so with two brushes, Cloud Billoway and Cloud Heft from Gruts FX Cloud Set were both increased to a very large size and dabbed down to get the fog effect – then the layers were set to a very low layer opacity to give the dreamy fog effect. Clipping Hue/Saturation Adjustment Layers to each allowed for some color variation. In the last step I added one of my frame layer styles setting colors from the image. This turned out to be quite a project!…..Digital Lady Syd
Summertime!
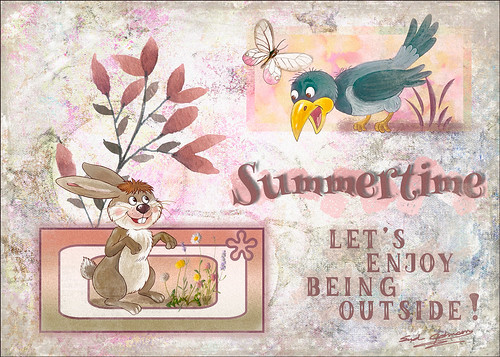
Just enjoying doing something a little different in Photoshop. I have not created a design effect in a long time. Can’t begin to thank all the people who have provided the large group of free resources that went into this image, but I will make an attempt. The first texture is one I created that is basically a bluish/gray painted effect. Then French Kiss’s (see sidebar for website link) Jubilant texture was placed on top for the colorful background effect and set to Linear Light at 76% layer opacity – a layer mask was used to remove part of the color in places that interfered with the text. Julia Mead’s Artistic Photo Overlays 8 was place on top and set to Hard Light – the Blur Tool was used to soften some of the black spots in texture. Next Lisa Glanz’s Magical Watercolor Graphics Vol 1 Sample Pink Bunch – this was duplicated twice to show up better and the top set to Multiply at 37% layer opacity. Two pink Vector blocks were created in Photoshop for both the characters to stand in. Layers styles were added to give the different edge effects. The bottom block also used a custom vector object from PS. Both the crow and hare are from the Cute Woodland Animals Bundle by Hasop. Both animals were paint to give a less graphic effect by painting over them using my SJ Pastel 3-painting Texture adder brush that I have talked about lots in my blogs. The Butterfly was from a Creative Live release called Aloha. The flowers in the hare box are called Clover 10 by Peolia. The Summertime font is Henny Penny and the other font is called LK Better Days.
Next step was to create a stamped layer (CTRL+ALT+SHIFT+E) to add noise (Tip 1 in my 10 Not So Well Known Photoshop Tips blog). Topaz (see sidebar for website link) ReStyle was opened and a preset from one of my other images was applied. What was done different is that the image was adjusted just for the animals and the Mask in ReStyle was used so that only the animals and reddish plant were affected. A frame from 2 Lil Owls Studio (see sidebar for website link) was created using a bonus texture and removing the white area – then saving as a PNG file. At the end a Blue Channel Luminosity Curves Adjustment Layer was applied. It is fun to try out different elements in a document just to see what you can get……Digital Lady Syd
A Pink Orchard
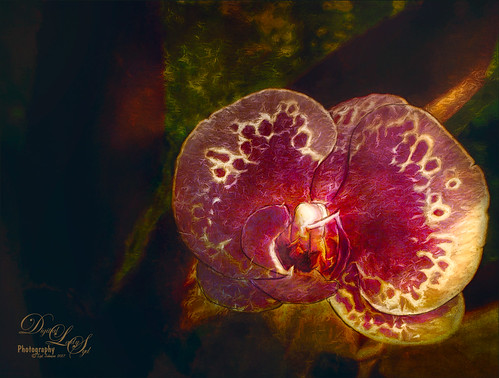
This orchard image was taken at the Harry P. Leu Gardens in Orlando, Florida – a wonderful place to take flower images if you are in the area. This image was started several weeks ago so I am not completely sure what I wanted as an end result. This flower began as a purple orchard, but Topaz (see sidebar for website link) Texture Effects 2 was opened and the Citronella Lily was applied with several adjustments. On a stamped layer (CTRL+ALT+SHIFT+E) Topaz Impression’s Fine Brush Scumble was applied. On another stamped layer, Topaz Detail 3 was applied, another composite layer and Lucis Pro was applied, and finally on yet another stamped layer, Topaz ReStyle’s Rustic Red and Orange preset. Sort of amazing all the Topaz effects in this little flower! I used my favorite line brush, Grut’s Ink Pin Clinger – to actually draw around just a little around the petals. Two textures were added: Kim Klassen’s August Trio Traverse blend mode set to Vivid Light at 18% and her Fav Collection Cinnamon set to Multiply blend mode at 65% layer opacity. A couple Curves Adjustment Layers and a Color Lookup Adjustment Layer set to Foggy Night at 55% layer opacity. Another stamped layer was created and Nik Viveza 2 was used to adjust the lighting in the image. A Red Channel Luminosity Curve was applied as a final step. Lots going on here……Digital Lady Syd
Native American Bottles, Pots and Dishes
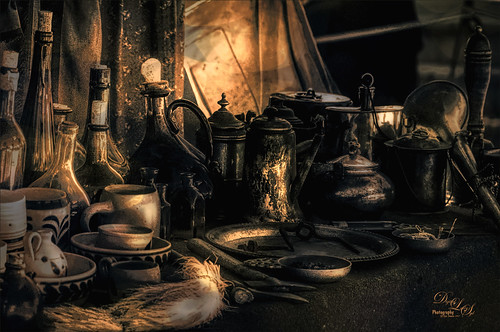
This image taken at the Ormond Beach Native American Festival was actually turned into a black and white in Lightroom. Painting in the highlights with an adjustment brush really made the light pop in the final iteration. In Photoshop, to remove a bit of noise, especially in the shadows, Topaz DeNoise 6 was used to remove it (used the Overall and Shadow sliders). Then Lucis Pro was opened to sharpen the details a little. It was set to Difference blend mode at 24% layer opacity and the Blend If sliders were used to further pull in the details. A Curves Adjustment Layer was used to add contrast. For color a Hue/Saturation Adjustment Layer was set to Colorize and a teal color effect was selected. Next another Hue/Saturation Layer was opened and a yellow-orange was applied to just the Highlights of the image. At this point the image looked really flat, but kind of old and vintage looking. I rather liked it. On a stamped layer (CTRL+ALT+SHIFT+E), Topaz ReStyle was opened and the Rustic Red and Orange preset was applied with a few adjustments and set to 74% layer opacity. On another stamped layer Topaz Texture Effects 2 was opened and A Little Dingy preset was applied. The Texture section was changed to a gold and black bokeh which enhanced the lighting effect. That was all that was done……Digital Lady Syd
The Mighty Bat Flower
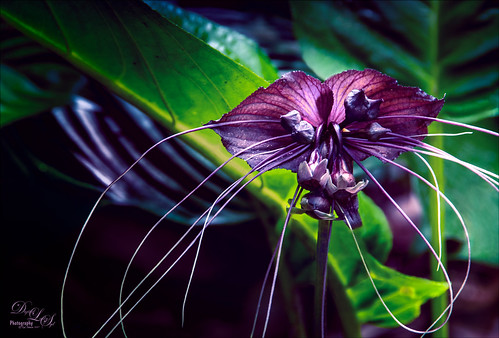
This unusual Bat Flower taken at the Harry P. Leu Gardens in Orlando, Florida, is an image I have wanted to post-process for a long time. I keep expecting a little Batman to come flying out of its center! It was a little tricky since it has such unusual antennae-like strands coming out of it, and there was a lot of light issues on the original image. The actual flower has a more brownish tone. I originally post-processed it set to the actual color, but it looked pretty boring. Therefore, I took a little artistic license and changed it to some of the purple shades already in the original image to give it a little pop.
There was mainly just a lot of clean up on this flower. A Selective Color Adjustment Layer and a Color Balance Adjustment Layer were used to adjust that color discussed above. Nik Viveza 2 was used to get the highlights on the flower just right and to darken the edges. A Green Channel Luminosity Curves Adjustment Layer was set to Luminosity blend mode at 73% layer opacity to mainly adjust the contrast on the actual flower. A Matt Kloskowsky Vignette (see my How to Create a Subtle Vignette blog) was applied as a last step. Not that much – just a lot of clean up! I think this is one of the most interesting flowers I have ever seen!…..Digital Lady Syd
Just Hanging Out with His Buddies
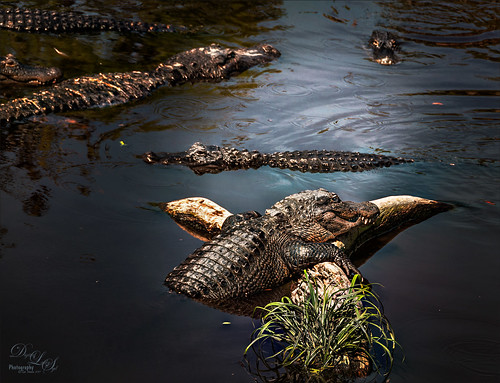
Just thought I would add this image of a bunch of alligators enjoying hanging out at The Rookery at St. Augustine Alligator Farm waiting for that egg that happens to fall out of a nest. Sad but true–sigh! Just my basic workflow here – some Lucis Pro, Camera Raw filter and Nik Viveza 2 to adjust the focus. Some Dodging and Burning, and Luminosity Curve and Black & White Adjustment Layers. Just a lot of fun here!…..Digital Lady Syd
Here comes the Sun!
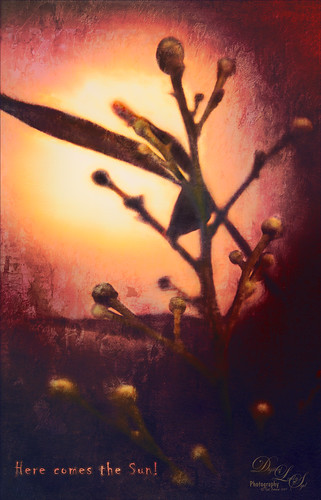
This is an image of some berries taken in my yard recently using my Lensbaby Composer, which give the soft effect. Mainly just a lot of work in Photoshop. This image actually uses three of one of my favorite texture people, French Kiss Textures (see sidebar for website links), to get this pretty effect: Atlelier Musing, Centre Ville, and Bohemian. Her textures are always beautiful and painterly. Lots of my standard adjustment layers were needed to get this effect along with a final adjustment in Nik Viveza 2. Also many layers of clean up and painting. Lots of fun but it took forever! Still, it is reminiscent of the Beatles song…..Digital Lady Syd
An Engraved Leaf
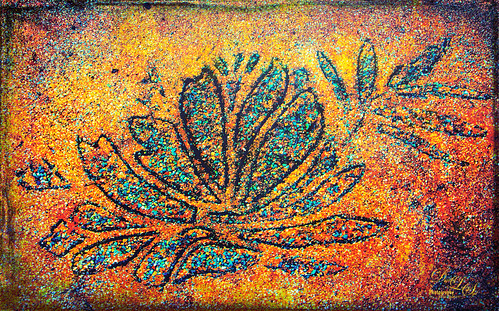
This image was taken at the Ormond Memorial Art Museum and Gardens of a pattern drawn into the sidewalk. The texture in the image was so nice, I decided to add a little pizzaz to it. First Topaz (see sidebar for website link) ReStyle preset Loulou and Mandy was applied. This gave it the bright orange and turquoise colors. Three adjustment layers were stacked: Color Lookup using Fuji F125 Kodak 2395, Levels, and Photo Filter using Cyan at 52% density. On a stamped layer (CTRL+ALT+SHIFT+E) Topaz Texture Effects2 was applied using a Dingy Cream preset. On another stamped layer, Nik Viveza 2 was applied to adjust corners. A Vibrance and Saturation Adjustment Layer was used. Then I decided to create a brush from the texture of a section selected using the Marquee Tool, turned to black and white, then painted out some more areas, and went to Edit -> Define Brush Preset. Now used the brush to paint in some added texture over the feather and flower and in blank parts of the image to add more texture. I really like the brush I created and hope to use it some more!…..Digital Lady Syd
Topaz Labs AI Gigapixel
Check out AI Gigapixel stand-alone software for upsizing your images. It’s incredible! And it can now be used as a plugin when in Photoshop. Also Topaz Labs Photo AI has some great sharpening and denoise tools along with Photo Video AI.

Luminar Neo
Click here to visit Luminar for more info and check out their new AI Filters.

GRUT BRUSHES – Photoshop Brushes for Digital Artists
Click here to visit GrutBrushes.com
And be sure to check out his Free Brush of the Week and Brush Sampler! These are the best brushes you can find!

Topaz Studio 2 and Legacy Topaz Labs Filters
Unfortunately Topaz Studio 2 and other Topaz Lab filters are no longer available for sale as of 2020. If you had bought these filters and would like to put them back on, here is a link to the Legacy Apps where they can be downloaded again. Below is an example of the wonderful Remix AI Filter from Studio 2. The wonderful Impression still works fine in Photoshop right now along with Adjust (all versions), ReStyle, and even PhotoFXLab!

On1 Photo Raw
Wonderful software to use as a substitute for or plugin with Photoshop. Many great filter effects and lots of AI capabilities!
