
Courting Herons
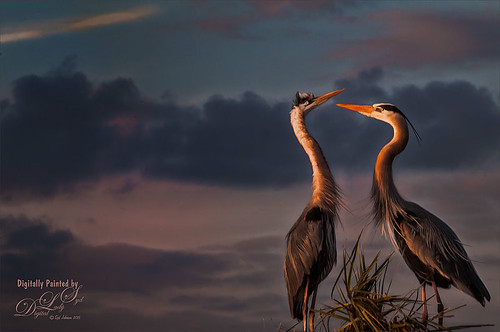
These two beautiful Great Blue Herons were in the middle of a mating ritual in their new nest on top of a palm tree during a recent visit to the Ritch Grissom Memorial Wetlands in Brevard, Florida (also known as the Viera Wetlands). Image was painted with the Mixer Brush – mainly just blending. Since the bird on the left was missing an eye, I had to copy the one from the right over, flip and adjust into the eye socket. Topaz Glow’s Room Glow preset by Blake Rudis (check out Integrating Topaz Glow into Your Workflow for info on this) was applied and set to Multiply blend mode at 48% layer opacity. Nik Viveza 2 was used on the background to even it out just a little. Since the lighting was perfect, there was little else that needed to be done. What beautiful birds!…..Digital Lady Syd
Digital Lady Syd Related Blogs:
How to Get the Soft Glow in Topaz Glow
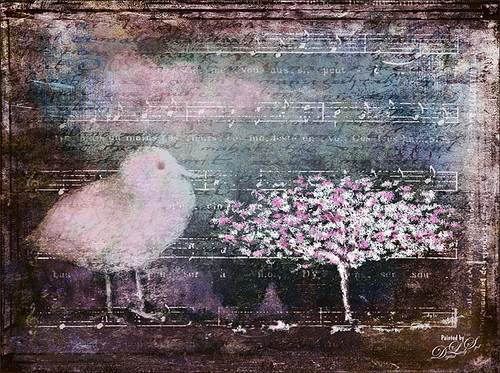
Springtime Wishes from Betsy
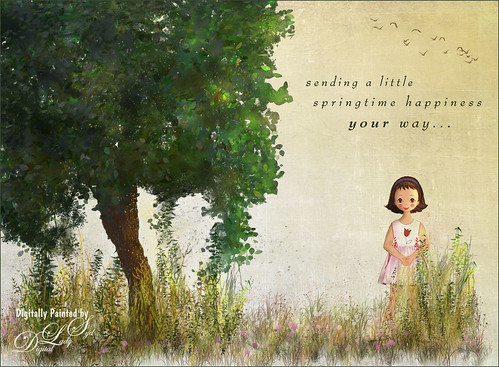
Was organizing the wonderful Photoshop Foliage Brushes from Aaron Blaise I recently purchased. I came up with this tree while checking out the different brushes and looked who popped up in the image! Why that is Betsy McCall of paper doll fame from 1958. She just looked like she belonged in this image. Basically just followed Aaron’s workflow and used his brushes to created the tree, reeds and flowers. Also added Frostbo Set 2 Grass (brush 010) for the front smaller grass. Used Kim Klassen’s December Collection Unexpected texture set to Multiply blend mode and 51% layer opacity. Used Bird Brushes II bylpdragonfly-brush bb114s2220.jpg and the was expression was included in a Design Cuts package (ldavi-sendingalittlehappinessyourway-wordarttitle1). Downloaded Betsy from the Betsy McCall website called Download and Print Vintage Betsy McCall Paper Dolls. Selected one of her dresses to pretty up the image. I am enjoying using these brushes so much!…..Digital Lady Syd
Sailing!
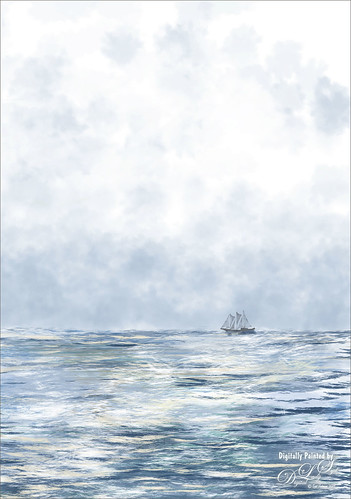
Totally love these new inexpensive Photoshop brushes I purchased from Aaron Blaise’s (a former Disney artist) website. This image used both his Water Brush Set and his Cloud Brush Set. (Check out his videos as he gives lots of just great digital painting tips throughout his demos.) This image was composed of one Cloud layer using his SB 46-12 brush (a major cool cloud brush) and three Water layers using three brushes: his SB 44-13, a really nice larger waves brush, SB 45-13, smaller sized waves for more distant effects, and SB 50-40, a very flat thin wave effect that could be used for horizons or fill in color waves. The sailboat is from Vector Art Box – set to a 40% layer opacity to give a slightly dimmed look. The layer was set to Multiply at 100% layer opacity, then duplicated and set to 21% layer opacity just to make the boat show just right. Last step was a Curves Adjustment Layer to add a little contrast to the image. Done! This was so easy to create and it is so much fun to use these brushes……Digital Lady Syd
Digital Lady Syd Related Blogs:
Just Some Photoshop Fun This Week!
How to Create a Watercolor/Ink Image in Photoshop
A Little Cherry Tree

Have not painted in a while so decided to give it a go. I wanted to paint a Cherry Tree since I lived in the Washington, DC area for many years and miss seeing them this time of year. The original image was created in Corel Painter 2015 on just the Canvas and using 9 different brushes on a Plaster Paper. This image was brought into Photoshop where a Clean Up layer was created. Three other layers using some of Aaron Blaise Foliage Brushes were added to soften some of the sharp edges mainly around the water and on the plants. A Motion Blur set to 4 was used to soften the graphic look os his brushes. Nik Viveza 2 was used to reinforce the focal area in the tree and a Level Adjustment Layer was added to make sure the contrast was correct. That was it! It was a lot of fun to get back to painting, but I still like to go between the programs……Digital Lady Syd
Painted Apples
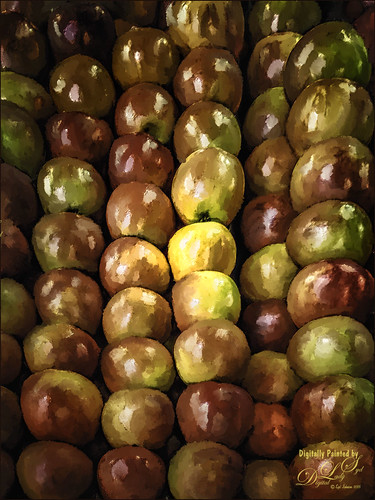
Not sure what inspired me to paint these apples from image taken at the local grocery store, but I did. The image was first opened in Lightroom where the basic image was adjusted, then in Photoshop. After some clean up, a stamped layer was created on top (CTRL+ALT+SHIFT+E) where Topaz (see sidebar for website link) Clarity was applied using the Landscape III preset. Next on a duplicate layer, Nik Color Efex Pro 4 was used (used Cross Processing Method L05 at Strength 27%; Darken/Lighten Center set to Shape 1, Center Luminosity 73%, Border Luminosity -46%, and Center Size 24%; Low Key Glow 0%, Standard Low Key 6%, Dynamics Low Key 0%, Sat 56%, Whites 3%, and Contrast 72%; and Detail Extractor 22%, Contrast 14%, Sat 25%, Shadow under ow, and Highlights under hl). On a New Layer above, used a Blender Mixer brush using property bar settings of Wet 100%, Load 1%, Mix 100%, and Flow 100% and set to Sample All Layers – turn off Load Brush After Each Stroke so it will just be a blender and mix the colors underneath. I am not sure which brush I used, but any brush you like should be a nice blender with the above settings. On a new Stamped Layer, Nik Viveza 2 was used to add focus to the center area. Last step was a Curves Adjustment Layer. I also painted this in Corel Painter and got a much more abstract look. Will probably show that version in a later post. Anyway, love the Photoshop Mixer Brush effect on these apples!…..Digital Lady Syd
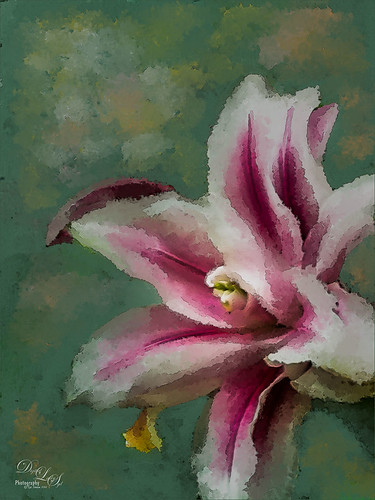
Just a Little Hibiscus

Image of my pink Painted Lady Hibiscus on my porch – they are such beautiful blooms! Thought I better practice painting a little in Photoshop as I had not done anything recently so here it is. In Lightroom and Dave Delnea’s Backlight 002 vertical preset was applied, and the middles of the flower was sharpened. The image was brought into Photoshop and Topaz (see sidebar for website link) Clarity using John Barclay’s Basic settings (Micro Contrast 0.36, Low Contrast 0.20, Medium Contrast -0.11, and High Contrast -0.23 – then my settings of Red Sat 0.22; and Lum Red -0.17 and Green 0.72). Next Topaz Black & White Effects plug-in was applied using a plug-in I call SJ Church (Conversion Basic Exposure Contrast 0.06 and Brightness 0.05; Quad Tone Color 1 Region Color (R7/G0/B7) and slider 9.95, Color 2 Region Color (R59/G51/B53) and slider 69.66), Color 3 Region Color (R158/G143/B146) and slider 150.6, and Color 4 Region Color (R255/G253/B216) and slider 255.0: and Transparency 0.58 – in the Mask, painted detail on stem and pistal using Brush Opacity 0.25/Hardness 0/Edge Aware 0.50 brush. Using same brush set to a small size 73, selected Burn and painted in the pistil shadow and some detail in the flower top. Used Color adjustment and painted in a little on flower tips. Dodges the left side of pistil and stem.) On a layer above, Jai Johnson’s beautiful free Spring Blush Canvas texture was added and a layer mask was added. Used my SJ Pastel 11 brush (I used Pastel 11 in SDW Pastel Brushes-this comes in as a huge 2130 px brush! I made it a 70 px brush – added Shape Dynamics and Texture to make a nice painting brush) set to 29% or less brush opacity, the flower was gently painted back in the layer mask. Text was added and a Levels Adjustment Layer was used to add back some contrast. That was it!…..Digital Lady Syd
New Impression of Octopus and Seahorse
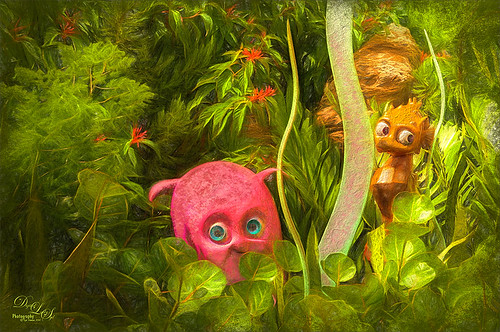
These cute octopus and seahorse were located at the The Seas with Nemo and Friends Pavilion in Epcot, Disney World Orlando. Been having fun trying out Topaz (see sidebar for website link) Impression so thought I would try the plug-in out on a different type of image. This turned out to be a lot of fun to do! In Lightroom Seim’s (see sidebar for website link) Power Workflow 4 Harsh Sun Fixer and Tint Golden Sepia presets were applied, then one by CV Delnea called Backlit Horizontal Right. In Photoshop a New Layer was added and some clean up was done. On a stamped layer (CTRL+ALT+SHIFT+E) Topaz Detail 3 was opened to apply just a little sharpening to the medium and large size details. A New Stamped Layer was created on top and duplicated (CTRL+J). The bottom new stamped layer was highlighted and Topaz Impression was opened. The Cave Dweller II preset was applied with no changes. On the top stamped layer, my SJ Colored Pencil preset was applied. (What’s in my SJ Colored Pencil preset? It was based on the Colored Pencil II preset and these are my settings: Stroke: Type 07, Brush Size 0.90, Paint Volume 0.77, Paint Opacity 0.20, Stroke Width -0.82, Stroke Length -0.25, Spill 0.26, Smudge 0.16, and Coverage 1.00; Color: Overall Saturation 0.37, Red Hue 0.70, Red Saturation 0.32, and Red Lightness 0.00 – this turns the reds cyan and gives the preset an ugly color so don’t change these sliders if it is not a look you need; Lighting Brightness 0.21, Contrast -0.40, and Light Direction x1.00 y1.00; and Texture: Strength 0.33 Size 0.00, Texture Paper I, and Background color white. For this image these changes were made my preset: only Color Section changes to Red sliders all set back to 0; Orange Saturation to 0.27; and Aqua Hue -0.37.) A layer mask was added to this layer and areas I wanted showing from the layer below were painted in with a soft round black brush set to 30% brush opacity (mainly the eyes and the seahorse needed some additional definition and extra texture to the leg in the air). Three New Layers were added above. With my regular chalk brush (Photoshop’s Chalk 60 with Shape Dynamics Angle Jitter at 19%), the octopus body was clean up with a pink color. Then on the next layer the same brush as a Mixer to add some color to the octopus head. (These settings were used in the Mixer to get the effect shown on the octopus head – in the Brush Panel the Scatter section was turned on and Scatter set to 133%, check both axis, and Count 1; Texture turned on and a Canvas texture set to 160% and inverted with Mode set to Color Burn, Depth 100 and Jitter Depth 59%; and Wet Edges turned on.) and on top layer painted in some color to the octopus leg in the air and reduced the layer opacity to 61%. A Sponged Edge border from French Kiss (see sidebar for website link) with a green Solid Color Adjustment Layer clipped to it (ALT+click between the layers) and a Curves Adjustment Layer were added. That was it and I really liked the results. I especially liked the way the background greenery came out. Give this plug-in a try if you have a minute……Digital Lady Syd
Digital Lady Syd Related Blogs:
Digital Lady Syd Speaks Out on Topaz Impression
Young Warrior

I loved how this image turned out. The original was taken at the Native American Festival in Ormond Beach, Florida. Not going to go into all the details as it was a huge process – 27 layers and lots of hours but I will say it was all done in Photoshop, mainly with a Flat Fan Oil Brush I created. Must give a shout out to Melissa Gallo, a Corel Master, for her wonderful textures and her techniques in teaching how to do this type of image, including creating your own brushes! Check out her website and get the Painting in Photoshop Workshop if you want to learn some fabulous techniques and tips. (She also has a new one being released shortly called Painter for Photographers that I am so looking forward to taking!) This texture is her April Pastel texture. Also used Topaz (see sidebar for website link) ReStyle to get the color in the image exactly right. This plug-in is in my top three! Totally fabulous what it can do to an image!…..Digital Lady Syd
Digital Lady Syd Related Blogs:
Digital Lady Syd Reviews Topaz ReStyle
The Mighty Tulip

Just another photo of a very colorful red and yellow tulip and some pink daisies from my local grocery store. Just practicing my painting. This time using my basic workflow. Add Seim’s (see sidebar for website link) Power Workflow 4 Magic Flat Light Fixer. Next Topaz (see sidebar for website link) Detail 3 to sharpen up the image a little, and Topaz Simplify to use as a base coat to paint above. On a New Layer above, used Photoshop’s Flat Fan Single Bristle Wet Brush as a regular brush to paint over the yellow tulip and some of the greenery. French Kiss (see sidebar for website link) Atelier GA Brush created in my blog was painted on the next layer. (See my How to Paint with a Texture Brush from Your Image blog for how to make this brush.) Melissa Gallo of Painted Textures Desert Sky Canvas texture was applied twice to create two texture layers, first set to Hard Light at 56% layer opacity, and then set to Color Burn at 24%. Created a Stamped layer (CTRL+ALT+SHIFT+E) on top and then copied the Topaz Detail 3 layer and placed underneath since I had some bad places on the petals. In the stamped layer, added a white layer mask and lightly painted back part of the tulip that were not sharp enough. Then on a New Layer above, used my Chalk 60 brush as a mixer to smooth over the tulip. I decided this image needed some pizazz – it was just too yellow and bright green. On yet another New Layer took my Chalk 60 brush with the texture turned on and painted some bright colored blotches all over it in oranges and yellows and greens and pinks – kind of went crazy. Set this layer to Pin Light. Added a Curves Adjustment Layer and a Levels Adjustment Layer to add contrast. On a stamped layer, Nik Viveza 2 was opened up and Control Points were added to the yellow tulip and the purple daisy in front. Topaz ReStyle was opened on another stamped layer above. (Here are the settings: SJ Very Muted Sepia preset. Changes to preset were: Restyle Opacity 88%; Lum Primary -0.58, Third -0.36, Fourth -0.45, and Fifth 0.30; Texture 1.00; Basic Opacity 23% set to Hard Light blend mode; Color Temperature -0.11; Tone White Level 0.25; and Detail Structure 0.06 and Sharpness 0.83.) The last step involved adding the beautiful Canvas Vignette border by the wonderful Corel Master John Derry – can be downloaded from this link. This is the final image. Okay – it is a bit of workflow, but sometimes it just takes a lot of manipulation to get the look you like!….Digital Lady Syd
Just Painting!
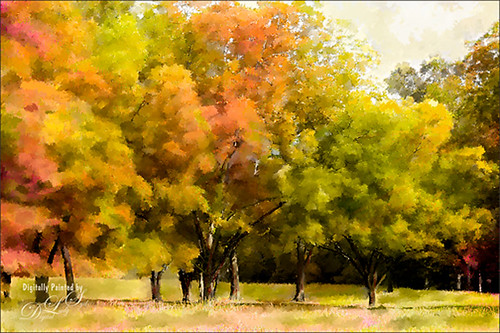
Decided to practice some painting on these beautiful trees in Jackson, Mississippi. Basically just painted using the directions from my Fun Photoshop blog called How to Easily Create a Photoshop Brush for Painting but using a pastel brush instead of a watercolor brush. The principles are the same. Used Melissa Gallo of Painted Textures Yellow Dawn Texture setting it to Hue blend mode at 91% layer opacity – this gave it the fall looking colors – and then the second time it was set to Vivid Light at 26% layer opacity and in a black mask only the highlights were painted back. The top stamped layer was set to Multiply blend mode at 84% layer opacity to better bring out the colors and a Levels Adjustment Layer was used to add more contrast. That was it. It took a long time to paint, but the results are usually worth the time……Digital Lady Syd.
Red Carnations on a Bright Sunny Texture
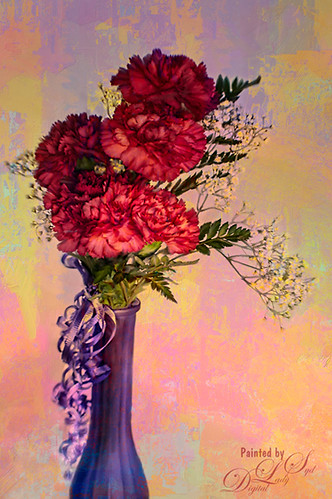
Just doing a little painting on some beautiful red carnations my daughter-in-law got for her birthday. Used Topaz (see sidebar for website link) Detail 3 to do an overall sharpening up of the image. Used Photoshop’s default brush Pastel Medium Tip as both a mixer and regular brush on this image and loved the brush strokes. Stacked two of Melissa Gallo of Painted Textures textures – August Copper set to Hard Light at 76% layer opacity and Spring Sky at Hard Light 78%. Last step was using Nik Viveza 2 to highlight the flowers in the center where I wanted the focus to be. It is a little bright, but I kind of like it – that is what is fun about stacking textures, you get some unexpected results! …..Digital Lady Syd
A Little More Painting with a Texture Brush from Your Image

Wanted to show you how I completed the image that I began in my You Tube Texture Video for my Fun Photoshop Blog How to Paint with a Texture Brush from Your Image. By creating a different brush and changing up my technique just a little, a totally different feel was given to the same image. So what did I do to get this totally different result from the same image?
The brush I created in the video I did save down as a “New with my settings” brush – I forgot to remind everyone of this rather vital step. You need to resave and rename your brush to keep the additional slider changes made from the initial brush created. A New Layer was added above and this time it was converted to a Mixer Brush – in the Options Bar turn off the “Load the brush after each stroke” icon and in the drop down, choose Very Wet, Heavy Mix. Now just make sure Sample All Layers is checked and you are ready to paint using this same brush as a Mixer “Blender” brush (see my Photoshop Blog How to Easily Create a Photoshop Brush for Painting for more info on this.) On a couple of layers, I just smoothed out edges and dabbed and then would go back to the regular brush with the same settings. Just went back and forth smoothing and adding a little texture and color. By doing that on this brush, the texture effect is not so over-the-top as it looked in the video and the rough edges were softened with the Mixer Brush. A Curves Adjustment Layer was added to increase the brightness since the painting darkened it down some. If you look closely, the pattern is over the objects just like the background – by adding the Pattern Fill Adjustment Layer on top and choosing this same texture set to 60% Scale, it blended beautifully with the texture – the layer opacity was set to just 26% for the blend. Then a Levels Adjustment Layer was added and the in the Output Levels, set the first number to 24 to take out the total black pixels which often darkens an image too much in paintings. I thought I was done but I tried a layer style called BMU_SSStyles_UltArtist_Watercolor-Dark from Scrap Girls packet which added a Pattern Overlay that resulted in the rather foggy spooky feel on the whole image – it felt so Harry Potterish! (See my Fun Photoshop Blog How to Get Painting Effects from Actions-Part 2 for info on this.) I was thinking I could have just used a fog brush at a low opacity and painted on a New Layer to get the same effect. I really liked how this version turned out – love the triangular shapes and still like my owl! Anyway wanted to show you how using this different texture, crop, and brush gives a totally different result! Hope you give this a try!…..Digital Lady Syd
Painting Away in Photoshop!
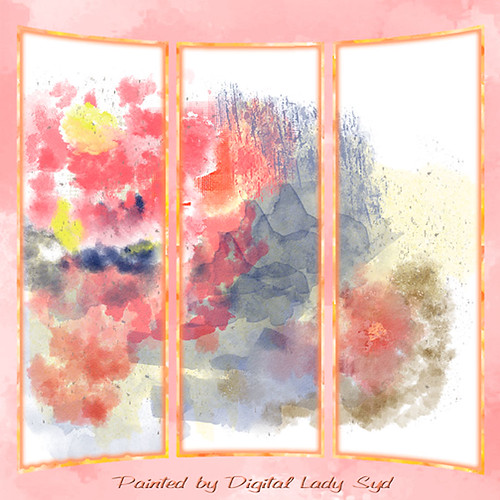
Can you believe this started out as a scratch pad for the new brushes I made for my How to Easily Create a Photoshop Brush for Painting blog, and came up with this? That’s how much fun it can be playing around with brushes in Photoshop. Five New Layers were created with different colors and brush strokes on each – I was just dabbing away trying to get some nice results when creating my brushes. Noticed immediately when done that these were some of my favorite colors. Hum… Anyway, on one of the Facebook groups I follow, someone started talking about these triptych actions they bought and it started me thinking that this might look kind of cool with that effect. I have no idea where I got this particular triptych but it was created in 2007 and I downloaded it in 2011. Here is a link to Gavin Hoey’s (one of my favorite British Photoshop gurus) free Instant Tryptych Action and the set he has for sale. Anyway, the basic steps included adding a layer style to both the original image and the triptych using Pattern Overlays in both cases. Oh well, hope you enjoy the results – keep experimenting with those brushes – never know what you will get!…..Digital Lady Syd
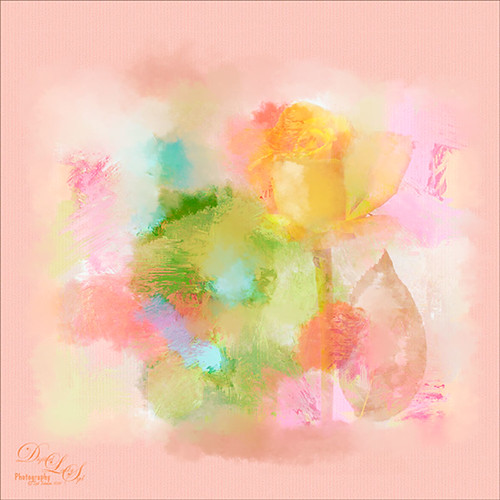
What Happened to My Yellow Rose?
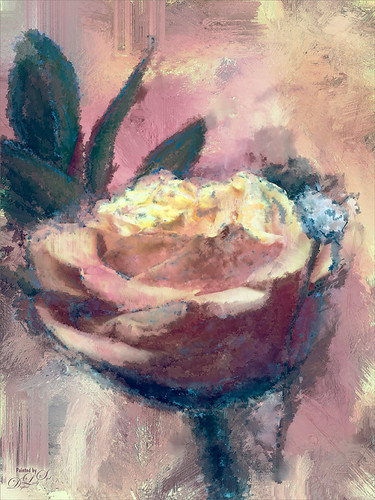
This is an alternate image of the yellow rose posted last week – see Mid-Year – Painting Project Progressing! I just wanted to let you see what using the wonderful Topaz (see sidebar for website link) ReStyle can do to an image – not sure which image I like best since I love the pink tones. Basically the yellow rose was opened into ReStyle and the Cream and Plum preset was selected. I use this preset a lot since it does have the color palette I love. The changed settings were: Hue Secondary -0.44 and Third -0.28; Sat Fifth -0.25; and Lum Primary 0.15, Third 0.03, Fourth 0.41, and Fifth -0.53; Basic Tone Black Level 0.03, Midtones -0.12, and White Level 0.41; and Detail Structure 0.45 and Sharpness 0.56. In Basic Mask painted in this effect in a black mask at the top of flower with Brush Strength 0.42, Brush Size 0.10 and Hardness 0.30. A New Layer was added above and the Mixer Brush was used to clean up the petals, but I did not like the way it looked, so I turned it off. The grungy look seems appropriate with this image and the blue specs look nice. The last step was adding a Curves Adjustment Layer to add more contrast. Not sure but I think I like it better than the yellow one. Decisions! Decisions!…..Digital Lady Syd
Mid-Year – Painting Project Progressing!
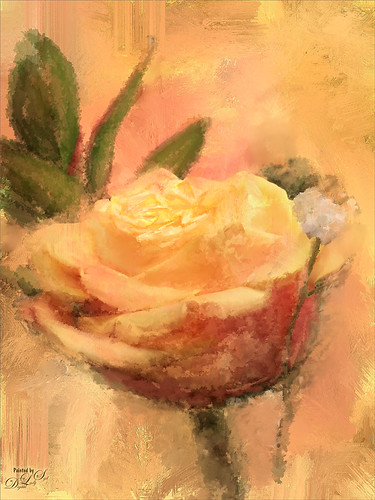
I am over halfway on my journey to achieving my New Years Resolution of learning to paint and here is an example of where I am at. This image was taken at the grocery store on my cell phone. Therefore I had a little sharpness issue, but with painting, you can do a little improvising. The texture was from Melissa Gallo at Painted Textures called Sunrise Canvas. This beautiful texture is one of several provided in her Painting with Photoshop workshop – this workshop is the first time it has really “sunk in” on how to do this. Melissa is an artist and Corel Master, but she teaches the Photoshop painting techniques very thoroughly. This image used her brushes. Anyway, I really am getting into this painting thing and it is totally fun! Oh yes, and how did I improvise that little bit of detail I wanted in the top of the flower? Well I used a technique covered in my blog called The Best Dodging and Burning Technique! and created a burn layer set to Overlay to sketch in a few lines with a small round brush at 12% brush opacity. Very subtle!…..Digital Lady Syd
A Little Brush Fun!
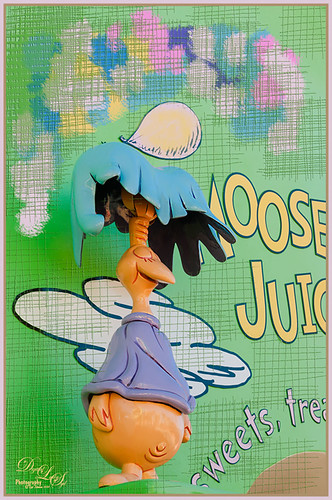
This funny character was part of a sign on a candy store in Dr. Seuss Land at Universal Studios-Orlando and looked like it would be fun to just play with it. Since he was on such an overwhelming green background, I added a new layer and just started using a Mixer Brush to add different blotches of paint to the image. Then on a New Layer above, a brush that I had created was used for the cross hatching effect- just liked the look of it once I added a Bevel and Emboss Layer style to it and set the layer opacity to 55%. To get the hatching off the lettering, a layer mask was added, but first the “Layer Mask Hides Effects” check box was checked in the Layer Style dialog. That way the hatching could be carefully removed from the figure and lettering. The Sharpen Tool was used on the character’s face. A stamped layer (CTRL+ALT+SHIFT+E) was created on top and my free SJ Mid Size Double Edge Frame was added – colors were sampled from the image. This a really cute image was jazzed up a bit by just adding some creative brush strokes!……Digital Lady Syd
Digital Lady Syd’s Rule No. 11: Keep Practicing!
Just wanted to practice a little more painting so I found this image taken with my phone at the local grocery store recently. I have found that if I do not keep practicing on images, I lose some of my creative ability. That’s because I have to keep looking up how to do so things I forgot how to do! So this image was just one I decided to practice using my Photoshop skills to add a lovely painterly look to these flowers. Used Topaz (see sidebar for website link) Detail 3 to sharpen the total image a little – I wanted the center of the flower, the focal point, to be as sharp as I could get it. I added a texture I created in Corel Painter using three brushes including a nice chalk brush to get some interesting texture. Added a New Layer on top and used in Blur’s Good Brush 5.1 Pro set (a wonderful huge free download of all kinds of Photoshop brushes including several really nice Mixer brushes!) Circles 混凝土 – 1 brush. On another New Layer added some color into the image using a Pastel Mixer Brush – be sure you are set to add color in your options bar to get this to work. Next the Sharpen Tool was used in another layer. The last step was adding a Color Balance Adjustment Layer and a Levels Adjustment Layer. I just love painting in Photoshop and I do not even mind practicing this!…..Digital Lady Syd
Vase of Spring Flowers
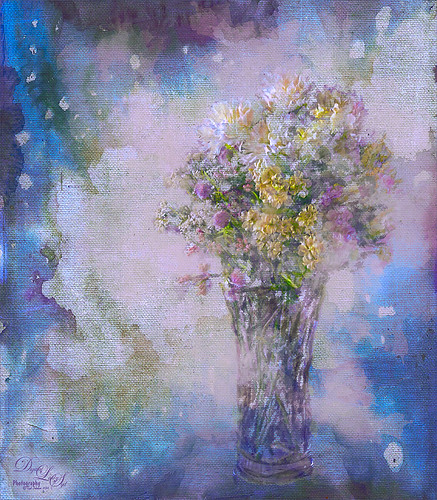
Just a vase of spring flowers that I decided to paint using Photoshop’s mixer brushes. I first increased the contrast of the flowers so they showed up sharp using Topaz (see sidebar for website link) Detail 3 – I do this a lot when I want a nice overall sharpness to an image. Also used a Curves Adjustment Layer to add some contrast to the image. 2 Lil’ Owls Stained Glass 25 (see sidebar for website link) was added on top and the flowers painted back in a layer mask. Next a new layer was added where some soft pink color was lightly brushed onto the layer to add a little more color around the flowers. The last major step was going into Topaz ReStyle and using the Light Pastel Daisies preset which changed the texture color from turquoise to more bluish tones. Love the result. …..Digital Lady Syd
Smudging Those Petals!
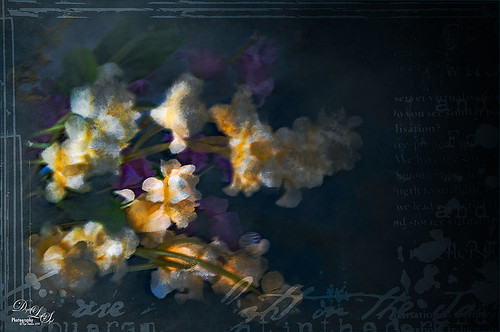
Last week I did a blog on using the smudge tool on my Fun Photoshop Blog (see How to Use the Smudge Tool). Thought I would post another example of the some of the nice results you can get when using it. In Lightroom Jared Platt‘s Pops Image preset was applied from one of his Presets, Presets, Presets! CreativeLive classes – this particular preset uses a Linear Tone Curve. In Photoshop some clean up was done, and Topaz (see sidebar for image website) Detail 3 was used to sharpen my focal point area. Next Topaz Simplify 4 was set to BuzSim preset with the Edge Strength set to 1.54. Once applied, a layer mask was used so just the center of the focal point has the plug-in applied. On a New Layer the Smudge Brush was used at 80% Strength to give the painterly effect to the petals. Just painted to give different opacities to each petal. Jai Johnson‘s Intenseblue-Canvas texture was applied and the flowers painted back softly in a layer mask using my chalk brush. On a stamped layer (CTRL+ALT+SHIFT+E) the Camera Raw filter was applied as a Smart Object and the Radial Filter was used to create the soft vignette. The last step involved using a mask created by Studio Viva Artistry on Studio Girls Scrapbookgraphics called Viva_Pennmanship_mask3 to add some additional interest. I really like the effect the Smudge Brush gives!…..Digital Lady Syd
A Splash of Color
Love the texture on this flower. Lightroom basic changes, Topaz (see sidebar for website link) Detail 3 for sharpening the focal point, Mixer Brush painting on flower – Fays Signature Pastel Blender 02 on image above, Curves Adjust Layer for contrast, Painted Texture‘s Dark Naples Yellow texture twice using Linear Light and Multiply blend modes. A composite layer (CTRL+SHIFTS+ALT+E) was created and turned into a Smart Object. In the Smart Object the blend if This Layer dark tab was adjusted so I could let a little color through. A turquoise blue Color Fill Layer was added underneath the Smart Object so the color shows through. High Pass Sharpening was the last step. I love the colors in this texture!….Digital Lady Syd
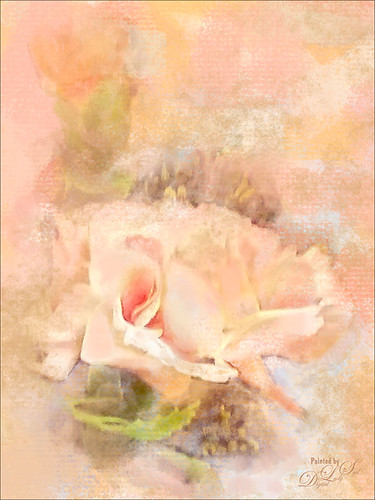
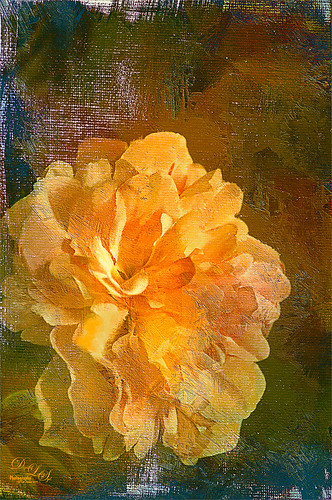
A Dreamy Rose!
Really enjoyed making this image. This yellow rose, a free image from stock.xchng by MEJones, was used to begin my painting. Painted Textures Parisian Pool texture was used. The edges of various splotches of color on individual layers were blended in using a Mixer Brush – not sure which one, but the Adobe Chalk Brush with a Shape Dynamics set to 19% would work fine. This brush can be used both as a regular brush and a Mixer Brush. The Camera Raw Filter was used to adjust the color using the HSL sliders. A Curves Adjustment Layer was used to add a little contrast. That was it but lots of fun to do!…..Digital Lady Syd
Some Crazy Painting!
Just having some fun with this image. A while back I did a blog on creative work called How to Create an Image from Nothing. This image was created in a very similar. This image totally combined painting in both Photoshop and Painter. I am finding I like some of the brushes in Painter better than those in Photoshop, but I am better at blending my images in Photoshop. Therefore I keep bringing in things created in Painter into Photoshop and put it all together. Not sure I will ever be able to reconcile the two programs, but at least I am getting my own technique. This image background was French Kiss Studio 3 White Wash – my favorite white texture. Two of 2 Lil’ Owls Studios (see sidebar for website link) Textures were used, the border is from ViVa Penmanship Mask 3, and the music from Kim Klassen Music and Script brushes from her Test Kitchen. Topaz (see sidebar for website link) ReStyle was used to create the beautiful final colors in the image. My free SJ Clouds 1 and 8 are also in this image. The chicken is a Painter brush by Karen Sperling called birdies. Rather crazy effect but lots of fun to do!…..Digital Lady Syd
Painting for Spring
Enjoying learning to use Photoshop to paint. Painted the flower using a Pastel Mixer Brush, then on another layer painted out the background and created a green background with same brush. Added some Mixer Brush splotches of color to add some light interest to the background. Added a Curves Adjustment Layer for contrast and that was it. I really love the spring-like colors!…..Digital Lady Syd


