
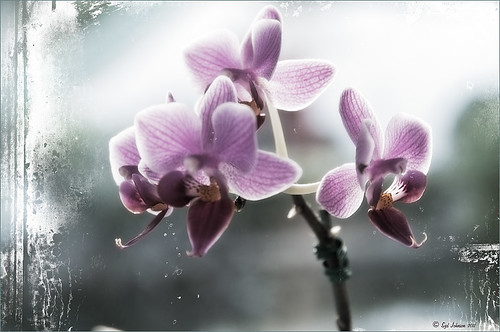
Let’s Focus on OnOne’s Focus Point 2 – Nice Little Plug-in!

These beautiful pink and white orchids were captured at the Hawaii Tropical Botanical Garden on the Big Island in Hawaii – they had a huge assortment of orchids in their Orchid Island exhibit, many varieties I had never seen before! If you look closely, you will see a tiny white spider web connecting the blossoms.
On this image I used OnOne’s Focal Point 2 – a really wonderful plug-in that is part of the OnOne Perfect Photo Suite 6.0 (see sidebar for website link). I had not used it before but after listening to OnOne’s short video called “Selectively Draw the Viewer’s Eyes Where You Want It To Go” (scroll down to 1/9/12), it proved to be very easy to apply and quite effective. It uses the Focus Bug technology like its other products, and the effect can be painted in or out with the Focus Brush. A soft blurred vignette can easily be added also. ShadowHouse Creations Pseudo Film Scratches Texture Heavily Scratched 2 was added with the layer set to Divide which gave the bright splotches of color throughout the image. The Sharpen Tool was used to selectively sharpen the forward edges of the flowers, and a composite layer (CTRL+SHIFT+ALT+E) was created on top to add a Layer Style. In this case, an oldie but goodie layer style from a book I bought years ago called “Adobe Photoshop 7 One-Click Wow!” by Jack Davis and Linnea Dayton was added using Wow Frame 09. The cool thing about this little book is that is shows what all the styles look like when applied. These styles are also included on the accompanying DVD to my favorite Photoshop Book “Photoshop CS3/CS4 WOW! Book” by Linnea Dayton and Christen Gillespie, where the original book is basically reproduced in the Appendices. Give Focal Point a try if you like this type of effect – very easy to use and gives very dramatic portrait or landscape effects also…..Digital Lady Syd
OnOne’s Perfect Effect Landscape Tips

This week I used one of OnOne’s quick video tips for their Perfect Photo Suite 6 (see sidebar for website link) called “Bring Out the Most Detail Out of Your Landscape” (need to go to the 12/21/11 video to find) where they give you some great settings for a starting point to adjusting your landscape images in Perfect Effect and Focal Point. These beautiful trees were growing on the Big Island in Hawaii. Only Perfect Effects was applied to this image and the Red color range in the Color Enhancer effect to bring out the pink in the flowers. I got a little over the top with the frame, but I liked the effect so I used it – it is PhotoFrame Taufer Texture 07 in darkish green at 61% opacity. If you have Perfect Photo Suite 6, or just Perfect Effects, check out this video and the numerous others that are listed. I have been learning lots by going through them – much better than reading the manuals. Thanks OnOne!…..Digital Lady Syd
Digital Lady Syd Related Blogs:
Another OnOne Perfect Effects Pix-Got To Love It!
Digital Lady Syd’s Review of OnOne Perfect Effects
Pseudo HDR in OnOne Perfect Effects
Abstract Feel Using the Motion Blur Filter

This image of bamboo shoots uses the Photoshop Motion Blur filter to get the interesting background. The basic idea came from a recent tutorial called “Creating an Abstract Landscape” by Curt Fleenor Photography. (A similar result was created in my blog called “Trying Out the Minimalist Look?” that uses a slightly different approach.) In this case, a gradient map, using an olive to mauve colored gradient, was added on top to give the interesting background colors instead of the really bright yellow and green from the original shot. The bamboo trees were selected with a layer mask just as the tutorial describes. A sun flare was painted on a layer using Obsidian Dawn’s light-beams burst 5 brush. The filter does give a nice abstract background. Anyway, it was just fun to do something a little creative…..Digital Lady Syd
Topaz Star Effects on a Wildflower?

I found these beautiful wildflowers on the side of an overlook just outside of Hilo on the Big Island in Hawaii. It was no larger than my thumbnail. For those of you who like to identify flowers, I believe this is called a Sensitive Briar, Littleleaf Sensitive-briar – Mimosa microphylla, a member of the pea family and the leaves will close up when touched. Here is a great description of these little flowers that I am not sure I was supposed to find in Hawaii.
To process this image, a Nik Color Recipe Detail + Vignette by Matt Kloskowski was used and a Classical Soft Focus filter was added at the bottom. Then it was processed in Viveza to sharpen the center and soften the green leaves in the background (move the Structure slider to the left to soften the edges). Next the image was taken into Topaz Star Effects where my SJ Small Stars preset was applied. (To create these tiny stars the following settings were used: Traditional Star Type; Main Adjustments – Threshold 0, Luminance 0.10, Size 0.20, Angle 75, Number of Points 12, and Spread 0.20; Color Adjustments – Saturation 0.80, Temperature 0.69 and others at 0; and Additional Effects – Glow 0.64 and others 0 – I like to start with effect a lot when using this plug-in.) The stars were hidden around everything but the flower tips. I was surprised how it really made the points of the flower pop. Finally OnOne PhotoFrame toner scratch 21 in a dark purple was added. Wow – once again I used many of my favorite plug-ins to get a really sharp pretty image!…..Digital Lady Syd
Topaz Star Effects on a Nature Scene
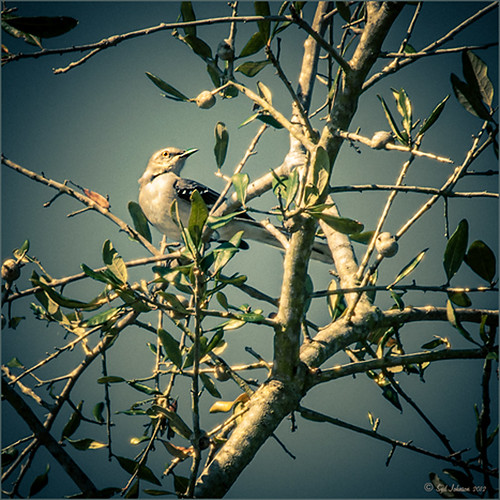 |
A warm glow feel was created in Topaz Star Effects (see sidebar for website link) to give a very nice soft brightening in your image. If you hover over the image, you can see the difference adding the plug-in at these settings. Very subtle but nice. In this case the sun was setting and there was a soft glow on the tree and bird already but the Star Effects emphasized it by the star placement in the plug-in. A preset was created (I named it SJ Softening Effect) using these settings for this effect: Star Settings – Traditional Star; Main Adjustments – Threshold 0, Luminosity 0, Size 0.12, Angle 75.00, Number of Points 12, and Spread 0.20; Color Adjustments – Saturation 0.80, Temperature 0.69, Rainbow Strength 0, and Rainbow Frequency 0; and Additional Effects – Secondary Points 0, Glow 0.64 and Ring Flare 0. If the effect seems too strong, adjust the Size down and be sure to brush out any stars that appear in the wrong places. A soft vignette was placed around the final image.
Give this new plug-in a try – it can give a nice soft feel to an image……Digital Lady Syd
Digital Lady Syd Related Blogs:
Trying Out Topaz Star Effects
Combining Plug-ins for More Image Interest
The Macro Shot

Recently I have been working on my Macro photography, especially since I have had some beautiful flowers on my porch due to the warm winter we are having in Florida this year. One of my favorite blogs is by Mike Moats called Tiny Landscapes where he gives some great advice on taking and processing macro images. A few things I am starting to try and the above chrysanthemums are the result of one of my efforts. A 60 mm Nikkor macro lens was used at F/19 at 1/20 to 1/350 sec. A Bower 0.5 x High Resolution Digital Lens with Macro was added to the lens. I created an HDR image from five shots which is how I got the large dynamic range in the photo. After that the processing was in Nik Color Efex Pro 4 using Tonal Contrast, Detail Extractor and High Key filter effects and Viveza 2. This is the basic workflow Mike Moats uses and it works very well on macro photos. My original shot was taken with a white background but I just did not like the way it looked. Mike says if you do not like the background feel, crop tight, which is what I did. I hope to try out some of his other tips in the near future – it is a lot of fun to take those close up shots…..Digital Lady Syd
Some of My Favorite Plug-Ins
 |
I am starting to sort through all the plug-ins that are out there and slowly figuring out what really works for my workflow. This is a really hard process since there are so many great plug-ins and some of them give very similar results. I have blogged on this many times showing how the same images look with the various plug-in effects.
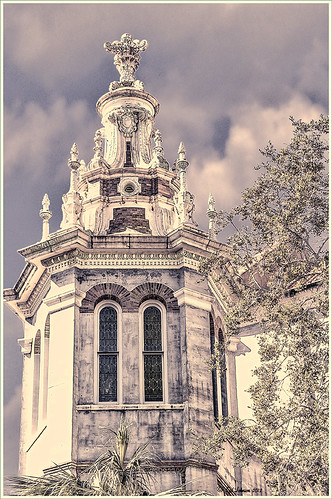
I started working on this image – not one I was totally in love with, but the old Flagler Presbyterian Church is so beautiful to look at that I wanted to create that sensation in the image. I began by manipulating the file in Topaz Adjust 5 (see link to website in sidebar) and hit the “Get Lucky” button just for the heck of it – and this really cool illustrated look appeared that I was not sure what to do with it. (Hover over image to see the Topaz 5 illustrated image.) I decided it needed a new sky so I opened up OnOne’s Perfect Mask (see website link in sidebar) and added a sky I had placed below the image. This plug-in is the best one I have found for replacing skies quickly – check out the little holes in the trees where the sky peaks through. Next several different effects were tried but none made me go “Wow” — that is until I decided to go into the Topaz Black and White Effects plug-in (see link to website in sidebar). It took no time at all – in fact I started with the same settings from my “My Office Friend Ted” image which was a totally different type of image. A few things were adjusted but it still was not quite right. Back in Photoshop a Color Balance Adjustment Layer was added to bring out the blues in the sky a bit more to get the right look. Now it looks like I remember it – but it took some effort. Luckily, I had a plug-in that gave me a great start.
I guess I can honestly say I still love both Topaz Adjust and Black and White Effects – they do have that versatility to turn an okay image around. Definitely great plug-ins and reasonably priced too! And OnOne Perfect Mask is the best for skies – still figuring this plug-in out for other types of selections. I hope to have a page set up soon on which plug-ins have made it into my workflow……Digital Lady Syd
Digital Lady Syd Related Blogs:
Topaz Plug-Ins – Same Image Trying Each!
Same Image – Different Plug-In
Another Pseudo HDR from Me!
 |
I love these photos I got from the London Eye a few years ago – they really look good with the pseudo-HDR look. Here I have applied my SJ-Vivid Drawing Look preset in Lightroom (for here for Adobe Camera Raw preset – note: change file extension to .xmp in zip folder to get file to work). I had to adjust the Exposure a bit after applying the preset. Then it was processed in Nik Color Efex Pro 4 using my SJ-Pseudo HDR1 recipe. NOTE: This download link is broken if you click the Download button, but by right clicking on the button and choosing “Save Link As,” the file will download correctly.” Usually the Detail Extractor slider needs to be adjusted so the image is not overdone. Next it was taken into Viveza 2 to get rid of the muddy color water that is so common in the Thames River pictures. By setting control points in the water areas and adjusting the Hue and Brightness sliders, the color could be changed to more of a blue tone. There was distortion from the movement and the glass of The Eye so I added a layer set to Overlay blend mode and painted with a black brush at 10% opacity over these areas to get it evened out. (Click on the image to see the original – most of the distortion was in the lower front and on the train bridge in the middle.) Finally the Sharpen tool was used on a separate layer along with Curves Adjustment for contrast and Hue/Saturation Adjustment Layers to desaturate a little. Loved the final result. This is very similar to what you would get with the Lucis Arts filter. Overall, loved the results! …..Digital Lady Syd
Digital Lady Syd Related Blogs:
Pseudo HDR Using NIK Color Efex Pro 4
Another Pseudo HDR Image with NIK CEP4 – Got to Love the Effect!
Settings for Vivid Drawing Look ACR/Lightroom Preset and NIK Color Efex Pro 4 Pseudo HDR Recipe
Where Am I?
Combining Plug-ins for More Image Interest

Took this image of a red bloom from the hibiscus tree in my front yard – I love hibiscus flowers! A 60 mm Nikkor macro lens was used at F/6.7 for 1/60 sec. A Bower 0.5 x High Resolution Digital Lens with Macro was added to the lens. The camera raw shot was adjusted in Lightroom and brought into Photoshop. Some of the distracting background was cloned out, the image sharpened a bit, then Nik’s Color Efex Pro 4’s Darken/Lighten Center filter effect was applied. The image was taken into Nik’s Viveza 2 where the structure on the pistil and stamen was increased, and the background softened a little by setting the structure to -100. ShadowHouse Creations texture 5AT-2 was added and set to Soft Light at 62%. Next the new Topaz Star Effects plug-in was applied to the tips of the stigma to make it sparkle and a bit to the yellow anthers (see sidebar for Topaz’s website link). Finally OnOne PhotoFrame’s Taufer Texture 12 was applied to finish off the image (see sidebar for OnOne’s website link).
This is a good example of how several different effects can create more interest – it also helps to have a great color combination to work with too!…..Digital Lady Syd
Digital Lady Syd Related Blogs:
Trying Out Topaz Star Effects
Using NIK’s Color Efex 4 and Viveza Together
OnOne’s Perfect Mask Works Great!
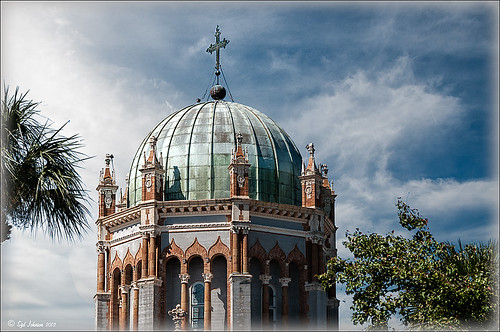 |
This image is of the Flagler Presbyterian Church built in 1889 in St. Augustine, Florida, by Henry Flagler as a memorial for his daughter. Hover over image to see the original image that has been adjusted in Lightroom.
To process this image:
1. The power lines first had to be removed. This was done very quickly using the technique shown in my Tidbits Blog “Get Rid of Those Power Lines Fast – with Paths and Spot Healing Tool!”
2, Some of the tree leaves needed to be removed too so the Clone Tool was used for this.
3. Nik Viveza 2 was used to sharpen up the building and get the detail to pop – this plug-in is probably the best one for localizing on an image how you want certain areas to look. The Sharpen Tool in Photoshop could be use instead to bring out the detail.
4. Place a new sky under the top layer. (Highlight the layer under the top layer, go to File -> Place, and Enter. Then right click on thumbnail of sky and choose Rasterize to get rid of the smart object.)
5. In my Fun Photoshop “Using Cloud Images to Fix Up a Sky” blog last I talked about replacing skies and gave several examples how an interesting sky can really add interest to in image. This time I used OnOne Perfect Mask (see website link on sidebar) to see if I like the new sky look. This is first time I tried using the tool and it was quick and accurate. It took about three minutes to add the new sky into the image – it creates a layer mask so it can be adjusted later if not everything is picked up. It has several different types of brushes to select the various areas that need to be covered when you have tricky selections like trees. You just click once in the open area and it picks up all the clear areas, then choose a Refine Brush and paint over the trees and it picks up all the little color openings in the trees. Very quick! Even certain colors can be isolated for selection.
Try downloading OnOne’s Perfect Mask if you do a lot of selecting and see if you are as impressed as me. I plan on trying out some other kinds of selecting in the near future and post again. I also plan on releasing some of the skies I find useful for adding into images very soon. Until then, have fun experimenting!…..Digital Lady Syd
Problems for Big Ben
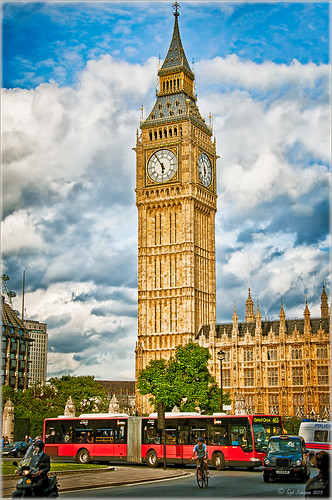 |
It is funny that I had just completed this image of Big Ben a few days ago and then it comes out that is has some tilting issues, 0.26 degrees NW or 18 inches off center at the top of the 314-foot tower. It will be thousands of years before Britain’s iconic landmark that houses the clock gets as bad as the Leaning Tower of Pisa in Italy. The rumor is Members of Parliament are meeting to discuss what to do including these two options: 1) Do costly repairs to both the Parliament Building and Big Ben, or 2) sell the entire complex to a rich foreign developer. Hum! For more information on this, check out The National Post article.
I tried to find an old famous painting of Big Ben but could not find one – can’t believe no one painted this gorgeous landmark in the 1800’s so my search is still on. In the meantime, I did find a site selling some very interesting Big Ben posters at Art.Com that I found very inspirational – give it a look to see some of the creative work others are doing (and for profit!).
How I processed this image? Believe it or not, this is just another pseudo HDR processed just like I do all my pseudo HDR’s. Used my SJ-Vivid Drawing Look preset in Lightroom 3 (download here if using Adobe Camera Raw) (note: change file extension to .xmp in zip folder to get file to work) and adjusted the Exposure, Blacks, Red Saturation (-45), Blue Saturation (+61), and Green Luminance (+3) sliders to make the image colors pop correctly. In fact the red bus was overpowering the image so the red saturation had to be reduced quite a bit. (Hover over image to see how it looked coming out of Lightroom.) I must say there was an amazing sky that day! Some clean up in Photoshop was done and the image was taken into Nik Color Efex Pro 4. All I did was add the SJ Pseudo HDR1 recipe (NOTE: This download link is broken if you click the Download button, but by right clicking on the button and choosing “Save Link As,” the file will download correctly.”) – I had to tone down the Detail Extractor and Contrast a little and change the Effect Radius to Large to get rid of the over-exaggerated HDR look. In Nik’s Viveza 2 I added a point on the clockface to make it really sharp but this could easily have been done with the Sharpen Tool in Photoshop. The last step was to add a Curves Adjustment Layer to brighten the whole image just a little. I was surprised how much detail came in from only applying the Lightroom preset without the Photoshop plug-ins. You could actually see the people riding inside the bus! It’s great when it all comes together with the light and composition to create a great shot!…..Digital Lady Syd
Digital Lady Syd Related Blogs:
Pseudo HDR Using NIK Color Efex Pro 4
Another Pseudo HDR Image with NIK CEP4 – Got to Love the Effect!
Where Am I?
My Office Friend Ted

This bear now sits in my office but I was never sure why I got him. Last week there was an interesting post by Ian Summers called “3 Exercises to Keep Creative Imagery Flowing” which gave me an insight to this conundrum. One of his generic creative exercises is called “Create a Giant Love Nest,” an environment that involves surrounding your work/creative area with many of the things you liked as a kid to help feed your creativity. I guess that is how Ted arrived – I found him at a bargain price in Cracker Barrel and had to have him. I am not even sure I had a Teddy Bear as a child but I liked his happy look (he never complains) and he is very soft and big (31 1/2″ tall). What’s not to like? So in honor of using childhood (and adult) toys and collectibles as a way to increase your creativity (and a good excuse to keep some of those things you just can’t part with), I am presenting my office friend “Ted.”…..Digital Lady Syd
PS. Ted was processed in Lightroom Beta 4 (see my Tidbits Blog “Trying Out Lightroom Beta 4“) and Photoshop using Topaz Black and White Effect (see my Fun Photoshop Blog “Topaz B&W Effects Plug-In-A Real Winner” and click on sidebar for website link). I started with the Opalotype Collection Flavescent preset and essentially adapted it by cranking up the transparency to 100, and adjusting the strength and placement of the vignette. A little localized face detail and burning on his mouth was added. That’s all.
Photoshop CS5 and Elements: Hand-Tinting the Easy Way
 |
The above purple orchard was on the table at the Ming Court Restaurant in Orlando, Florida (one of our favorite restaurant in Orlando). I was not really happy with the original image (hover over image to see) – the flowers came out a little soft to my liking. I was pleased to see this hand-painting technique saved a beautiful flower image and gave it a soft painterly feel.
The steps to create this look are easy and could probably be put in an action. The process was taken from an article in Mastering Digital Photo Processing Magazine from the Fall 2008 issue. Here are the basic steps to creating this image:
1. Do any exposure adjusting in Lightroom or Adobe Camera Raw.
2. In Photoshop, create two copies of the original layer and turn off the top layer.
3. On middle layer convert image to black and white – I used the Black and White Adjustment Layer to get a nice conversion. There are so many ways to do this – choose your favorite. For Elements users, go to Enhance -> Convert to Black and White and select one of the canned styles as a starting point – then adjust the sliders, especially the contrast slider.
4. Turn on the top layer and add a Gaussian Blur filter with a Radius set to 18. Change blend mode to Overlay (or try others if you do not like the effect) and lower the opacity to get the pleasing hand-painted look. The opacity for the above was 61%.
Optional Step – Can add a Photo Filter Adjustment Layer. Choose a color using the Color swatch and adjust the Density slider. The magazine suggested this can “increase the sense of oils being applied over a black-and-white print.” I did not do this here, but it did give an interesting look with the default Warming Filter (85) color.
5. At this point a New Layer was created and the Sharpen Tool was used to show definition more clearly between the flower petals.
6. A Curves Adjustment Layer was added for contrast. Elements users add Levels Adjustment Layer.
7. To add a border or layer style, create a Composite Layer on top (CTRL+ALT+SHIFT+E). OnOne’s PhotoFrame Taufer_Texture_10 was added to give the frosted window effect – one of my favorite looks. (See sidebar for OnOne’s website link.)
That’s it! A pretty easy workflow and it gives a beautiful soft look. Hope you enjoy trying this short and sweet workflow – until next time…..Digital Lady Syd
Where Am I?

This image was taken in London a few years back of The Royal Horseguards Hotel, a 5 star hotel that overlooks the River Thames near the London Eye. It is a beautiful old building that stands out from the treetops. Check out this virtual tour of the outside to see the size of the immense building!
The image was processed using OnOne’s Perfect Effects plug-in (see sidebar for website link) where a light blue-dark blue cross-processed layer was created. Next Nik’s Viveza was added to add more detail to the buildings since I cropped in pretty close from a much larger image. In Photoshop a Selective Color Adjustment Layer was next using only the Whites and adjusting the Yellow to +21 and the Black to -5 – this adds the sunny feel to the image. The Sharpen Tool was applied to the building tops and Curves Adjustment Layer to add contrast. Finally, one Florabella’s Snow Texture 3 (the link is to her Facebook page with the free download on the left side) was applied on top – the layer was set to Screen at 73% opacity. I am having so much fun playing with all the different looks you can get with the different plug-ins applied together. Try combining some of your plug-ins and see what great results you can get!…..Digital Lady Syd
Digital Lady Syd Related Blogs:
Digital Lady Syd’s Review of OnOne Perfect Effects
Another OnOne Perfect Effects Pix – Got To Love It!
Pseudo HDR in OnOne Perfect Effects
Using Nik’s Color Efex Pro 4 and Viveza Together
Digital Landscape Effects with Nik Software
Daisies are Everywhere!

I wrote a Fun Photoshop Blog called “Using NIK’s Color Efex Pro 4 and Viveza Together” showing a great workflow using these plug-ins on the same Smart Object layer. Here are my daisies again shot at a different angle. (They were shot using my 18-200 mm zoom lens at 75 mm, F5.0, 1/60 sec, and ISO 400.) Different CEP4 filters were stacked to give a totally different result. (See settings below.) I really liked the way the color of the flower was altered to give this softer feel. Lightroom and ACR will give a fairly close look as to what Viveza achieves, but not exactly the same as discussed in the other blog. Give this workflow a try – download the trials and see what you get if you do not already own the plug-ins. This can be very addictive! Have fun…..Digital Lady Syd
Plug-in Settings for this image: CEP4 filters: Cross Processing (Method T04, Strength 86%, three controls in the background to remove the effect), Tonal Contrast (Highlights -80%, Midtones -80%, Shadows -80%, Saturation 20%, Contrast Type Fine, one control point on pink background flower, and Opacity Slider set to 62%), Darken/Lighten Center (#1, Center Luminosity -36%, Border Luminosity -2%, and Center Size 57%), and Vignette (Vignette Color set to light yellow, Shape 2, Adapt Edges 0%, Transition 84%, Size 46%, Opacity 38%, and one control point set on pink background flower to remove effect). Viveza used seven control points to adjust background and bring out the center of the flower.
Blue Orchids?

Yep – that’s what you see. I snapped this jpeg with my little Canon Power Shot camera while shopping in the grocery store for final holiday goodies a couple weeks ago. Wow! I guess the soil has been treated to make the color in the orchids turn blue. I had to grab a few shots!
To process this image, I first lightened it as the colors were so blue the detail was totally missing. Then I added a free Florabella Snow Texture (the link is to her Facebook page with the free download on the left side) to give it that nice winter feel. Next Nik Color Efex Pro 4 was applied using the Bleach Bypass, Darken/Lighten Center, Tonal Contrast, and Vignette filters to get this effect. Finally OnOne’s PhotoFrame acid burned controlled 13 (see sidebar for website link) was added. Enjoy!…..Digital Lady Syd
Digital Lady Syd’s Rule No. 5: Just Step Outside and Look Around!

If you find yourself bored because you have not taken any interesting images recently, just step outside and take a look around. I was feeling just this way this past week – with the holidays there just was not much time to go out and take some interesting pictures. So on Christmas Day, I decided to walk around outside just on the off chance there was something interesting. It was warmer than usual outside and there was this beautiful unexpected Monarch butterfly in my Purple Queen flowers. He seemed a little aggravated that I was taking his picture, but hey, I wasn’t really bothering him. (You can tell the butterfly is a male because of the black spot on his mid-hind wings in the vein.)
The image was shot with a Nikon D300 using my 18-200mm zoom lens at 200 mm, f/9.5, 1/90 sec, ISO 400 – did not have time to change to a macro lens or I would have missed the shot. I shot in burst mode and several of the shots were blurry as he was moving his wings so fast! Not used to taking pictures of butterflies! This image was processed using NIK Color Efex Pro 4 with the Detail Extractor Filter, Vignette Blur to get ride of distracting leaves and ground in the image, and a regular Vignette. Used the Sharpen Tool on another layer and a Curves Adjustment Layer to finish off.
It was fun to take more of a macro shot for a change I always love taking pictures of flowers. Great change of pace and it got me interested in working on my flower photos for a few days while the weather is pretty bad. In the meantime, take a look around outside your house and maybe you will find something interesting, like I did, that you had not noticed before!….Digital Lady Syd
Getting That Vintage Look!

I had not done an HDR image or post in a long time so I pulled out NIK’s HDR Efex Pro, which usually gives me the look I want. Personally, I think it is a little harder to use than Photomatix Pro and Photoshop CS5’s Merge to HDR, but the results can be spectacular if done correctly. This image is of an Ice Cream Shop on St. George Street in St. Augustine, Florida. This is a great example of the typical Spanish home that was built back in the early 1800’s. The texture in the building came out really nice. What I like about this program is on the right side of the program, there is a drop-down menu called HDR Method where a lot of different looks can be tried out. The basic global adjustment sliders and the U-Point controls are still available so control points can be placed where needed and the strength adjusted to fit the location. In this case, the Fresco method was chosen at 70% strength. I did bring the image into Photoshop to clean up some of the distracting items and to sharpen the lettering in the signage with the Sharpen Tool. The edges were treated with OnOne’s PhotoFrame Taufer Texture 12 in dark black (see sidebar for link to website). Overall it gives a pretty convincing vintage look.
Another great program from NIK!…..Digital Lady Syd
Digital Lady Syd Related Posts:
Different Images-Same Look Using HDR!
Where Am I?
A Little After-Holiday Cheer!

With the holidays winding down, I thought I would post one of the shots I took with my little point and shoot Canon 1000 camera of a friend’s Dickens Village set up in her living room. I can’t say enough about how beautiful it looked, especially in the evening when the houses were all lit up. Absolutely Amazing!
The image was processed in Lightroom just a bit – the colors were so strong it did not need much adjustment. Next NIK’s Color Efex Pro 4 was applied using the Detail Extractor filter and setting points so the snow was not affected as much, and a slight darkening Vignette filter. Back in Photoshop the Sharpen Tool was used on some of the figure’s faces and back edges to make them stand out a little more and that was it.
Hope you had a great holiday – I know I did……Digital Lady Syd
Digital Lady Syd Related Blogs:
NIK Color Efex Pro 4 – Digital Lady Syd’s Review!
Pseudo HDR Using NIK Color Efex Pro 4
NIK Color Efex Pro 4 – First Try!
Another OnOne Perfect Effects Pix – Got to Love It!
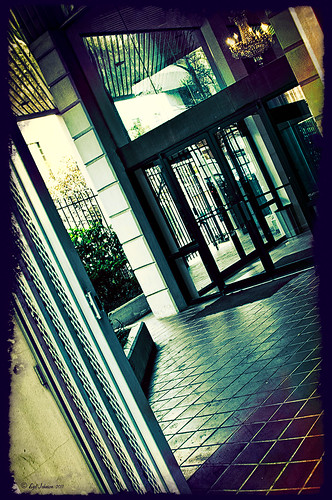 |
I discovered I really liked this image of an entryway into a building in Jackson, Mississippi, that was completely empty. Really sad to see such a nice space and nothing in it. Anyway, when I took the picture there was some vertical distortion (hover over image to see original) that I was not able to get rid of easily. While inside the Lens Correction Filter trying to straighten up these bowing lines, I discovered that the image looked really neat twisted – so that is how this picture started out.
The image was still a little flat so I decided to experiment some more in the updated plug-in from OnOne called Perfect Effects (see sidebar for website link). This image has three effects stacked – in Black & White tab, Roadie filter was chosen and set to Overlay blend mode at 73%; in Movie Looks, Urban Sickness set to Color blend mode at 78%; and in Vintage, Nicely Toasted set to Darken blend mode at 100%. The layer was duplicated and rasterized (right click layer and select rasterize to get rid of smart object) and the Sponge Tool was applied to the yellow leaves in the background to color them a bit more. On a duplicate layer a High Pass filter set to 9.1 was to sharpen the image and set to Soft blend mode. A final Curves Adjustment Layer was added for contrast and OnOne.s PhotoFilter acid burn controlled frame. That is it and I love the results!
This is how I like to experiment – just try different things as you go into the various parts of Photoshop – it can be amazing what you come up with. I did not imagine this image as a diagonal, but it really does the image justice. I hope this will give you some inspiration to try this technique on some of your pictures – it can be quite interesting…..Digital Lady Syd
Digital Lady Syd’s Related Blogs:
Digital Lady Syd’s Review of OnOne Perfect Effects
Pseudo HDR in OnOne Perfect Effects
First Try – OnOne’s Perfect Effects 3
Elements or CS5: Stacking the Same Image for Effect

This image was created in Photoshop Elements 10 – it is of an old abandoned gas station not too far from the airport in Jackson, Mississippi. I am still figuring out this program so this was definitely just playing around and getting used to what the program can do. To create this optical illusion, follow these steps.
1. Open up image into Elements (or CS) and duplicate the layer (click OK in the dialog that opens).
2. In this case the top layer was taken into Nik Color Efex Pro 4 and an HDR preset was added to create the HDR effect. (If you have the plug-in or are using it as a trial version, my blog “Settings for Vivid Drawing Look ACR/Lightroom Preset and NIK Color Efex Pro 4 Pseudo HDR Recipe” has the preset settings you can enter manually or download already as a preset.) Any effect can be applied here.
3. After coming back into Elements (or CS), add a Layer Style was added – used an inner Glow using the default color at 114 pixels and opacity at 75%, and a black Stroke set to 18 pixels at 100% opacity. At this point the image can be transformed and rotated like the image above.
4. Next the bottom layer was highlighted and a New Layer was added below (ALT+click on the New Layer Icon) and filled with a beige color (CTRL+Backspace).
5. Set the image layer to Multiply blend mode at 88% opacity to make the bottom image much softer.
6. Go to the Adjustment Layers (third icon at bottom of Layers Palette) and select Gradient Map – the Light Brown gradient was chosen and the Layer was set to Soft Light blend mode to make image even softer.
7. Finally add a Levels Adjustment Layer to bring back a little contrast of the whole image.
8. The Sharpen Tool or Unsharp Mask filter can be added at this point if you want to sharpen the top layer image but since the Pseudo HDR preset was applied in NIK, it oversharpened the above image.
9. I created a Text Layer with my name and the copyright symbol was added using the Custom Shape Tool.
I was really pleased with the results and it gives an interesting effect. Try experimenting with the different layer combinations and see what you can get. It could turn out to be unexpectedly interesting!…..Digital Lady Syd
Pseudo HDR in OnOne Perfect Effects
Since I have tried this in other plug-ins, I thought I would give it a shot in OnOne’s new Perfect Effects plug-in (see sidebar for link to OnOne’s website) to see if I could get a similar effect. Just as I thought – no problemo!
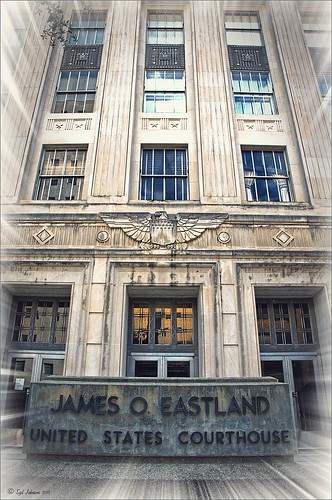 |
This is a rather unremarkable image except I liked the carved eagle engraved on the building. Hover over the image to see the original. By using Perfect Effects, I was able to get that pseudo HDR effect easily. These are the effects used in this image stacked bottom to top: Black and White preset set to Roadie in Multiply Blend Mode at Strength 100; Color Enhancer (Open up Effect Options and select Color Enhancer) and Color Range Orange was chosen to bring out the Orange color by adjusting the Hue set to 37, Saturation set to 77 and Lightness set to 94 sliders; another Color Enhancer layer was added to adjust the Blue Color Range – Saturation to 92 and Lightness to -35; and another Color Enhancer layer set to Aqua Color Range – Saturation 46 and Lightness 18; next the Golden Hour Enhancer preset in the Landscape section at Strength 63; Vignette created in the Blending Options drop-down with Brightness set to -68, Midpoint 58, Feather 80 and Roundness 5 and Normal Mode; and finally Katy preset in Vintage section set to Strength 100. It sounds hard, but once done, just create a preset to recreate it anytime – very easy to apply. To finish up the image in Photoshop, on a New Layer the Sharpen Tool was used to selectively sharpen the Eagle and some of the window lines. Finally the OnOne’s PhotoFrames zoom_19 frame was applied.
NOTE: After applying each layer preset or effects settings, be sure to click the Add button under the Strength slider to set the changes. To toggle the original and current views, press CTRL+P.
Well once again this was lots of fun and pretty easy to do. Give it a try and see if you like what you see. If you are interested in the pseudo HDR look, check some of my related posts below……Digital Lady Syd
Digital Lady Syd’s Related Blogs:
Digital Lady Syd’s Review of OnOne Perfect Effects
First Try – OnOne’s Perfect Effects 3!
Pseudo HDR Using NIK Color Efex Pro 4
Another Pseudo HDR Image with NIK CEP4 – Got to Love the Effect!
With One Good Photo – Try the Pseudo HDR Effect
Why I Love OnOne’s Perfect Layers!

OnOne’s Perfect Layers plug-in was used to add the texture to this image. It could have been done in Photoshop just as easily (and a lot of people say this), but the reasons I like Perfect Layers is that:
(1) you just have to click a button to get rid of a texture you are trying and do not like;
(2) just load a new texture to apply and add several others if you want. Much easier that placing a texture from Bridge and then going to the Layers Panel to try different blend modes.
(3) can create several virtual copies with different effects in Lightroom and bring them all into Perfect Layers as one file with lined up layers where the blend modes can be changed, textures added, and areas masked out. Major cool!
(4) even though it is not a Smart Object, when you open the PSD file in Photoshop, all the layers created in Perfect Layers are in place and reconstructed right there.
I am all for doing things faster and better and Perfect Layers does just that. I am not sure I have created a bad texturized image since getting this program. And that is why I Love Perfect Layers!
The image is of a building in Stirling, Scotland. The beautiful texture is provided free by ShadowHouse Creations and is called Oil Painting One (it has a nice short tutorial with the download that is very good also.) An OnOne PhotoFrame called acid burned controlled 05 was added and the image sampled to get a matching frame color.
Give Perfect Layers a try if you use Adobe Lightroom – can download a trial of Perfect Layers by clicking on the OnOne Perfect Photo Suite link on the side. Until Later…..Digital Lady Syd
Digital Lady Syd’s Related Posts:
“Perfect” Perfect Layers
Clarifying Clarity! Adobe Camera Raw and Lightroom Quick Trick
New Plug-In for Lightroom
First Try – OnOne’s Perfect Effects 3!
I love OnOne’s PhotoFrames (see sideboard to access OnOne’s site) – not sure anyone can beat this plug-in for its versatility and choices for adding borders onto an image. I use this plug-in probably 90% of the time. It surprised me how handy it is and how much I use it.
That said, I have not been as big a fan of PhotoTools 2.6 – still a very versatile plug-in but it was a lot harder for me to use than PhotoFrames. Therefore I did not use it near as much as many of the other plug-ins I have covered here in my Tidbits Blog and in my Fun Photoshop Blog. I have been waiting anxiously for the newer version of PhotoTools to be release and it is finally here in the form of a new name – Perfect Effects 3 – and interface. The whole suite of plug-ins (which these are two of the plug-ins in the Suite) has been re-engineered into an interface that can be opened from one place in the new OnOne Perfect Photo Suite 6.0.

The above image is of a beautiful clock in the historic district of St. Augustine. Not much was done with the sliders – I was just trying out the interface and getting around. This image has three effects stacked in this order: Texturizer section – Itchy preset; Vignette section – Grunge Vignette Dark; and Borders – Russell preset. Before applying the first preset, the clock was masked with the Masking Brush (Show Mask set to Overlay and Painting Mode to Paint Out) so the texture would not cover it.
It is nice to see some interesting borders included with this plug-in. The interface is improved but I still am learning how to get around it completely yet. I have just done a longer review at my Fun Photoshop Blog “Digital Lady Syd’s Review of OnOne Perfect Effects.” Download a trial version yourself – there is a 30-day fully functional trial period. Have fun experimenting…..Digital Lady Syd
Related Digital Lady Syd’s Blogs:
Same Image-Different Plug-in
Adding a Texture for Flair!
Dual Tone Plug-in Comparison


