
The Art Corner: Poetry and Music by Clodion

This Carrara marble artwork is found in the East Sculpture Hall of the National Gallery of Art in Washington, DC, and was sculpted in 1774-1778 in Paris by Clodion. Metal Chris, a great local DC concert photographer and founder of the DC Heavy Metal website, took all these these images for me recently as I missed it on my last trip to the National Gallery. What I love about this sculpture is that by viewing it from the different angles, which Chris did, you get a very different expression and feel of the art. Poetry definitely takes on a very different look depending on the view.


The Gallery’s site says “Clodion prepared a terracotta model for Poetry and Music, which is in the National Gallery and frequently on view in the ground-floor sculpture galleries. It provides a rare chance to compare an artist’s model with the final version in stone. In this case, Clodion modified the figure of poetry, “correcting” it to adhere to traditional representations: the terracotta figure had rested his head in his hand, but here he holds a writing stylus.” I will try to find this on my next trip to the Gallery – I think it would be fun to see. This is one of four sculptures that were meant to bring to life the abstract concepts of the arts and sciences. I did a previous blog called The Art Corner: Painting and Sculpture by Tassaert if you are interested in more information on both sculpture pieces. The last two pieces, Geometry and Architecture by Jean-Jacques Caffieri created in 1776 and Astronomy and Geography by Felix Lecomte created in 1778 are located at the National Trust, Waddesdon Manor, Buckinghamshire, England.
The first image was processed using Russell Brown’s Paper Texture Panel (see Russell Brown’s Paper Texture Panel Updated! blog to download) and Flypaper Textures Creme Anglais Taster set to Overlay Blend Mode at 93% Opacity and Touchstone Taster set to Overlay Blend Mode at 100% Opacity. Layer masks were added to clean up the faces and shadows a little and a large shadow on the wall was removed as it was very distracting. What really made this image so beautiful was OnOne PhotoFrame (see sidebar for website link) Maivre Background set to Overlay Blend Mode at 80% Opacity while still in the plug-in. It was actually just like adding another layer of texture. Once back in Photoshop, a layer mask was added to softly clear the face area of the texture. The left image of Poetry was converted to a black and white using Nik’s Silver Efex Pro 2 starting with the High Contrast preset. A little localized sharpening was done to the his face using the LAB sharpening method (see my Fun Photoshop blog Unsharp Mask Filter in LAB Mode) and some noise was removed from his body using Imagenomics Noiseware that I am trying out. The right image was hardly touched (only slight noise removal due to the dark lighting effect) – just a beautiful image and very much how the sculpture looks at the Gallery.
If you get a chance to go to this wonderful Art Gallery in DC, you will should try to see one of these beautiful sculptures…..Digital Lady Syd
Nik CEP4’s Film Efex Faded for an Illustrative Look

Had fun working on this little Hawaiian ‘Elepaio bird that was living with a bunch of his buddies at the Palace Tower in the Hilton Waikoloa Village. For very small birds they really make a racket, especially around sunrise and sunset – very busy, busy, busy birds! To create this sketch-like effect, he was processed in Nik Color Efex Pro 4 stacking just two filters – the Detail Extractor and Film Efex Faded set to Film Type 11 and an overall opacity of 71%. A Curves Adjustment Layer was added to add contrast and OnOne PhotoFrame (see sidebar for website link) Dave Cross 02 to finish the image. Very simple but I really loved the illustrative look of the bird. These new Film Efex filters in Color Efex Pro 4 give some great results but you have to play around with them to achieve it sometimes. Here is a link that shows what the Film Efex Faded filter will do from their website – Nik is currently presenting a filter each week and showing how it can be used. Really good stuff here!…..Digital Lady Syd
Digital Lady Syd’s Related Blogs:
Nik Color Efex Pro 4 Just Does It Right!
The New Film Efex-Vintage Filter From NIK CEP 4
Little Green Frog’s Makeover Using Nik’s Color Efex Pro 4!

This little guy was hiding between a couple Queen Emma Lily leaves during a rather heavy rainstorm. Had to get his picture! He is a Green Treefrog and is one of the reasons I don’t get a good night’s sleep this time of year, but his coloring is beautiful!
I tried several different effects before settling on a recipe of Nik’s Color Efex Pro 4 filters. These filters were stacked as follows: Detail Extractor set to an Overall Opacity of 50%; Midnight using Neutral Color Set, the Blur slider reduced to 8%, and Overall Opacity of the filter set to 80%; Vignette Lens centered on frog and Overall Opacity set to 53%; and Image Borders – just a plain Type 13. This is a reminder that you don’t have to use the filter effect at 100% – just open up the Control Points panel at bottom of each filter panel and an Opacity slider appears that can be adjusted for the amount you want. Back in Photoshop, I used the LAB Sharpening technique to sharpen up just his body a little (see my blog Unsharp Mask Filter in LAB Mode). A Curves Adjustment Layer was added to increase contrast just a little and that was it. He has no idea how handsome he is!…..Digital Lady Syd
Digital Lady Syd Related Blogs:
NIK Color Efex Pro 4 – Digital Lady Syd’s Review!
Pseudo HDR Using NIK Color Efex Pro 4
White Daisies! Using Color Efex Pro Midnight Filter
Nik Color Efex Pro 4 Just Does It Right!
Where Am I?

This is an image of San Francisco taken at night in February in a brisk and cold breeze. I just listened to another interesting webinar by Nichole Paschale from Topaz (see sidebar for website link) called Night Photography Enhanced with Adjust, Black and White Effects and Star Effects. I am always surprised how much I learn from these short videos – there were several good tips in this one, even though I know these programs pretty well. My image was not that great, but I needed a nighttime image to try some of the techniques on. Now I rather like the effect. Of course it uses one of my favorite plug-ins, Black and White Effects, so I am not surprised I like the results. The preset was set to my Old Vintage Effect (see Quad Tones in Topaz Black and White Effects Plug-in to create), one I use on a lot of my images. Next the Star Effects plug-in was used to enhance the streetlight using Sun Flare 1 preset. A Flypaper Texture Lemoncello Taster texture layer was added using the Multiply blend mode at 35% opacity. It still did not have the feel I wanted, so I added a Black and White Adjustment layer and mainly lowered the yellow and added some reds and greens and blues. The opacity was set to 26%. A layer style was added to frame the image. I can honestly say this is exactly how the street looked to me as I was walking to dinner on that cold dark night. If you have not tried out some of Topaz’s videos, give them a listen. Lots of cool things to try in them!…..Digital Lady Syd
Topaz Adjust’s French Countryside Preset – Beautiful!
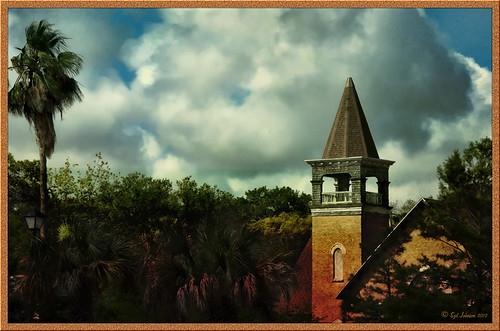 |
Thought I would do another Before and After where I show what one of my favorite presets in Topaz Adjust 5 (see sidebar for website link) looks like when applied. This image was taken in full light and I really took the image as a test shot before visiting some of the wonderful historic sites in St. Augustine, Florida. I really love steeples and cupolas on buildings. I had a hard time deciding what to do with it – it was a hand-held three HDR image. I processed it in Photoshop’s Merge to HDR Pro, only checking the Remove ghosts box before exiting to Photoshop (hover over image to see the tone-mapped image). Some image clean up was done, and two curves adjustment layers, one for contrast and one for color tone, were added since the image was not processed in Lightroom or Camera Raw. After much experimentation, I finally settled on using Topaz Adjust 5 and the French Countryside preset. It seems to soften the image just enough, yet retains some detail in the image – the trick is to adjust the Detail tab’s Threshold slider to bring back some of the details. Then I added Caleb Kimbrough Summer 4 Texture – one of my favorite textures to add the red and green tones into the image for that warm feel. (Also check out his site for many other wonderful textures.) The image took on a totally different feel. Try this preset if you have Adjust…..Digital Lady Syd
Digital Lady Syd Related Blogs:
Why I Love Topaz Adjust!
Topaz Adjust 5 Is Here! First Look!
Making An Ordinary Image Your Own
Cafe Alcazar and Vintage Topaz Adjust

Here is an image of the Cafe Alcazar that is located in the old swimming pool area of the current Lightner Museum (old Hotel Alcazar) in St. Augustine, Florida – one of the best places to grab lunch if you are in the city. I did very little to this image but apply a Topaz Adjust preset called Daylight to Tungsten II which gave the browns the rich tones, sharpened using my LAB sharpening method and added a Curves Adjustment Layer to increase contrast. Topaz Labs did a nice video on their Film and Vintage Effects with Adjust, B&W Effects and Lens Effects that does a good job of explaining how to get this look. I really love the feel of this image – gives a little of that vintage effect the historic location instills……Digital Lady Syd
Digital Lady Syd Related Blogs:
Where Am I? (Cafe Alcazar)
Unsharp Mask Filter In LAB Mode
I Didn’t Know That! Curves Adjustment Layers
Quad Tones in Topaz Black and White Effects Plug-in
Hibiscus Flowers – I Love to Photograph Them!

These beautiful Red Chinese Hibiscus blooms appeared on Mothers Day last week so I had to take their picture! Used my favorite artistic plug-in – Topaz Black and White Effects (see sidebar for website link) – and applied a preset I had created earlier called Water Landscape Sunny (Adaptive Exposure section – Adaptive Exposure 0.18, Region as 26.10, Detail 1.11, and Detail Boost 1.09; Quad Tones which creates the interesting effect used Color 1 Region set to R1G1B12 and 9.60, Color 2 Region set to R63G78B85 and 95.97, Color 3 Region set to R216G211B129 at 141.2, and Color 4 Region set to R255G254B237 and 255.0; Edge Exposure set to Edge Size 0.19, Edge Exposure -0.43, and Edge Transition 0.27 for all sides; and Transparency set to 1.00.) While in the plug-in, the Detail brush was used to sharpen the center of the flowers and to go around the petal edges where they overlap each other. Next ShadowHouse Creations Marshmellow Skies texture set to Overlay at 100% opacity was added to give the soft green-turquoise feel to the background – a white layer mask and a soft black brush was used to take the texture effect off the flowers. A Curves Adjustment Layer was added and OnOne PhotoFrame (see sidebar for website link) grunge 04 set to 75% opacity was also added. Not hard and once again a really beautiful effect. I love Black and White Effects! I could do this all day! As you can see by the number of related blogs below, this is definitely one of my favorite plug-ins – check them out for several other examples on how to use it!…..Digital Lady Syd
Digital Lady Syd Related Blogs:
Black and White Effects on Outside Art
Cleaning Up a Messed Up Photo
Topaz Black and White Effects Quad Tones Are Great!
Sunny Preset for Topaz Black and White Effects
My Office Friend Ted
Loving Both Filters!
The Art Corner: Painting and Sculpture by Tassaert
Quad Tones in Topaz Black and White Effects Plug-in
Get Rid of Those Power Lines Fast – with Paths and Spot Healing Tool!
Topaz B&W Effects vs. Nik’s Silver Efex Pro
Just Another Topaz Black and White Effect Example
Topaz B&W Effects Plug-In-A Real Winner!
White Daisies! Using Color Efex Pro Midnight Filter
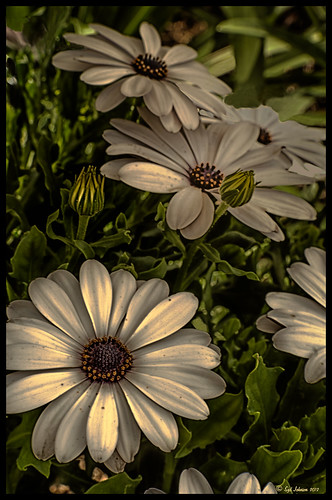
These beautiful daisies are growing in my front yard – first time I had seen this variety with the navy and orange centers. (Hover over image to see the image as it came from Lightroom.) Got a chance to try out the new Color Section in the Lens Correction Panel in Lightroom 4’s update (Adobe Camera Raw 7.1 for Photoshop) and it worked great! See New Color Fringe Correction Controls for information on this new tool. Next used Nik Color Efex Pro 4 with Detail Extractor, Midnight and Image Borders filters stacked. The Midnight Filter set to Sepia Color Set really gave this image the lovely soft feel. Added a few control points in Nik Viveza 2 to bring out the structure of the flower centers and buds. Added a Curves Adjustment Layer and painted out a few of the distracting light points. That was it……Digital Lady Syd
Digital Lady Syd Related Blogs:
NIK Color Efex Pro 4 – Digital Lady Syd’s Review!
Nik’s Viveza 2 Plug-In – A Hidden Gem!
Nik Color Efex Pro 4 Just Does It Right!
Black and White Effects on Outside Art

I call this image “Who’s Looking at You?” I almost fell down taking this image and everybody at the Flagler College (old Ponce de Leon Hotel in St. Augustine, Florida) thought it was funny as the tour guide just said one of her rules was no one was allowed to fall down! Oh my! Anyway, I was totally struck by the beautiful face on this figure which is part of the Ladies Side Courtyard Entrance. I do not know who actually created the figure but it appears to be similar to the Lion Statues outside the entranceway (see my Tidbits Blog Loving Both Filters!) Used Topaz Black and White Effects on image selecting the Cyanatype Collection -> Cerulean Dynamic preset to get the color effect started. Also used a Gradient Fill Adjustment Layer using a Gorgeous Gradient Royal set to Linear Style, 90 degrees, and Reverse with layer set to Overlay blend mode and 62% opacity – painted out the face a little using a white layer mask and low opacity black brush. Sharpened the face and that was it. I loved the final result!…..Digital Lady Syd
Whale Watching with Nik’s Color Efex Pro 4 & Viveza 2

One of the many photos of a great whale watching trip on the Big Island in Hawaii. (See Hawaii Ocean Sports for information on whale watching boat trip.) This image used one of the workflows I like to use for quick processing of my images. The RAW file was adjusted in Lightroom where the Highlights, Shadows, Whites and Blacks sliders were moved. Next the Exposure and Contrast sliders were adjusted, and finally it was straightened and cropped. The image was brought into Photoshop and opened in Nik’s Color Efex Pro where five filters were added in this stack order: B&W Conversion (Dynamic Contrast), Photo Stylizer (Cool Silver – Style 1), Low Key, Darken/Lighten Center, and Detail Extractor applied just to background area with Control Points. Not sure how I came up with this combination, but I really liked the final result. Nik’s Viveza 2 was used to sharpen up the whale and water blowing up behind him. OnOne PhotoFrame acid controlled 12 (see sidebar for website link) was added using a matching color from image. That was it!
The combination of Color Efex Pro and Viveza is a pretty powerful combination. I do not process any image now without at least going into Viveza – it is a fabulous finishing plug-in…..Digital Lady Syd
Digital Lady Syd Related Blogs:
Nik’s Viveza 2 Plug-In – A Hidden Gem!
Detail Pop Using Nik Color Efex Pro and Viveza
Using NIK’s Color Efex Pro 4 and Viveza Together
Nik Color Efex Pro 4 Just Does It Right!

Loved the beautiful old puppets on display in one of the walkways at the Hilton Waikoloa Village on the Big Island in Hawaii. It seemed like a perfect time to once again add the Nik Color Efex Pro 4’s new Film Efex – Vintage filter. The Colorize Filter, Midnight Filter, and Image Border were then stacked on top. Finally a little Nik Viveza 2 to sharpen the elephant a bit and that was it! Love the results!…..Digital Lady Syd
Digital Lady Syd Related Blogs:
The New Film Efex-Vintage Filter From NIK CEP 4
Beautiful Daisies with Film Efex: Vintage in Nik Color Efex Pro 4
Unsharp Mask Filter In LAB Mode
(Here are my settings for the filters: Film Efex-Vintage – Saturation 10%, Warmth 79, Vignette 63, Brightness -2, Grains per pixel 500, Film Strength 80%, and Film Type 13; Colorize – Method 6, Color R143G209B219, Strength 5%; Midnight – Color Set Neutral, Blur 0, Contrast 30, Brightness 60, Color 57, Shadows 20, and Overall 78%; and Image Border – Type 3, Size 60%, and Spread 98%.)
Another Soft Hawaiian Landscape

Image was taken at Lapakahi Historical State Park of one of the homes the early Hawaiians lived in roughly 600 years ago on the western side of the Big Island.
For this image, the steps used were from my my blog Using Color Efex Pro and Texture for a Warm Hawaiian Landscape Effect for the second image. Same Lightroom preset, same textures (using Russell Brown’s Texture Panel (see my blog Russell Brown’s Paper Texture Panel Updated!), and same adjustment layers. Image was sharpened and a New Layer was added on top where a paint brush set to yellow at 20% opacity was used to paint in the blown out highlights on the roof of the house. (See my blog Getting Rid of Those Blown Out Areas in Your Image on how to do this.) A different OnOne PhotoFrame was added – Taufer_Texture_12. (See sidebar for website link.)
Not very realistic but definitely has that Hawaiian feel and that is okay!…..Digital Lady Syd
Beautiful Soft Flowers

Just loved the pink hyacinths I bought – hope they will come back next year! This image was taken with my Micro Nikkor 60 mm f/2.8 lens at f/9.5. Used Mike Moats workflow (see info on this in related blogs below) with Color Efex Pro 4 (stacking Tonal Contrast, Darken/Lighten Center, and Vignette filters) added first and then Viveza 2 to make the details sharp. OnOne PhotoFrame napp_frame_12 (see website link in sidebar) was added. Final result – beautiful!…..Digital Lady Syd
Digital Lady Syd Related Blogs:
Using NIK’s Color Efex Pro 4 and Viveza Together
Nik’s Viveza 2 Plug-In – A Hidden Gem!
The Macro Shot
Cleaning Up a Messed Up Photo
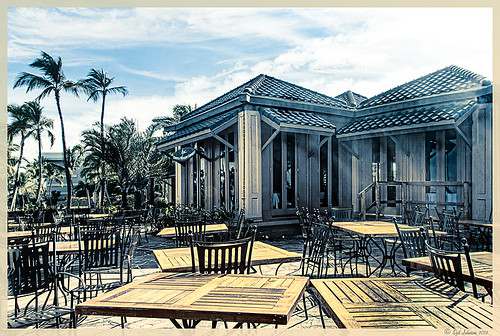 |
Here is another before and after for you. The image of the KPC Seafood Restaurant at the Hilton Waikoloa Village on the Big Island in Hawaii. At night it was wonderful to eat outside under the dark starlit sky with the ocean waves in the background. I wanted to add this image to a Hawaiian slideshow I am creating in Lightroom 4 and was really disappointed at how bad the original image appeared. I liked the tone in the wood and the sky was rally nice but otherwise, it was not too good an image. I tried several techniques, walked away from it for a day, and came back to it. I finally got the nice result shown above (hover over image to see the original). To get this result, I removed the palm tree going straight up to nowhere. Next I went into Nik’s Viveza 2 to get rid of the hazy feeling. I usually use this filter later in my workflow, but this image needed a quick tune-up before I could do anything else. Then I went into Topaz’s Black and White Effects (see sidebar for website link) and by playing with the Quad Tones, got this really nice result. (For settings, see below.) A Curves Adjustment Layer was added to enhance the contrast of the building, but the blue in the sky was painted black in the mask to keep it from being affected by the curve change – the blue of the sky competed too much with the blue tones in the restaurant. Noise was removed from the whole image (see Russell Brown ACR blog below to do this). Localized sharpening was done and Puppet Warp was used to straighten the vertical lines of the restaurant. I feel like I was able to save an otherwise very bad image by using these two plug-in filters, and I might add two of my very favorites. For information on how to do some of my workflow steps, see my blog links below. …..Digital Lady Syd
Digital Lady Syd Related Blogs:
Nik’s Viveza 2 Plug-In – A Hidden Gem!
Quad Tones in Topaz Black and White Effects Plug-in
I Didn’t Know That! Curves Adjustment Layers
Edit Layers with ACR (Adobe Camera Raw) Script
Straightening with Puppet Warp!
A preset was created in Topaz Black and White Effects using these settings as shown on the final version of image above: Conversion: Basic Exposure settings – Contrast 0.08, Brightness 0.05, Boost Blacks 0, and Boost Whites 0; Adaptive Exposure settings – Adaptive Exposure 0.56, Regions 7.06, Protect Highlights 0, Protect Shadows 0, Detail 2.17, and Detail Boost 1.04; and Color Sensitivity settings – Red (-0.15), Yellow (0.38), Green (-0.42), Cyan (0), Blue (-0.09), and Magenta (0). Finishing Touches: Silver and Paper Tone settings – Tonal Strength 0.63, Balance 0, Silver 32.00, Silver Tone Strength 0.50, Paper Tone 32.00, and Paper Tone Strength 0; Quad Tone settings: Color 1 Region (Color R0G0B0), 24.68, Color 2 Region (Color R86G102B136) 69.92, Color 3 Region (Color R229G223B164) 154.9, and Color 4 Region (Color R255G252B206) 255.0; Vignette settings – Center (2796,1607), Vignette Strength (-0.09), Vignette Size 0.53, Vignette Transition (0.63), and Vignette Curvature 0.75; and Transparency settings – Overall Transparency 0.59)
Creating a JPG From a Video in Lightroom 4

This whale came to visit the catamaran while I was whale watching (through Hawaii Ocean Sports) – I guess this is unheard of that a whale would come so close to the boat and hang out for 5 minutes like this guy did. Everybody on the boat including the boat personnel were going crazy as the whale would swim under the boat to the opposite side and then swim back under to the other side. He was so close you could almost touch him! He came up at the back of the boat and then turned around and raised his tail at the boat as he left. What a trip! Using my Sony Handycam HDR-XR500V video camera, I was able to get some nice video of the whale although it was hard to be at the right place at the right time with so many people around. What is really nice is that now Lightroom 4 has a limited video editing function. You can actually scrub through your video and select a frame that can be saved as a JPEG (click to open the square to the right of the video timeline and select Capture Frame) which can then be edited in both Lightroom and Photoshop. That is how I got this image.
The Exposure, Highlights, Shadows, and Blacks sliders all had to be reduced and the Contrast was increased to get a good image of his face. In Photoshop Topaz Adjust was opened using the Film Collection Effect Vintage Grunge IV preset. The Detail Strength was lessened a bit, the Warmth slider moved warmer a little, Grain and Vignette turned off, and Transparency slider set to o.25. Back in Photoshop a Hue Saturation Adjustment Layer was added to slightly desaturate and change the Hue in the Red tones on the whale. A Curves Adjustment Layer was added to improve contrast. Not bad for a fairly low resolution image. If you like Lightroom and have some video clips, you should take a look and see if you can use some of the frames you captured to add to your photo collection…..Digital Lady Syd
Topaz Lens Effect Tilt & Shift with a Zoom!

These are a few of the kayaks that can be rented at the Waikoloa Beach Marriott Resort and Spa on the Big Island in Hawaii. I was listening to a webinar presented by Nicole Paschal at Topaz Labs called “Isolating Subjects with Lens Effects” – this webinar should be posted soon at Topaz Labs-YouTube. She presented six or seven different ways to use selective focus on your images using this plug-in.
For this image Topaz Adjust (see sidebar for website link) was first applied just to brighten up the image a little – added the Spicify preset. Next Topaz Lens Effects was opened. Nicole really likes to use the Camera Tilt & Shift effect to selectively isolate her subjects. That is what is applied here. The Tilt Shift Adjustment were set to: Focus Area Width to 0.20, Transition to 0.59, Blur Amount to 0.08 and Angle to 0.89 so that the blur runs across the back of the kayaks. The Image Adjustments were set to Brightness 0.11, Contrast 0.15 and Saturation to 0.03. In the Distortion Adjustments section, Tangential was clicked, and a 1.89 Distortion Scale was applied – this cropped the image centering it on the Tilt Shift Adjustments Blur point in Focus Area section. Each time the blur point is moved, you get a different result. This image ended up with the Effect Position at 560, 612.
There are several other effects discussed in this webinar which are fun to try. Listen to the webinar for more good tips. The above effect may give some very interesting results on different types of images. I will definitely be checking this out…..Digital Lady Syd
Digital Lady Syd Related Blogs:
Topaz Lens Effects Plug-In
Topaz Simplify and Lens Effects Saves an Image!
Combining Plug-ins – Double the Effect!
Topaz Lens Effect’s Artistic Flair!
Topaz Simplify and Lens Effects Saves an Image!
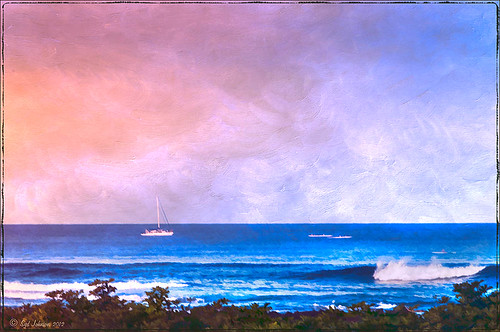 |
The catamaran is one of the whale watching boats you can take while on the Big Island in Hawaii (see Hawaii Ocean Sports for more information on this). This image was taken the day before my adventure and it was not a good at all (hover over image to see original RAW image) – but I really wanted a shot of the boat on the water. Therefore some improvisation had to be employed. After cropping and doing some RAW adjustments in Lightroom, Topaz (see sidebar for website link) came to the rescue. Topaz Simplify 3 was applied first to get rid of the focus issue – the BuzzSim preset was used as a starting point with these changes: Simplify Size slider was changed to 0.15, Brightness slider changed to 0.08, Saturation slider to 1.27, Edges: Color Edge Fine, and Edge Strength slider 1.50. Next Topaz Lens Effects was applied using the Filter Dual Tone Effect to create the warm feel in the sky with a preset I previously created called Sunrise Effect. (See below if you would like the settings for the preset.) Next Flypaper’s Paper Texture Creme Anglaise (one gorgeous texture!) was used via Russell Brown’s Paper Texture Panel for Photoshop CS5 and CS6 (see my blog Russell Brown’s Paper Texture Panel – A Real Winner!) and set to Divide Blend Mode at 100% opacity. A Curves Adjustment Layer was added to fix the contrast. Finally OnOne’s Photoframe grunge 09 was added (see sidebar for link). An image I would normally have trashed has now been turned into a beautiful picture that I really love. Give this technique a try if you own the Topaz plug-ins. The combination works great together, especially if you want to save an image!…..Digital Lady Syd
My Topaz Lens Effects Sunrise Preset contains these settings: Transition Adjustments – Region Size 0.45, Transition 0.35, and Angle 149.7; Region A Adjustments – Cyan Cast 0, Red Cast 0.20, Magenta Cast 0.01, Green Cast 0.03, Yellow Cast 0.70, and Blue Cast 0.24; Region B Adjustments – Cyan Cast 0.15, Red Cast 0.10, Magenta Cast 0.15, Green Cast 0.05, Yellow Cast 0, and Blue Cast 0.05; and Image Adjustments – Brightness 0.05, Contrast 0.08, and Saturation 0.07.
Digital Lady Syd Related Blogs:
Topaz Simplify and Topaz Detail Together
Simplifier and Simplify Filters
Russell Brown Texture Panel Landscape Image
Detail Pop Using Nik Color Efex Pro and Viveza

This little bee really wanted his picture taken so here it is. I am still not sure what flower this is – it was at the Hawaii Tropical Botanical Garden on the Big Island in Hawaii. To get the color so bright and the detail so sharp in this image, a Nik Color Efex Pro recipe was used following a link at the Nik website called My Go-To Recipe for Bringing Out Details with Ellen Anon. Next Nik Viveza 2 was added to soften the large leaves in the background (set Control Points in corners and move the Structure slider to -100 to get a soft smooth appearance). Very simple and easy to do. I still love using these two plug-ins together!…..Digital Lady Syd
Digital Lady Syd Related Blogs:
NIK Color Efex Pro 4 – Digital Lady Syd’s Review!
Using NIK’s Color Efex Pro 4 and Viveza Together
Combining Plug-ins for More Image Interest
The Macro Shot
Daisies are Everywhere!
Hyacinths and OnOne PhotoFrames

I recently did a blog called My Favorite Photo Frame Plug-In – OnOne PhotoFrames (hum!) on the really nice OnOne PhotoFrames (see sidebar for website link) that I use on many of my images. Here is another nice example of their beautiful frames. (This frame is the Taufer Frame 08 using a light beige color – Russell Brown’s Paper Texture Panel was used on this image – see my Fun Photoshop Blog Russell Brown’s Paper Texture Panel – A Real Winner!)
Give these frames a try – they are easy to use and can really enhance your final image. You can download a 30-day free trial at their website or while in website go to the Products header -> Free Products and select Edge and Framing Effects where you can download 30 frames to use for free! Give it a try! ….Digital Lady Syd
Topaz Simplify and Topaz Detail Together

Recently I watched a video, this time for Topaz plug-ins (see sidebar for Topaz website and more blog links below), and learned a couple new things I thought I would share. If you have read my blogs before you know that I am a big fan of Topaz products – they may not be the most sophisticated, but they do some very cool effects the other major companies can’t achieve. Scott Stulberg did a lengthy video called “Memorable Travel and Stock Photography” where he covers Topaz Adjust, Detail and Simplify. I tried to incorporate a few of these tips in this image of sun-lighted grass growing on the road to Waipi’o Valley on the Big Island in Hawaii. Gosh it is hard to take a bad picture in Hawaii!
To begin with, Topaz Simplify was used. Scott suggested this plug-in is great to use on a shot that is a bit soft from a gentle breeze or a not-so-great lens – this effect can save an image and turn it into something very nice. There are two color space choices – RGB (more vivid colors) or YCbCr color space (more muted colors). This image used the YCbCr color space. Scott mainly uses the BuzSim preset – the trick is to move the Simplify Size slider to the left from the default setting (0.33) and you will see the detail return but the color stays saturated. On this image the Simplify Size slider was set to 0.05, Details Boost slider set to 0.79 (default is 1.00), and Details Size set to 0.13 (default is 0.20). It is a very similar result to using Vibrance in Photoshop but Simplify has much better color saturation. In the Adjust section, the Saturation was toned down a bit to 0.96 (default 1.31) and Saturation Boost set to 1.00 (default 1.15). He is basically lowering or turning off all the artistic settings and leaving the saturation turned on. One small problem I seem to have with Topaz products is that sometimes I have trouble retrieving the settings when using a Smart Object layer, which is supposed to retrieve the plug-in settings used on the image. Therefore, create a preset and name it something that will remind you of the image if you liked the result.
Next Topaz Detail was used. Scott feels that this plug-in makes it appear you were using a better lens than you really were. Basically you want to move the Medium Detail slider, then the Small Detail and Large Detail sliders until you get a sharper feeling image. He does very little sharpening to his photos but uses Detail to do the sharpening – it is like using the Clarity slider in a realistic way. That is how the plug-in was used for this image.
The final touch I added was a Hue/Saturation slider boosting the yellow saturation up quite a bit. Then I filled the layer mask with black (CTRL+Backspace) and painted with a very low opacity soft brush in to give just a soft yellow tone. OnOne’s Dave Cross 14 frame (see sidebar for website link) was added using a color sampled from the shot.
Sometimes it feels like I harp on all these these plug-ins, but they really are fun to use and they can take your images to a new level…..Digital Lady Syd
Digital Lady Syd Related Posts:
Simplifier and Simplify Filters
Topaz Plug-Ins – Same Image Trying Each! – this blog has many of my Topaz blog links at the bottom if you would like more information on any Topaz products
Beautiful Daisies with Film Efex: Vintage in Nik Color Efex Pro 4
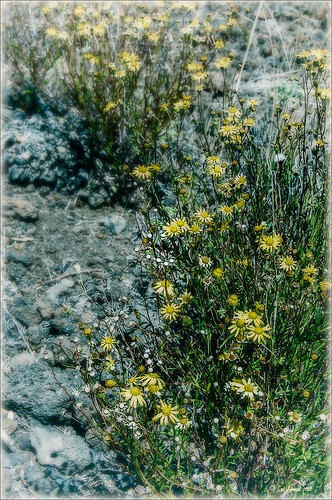 |
These beautiful sunshine daisies were growing wild at the 9000+ ft. on the Mauna Koa volcano on the Big Island in Hawaii. The ground was very arid and it was super-breezy at this spot. This is just another example of using Nik’s Silver Efex Pro 2 and Color Efex Pro 4 together to get a very nice look. The original had a very cluttered appearance (hover over image for original), but by using Film Efex: Vintage and Vignette: Blur filters stacked, this much more appealing image is created capturing what the flowers looked like to me. Totally loved the color combination that resulted.
If you do not own these two Nik plug-ins, I would encourage you to download a trial. Together they create a wonderful result. For more information on the steps required to get this look, see my Fun Photoshop Blog “Use NIK Color Efex Pro 4 and Silver Efex Pro 2 Together to Create Fabulous Landscapes!” Also see my Tidbits blog “The New Film Efex-Vintage Filter From NIK CEP4.” Have fun experimenting – I know I am!…..Digital Lady Syd
Magnificent Macros with Nik Plug-Ins

The Jazze Rose Frost Alstroemeria flower is one of the prettiest perennials that you will find. This one resides in my front yard now. The same workflow with Nik products that really make your landscapes pop was applied to this macro. Silver Efex Pro 2 (same High Structure-Harsh preset with Color Filter set to Green), Color Efex Pro 4 (Darken/Lighter Center and Graduated Neutral Density filters stacked), and Viveza 2 to bring out details in the stamen structure were applied. That was it! Check out my Fun Photoshop blog “Use NIK Color Efex Pro 4 and Silver Efex Pro 2 Together to Create Fabulous Landscapes!” for more information.
Give this a try next time you want a different look for your macros!…..Digital Lady Syd
Topaz Black and White Effects Quad Tones Are Great!

Just another day in paradise! This is beach front at the Waikoloa Beach Marriott Resort and Spa on the Big Island in Hawaii. I was having trouble finding some way to make the image really pop and look like it looked to me when I was there. I ended up going into Topaz’s Black and White Effects (see sidebar for website link) thinking it might look good as a black and white image. In Topaz plug-ins, you have to reset your settings or the last one used shows up on the image. Well the last effect I had used was my Old Vintage Effect Preset and it gave this image exactly what it needed. To create this preset, see my blog “Quad Tones in Topaz Black and White Effects Plug-in” to get the basic information to create the quad tone colors required for this warm sunny feel. I did increase the Adaptive Exposure slider from 0.18 to 0.41 to get more of an HDR look, checked Process Details Independently because of a little haloing around the tree trunks, and selected a light Vignette for this image instead of a Border. In Photoshop I had to remove a little noise. No sharpening or curve adjustments were needed. OnOne (see sidebar for website link) PhotoFrame Taufer Texture 12 was added. I really like this combination of colors and have used it many times. Try the settings if you want to get that warm feel…..Digital Lady Syd
Digital Lady Syd Related Blogs:
Sunny Preset for Topaz Black and White Effects
The Art Corner: Painting and Sculpture by Tassaert
Topaz Plug-Ins – Same Image Trying Each!
Topaz B&W Effects Plug-In – A Real Winner!
Keeping Focus Where You Want It Using Focal Point 2 and Color Fill Adjustment Layer
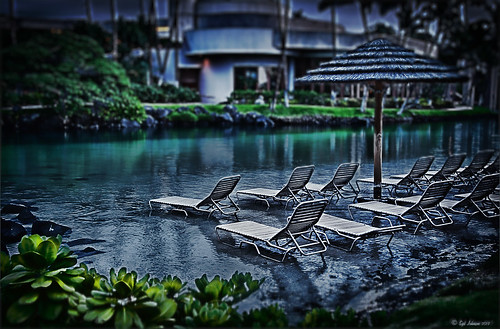 |
The above was shot in the early evening in the Lagoon Area at the Hilton Waikoloa Village – very near the Dolphin Learning Center. This is an HDR image processed in Nik’s HDR Efex Pro using three images. In my last blog OnOne’s Focal Point 2 (see sidebar for OnOne’s website link) was shown on a beautiful flower shot (see “Let’s Focus on OnOne’s Focus Point 2 – Nice Little Plug-in!“).
This time I wanted to show how pretty it works on a landscape. The Focus Bug was used to keep the lounge chairs in focus and the Focus Brush was used to keep the thatched umbrella in focus. Also a very nice dark vignette was added from inside the plug-in.
Here is a little tip on how to keep your highlights under control. In this case to keep the water highlights from becoming too dominant in the evening image, a Color Fill Adjustment Layer in any color was added, the layer masked filled with black (click on layer mask thumbnail and press backspace to fill with black), and then by double clicking on the adjustment layer color swatch, a dark blue color from the image water area was sampled so the fill color matches it. In the black layer mask, paint back with a very soft low opacity brush (between 10 and 30%) the areas you want darkened, in this case mainly the water areas around the lounge chairs – this is just a very subtle adjustment.
The last step involved adding a Curves Adjustment Layer to give a little darker feel to the image. That was it. To see the tonemapped image before the plug-in and color fill layers were added, hover over the image.
Give Focal Point 2 a try if you get chance (if you buy fine art photographer Vincent Versace’s book, “Welcome to Oz 2.0: A Cinematic Approach to Digital Still Photography with Photoshop,” the Focal Point 2 plug-in is a free download from the book which has good reviews. Also try using a Color Fill Adjustment Layer to reduce out-of-control highlights. It is a very simple technique that works very effectively!….Digital Lady Syd


