
Happy Valentines Day!

These flowers were growing in the countryside in Belarus several years ago. I am not sure what kind they are, but the blooms were huge! And the colors are incredible! Not a lot of processing here. After some basic slider adjustments in Lightroom 4, the image was opened up in Photoshop and three inches were added the left side of the image to create an area to add type by going to Image -> Canvas Size. The image was sharpened using Topaz (see sidebar for website link) Detail 3 and the Feature Contrast II preset. Some of the contrast was removed from the image by duplicating the top layer and setting it to Screen blend mode. A black layer mask was added and the high contrast areas were painted back in so they were not so obvious. (See a wonderful video by Melissa Gallo of Painted Textures called Turn Your Photo into a Pastel Painting, Pencil Drawing or Pen and Ink on how to do this.) A New Layer was created and some of the too bright highlights on the pink and purple flowers were lightly painted out. (See my Tidbits Blog Getting Rid of Those Blown Out Areas in Your Image.) Added a Levels Adjustment Layer per Melissa’s suggestion and then Topaz Simplify 4 was opened and the Painting II preset applied. The centers of the large blooms were brushed out to bring back the detail a little using a brush set to 33% opacity in the Local Adjustments section, the Dynamics slider in the Adjust section was set to 0.38, and Tone in Finishing Touches was checked. Back in Photoshop Kim Klassen’s Reentry Texture was added – beautiful texture that was free by signing up for her newsletter. On a white layer mask the flowers were lightly painted out to reveal the flowers just enough. Next on another New Layer some pink hearts were added to the background using Obsidian Dawn’s hearts-glitter brush set’s Glitter Brush set to 4100 px. Once again a white layer mask was added and the flower painted out so the hearts do not cover them. This layer was set to 68% opacity. The text was added using my favorite Freehand575 BT font set to a default setting of the Bevel & Emboss layer style. A basic texture image turned into a Valentine for you!…..Digital Lady Syd
Painterly Effect using Topaz Detail and Simplify
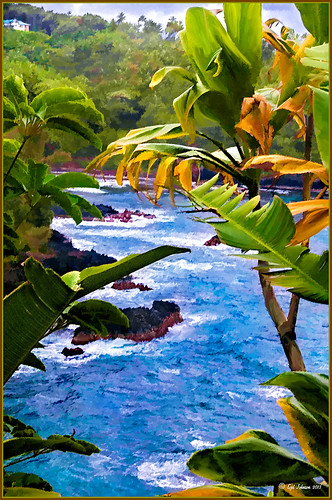 |
I was looking through my notes from last year and came across some nice info on using Topaz (see sidebar for website link) Simplify and Detail together to create an oil painting look. (See Creating an Oil Painting Effect from Topaz Labs.) My Hawaiian image from the east coast of the Big Island was one I had not originally processed as it really did not catch my eye – hoover over image to toggle to original. While doing a little Hawaii dreaming, I came across it again and thought it might look good using some of the settings from this video. (I really was thinking about how it would be to live in the house up in the top left – hum!) I actually did not follow the exact video workflow, but it did get me thinking about how to do this. Now that both Simplify and Detail have been updated, it was easier to get some different looks. Here are the steps I followed:
1. Duplicated the Background layer (CTRL+J). Topaz Detail 3 was opened and the settings from the second example in the video were applied: Small Detail .53, Medium Detail .46, and Large Detail .44.
2. Duplicated the Detail layer. Next Topaz Simplify 4 was opened and the Painting IV preset was applied. The only change to it is that the Edges section was turned off as it made the trees in the background stand out.
3. A Layer Mask was applied to the top Simplify layer. Some of the Detail Layer was brought back in by painting black on the mask on the foreground leaves. Also some detail in the little rock island was painted back.
4. What I did different was to add a New Layer and paint over the foreground leaves and trees in the midground to give a more painterly look and smoothing out some of the rough edges and colors that Simplify can bring into an image. A wet mixer brush was used for this.
5. Next a general Curves Adjustment Layer was added to bring in some contrast.
6. The sky was really blown out, so I added another Curves Adjustment Layer that brought back the natural clouds from the original image into the sky. The Layer Mask was filled with black and just the sky area was painted back with a soft black low opacity brush.
7. The water was way too cyan for my taste, so another Curves Adjustment Layer was added and the different color channels were adjusted to get a better color for the water.
8. I felt like the eye was not guided with a strong enough element to get you through the image. Therefore, a New Layer that was set to Overlay Blend Mode was added. With a large black brush set to 15% opacity, the edge of the bay was lightly painted on the water all the way to the back center. This burned in a slight contrast in the water for the eye to follow. Much better overall impact for the image.
9. The last step involved adding my SJ Thin Double Edge Frame layer style left at the default colors.
That is how I got this very Hawaiian Oil Paint feeling. Give these two plug ins a try and see what you think…..Digital Lady Syd
Digital Lady Syd Related Blogs:
Topaz Simplify and Topaz Detail Together
EPCOT Texturized

Was looking at some of my older work and came across one of my first texture images from three years ago. I really liked the treatment of this image so I thought I would try to reconstruct how I did it. A very different workflow was used. When the Lightroom adjusted image was opened in Photoshop, I did some clean up to remove some tourist heads. Then Topaz (see sidebar for website link) Adjust’s Spicify preset was applied. Next Nik Silver Efex Pro Antique Plate preset (pretty close to SEP2’s Antique Plate II) was added and set to 42% opacity. Ash Texture 25 was added (it’s a shame but they are no longer available, but Isabelle Lafrance free Decemberpack1 texture 1 has a very similar look) and set to Overlay at 100% opacity. Back into Silver Efex Pro where the Neutral preset was applied – layer was set to Screen at 51%. Next a Curves Adjustment Layer was added using a slight S curve to enhance contrast. Topaz Simplify was applied using the basic BuzSim preset. The last step used OnOne’s (see sidebar for website link) PhotoFrame Dave Cross 15 set to 72% opacity – the PhotoFrames are no long available in the newest release but many are incorporated in the new Perfect Effects 4 module. The final result is really nice – I am going to experiment some more using these plug-ins to enhance my texture effects…..Digital Lady Syd
Beautiful Feathers!

These beautiful feathers were from the 24th Annual Native American Festival held in Ormond Beach, Florida. Totally enjoyed looking at the many exhibits and vendor tents, and the shows were very entertaining. This image is of a display of feather hair bungies that was in a vendor tent. Very little treatment was done to the image. The biggest change in Lightroom was changing the aspect ratio to a square crop. A few Basic sliders were adjusted before opening Photoshop. First the image was taken into Topaz (see sidebar for website link) photoFXlab where the layer was duplicated and in the Effects tab, Black and White Albumen – Chocolate was applied (this is actually a preset in the Black and White Effects plug-in). Next in the Adjustment Tab, Saturation was set to 2, Exposure to -0.05, Contrast to -5, and Dynamics 25. The top layer was set to 52% opacity and a Color Blend Mode. Once back in Photoshop, Topaz Detail 3 was opened and the Overall Medium Detail preset applied. A black layer mask was added and with a soft white low opacity brush, only areas I wanted really sharpened were painted back in. Then a little clean up to smooth the background was done. I really like the soft looking feathers in this image. What a fun place to take pictures – and not much processing needed afterwards!…..Digital Lady Syd
Hyacinths Deep in Reflection

Recently I posted a blog using this image called Take the Time to Experiment! where a Mirror Effect filter from The Plugin Galaxy was used. This time the Flood Filter from Flaming Pear was applied. I love this filter. It is the only one that gives a really realistic look to a water reflection. Before applying the filter, the canvas had to be increased to add the reflection under the image. (Here are the Flood filter settings used so you can see all the sliders that can be manipulated: Horizon 60, Offset 0, Perspective 68, Altitude 6, Waviness 17, Complexity 17, Brilliance 28, Blur 15, Size 0, Height 23, Undulation 46, and Glue Normal.) See my Fun Photoshop Blog The Flood Look for tips on how to apply this filter. Nik Color Efex Pro 4‘s Midnight, Polaroid Transfer, and Detail Extractor filters were applied to just the hyacinths to add back some color to the flowers, especially in the reflection. In Photoshop the layer was then set to 69% opacity. That was it. Really fun effect!…..Digital Lady Syd
Adding Texture to a Landscape

Usually I use my own images to alter, but I found this beautiful texture image of old buildings in Porto, Portugal, from Mayang’s Free Textures (scroll down a ways in link to see original) and it seemed like a good candidate to see what I could do with some more textures to enhance it some. Click their link to see the original image and lots of others that can be used for personal use.
This image was first processed using Topaz (see sidebar for website link) photoFXlab. First duplicated the layer. On top layer the Black & White Effects plug-in was opened and Hand Tinted Chiffon was selected with Transparency set to 1.00 and Vignette Strength to .45. After applying the plug-in, back in photoFXlab this layer was set to Linear Light at 100%. A +From Stamp layer was created and these Adjustment tab sliders set: Tint -8, Saturation 17, and Dynamics -28. Next exited to Photoshop where some clean up was done and French Kiss Artiste Collection Fantasie texture was applied. Two Hue/Saturation Adjustments Layers were added with black filled layer masks – the red-orange color needed to be adjusted and the greens above the buildings were off. These areas were painted back in the masks to create the correct tone in the image. An Ash texture (no long available – but Shadowhouse Creations has a very similar texture called ArtGrunge 5 which would give a very similar effect) and it was set to Hard Light blend mode at 45%. A hazy feel was added to the image by adding a Levels Adjustment Layer and just moving the Output Level black tab to 80. A Curves Adjustment Layer was added next to just slightly add contrast. This image had a very low resolution on it so I created a composite layer on top (CTRL+ALT+SHIFT+E) and went to Image -> Image Size and checked the Resample Image box and set the resolution to 240, leaving the size alone. The last step was adding my Mid Size Double Edge Frame layer style – sampled colors in the image for frame colors. I was really pleased with how painterly this image turned out. It is a little different from creating a flower type texture image, but you can really add some creative aspects with a little experimenting. And thank you Mayang.com for supplying such a interesting image to work with!….Digital Lady Syd
Fake Panoramic Effect
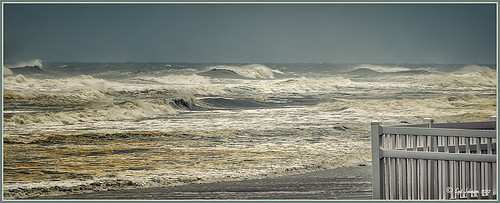 |
Taken the morning after Hurricane Sandy went past Ormond Beach in Florida, this image showed how strong the surf was and how gray the sky appeared even though the ferocious hurricane was not a direct hit. We were so fortunate that the storm did not hit Florida directly.
What I really like about the shot is how sharp the texture in the waves and beach surf is. To get this effect, the image was first processed in Lightroom where just basic slider corrections were made and a custom crop was created. I usually do not do this, but this image seemed to scream panorama to me as the sky was so plain and the main subject is the large expanse of water. Since everything was moving, a several shot panorama was out of the question, so it had to be faked. Click on image to see Lightroom version – it is very flat, not at all how I remember it. In Nik Color Efex Pro 4, a Cross Processing filter using Method C04 at 27% strength, Detail Extractor filter set to Normal (Detail Extractor at 64%, Contrast at 31%, and Saturation at16%) with 6 Control Points to restrict the filter effect to the sky area, and a Lens Vignette filter (Amount -9, toward Rectangle,Size 57% and Brightness -16%). In Nik Viveza 2 the Center was brightened. The Spot Healing Brush was used on a clean up layer, and Contrast was boosted with a Curves Adjustment Layer. The default preset in Imagenomics Noiseware was applied. When noiseware is applied, the image detail will usually get softer – therefore, in a white layer mask, I painted with a soft black brush the waves back so you can see the water mist detail. The last step was to apply my free SJ Thin Double Edge Frame layer style sampling colors from the image. Now I get the result I remember!…..Digital Lady Syd
Christmas Wreaths at SeaWorld

For this wonderful holiday, thought I would show this pretty image of wreaths from SeaWorld Orlando. Just a little basic processing in Lightroom before taking the image into Photoshop. Topaz (see sidebar for website link) Adjust 5’s High Key preset was applied with the Overall Transparency set to .24. Next Topaz Detail 3 was applied using the HDR Enhancement II preset. French Kiss’s Artiste Chamante texture was applied and set to Overlay at 100% opacity. My free Snow1 Overlay was next applied and set to 75% opacity. French Kiss’s Glorious Grunge Edging Overlay was applied next and a Solid Color Adjustment Layer set to a light pink was added. Since the edging did not seem to show up real well, it was duplicated along with the Adjustment Layer. That was all that was done and I love the final effect – the umbrella really added to the shot. Hope all are having a wonderful week!…..Digital Lady Syd
Little Red Corvette

Just felt like using a couple of my old standby favorite plug-ins to create a vintage feel to this image. This old red corvette image was taken at the 39th Annual Daytona Turkey Run at the Daytona International Speedway infield. I love the way the raceway seats are in the background – it just seems to the be the right setting for this old girl – I love corvettes! It was processed first in Lightroom starting out with cropping and applying one of David duChemin’s Lightroom 4 presets called Warmer Sunset -.66 Grad – I was surprised it gave such a nice vintage feel for starting post-processing of the image. From there several adjustments basic Lightroom adjustments were done and the chrome was sharpened using an Adjustment Brush. In Photoshop Nik Viveza 2 was used with control points placed on the windshield to clean up some window glare (this plug-in does an amazing job with window glare) and on the detailing on the car. Then Nik Color Efex Pro 4 was applied and several of my favorite filters were stacked – Darken/Lighten Center, Detail Extractor, and my favorite for getting this vintage feel, Film Efex Vintage set to Film Type 14 with an overall opacity of 56%. A Curves Adjustment Layer was added and French Kiss free Glorious Grunge Edging Overlay with the lines inside removed was applied and set to a tan color. I wish I could fix up this car – she really was a beauty!…..Digital Lady Syd
Digital Lady Syd Related Blogs:
Yellow Dogface Butterfly in her Glory!
Soft and Sharp Image at the Same Time!
Christmas at SeaWorld Orlando

These “floating” trees were in the pond area at SeaWorld Orlando in October and they looked really strange. I decided to spruce them up a bit and give them that holiday feel – these must have been the first decorations they put up. I have said it before and I will say it again – whenever I cannot figure out something interesting to do with an image, OnOne’s (see website link on sidebar) Perfect Effects usually has the answer. In this case two effects were stacked: Nicely Toasted preset from the Vintage group – set to Hard Light at 74% opacity and Warm Vintage also from the Vintage Group with a few changes to Brightness (-45), Contrast (-40), and Darken Blend Mode with Strength 58. A Composite Channel Curve was set (In157/Out 138). My free Snow1 Overlay was added along with my free Merry Christmas PNG Overlay using an Outer Glow layer style set to a bluish color (Blend Mode Normal, Opacity 39%, Spread 8%, and Size 215 px) – use this trick to to make your text and overlays stand out if on a busy background. Added text layer for my name, and added French Kiss Glorious Grunge Edging Only with the grunge erased from the middle. All of these overlays used a Solid Color Adjustment Layer set to a soft cream color sampled from the roof of the building. (Layer -> New Fill Color -> Solid Color and check Use Previous Layer to Create Clipping Mask for each overlay). The text layer used the same color. A Curves Adjustment Layer was added and the mask filled with black – with a 30% opacity white soft brush, the areas I wanted affected were painted back in the mask. That was it. Hope you can use a few of these tricks to make some nice cards…..Digital Lady Syd
Digital Lady Syd Related Blogs:
Where to Find Those Cool Free Christmas Card Templates?
Free Christmas Card Vectors and Brushes
Beautiful Christmas Flowers
Some Free Christmas Overlays to Spice Up Your Christmas Cards
Unexpected Humor in an Image

I was so busy trying to shoot these beautiful McCaws in sharp detail on my camera (Blue Horizons Show at SeaWorld-Orlando) that I did not notice what else I was shooting. What a surprise! Although I must say I did a pretty good job of catching the birds while they were zipping by pretty fast. The birds even look like they are laughing!
After basic processing in Lightroom, I decided the image needed a soft background feel as it was really busy and the birds were getting lost in the background. So I went back to one of my all time favorite filters, Nik Color Efex Pro 4‘s Film Efex-Vintage, to get the look I liked. First the Darken/Lighten Center filter and Brilliance/Warmth filter were applied – both of these filters I use a lot as they always give nice results. But one of my very favorites is the Film Efex-Vintage filter – there are so many options with this one filter that it is amazing. This time Film Type 11 was chosen with the vignette turned off. It turned this image into these beautiful brown tones. Clean up, a Curves Adjustment Layer to add just a little contrast, a Photo Adjustment Layer set to Cooling Filter 80 at 43% density (applied to just the birds by filling the layer to black and painting back in the birds in white), Noiseware‘s Default preset, and a soft painted layer was used to slightly soften the trapeze artist. My Soft Sparkle Overlay Frame was added with a Color Fill Adjustment Layer clipped to it to change the color to a dark brown. To see other results of using the Film Efex-Vintage filter, check out some of my older blog links below……Digital Lady Syd
Digital Lady Syd Related Blogs:
The New Film Efex-Vintage Filter From NIK CEP 4
Loving SeaWorld!
Hawaiian Bliss!
Nik Color Efex Pro 4 Just Does It Right!
Vintage Toy Processing

This image is of a really cute 6-year old that I met at the 39th Annual Turkey Run at the Daytona International Speedway who graciously agreed to pose for me. These vintage toys bring back a jolt from years past! Amazing you can still buy them! This image was processed in Lightroom using a Gritty Preset by Michael Rather from the True Grit Video – I use this preset a lot for this type of look. Then I increased the orange and red saturation a little to get the colors to pop. An adjustment brush set to Sharpen and Clarity was added to sharpen the lettering and detail on the toys only. In Photoshop Topaz (see sidebar for website link) photoFXlab was opened and from the Effects tab, the Retro Style I from Topaz Adjust 5 was applied. My favorite Adjustment tab brush Dynamics was increased along with the Sharpness. Then using the Masks tab, the effect was removed from the boy’s face. The layer was then set to Darken blend mode at 88% opacity. Back in Photoshop a High Pass Filter set to 8 and Soft Light blend mode was used to sharpen the photo. The last step involved adding French Kiss’s Glorious Grunge Edging free overlay with some of the lines removed in the center so as not to be distracting. The last step was using Nik Viveza2 (all time favorite plug-in) to direct the eye to the cute kid and toys. That’s it!…..Digital Lady Syd
Digital Lady Syd Related Blogs:
Trying Out Some New Techniques!
Digital Lady Syd’s Review of Topaz photoFXlab v1.1
Using photoFXlab v1.1
Using Topaz photoFXlab to Replace Skies
Yellow Dogface Butterfly in her Glory!

This Southern Dogface Butterflies (named for their heads that look like French poodles) visited my purple pentas this fall. They are very skiddish butterflies and are hard to photograph. I used my 60 mm Nikon Macro Lens to catch the shot at F/3.2, 1/2000, and ISO 200. The image was processed first in Lightroom 4 using the workflow from my How to Use Adobe Camera Raw (ACR) or Lightroom 4 Quickly blog. To create the soft effect, Nik Color Efex Pro 4 was applied with several filters stacked: Midnight using Neutral Color Set, Glamour Glow with Glow set to 90%, Vignette, and Film Efex Vintage set to Film Type 2 and an Overall Opacity of 40%. The Sharpen Tool was applied to the face. Nik Viveza 2 was applied to soften the bright tones in the background and to sharpen the head a little more. My Mid Size Double Edged Frame was added to the image to finish up. I really enjoyed working on this image – it has a different feel to what I normally do……Digital Lady Syd
Displacing an Overlay

Since I have been posting a lot on overlays recently, I wanted to show how you can get a really authentic look to overlays by displacing them onto a textured background. In this image the lettering looks like it has been on the wall in the background all the time. This is pretty neat trick Photoshop can accomplish but I personally find it hard to do. Corey Barker, of The Photoshop Guys fame, gave a nice quick tutorial on his Planet Photoshop website called Graphic Texture. The process involves creating a displacement map psd file that is applied to the overlay layer. The steps are as follows:
1. Open image and make sure it is in 8 bit mode. To find out, go to Image -> Mode -> 8-bit. At this point I created a Stamped Composite layer of all the work I have done to have a clean layer to start this process on – go to CTRL+ALT+SHIFT+E.
2. Create duplicate copy of image by going to Image -> Duplicate Image and click OK. This will be your Displacement Map image. Convert this image to black and white image by going to Image -> Mode -> Grayscale. Save the Displacement Map as a psd on your desktop so you can get to it easily.
3. In your regular image, do corrections and add your overlay were you want it. Be sure to Rasterize (right click and select) your overlay if it is a Smart Object.
4. With overlay layer selected, go to Filter -> Distort -> Displace and in the dialog box, set Horizontal and Vertical to 5 for small displacement or 10 or larger – the image above used 5. You are then directed to find your grayscale image on your desktop. Once done, the overlay will distort by the amount of your settings.
5. CTRL+click on overlay layer thumbnail to select your graphic.
6. Highlight your layer underneath your overlay layer, and CTRL+J to copy to a New Layer. Turn off your old overlay layer. The lettering may totally disappear now. Desaturate the new displaced overlay layer by pressing CTRL+SHIFT+U. Go to Layer -> New Fill Layer -> Solid Color and check Use Previous Layer to Create Clipping Mask and OK. Change to any color – try sampling in your image when you hover your mouse over it. You do not need to turn on the original displaced lettering layer.
7. Try changing the layer blend modes and opacity of your overlay layer. Add a Levels Adjustment Layer to increase contrast if needed.
That is it. It is not that difficult but does take a little manipulation to get to work. If you do get it right though, a beautiful result will occur…..Digital Lady Syd.
Digital Lady Syd Related Blogs:
How to Create Personal Overlays for Your Images
Spotlight on the Pink Spica!

Just another example of the wonderful Camera Raw sliders now updated with Adobe Photoshop CS6 and Lightroom 4. This beautiful pink spica was taken at the Hawaii Botanical Tropical Garden and was first processed in Lightroom 4 by following Scott Kelby’s workflow in my How to Use Adobe Camera Raw (ACR) or Lightroom 4 Quickly blog. The White Balance was left as shot, Exposure set to -0.10, Contrast +24, Highlights -100, Shadows +100, Whites +10, Black -6, and no Clarity or Vibrance were used. The Green slider was set to -30 in the HSL Saturation section to reduce the color just a little. Noise reduction Luminance was set to 22, the Lens Correction profile was set to my camera lens, and in Effects a Highlight Priority Style Post-Crop Vignetting Amount set to -41.
In Photoshop a lot of clean up was done on the leaves – they had spots everywhere but the Spot Healing Brush worked wonders on most of it – just set to Content Aware in the Options Bar and swipe away. Scott’s Highlight Effect was applied to spotlight the flower (duplicate the layer and set it to Multiply blend mode, then add a layer mask and paint back in your object with a big soft black brush). Topaz (see sidebar for website link) Simplify 4’s Watercolor II preset was applied to soften the flower a little. A black layer mask was added and the flower was painted back with a low opacity brush in white to give just a hint of the painterly look. My Thin Double Edge Frame layer style was applied with colors sampled from the image. Very quick and very easy. Love the final look…..Digital Lady Syd
Digital Lady Syd Related Blogs:
Spotlight Effect With the New Subtract Blend Mode
A Vintage Butterfly Postcard Effect

My butterflies certainly get around. This lovely lady is checking out my yellow and pink lantanas in my front yard. I had fun creating this antique post card effect. Not sure why I did it but it was fun. Thought I would share how I got this final result as it involves using overlays, which add such an interesting look to an image. The original butterfly image was processed using Nik Color Efex Pro 4‘s Detail Extractor filter and then Film Efex Nostalgic Film Type 1 filter. This gave a very solid looking, almost illustrative look, butterfly and flowers to work with. I added a black layer mask and painted back the parts I wanted to use for the image. Underneath this layer ShadowHouse Creations PC8 (Post Card) texture was added and a Solid Color Adjustment Layer clipped to the texture (CTRL+Click between the layers) using a lighter color to brighten it up. Two layers were created and light blue and pink were painted around the butterfly and flowers. Three of French Kiss’s overlays were added: 1904 for the writing, Grungy Flourish for the upper left corner design, and Stamp 2 – all from the French Script No 1 brush collection, and Glorious Grunge Edging for the outside of the postcard (this is free on her website and a really nice overlay effect). Also on a New Layer a single brush stroke of Paper Scratch Brush in Paper Damages Brush Set on Adobe Exchange was used to get the folds. This just sort of developed and it was fun to do. Got to love Photoshop!…..Digital Lady Syd
Digital Lady Syd Related Posts:
Artistic Daisy!
Artistic Daisy!

This yellow daisy has a very interesting texture by French Kiss Textures called Lakeside – she actually offers it for free at her website (she also has some great tutorials on how to use textures on her site). I was not that familiar with her textures until recently – she has some beautiful textures that have more of an artistic flair to them than most sites. This texture was actually placed behind my daisy. A Hue/Saturation Adjustment Layer was placed above the texture and the colors were changed from the blue-yellow-green to the green-purple tones by setting Hue to -117, Saturation to -41 and Lightness to -8. The daisy had been cut out as an object using Select -> Color Range and selecting just the flower and stem. The flower was processed in Topaz (see sidebar for website link) Simplify 4 using the Oil Paint Toned V preset – the Tone and Edge Sections were turned off and the color space set to RGB. The layer was set to 75% opacity to tone it down a little. A pink textured border (see my SJ PNG Borders) was placed round the image and the color was changed to light brown using another Hue/Saturation Adjustment Layer set to Hue +48, Saturation -3, and Lightness 0. A Curves Adjustment Layer was added to get the final contrast in the image. That was it. Try downloading her free texture package and see if you like them as much as I do!….Digital Lady Syd
Digital Lady Syd Related Posts:
Getting a Nice Painterly Landscape Effect with Topaz Simplify and Texture
A Little Hollywood for My Butterfly Model
Digital Lady Syd Reviews Topaz Simplify 4
Getting a Nice Painterly Landscape Effect with Topaz Simplify and Texture

An easy way to get a painterly look. This image is at the entrance to SeaWorld in Orlando, Florida, and is a great place to take a shot – very Disneyland-like colors! This look was created by doing these things:
1. Applied Topaz (see sidebar for website link) Simplify 4 using the Painting V preset set to transparency to .28
2. Next French Kisses Artiste Fauve Rainbow texture was added – although any painted texture you like could be used. A Hue/Saturation Adjustment Level was clipped to the texture layer (by ALT+clicking between the layers) and Saturation was set to -100 to desaturate the texture so it can be layered on top of the image so the color in the texture does not show up on the image. The texture blend mode was then set to Hard Light at 34%. (Try different blend modes to see which looks best on your image.)
3. A Levels Adjustment Layer was added to brighten the image as the texture tends to darken the midtones.
4. Topaz Detail 2 was applied to sharpen the image using the Creative Detail Accent preset with some adjustments to the three color sliders and the saturation slider.
That was it and you get this nice painterly effect!…..Digital Lady Syd
Digital Lady Syd’s Related Blogs:
Topaz Simplify and Lens Effects Saves an Image!
Digital Lady Syd Reviews Topaz Simplify 4
Using Topaz Simplify for That Artistic Feel!
Feeling Butterflies!

Really liked the way this image turned out and it was a fairly simple process. After setting the Lens Correction panel and Cropping the image, a Blue Sky-Heavy Green preset created from Dave duChemin’s Lightroom 3 book (the preset contains only Split Toning panel – Highlights Hue 220 and Saturation 25, Balance -15, and Shadows Hue 120 and Saturation 20) and Matt Kloskowski’s preset Focal Point (Portrait – Bottom Right) were applied. Since the first preset only affected the Split Toning panel and the Focal Point preset did not change this panel, both could be applied in Lightroom without a problem. The image was brought into Photoshop and first Topaz (see sidebar for website link) Detail was applied (Detail Setting used: Small Detail .5, Medium Detail .3, and Large Detail .3; and Tone: Brightness .03, Contrast -.16, Cyan-Red .26, Magenta-Green -.37, and Yellow-Blue .44) and Topaz DeNoise 5 (Noise Reduction slider .42 and Recover Detail slider .36).

Now the out-of-focus pink flowers looked bad, so a New Layer was created to paint in the over-exposed white spots to keep the eye from wandering to those areas. On another New Layer using a 15% opacity soft edge brush the straight green stem was painted darker sampling in the image to add a slightly darker green. Another Hue/Saturation Adjustment Layer was added and the Yellow Saturation set to +40. It took a while to settle on a final result but since the Adjustment Layers are all non-destructive, it was easy to try different effects. A Gaussian Blur was applied to a Composite Layer (CTRL+SHIFT+ALT+E) created on top and using a Radius of 6.6. On a layer mask, the butterfly and foreground flowers were painted back in black on the mask. A lower 30% opacity brush was used to slightly paint back the flowers in the mid-ground left side. Next my Soft Sparkle Overlay Frame was applied but since it is a deep reddish brown, a Solid Color Adjustment Layer (Clip it to the layer by clicking ALT+Click between the frame layer and the adjustment layer) set to an off-white was used. Finally a Curves Adjustment was added contrast. Just Fun!……Digital Lady Syd
Digital Lady Syd Related Blogs:
How To Make Frames or Borders
Getting Rid of Those Blown Out Areas in Your Image
A Little OnOne Perfect Effects Vintage Look

This beautiful Scottish Church was taken from a train going from Edinburgh to St. Andrews. This is a wonderful way to capture some of the countryside. I am surprised how sharp this image was since the train was moving – my settings using a 18-200mm Nikon lens were F/13, 1/200 sec, ISO 400 using a 45 mm lens. For post-processing, the first thing done was to create three Virtual Copies in Lightroom and set them at different exposure settings – one to about -2, one using the original, and one set to +1. This is a way to get an HDR look using a single image. The first two where then taken individually into Topaz DeNoise 5 (see sidebar for website link) and adjusted for noise issues. The +1 just used a little adjustment in Lightroom since the over-exposed image did not have a lot of noise. All three images were then selected in Lightroom and right-clicked to get menu – Open In -> Merge to HDR in Photoshop. That is how the bottom layer was created. Next by applying OnOne Perfect Effects (see sidebar for website link), the image took on a great look. This plug-in can do interesting things to images – usually when I just can’t put my finger on what I need for a photo, Perfect Effects has a solution. This image uses these filters presets stacked: Black and White->Warm Gray with colors swapped in Effects Options, Detail->Texture Booster, and Borders->Russell with Scale set to 4 in Effect Options. Back in Photoshop Nik’s Viveza 2 was applied to add a little soft color in the sky, sharpen the cupola, and add a little brightness to the front of the church. Then Topaz DeNoise 5 was applied one more time to get rid of some noise created by the plug-in application – this time it was targeted to the sky and water using an Overall Strength setting of .11, and for the lighter areas, Adjust Highlights set to .28. Recover Detail was set to .30 and Reduced Blur to .13. This sounds like it was a lot of effort, but it really was very quick to apply. The hardest part was adjusting the noise in the three virtual copies in Lightroom. …..Digital Lady Syd
Digital Lady Syd Related Blogs:
Can a Pseudo HDR Image be as Good as the Real Thing? (Part One)
Can a Pseudo HDR Image be as Good as the Real Thing? (Part Two)
Polly Parrot Simplified with Topaz!

Pretty basic application of Topaz (see sidebar for website link) Simplify 4 on this image. This adorable parrot image used a Simplify preset I previously applied to an ocean scene. (These are the preset settings: Simplify YCbCr; Size 0.15, Feature Boost 0, Details Strength 1.09, Details Boost 2.42 , Details Size 0.70, Remove Small 0.10, and Remove Weak 0.31; Adjustments tab: Brightness 0, Contrast 1.05, Saturation 1.70, Saturation Boost 1.20, Dynamics 0.31, Structure 0.95, and Structure Boost 1.00; No Edges; Curves Tool – Strong Contrast II; and Transparency – Overall Transparency 0.40.) ShadowHouse Creations beautiful Overlay Texture MO8-2012 was applied at Linear Dodge (Add) blend mode at 100% opacity. A Curves Adjustment Layer and a little clean up finished up the image. I love the results!…..Digital Lady Syd
Loving SeaWorld!

Just a great start to a fun day at SeaWorld-Orlando. This is what you see right after entering the theme park. The lovely red flowers are red Bougainvilleas. In Lightroom three images were used in PhotoMatix’s Merge to 32-bit HDR program. Then the resulting TIFF image also was processed in Lightroom 4.2 before it was opened up in Photoshop CS6. Nik Color Efex Pro 4 plug-in was applied stacking these filters: Film Efex: Vintage using Film Type 4, Glamour Glow, Midnight using an overall Opacity of 40%, and Image Border Type 4. A Curves Adjustment Layer was added to adjust contrast and the Sharpen Tool was used on the blooms. I really love the lighthouse with the whale image……Digital Lady Syd
Digital Lady Syd Related Blogs:
Digital Lady Syd Reviews Topaz DeNoise 5
Orange Flower Fun!

Just felt like posting a pretty autumn looking flower – these are called Orange Spark Symphony (Osteospermum hybrid) which are also called Mimosa Sunset – very confusing and very unusual! Topaz (see sidebar for website link) Adjust 5 was used with the Retro IV preset applied. ShadowHouse Creations OldPhoto2 texture was used and set to Soft Light Blend Mode. That is it! I love these daisies!…..Digital Lady Syd
Digital Lady Syd’s Related Blogs:
Digital Lady Syd’s Review of Topaz Adjust 5!
Cafe Alcazar and Vintage Topaz Adjust
Trying Out Some New Techniques!

Just thought I would try out a couple new tricks. The image was a JPG shot with my little point-and-shoot Kodak camera at Flagler Beach on a beautiful early evening. A short Lightroom video called True Grit by Michael Rather was followed to create a nice gritty effect preset. I tried it on this landscape image (he used an image of a boy’s face) and really liked the effect. Next Topaz released Simplify 4 (see sidebar for website link) so I applied this plug-in to the photo in Photoshop. This is a free upgrade for anyone that has the bundle or has bought the Simpify plug-in previously. Lots of fun here. This was basically just playing around with the settings to get to know the program and getting a nice look. In Photoshop a Hue/Saturation Adjustment Layer was added where the Red Hue slider was moved so it was not so bright. I also added a layer mask to the Simplify layer and painted back in just a little of the white wave detail using a soft, low opacity black brush in the mask. The last step is my Black and White Layer Style. …..Digital Lady Syd
Digital Lady Syd Related Blogs:
Using Topaz Simplify for That Artistic Feel!
Blue Flowers and Layer Style Frame
I Didn’t Know That! Converting Lightroom Preset to Adobe Camera Raw Preset


