
Beware of Snoozing Cat!
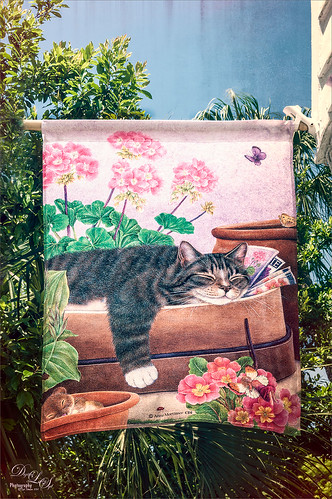
Loved this banner by Anne Mortimer CDI (she does great cat images) outside a darling upstairs cat boutique in St. Augustine, Florida, called City Cat County Cat. (No website so here is their store address: 72B St. George Street, St. Augustine, FL 32084 – definitely worth a stop if you love cats!) If I had a cat, I would buy this! Just basic changes in Lightroom before going into Photoshop. This time I used the Adaptive Lens Filter to straighten up the edges of the banner just a little. On a duplicate layer, OnOne (see sidebar for website link) Perfect Effects was opened and Jason Lucas’ preset Old Man’s Chair (from an OnOne give-away set when you own the suite) was applied and the top Texturizer layer’s opacity was reduced for less Light Leak effect. A Detail Adjustment Layer was added on top in the plug-in and just the cat’s face was sharpened. Back in Photoshop the layer opacity was set to 73%. I created a stamped or composite layer on top (CTRL+ALT+SHIFT+E) and the Sharpen Tool was used just a little bit on the cat’s face and the mouse. That was it – very simple and I really like the preset by Jason – gave a great vintage effect!…..Digital Lady Syd
Digital Lady Syd Related Blogs:
How to Use the Adaptive Wide Angle Lens Filter
My Turtle Friend

Been enjoying my turtle pictures from the Ormond Beach Memorial Art Museum and Garden in Ormond Beach, Florida. This guy was just minding his own business and enjoying the Florida sun when I snapped him. Just basic adjustments were done in Lightroom. In Photoshop I used Nik Viveza 2 to sharpen his turtle lines and to draw focus to his face, and then the Camera Raw filter was applied using the Radial filter for a vignette effect. Really liked how this guy turned – just fun to do!…..Digital Lady Syd
Pretty Hats
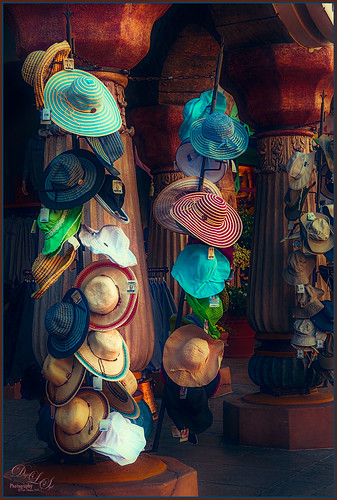
Had to take this image of these really cute hats. Topaz (see sidebar for website link) Detail 3 was applied first in Photoshop to add some general sharpness to the image. Then Topaz Restyle’s Waterloo and Mint preset was added – loved the resulting rich colors that were achieved. The last step was added three Camera Raw Filter Radial Filters to bring the focus of the image on the hats to the left. Add my SJ Thin Double Edge Frame using sampled colors from the image to match. I really enjoyed seeing these hats – so pretty!…..Digital Lady Syd
Soft Pink Calla Lilies!
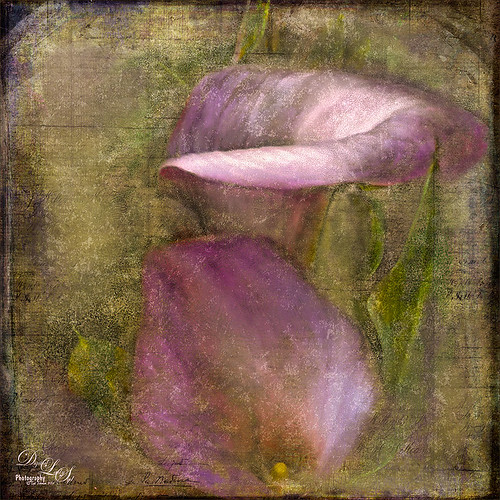
Just wanted to play with this beautiful image of soft pink calla lilies – love their color! Took them with my Android phone in the grocery and loved the result. Did nothing special to them in Lightroom – just the basics, then did a little clean up on the image in Photoshop before adding 2 Lil’ Owls (see sidebar for website link) Carnavale texture. Painted back the flowers in a layers mask attached to the texture and topped it off with Kim Klassen‘s Cloth & Paper Collection’s Magicfilm set to Soft Light blend mode at 45% layer opacity. This completed the vintage feel. The colors just did not look quite right to me and I had a hard time figuring out what to do to get the final look I liked. Then it hit me – go to my favorite plug-in – Nik’s Viveza 2 – and sure enough, with just two control points on the flower petals, I got just the color effect I wanted. Once again, lots of fun to do on boring Monday!…..Digital Lady Syd
Total Eclipse of the Moon!
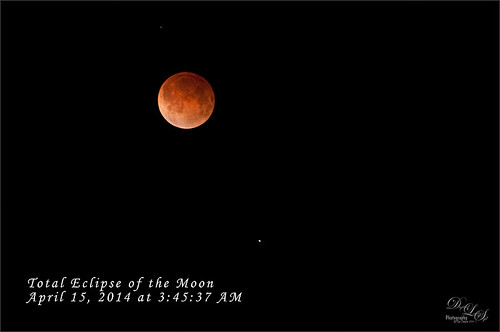
Image of lunar eclipse taken on April 15, 2014 at 03:45:37 AM from northeastern Florida showing what was considered totality according to Astronomy Magazine. Image was shot with my AF-S Nikkor 70-300 mm 1:4.5-5.6 G lens set to aperture priority mode at F/5.6, 300 mm focal length (with crop factor 450 mm), and ISO 1600, with a resulting shutter speed of 2.0 sec. My Nikon D300 was set up on a tripod with a shutter release cord to get the sharpest results. Unfortunately the sky was not all that clear when the photos were being shot and my equipment is not the latest, but all in all, I think it did a fair job of getting a beautiful lunar eclipse shot. No post-processing in Lightroom – just did not help. Took image into Photoshop and used Topaz (see sidebar for website link) DeNoise (Overall 10, Shadows 34), then applied a black layer mask and just painted in a few areas that really needed it – really not too much adjustment here even though my camera does not handle ISO 1600 real well. Topaz Detail 3 was applied (here are the settings: Small Details 0.28, Small Details Boost -0.02, Medium Details 0.55, Medium Details Boost 0.15, Large Details 0.61, and Large Details Boost -0.29 – best plug-in around for this type of detail work) and once again a black layer mask was applied and just a few areas were added back to get more detail in the moon surface. The text font is Monotype Corsive at 38 points. That was it! It was so much fun to go out and shoot at night. Also check out my blog of a lunar eclipse taken on 12/21/10 called Shooting a Lunar Eclipse for more info. Have a great day!…..Digital Lady Syd
Lantern at Stetson
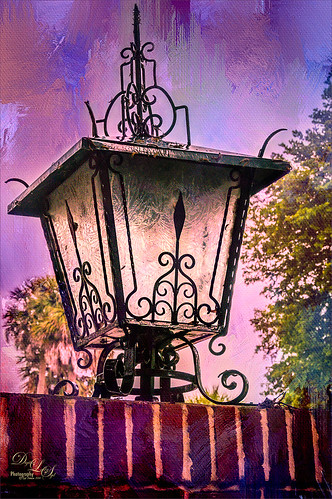
This beautiful large lantern was sitting on top of a large brick wall introducing Stetson University in DeLand, Florida, where my son goes to school. This was an easy image to post-process – just a little detail sharpening using Topaz (see sidebar for website link) Detail 3 so the glass etching could be seen better. Used a black layer mask and just painted back the glass areas. Next I used Mellisa Gallo (one of my favorite texture people) of Painted Textures November Twilight texture set to Linear Light blend mode at 100% layer opacity and April Impasto texture set to Multiply at 52% layer opacity – these were both from great deals she runs on her website each month. The lantern was painted back softly in a layer mask on each texture so the etchings still show up nicely. Now to get the lantern to light up just a little, I tried several different things and it just did not look right. My last attempt was using Nik’s Viveza 2 and setting a Control Point in the lantern. Then the Warmth was set to 44%, Brightness 36%, Contrast -32%, Saturation 52%, and Shadow Adjustments 100% to get the soft glow in the lantern. This filter never lets me down! Anyway, this image is just the way I wanted it!…..Digital Lady Syd
The Red-Roofed Barn

Here is a good example of what not to do – I have no real idea how I post-processed this image of a red-roofed barn in Jackson, Mississippi, last week on my laptop, as it got saved accidentally as a flattened .psd file. I really like the results so I am going to guess. I believe that I placed a sepia version on top of a regular version by bring in two versions from Lightroom. With the sepia layer on top, I lowered the opacity a little on the sepia toned layer, and then back more of the the beautiful red roof and light green foreground. Usually I w0uld have removed all the wires, signs, and telephone lines, but in this case, it seems to really be how to the image actually looked. A stamped version (CTRL+ALT+SHIFT+E) was created on top of the layers, and a fairly strong vignette was added in OnOne (see sidebar for website link) Perfect Effects 8 along with some sharpening. This software does a really nice job on landscapes like this. Anyway, I liked the photo so I thought I would post it……Digital Lady Syd
Heathcliff in Toon Lagoon

Just a funny picture comic character Heathcliff the Cat from Toon Lagoon at Universal Studios, Orlando, Florida. Just had fun doing this one. Actually used Topaz (see sidebar for website link) photoFXlab’s Instatone tool to get the really pretty sunset looking sky – it was really a bright blue sky and the middle of a sunny day. Created a watercolor border frame by painting around the edges of a New Layer on top and with a light purple color Solid Color Fill Adjustment Layer, the color was clipped to the frame (ALT+click between the two layers to clip). The Camera Raw Filter’s Radial filter was applied to try to draw the focus of the image to Heathcliff. Overall a pretty striking image that I would never have gotten without Instatone. Lots of fun to do!…..Digital Lady Syd
Digital Lady Syd Related Blogs:
InstaTone in photoFXlabs – Great Fun and Great Results!
Digital Lady Syd’s Review of Topaz photoFXlab v1.1
InstaTone Sunset
Harry Potter World
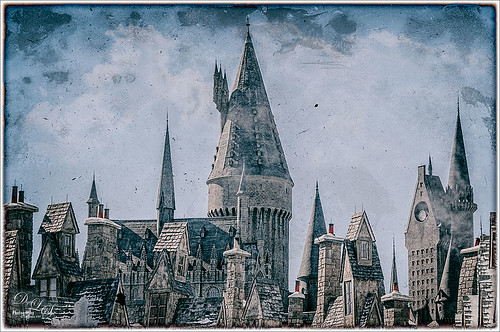
Having some fun here with two of my favorite filters in Photoshop. This is just an image of the tops of the Wizarding World of Harry Potter at Universal Studio in Orlando, Florida. Did basic slider adjustments in Lightroom, then in Photoshop applied Topaz (see sidebar for website link) Detail 3 to sharpen. Added a couple clouds from my free Cloud Brush Set, and applied Nik’s Analog Efex Pro plug-in to get the real vintage feel. Used Puppet Warp twice to try and straighten the towers which are not straight no matter what, but I wanted the big one in the middle straight looking. (See my Straightening with Puppet Warp! blog.) Added a layer style to create the framing. That was it……Digital Lady Syd
Driftwood Eagle
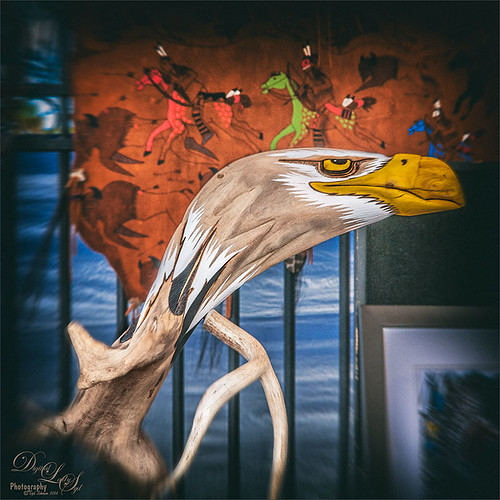
I loved this beautiful piece of art that one of the vendors was selling at the 2014 Native American Festival in Ormond Beach, Florida, recently. The image just seemed to say Nik Analog Efex Pro to me, so this filter was applied as a Smart Object. In the filter the Basic Adjustments, Lens Distortion, Zoom & Rotate Blur, Lens Vignette, and Film Type were selected. Then back in Photoshop, the actual face and part of the wood body were painted back in the filter mask. A Curves Adjustment Layer with a slight S-curve was added on top and that was it. Love the color in this image – really reminds me of the festival……Digital Lady Syd
Wishing I Was Back in Hawaii
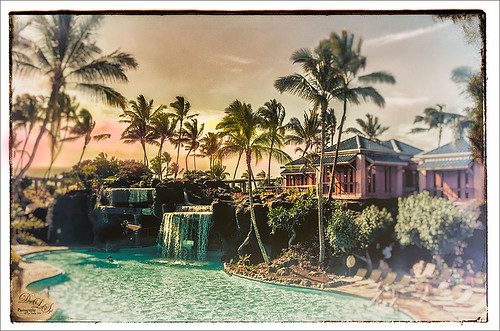
Wishing I was back in Hawaii – been a while. Taken at the Hilton Waikoloa Village on the Big Island – really fun place to stay. I just love the what Nik’s Analog Efex Pro does to give a nice vintage feel. Otherwise just a little clean up here and adding some contrast using Curves Adjustment Layer……Digital Lady Syd
A Nice Illustrative Look

Another image that required a lot of adjustments but lots of fun to post-process. These Savannah homes had cars and trees and all sorts of things in the way so it is amazing that it turned out looking as good as has. I guess that is why I love Lightroom and Photoshop – it is so fun to see what you can do to an image!
Nothing special in Lightroom – just the basics. Next used Topaz (see sidebar for website link) Black & White Effects 2 to give a bit of an illustrative look to the image and to add a pretty vignette and border. Alien Skin Snap Art 4‘s Pastel Portrait – soft preset was applied and set to 60% layer opacity. Used a Selective Color Adjustment Layer to get the color adjusted. The Puppet Warp Tool was used to slightly spread the roof from the bottom on the right side as it was a little distorted. That was it but it seemed to take a while. Still, the final result turned out so nice…..Digital Lady Syd
Swan Fountain
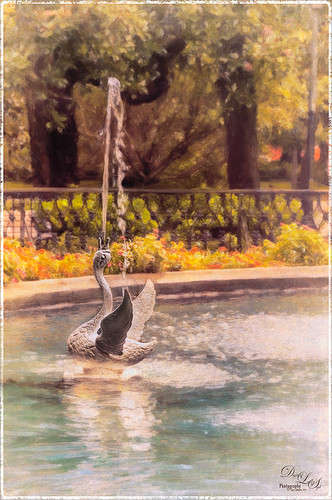
Loved the Forsyth Fountain in Forsyth Park in historic Savannah, Georgia. The whole fountain is rather magnificent! This image is just of one of the little swans spewing water around the main fountain. Just the basic slider changes were done in Lightroom. Once brought into Photoshop, the image was processed using the modified Factory Setting from Snap Art 3 – for Snap Art 4 I created a matching preset so I could continue using it. There were three layers selecting different parts of the image in Snap Art. Some clean up and sharpening was done and a Curves Adjustment Layer was added for contrast. Kim Klassen’s Cloth & Paper Reign texture was set to Multiply blend mode at 100% and the old OnOne PhotoFrame grunge 13 was added as a last step. Very easy to do and very pretty result!…..Digital Lady Syd
Mixers for Margaritas!
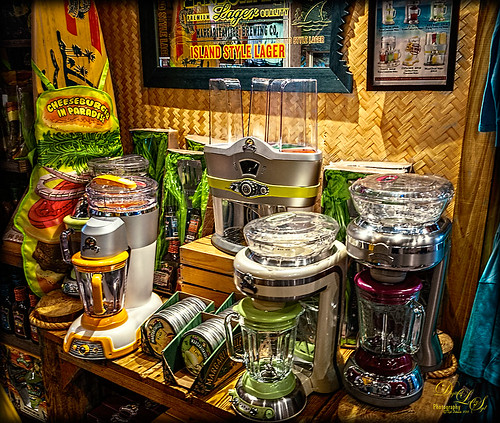
Totally loved this display taken at the Margaritaville on City Walk, Universal Studios, Orlando, Florida. I could actually see myself making up a wonderful batch of Margaritas with one of these gorgeous mixers! There really was not much processing done here. Just a few basic sliders and some cropping in Lightroom. Did some LAB sharpening this time since there were so many details. ( See my Unsharp Mask Filter In LAB Mode blog for more info on this.) Topaz (see sidebar for website link) Detail 3 was used to sharpen a little more. A Color Balance Adjustment Layer was added and the Midtones were set to 0/-25/-60 to bring out the yellows in the texture a little more. Last step was Topaz ReStyle – just overall brightened up the image. (ReStyle settings: Started with Dark Goldenrod Sunset preset. Color Style Hue Fifth -0.50; Sat Primary 0.08, Secondary 0.02, Third 0.25 and Fifth 0.13; and Lum Primary -0.41, Secondary 0.31 and Fifth -0.03; and Texture Strength 0.72; Basic Tone Black Level -0.12, Midtones 0.09, and White Level 0.11; and Detail Structure 0.28, and Sharpness 0.06.) Just more fun in Photoshop!…..Digital Lady Syd
The Boy in the Bubble

This looks like so much fun – wish I could try it! This boy is riding in one of 4 giant floating bubbles at the 2014 Native American Festival in Ormond Beach, Florida, this past weekend. The kids don’t get wet andhave a great time trying to stand up and run. Very little processing was done on this image, which is unbelievable since he is behind a thick piece of soft vinyl. In Lightroom, after some basic adjustments and cropping, Dave Delnea’s Forest Walks Look 3 preset was applied – but I used The Fader to reduce the preset effect to just 61%. Really brought out just the right amount of greens and blues. In Photoshop Topaz (see sidebar for website link) DeNoise 5 was set to an Overall Setting of 0.19. Some clean up was done where the water looked funny on his face. Nik Viveza 2 was used to slightly tone down the bright specular light in the upper left side of the image and to even out the face color. That was it. I like the natural texture the vinyl created. What a cool amusement – looks like he is really is floating!…..Digital Lady Syd
Where Can You Find the Cutest Lion?
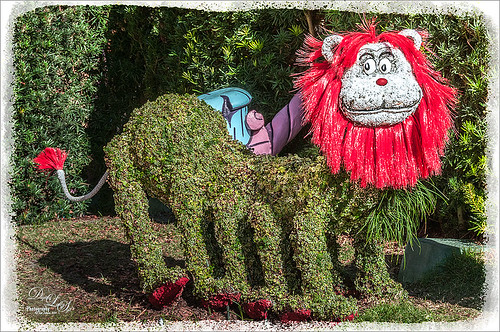
This little guy that was standing on the side in Dr. Seuss Landing at Universal Studios Islands of Adventure has got to rank right up there for cuteness! I loved the topiaries in this area – Universal did a great job on them. Very little processing was done to this guy. In Lightroom just the Basic slider adjustments and cropping. Used an Adjustment Brush to even out some of the shadows on the lion’s body and Dave Delnea’s Backlight Horizontal Right preset was applied to even out the light a little. In Photoshop just a little basic clean up in the top corner where a branch was showing. Next the High Pass filter set to 6 and Overlay Blend Mode was used to sharpen just the face and edges of his red mane by adding a black layer mask to the filter and painting back those areas. A painted frame was added as a border and an Adjustment Layer to add just a little overall contrast. That was it! Just love this shot!…..Digital Lady Syd
Fire Brigade Bike
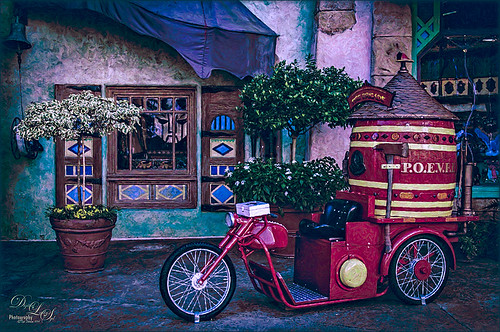
Finally got to see Universal Studios Islands of Adventure section in Orlando, Florida. This image of a Fire Brigade bicycle was one of the first things I saw – very unusual item so had to take a picture. Had to get a little creative though since that is what I do! This time Trey Radcliff’s Biting Icecream preset was applied in Lightroom along with some basic slider adjustments. In Photoshop Topaz (see sidebar for website link) Adjust 5’s Photo Pop preset was added next. Then just a bit of sharpening using Topaz Detail 3 was. Probably did not need it since next I went into Alien Skin’s Snap Art 4 and added the Factory Default settings from Snap Art 3 (which I manually created) and added a little more saturation – no mask layers. Back in Photoshop Topaz ReStyle was opened up and the bright oranges and reds were swapped out for blues and darker reds. I just liked theses colors better so that is what you see. Last step added a slight dark vignette around image using a Curves Adjustment Layer. This was such a nice colorful picture and the nice thing – no people around! Anyway, lots of fun to process using my favorite plug-ins…..Digital Lady Syd
Digital Lady Syd’s Favorite Preset for Nik’s Analog Efex Pro

Just another example of what Nik’s Analog Efex Pro can do. Used Topaz (see sidebar for website link) ReStyle’s Shaded Subways preset (with these changes: Color Style Lum Secondary 0.07, Third -0.48, and Fourth 0.34; Texture Strength 1.00; and Sharpness 0.84.) Once again used my favorite settings for the plug-in. And that was it. I love the results – using ReStyle with Analog Efex Pro is a really nice combination. Since I am using this preset so much and find it really easy to adjust, I thought I would share the settings with anyone that would like to get a similar effect. Just tune out if you do not want them.
The preset was named SJ Favorite preset. The settings for each section used in the image above are as follows: Basic Adjustments – Detail Extraction 65%, Brightness 14%, Contrast -36%, and Saturation 13; Light Leaks – Strength slider 50%, set to Soft, and selected third row over and fifth row down (a reddish triangle coming from the left and the center point in the middle lower left (this can be adjusted depending on your image); Lens Vignette – Amount 78%, slider moved all the way right under Rectangle, and Size 44% with the center point in the middle of the image; Film Type – Subtle selected using the third row over and fourth row down film, Neutral to Faded slider placed just a little to right of middle, Strength 70%, Grain per pixel 400, and Soft to Hard slider in the middle; Frames – selected White in drop-down and used the first column fourth row down frame – I believe I clicked the Vary button a couple times here but not much difference occurred; and Levels & Curves – this is a little tricky but it makes all the difference in the preset. This is a 16 X 16 grid, so set the points where noted. For the Luminosity Channel, create a curve that starts with a point at 0,0, then one at 8.5, 8, and the last one goes up to the top with a small straight line to the top right corner so use this point 14, 16 – you may want to adjust this the way you want but it really pops my image by adjusting this curve – all other curve lines are left alone. You can go to the Camera Kit and add in other effects to get a little different look – I do this all the time.
The second image in my Photoshop With Corel Painter for Texture blog shows this same preset. Hope you will give it a try – Nik’s Analog Efex Pro is really a lot of fun!…..Digital Lady Syd
Visiting the Country
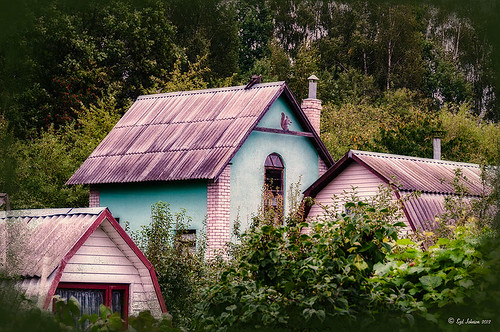
This is an image of several dachas in the countryside outside the City of Minsk in Belarus. This image had very little processing done to it – just three filters stacked in Nik Color Efex Pro 4 (Brilliance/Warmth, Midnight using the Neutral Color Set, and Detail Extractor). A Curves Adjustment Layer was added and several power lines were removed following my Get Rid of Those Power Lines Fast – with Paths and Spot Healing Tool! blog. The overlay is the same one created for the top image in the blog linked below, and was added with a dark green Color Fill Layer clipped (ALT+click between the layers) to it so it looks dark. See my How to Create an Overlay Out of a Texture blog on how to create this overlay. I like the soft diffused effect the filters created…..Digital Lady Syd
What a Dolling Picture!
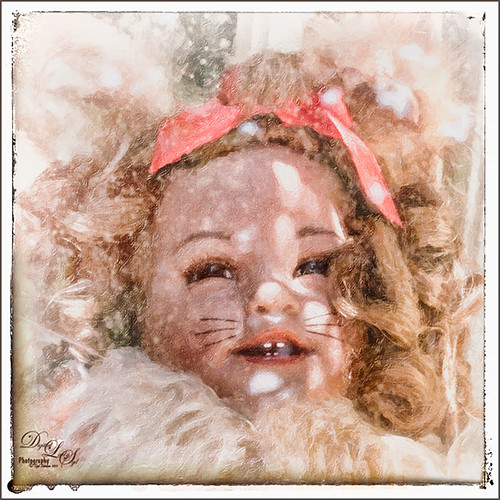
This is a rather crazy image of a doll in a lion outfit that I decided to do some processing on. The RAW image had a lot of window reflection, but for some reason I just liked the way the sun lit up the doll and hair on the right side. I do not even mind the white blown out spectral spots – it sort of added to the wintry old feel. In the original file had a lot of spectral highlights that looked like snow. Alien Skin Snap Art 4 was applied in Photoshop using the Impasto Detailed preset and two Detail Masks to bring in the facial features. Then I added my free SJ Snow2 slight blur overlay set to 34% layer opacity. A Solid Color Fill Adjustment Layer was clipped (ALT+click between layers) to the overlay to give a little light peach color to the snow. Nik Analog Efex Pro was applied for a little vintage feel. The last step was to add a Curves Adjustment Layer to add contrast to the image. That was it – for some reason I really like this image!…..Digital Lady Syd
Bamboo Forest Abstract
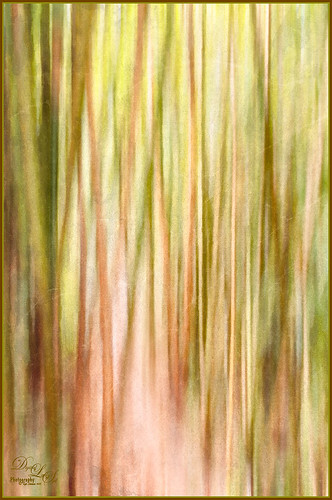
Got inspired by a short tutorial called Dustin Abbott’s Autumn Abstract with Snap Art 4 on Alien Skin’s website where he created this really interesting abstract painting. The image above is of a bamboo forest on the Big Island in Hawaii. I wanted a little less abstraction so some of the bamboo could be seen but the beautiful Hawaiian forest colors were the main interest. Therefore, I only used a Motion Blur Distance of 594 pixels. Next in Snap Art 4 Dustin Abbott’s Autumn Abstract preset (he graciously lets you download the preset in the tutorial link above) was applied. Back in Photoshop a layer mask was added where a few of the trees were painted back softly just to exaggerate the foreground tree shapes. Next Topaz ReStyle (see sidebar for website link) plug-in was added. (Started with Olivine Pastures preset to keep the Hawaiian green and pink colors intact. Color Style Hue Third -0.14, Sat Primary -0.28, Third 0.20, and Fifth -0.17, and Lum Third 0.63 and Fifth 0.59; Texture Strength 1.00; Basic Opacity 62%, Blend Mode Screen, Color Tint 0.16 and Sat 0.20; and Detail Structure 0.31.) The last step involved adding another of my favorite plug-ins, Nik Analog Efex Pro. (Used these filter settings: Basic Adjustments with Sat at 24%; Dirt & Scratches 82% using the last Organic thumbnail; Photo Plate Corroded – 2nd down 2nd over – at 20% Strength; and Levels & Curves with RGB and Luminosity Curves pulled just a little down and over at 81% Strength.) I think the image depicts exactly what I wanted to express – mainly emphasizing the gorgeous colors and the soft vertical feel of the forest. Give this technique a try and see what you can do……Digital Lady Syd
Digital Lady Syd Related Blogs:
Digital Lady Syd Reviews Alien Skin Snap Art 4
Wintry Dahlia

Loved how this beautiful white dahlia bloom came out – and once again it used two of my favorite Photoshop plug-ins. First applied Trey Radcliff’s Yesterepoch preset to flower in Lightroom. In Photoshop sharpened up the image using Topaz (see sidebar for website link) Detail 3 using these settings: Detail Panel: Highlight – Small Details 0.42, Small Details Boost 0.45, Medium Details 0.54, Medium Details Boost 0.40, Large Details 0.48, and Large Details Boost 0.44. Back in Photoshop filled a layer mask with black and painted back just the edges of the flower that I wanted emphasized – this kept the petals in back less in focus. Added one of my textures that I made in Corel Painter with a layer mask so the flower did not have texture applied, and set the layer to 32% layer opacity. Next opened Nik’s Analog Efex Pro plug-in and used a preset I created called Very Basic Set up. It contains just the Basic Adjustments panel (Detail Extraction 30%, Brightness 35%, Contrast 25% and Saturation -30%), Bokeh filter (Blur Strength 24%, Boost Highlights 94%, and centered on middle of flower), and Lens Vignette filter (Amount -33%, slider set under R in Rectangle, Size 77%, and also centered on flower middle). Back in Photoshop added a Levels Adjustment Layer to give just a little more contrast. I really liked the soft textured feel to the flower…..Digital Lady Syd
Christmas Flowers!
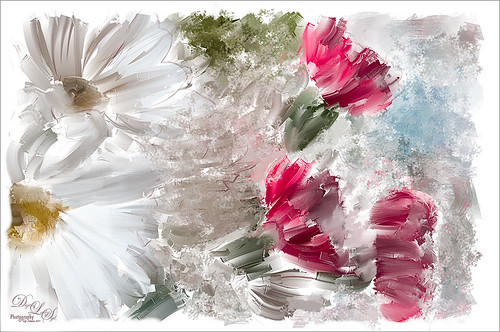
Recently I set a goal to learn how to use Corel Painter. These Christmas flowers were a perfect choice for me to practice some of my newly developing skills. I love the colors that the brushes created although I am not sure exactly which brushes I used, but several blending brushes were used. I have learned to keep a custom panel of my favorite brushes set up so I do not have to keep searching for them. (Not unlike setting up your own panels in Photoshop.) After I finished painting it, I wanted to show a few outlines for emphasizing certain area. The original image into Topaz (see sidebar for website link) Simplify and a sketch with black lines on a white background was created. Back in Photoshop, the white was removed using Color Range, and then the layer was moved into the Painter image. A layer mask was added and lines I did not like were removed and the layer was set to 51% opacity. A dark brown Solid Color Fill Adjustment Layer was clipped (ALT+click between the layers) to the lines layer. A Hue/Sat Adjustment Layer was added to make the flowers the perfect color of red. Some localized contrast was added by selecting a Curves Adjustment Layer and filling the layer mask with black. Just the areas where I wanted contrast was painted back, which was mainly the red flowers. I love the way Painter and Photoshop work together! Hope everyone is having a wonderful Holiday Season!…..Digital Lady Syd
A Secret Garden
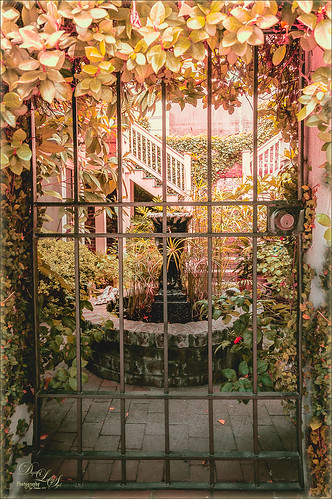
This was one of my favorite images from Savannah, Georgia, when visiting last month. Not a lot was done to this image although the Puppet Warp command had to be used to straighten out the walls due to the lens distortion. Also Topaz (see sidebar for website link) ReStyle was applied to get the pretty soft light effect – the settings were from a Test Preset when I first got the program so I am not sure where I started. Finished up with a little Nik Viveza 2 to direct the eye to the stairs. This image uses some of my favorite colors……Digital Lady Syd


