
A Victorian Visit
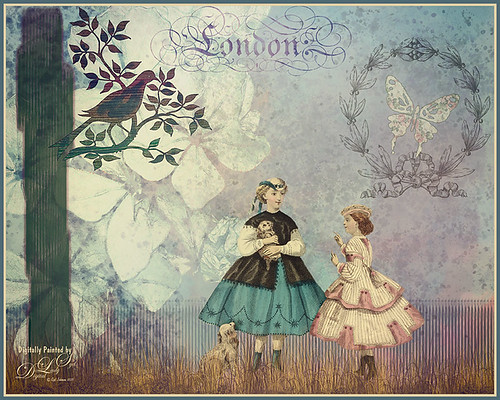
This is just a little composite of various elements that I put together for the fun of it. I love the little girl clip art that was from Mary Bailey, I believe as a magazine download – I could not find a link to her. Thought I would mention the use of Axeraider70 Edge Brushes to make the fence and tree trunk. Lots of splatters and one of my painted backgrounds were used. The butterfly shape was from Nicky Laatz and the wreath and London text were from Graphics Fairy. The bird was from the Old Design Shop. The flowers are from another one of my images. The foreground grass was from brushes by Aaron Blaise. Topaz (see sidebar for website info) Len Effects Toy Camera filter using the Memories preset with no vignette, than applying Polarization Filter set on High to brighten the image up. Nik Viveza 2 was used to direct focus to the girls. It was a lot of layers and step, but a lot of fun to do……Digital Lady Syd
Summertime!
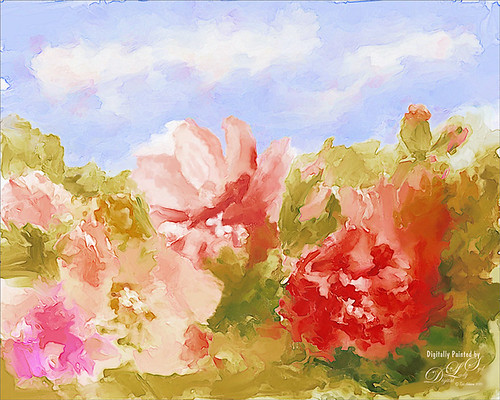
These are just some flowers I started painting in Corel Painter 2015. This used the Basic Paper with the default settings. Only an oil paint brush and a blender were used. Just a lot of fun to paint. I then brought the image into Photoshop and duplicated the background. Topaz (see sidebar for website link) Glow was opened and my SJ Mysterious II Water preset was applied. This mainly made the image more vivid. Once out of the plug-in, Grut’s O Rooster Suit brush was used in PS to smooth out uneven lines and do general clean up. Nik Viveza 2 was used to make sure the red flower was the focal point. I really enjoyed doing a little free-style painting……Digital Lady Syd
Still Life Fun
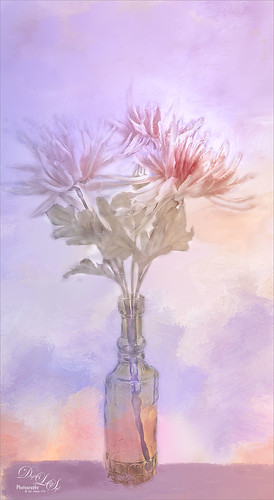
This is just a still life image I took a while ago of some flowers. Added one of my painted textures underneath, then with a black mask added to the flower layer, painted back in the flowers. The texture was copied twice and placed on top – one was set to Multiply blend mode at 54% and the other set to Color blend mode at 76%. A table and shadow were added using Grut Oil Rooster Suit brush. On a stamped layer (CTRL+ALT+SHIFT+E) Nik Viveza 2 was used to further bring out the color of the flowers. Several clean up layers were used and a few adjustment layers were added to create some contrast. I really love flowers….Digital Lady Syd
The Blushing Bride
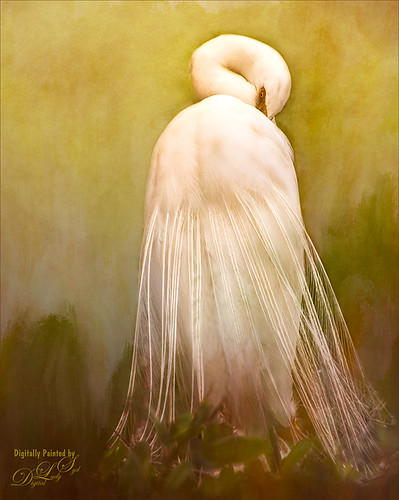
This lovely Snowy Egret with her magnificent plumage was another bird shot taken at the St. Augustine Alligator Farm rookery a few months ago. She was placed above Jai Johnson’s Emerald Green Canvas free texture (all her textures are fabulous) and with a black mask, was painted into the texture. This texture was chosen since the bird had lots of dark green foliage around her – the thin feathers could be seen better. Next a Corel Painter texture I created showing some soft plant-life in the background was placed on top and set to Hard Light blend mode at 39%. On a stamped layer (CTRL+ALT+SHIFT+E), Topaz (see sidebar for website link) Lens Effects was opened and two filters were applied: Reflector (Settings: Gold Top – Type Golden, Strength 0.65, Transition 0.37, Position 0.36, and Angle 176.4) and Add Vignette-Selective – Burnt Sienna (Settings: Placement Adjustments Focus Width 0.66, Focus Height 0.48 and Effect Center: (1751,806); Tonal Adjustment – used default sienna color, Vignette Strength 0.35, Transition 0.75, Contrast 1.63, Brightness 131.2, and Opacity 47.03). On a duplicate layer Nik Viveza 2 was used to bring out the sharpness of the eye a little more and the structure in the bird’s back. A black and white Adjustment Layer was used to adjust the focus just right and then set to Luminosity blend mode at 44% opacity. Then on another stamped layer, Topaz ReStyle’s Tuscany Memories was applied and set to Hard Light at 45% for the ReStyle section. That was it!…..Digital Lady Syd
Jumping Whales
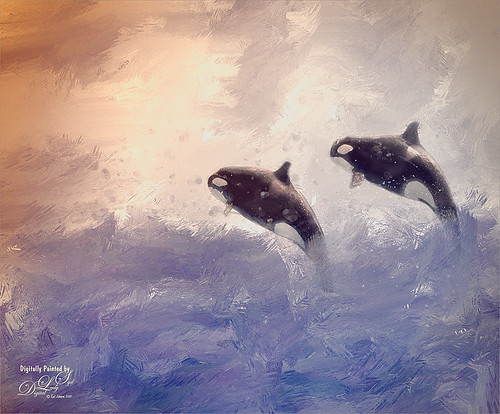
These Killer Whales were performing a few years ago at SeaWorld Orlando. I decided to place them in a water texture created in Corel Painter. I wanted them to look like they are in their natural environment. The biggest problem I had with this image was getting the lighting to look natural on the sharper whales. First the whales were painted through a black mask on top of my SJ Stormy Weather at Sea texture. Several adjustments layers were used to even out the tonal contrast and color. Then Topaz (see sidebar for website link) Lens Effects was used on a stamped layer (CTRL+ALT+SHIFT+E) and the Vignette Selective using the Golden Halo preset was used. Nik Viveza 2 was used the get rid of the color cast and turn the spots on the whale white. The texture was copied twice and placed on top of the layers – first set to Multiply blend mode at 49% layer opacity, and then set to Hard Light at 21% layer opacity. Some water splatter layers were created to get the water splashing effect using Aaron Blaise Water Splatter Brushes (all his brushes are fabulous!). On yet another stamped layer, Topaz Lens Effects was opened up again and the Toy Camera effect was chosen – used the preset Awesomeness for starters and tweaked it to get the correct sunlight effect. The last step was a Levels Adjustment Layer to even out the contrast. This was really a lot of fun to do!…..Digital Lady Syd
A Face in the Crowd
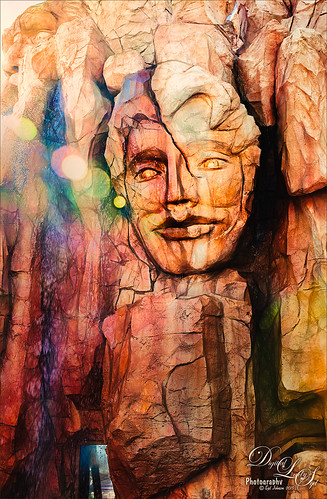
This image was taken at The Lost Continent area of Universal Studios in Orlando, Florida. It is a rather interesting engraving in the mountain. The bokeh was actually on the image I took. Not a lot was done to time, just Topaz (see sidebar for website link) Glow (my SJ Inter Web Variation preset) set to Soft Light blend mode at 50% layer opacity and Nik Viveza 2 were used to emphasize the lines and the lighting in the image. On a New Layer set to Overlay, several of the face lines were painted over to darken so you could see them more clearly. It turned out rather painterly looking!…..Digital Lady Syd
Horses Checking Me Out
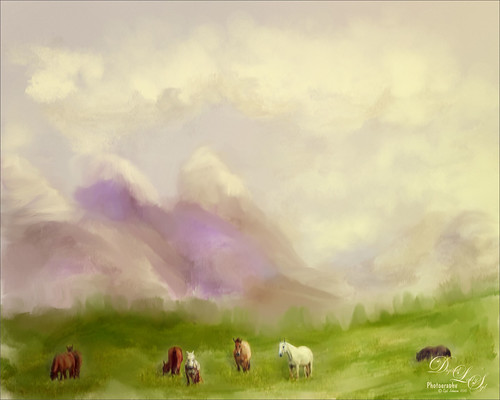
Created this image using a texture I painted in Corel Painter and a horse image from Belarus. This is basically just painting the horses into the texture by using a black layer mask on the horse image above. Then used Topaz (see sidebar for website link) Lens Effects Toy Camera filter Awesomeness I preset as a start, then applied the Reflector filter to lighten up the whole image. On a stamped layer Topaz Restyle was used and just the bottom colors were changed to darker tones. Then mainly just some clean up – love the the results……Digital Lady Syd
Seashells on the Beach
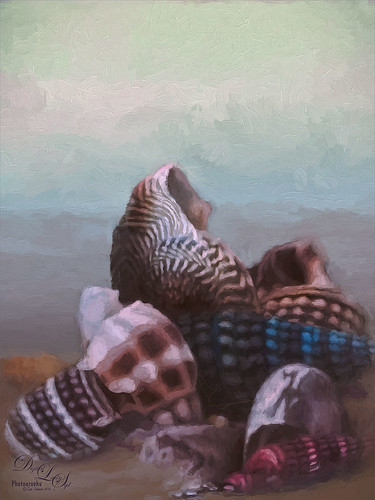
These shells were actually inside the base of a lamp – just did a close up phone image. By adding one of my Corel Painter textures and painting back in the shells in a layer mask, the busy original background could be replaced. Now for a change up – Topaz (see sidebar for website link) Impression’s Oil Painting 1 preset was applied. Next on a New Layer, some image clean up and painting was done. Last step was applying on a stamped layer (CTRL+SHIFT+ALT+E) Topaz Restyle’s Soft Sienna Veil preset with a few adjustments in the color sliders. This was the final result and I loved the colors in it whole image……Digital Lady Syd
The East Clouds in a Sunset
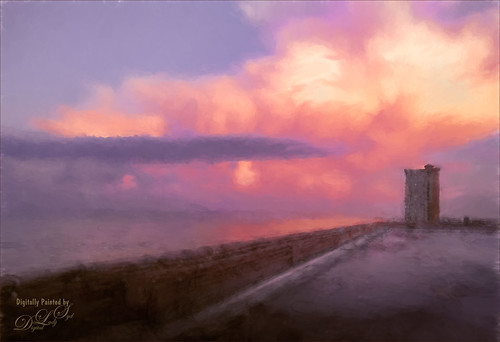
Just a quick phone pix I took from the penthouse at the La Playa Resort in Daytona Beach, Florida. This was taken facing east over the Atlantic Ocean while the sun was setting on the west behind the Intracoastal Waterway. Not much done here – just Topaz (see sidebar for website link) Impression applied using the Watercolor IV preset with a little color adjustment, some Mixer brush clean up, and a Selective Color Adjustment Layer to reduce the overwhelming blue effect in the image. Loved how the sunset plays off the ocean clouds!…..Digital Lady Syd
My Magical Front Yard
My front yard is a little crazy looking but it is a happy place, at least for the tree frog! This was just a lot of fun to do. Used Topaz (see sidebar for website link) Glow and my SJ Inter Web Variation preset set to Exclusion blend mode at 100% layer opacity. On a stamped layer (CTRL+ALT+SHIFT+E) Nik Viveza 2 was used to brighten the Tree Frog and the flower. Some painting clean up was done on a separate layer. On another stamped layer, Topaz ReStyle’s Rustic and Orange preset was applied. Another stamped layer set to Smart Object, Photoshop’s Camera Raw Radial Filter was used three times to lighten exactly where I wanted. Last step was to add some splatters more so in the dark areas to add a little more magical feel. Hope you enjoyed it!…..Digital Lady Syd
Topaz Glow Inter Web Variation preset settings: Primary Glow Type Dark, Glow Strength 1.00, Effect Sharpness 0.12, Electify 1.00, Simplify Details 0.06, Edge Color 0, Detail Strength 1.00, Detail Size 0.42, Brightness 0.16, Contrast 0.18, Saturation 0.08, Line Rotation 0, and Glow Spread 0; Secondary Glow Glow Type Light, Glow Strength 0, Effect Sharpness 0.54, Electrify 0.11, Simplify Details 0, Brightness 0, and Contrast 0; Color Overall Saturation to 0.62, Red Sat to 0.44, Yellow Sat to 1.00 Yellow Lightness -0.36, Green Sat 1.00 and Lightness -0.51, Aqua Lightness -0.36, Purple Sat 1.00, and Magenta Sat 1.00 and Lightness 0.50.
Abstract Wetlands

Felt like doing something a little different with a rather ordinary image. This was another shot from the Ritch Grissom Memorial Wetlands in Brevard County, Florida (also known as the Viera Wetlands). This image was first Merged to HDR in Adobe Camera Raw 9.0 – thought I would put it through its paces and it worked really well. I have a lot of HDR programs, but it is so nice to have all the ACR tools available to clean up the result.
Once the HDR file was created in ACR, the image was opened as a Smart Object in Photoshop CC2015 to add a few filter effects. Topaz (see sidebar for website link) Glow was using my Inter Web Variation preset set to Hard Light blend mode. (Here are the settings: Primary Glow Type Dark, Glow Strength 1.00, Effect Sharpness 0.12, Electify 1.00, Simplify Details 0.06, Edge Color 0, Detail Strength 1.00, Detail Size 0.42, Brightness 0.16, Contrast 0.18, Saturation 0.08, Line Rotation 0, and Glow Spread 0; Secondary Glow Glow Type Light, Glow Strength 0, Effect Sharpness 0.54, Electrify 0.11, Simplify Details 0, Brightness 0, and Contrast 0; Color Overall Saturation to 0.62, Red Sat to 0.44, Yellow Sat to 1.00 Yellow Lightness -0.36, Green Sat 1.00 and Lightness -0.51, Aqua Lightness -0.36, Purple Sat 1.00, and Magenta Sat 1.00 and Lightness 0.50. Set to Screen blend mode at 66% Strength; and no Finishing Touches.) On a stamped layer (CTRL+ALT+SHIFT+E), Topaz Impression’s Turner Storms II was added. It was turned into a Smart Object and Photoshop’s Camera Raw filter was opened – used Photoshop Cafe’s PS Cafe-euro model preset with some Basic adjustments and color changes. I really liked the fantasy feel I was getting. Some clean up on a New Layer was done. On another New Layer Kyle’s Real Watercolor Spatter Mixed brush was used on the foreground, a gradient overlay layer style added, and then a Guassian Blur filter set to 2.0 radius was applied to this layer. The last step was using Nik Viveza 2 to draw attention to the focal point. I really liked the results of this image….Digital Lady Syd
Soaring Spoonbill

Still enjoying the bird images I took at the St. Augustine Alligator Farm Rookery this Spring. The original image was captured with a totally light blue sky behind this Roseate Spoonbill. This made it easy to add a texture underneath the image (my painted texture created in Corel Painter called Seashore) and changing the blend mode of the bird layer to Multiply. Topaz (see sidebar for settings) Clarity and DeNoise 5 were applied to cleanup the the bird layer. On a stamped layer (CTRL+ALT+SHIFT+E), Topaz Glow’s Room Glow Blake Rudis preset was applied (check out Integrating Topaz Glow into Your Workflow for info on this). Next on a New Layer Fay Sirkis’s (from KelbyOne) Precious Oil Diamond Mixer was used to clean up the feathers and beak a little. Topaz Impression Watercolor II preset with no spill was applied. Nik Viveza 2 was used to bring out the color of the bird just perfectly and a Curves Adjustment Layer was used as a last step for overall contrast. I love my bird pix!…..Digital Lady Syd
Just a “Big Scoop”
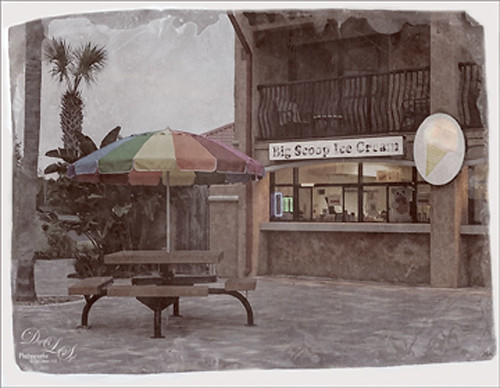
Loved the vintage result of my favorite local ice cream place. This was a phone image processed using OnOne Photo Suite 9.5 (see sidebar for website link) – used B&W Effects and Perfect Effects to get this look. The original layer was converted to a Smart Object so I could tweak later the results. In B&W Effects, the Daguerreotype Clean preset was selected with adjustments to its settings. In Perfect Effects the Bleach Bypass preset was set to Lighter. With the Lighten Paintbrush, the umbrella was painted and with the Detail Paintbrush, the inside of building and picnic table were painted. Since the B&W effect was too strong, I clicked the little icon on the right edge of the Perfect BW layer in Photoshop and the opacity was changed to 75%. Then a layer was added on top to paint back in solid white border where needed. Last step was to distort the letters as they totally draw the eye whenever letters appear in an image. Just painted over with a little grunge brush. Enjoyed creating this vintage look!…..Digital Lady Syd
A Little Scottish Architecture
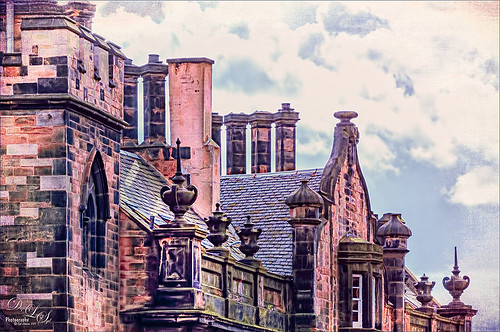
Just an image of the beautiful architecture taken near Edinburgh Castle in Scotland. The original image in Lightroom was major dark – not sure why. Used the Basic sliders to brighten up the image, but the noise was pretty bad. Therefore , in Photoshop Topaz (see sidebar for website link) DeNoise was used. Topaz Glow was used on a stamped layer above and my SJ Graph III preset was applied – layer was set to Overlay blend mode at 65% layer opacity. (Here are the settings: Primary Glow: Glow Type Dark, Glow Strength 0.17, Effect Sharpness 0.09, Electrify 0.23, Simplify Details 0.25, Edge Color 0.20, Detail Strength 18, Detail Size 0.24, Brightness 0.23, Contrast 0.17, Sat 0.01, Line Rotation 0.09, and Glow Spread 0.20; Secondary Glow: Glow Type Light, Glow Strength 0, Effect Sharpness 0.47, Electrify 0.17, Simplify Details 0, Brightness 0.36, and Contrast 0.62; Color Red Sat 1.00; Orange Sat 0.27; Yellow Sat 0.20 and Lightness 0.09; Aqua Sat 0.78 and Lightness -0.26; and Blue Sat 0.49; Finishing Touches: Effect Coverage 0, Smudge 0.00, Sharpness 0.25, Sharp Radius 0 and Vignette Size 0.) Also in the Layer Style, the sky was brought back using Blend If Underlying Layer slider and splitting the white tab (ALT+drag on tab to split) with settings of 122/145. Topaz Lens Effects Reflector filter was used to lighten up the face of the buildings (Type Golden, Strength 0.28, Transition 0.31, Position 0.49, and Angle 208.5). By adding a layer mask, the sky was painted black so the effect only applied to the buildings. Next on a stamped layer used Nik Color Efex Pro using Tonal Contrast, Brilliance/Warmth, and Vignette Lens. A vintage frame was added on top and set to Overlay blend mode. I love working on images from Scotland!…..Digital Lady Syd
Where Are My Eyes?
This image was taken at the St. Augustine Alligator Farm website link. I don’t know anything about it, just that it greets you when entering the attraction. Very little was done to this image. In Lightroom Trey Radcliff’s Dramatically Clean Chipmunk preset was applied. In Photoshop Topaz (see sidebar for website link) Impression’s Turner Storm II preset was applied. A white layer mask was added in PS and a little bit of the lighter areas were painted back in the face to draw some focus to it. On a stamped layer (CTRL+ALT+SHIFT+E) that was converted into a Smart Object, Nik Color Efex Pro 4 was opened. The Graduated Neutral Density filter selected (Upper Tonality -25%, Lower Tonality 7%, Blend 27%, Vertical Shift 43%, Rotation to adjust the light 158 degrees, and Highlights 1/4 of the way to right). In the same Smart Object Nik Viveza 2 was applied. A Focal Point was added to the eyes and nose area (Brightness 33%, Contrast 40%, Saturation 38% and Structure 58%). Two Curves Adjustment Layers were added – one a darken curve to separate the head from the busy leaf background, and one to add contrast to the face since an S-shape curve was used. Both layer masks were turned to black (CTRL+I inside the mask) and just localized areas were painted back with a soft white brush at 17% brush opacity. Last step involved adding a New Layer and actually painting in some color where it was needed using a very low opacity brush (12%) and sampling in the image to match areas. That was it. Lots of fun to do!…..Digital Lady Syd
Bear Checking You Out!

This image is of the bearskin that is usually at the Native American Festival in Ormond Beach, Florida, this year. In Lightroom Seim’s (see sidebar for website link) Magic Harsh Sun Fixer preset was used. In Photoshop on a duplicate layer, Topaz (see sidebar for website link) Detail was applied to overall sharpen. Topaz Impression was applied using Oil Painting by Jim Salas (light direction was changed to fit image and Texture Strength slider set to 0 since textures were added to image outside of plug-in). A couple of Flypaper Textures were applied. Then I really cropped image in to get a close up of the face. The final step involved adding my favorite filter Nik Viveza 2. Control points were placed on the nose to enhance the color and sharpen it a little to draw the eye to that part of the image. This was originally a great big image that I could not get a look I liked so the crop really made the image…..Digital Lady Syd
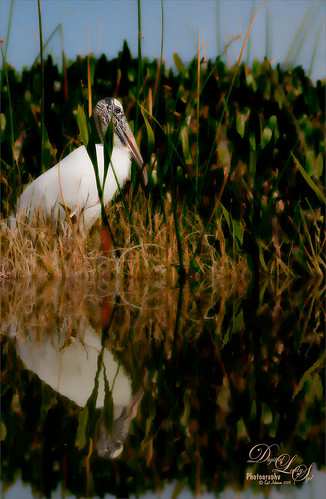
Here’s Looking At You
I really love these big gentle birds. This wood stork was giving everybody some serious eyeball at the St. Augustine Alligator Park recently. In Lightroom just did the Basic Slider adjustments and applied Dave Delnea’s Backlit Vertical Right and Custom Tone 002 presets. In Photoshop Topaz (see sidebar for website link) Detail 3 was applied next for overall sharpening. Topaz Glow was applied on a stamped layer. A Selective Color Adjustment Layer was added where just the Yellows were changed. Nik Viveza 2 was opened on a stamped layer and a control point was placed on the head to add more detail. Painted Textures Sunrise Canvas texture was set to Linear Burn at 50%. In the Layer Style the Blend If white tab was set and split to 190/212. Some clean up layers were added throughout to sharpen up various areas. I really liked the artsy look this bird ended up having!…..Digital Lady Syd
Singing Spoonbill Duet Takes Rookery by Storm!

Recently our Photo Club took a trip to the St. Augustine Alligator Farm’s Rookery to check out the birds. What a riot, as usual. I had never gone quite this early so the birds were doing a lot of mating and nest building, but not a lot of babies yet. It was total craziness and the Roseate Spoonbills were in all their splendor. I had never had a chance to see this many at one time and they were practically tame! They would get so close you could hardly focus your camera. Needless to say, it was a great time. These two birds were either doing mating clacking song, or totally entertaining the photographers. I was less than 5 feet from them and they were there all morning.
This image was mainly just sharpened up a bit and the basic tonal correction was done in Lightroom. In Photoshop Topaz (see sidebar for website link) Clarity using John Barclay basic settings preset (Micro Contrast 0.36, Low Contrast 0.20, Medium Contrast -0.11, and High Contrast -0.23) was applied. On a stamped layer (CTRL+ALT+SHIFT+E) Topaz Glow was applied using my SJ Mysterious II Water preset (Primary Glow: Glow Type Dark, Glow Strength 0.30, Effect Sharpness 0.63, Electrify 0.14, Simplify Details 0.17, Edge Color 0.28, Detail Strength -0.06, Detail Size 0.20, Brightness -0.56, Contrast 0.44, Saturation 0.00, Line Rotation 0.00, and Glow Spread 0.00; Secondary Glow: Glow Type Light, Glow Strength 0.00, Effect Sharpness 0.22, Electrify 0.03, Simplify Details 0.00, Brightness 0.45, and Contrast 0.64; Color Overall – all set to 0; Red RedSat 0.34; Orange Sat 0.33; Yellow Sat 0.03 and Lightness -0.29; Blue Sat 0.42 and Lightness -0.43; and Magenta Sat 0.75 and Lightness -0.35) set to Strength 64% and Overlay blend mode in the plug-in. A clean up layer was placed on top to clone out a few distracting bush edges and that was it. This was a really fun image to take!…..Digital Lady Syd
Very Busy Snowy Egrets
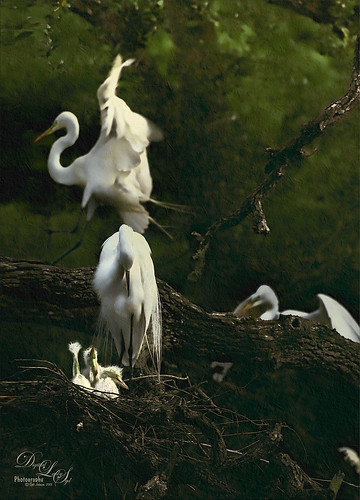
This is one of the shots I got at the St. Augustine Alligator Farm rookery. This is such a fun place to visit this time of year – the birds are totally distracted and let you take really great photos. The above is of the beautiful Snowy Egrets – at this time only a few baby birds were seen, most were nest building and mating.
Here is a quick run-down of what was done to this image: In Lightroom Seim’s (see sidebar for website link) Super HDR X preset and Dave Delnea’s Develop Preset Forestwalks Look 03 were used before bringing photo into Photoshop. A little clean up and then a stamped layer was created (CTRL+ALT+SHIFT+E) on top. Topaz (see sidebar for website link) Clarity was used to do an overall sharpening – this time I wanted a little more of an artsy look so my SJ Artsy with Highlights preset was used. (Settings: Clarity Dynamics Micro Contrast -0.86, Low Contrast -0.86, Medium Contrast 0.63, and High Contrast 0.94; Tone Level Black Level -0.19, Midtones -0.36, and White Level 0.19; HSL Filter Hue – no changes; Sat Orange 0.06, Yellow 0.63, Green 0.13, Blue 0.25 0.25, and Overall -0.45; and Lum Orange 0.36, Yellow -0.34, Green -0.42, Blue 0.61, Purple 0.11, Magenta 0.75, and Overall -0.27 – all other colors were 0.00.) A layer mask was added and the birds were faces and beaks were painted out to maintain the sharpness since this preset smooths out colors. Nik Viveza 2 was used to draw focus to the babies and help remove a bit of yellow in the bird feathers. A Levels Adjustment layer was added to add back some contrast into the image. On another stamped layer, John Derry’s Varnish-Matte-Light layer style was used to apply a little painterly feel to the whole image. That was it. I love working on these bird images!…..Digital Lady Syd
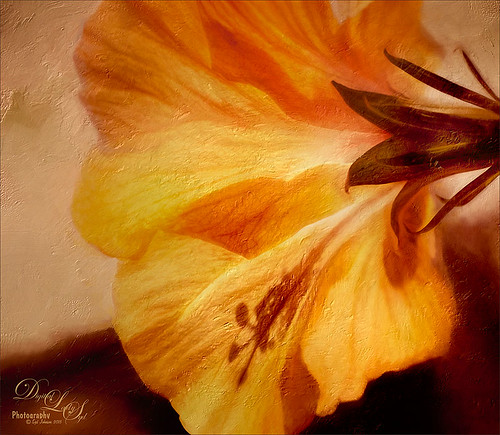
Looking Through You!
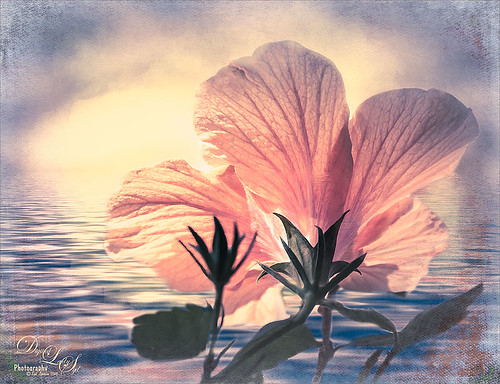
Took this image recently when the sun was shining so beautifully through the peach Hibiscus bloom. These are the most beautiful flowers but they only last a day. What a shame! This image was put together very simply. In Lightroom Trey Radcliff’s Sunday Alone preset was applied. Then in Photoshop, the Shake Reduction filter was applied – did not make much of a difference in this case. On a duplicate layer, Flaming Pear’s Flood preset was next used so that it covered up about 3/4 of the bloom. (Here are the settings used: Horizon 45, Offset 0, Perspective 57, Altitude 50, Waviness 78, Color dark blue #0b1b4e, Complexity 47, Brilliance 65, Blur 54, Size 0, Height 31, Undulation 40, and Glue Normal.) A layer mask was added and the bloom and leaves were painted back. On a New Layer above, Kyle’s Real Watercolor Big Rough Small Grain was painted onto the image to get a pretty soft sun glow. Used the same layer mask but this time painted back around the top of the blossom. On another New Layer, used a Pastel Brush set to 35 pixels, Multiply brush mode, 53% brush opacity, Pressure Sensitivity for Opacity icon on, and 100% Flow. By sampling in the blossom, I tried to smooth some of the shadow transition lines. Next 2 Lil” Owls (see sidebar for website link) Color Bokeh-Grunge Set 5 was placed on top in a layer mask, the center was cleared of the hazy feel to focus on the flower. The last step was a Curves Adjustment Layer. I really like the colors in this one…..Digital Lady Syd
Beautiful Maize
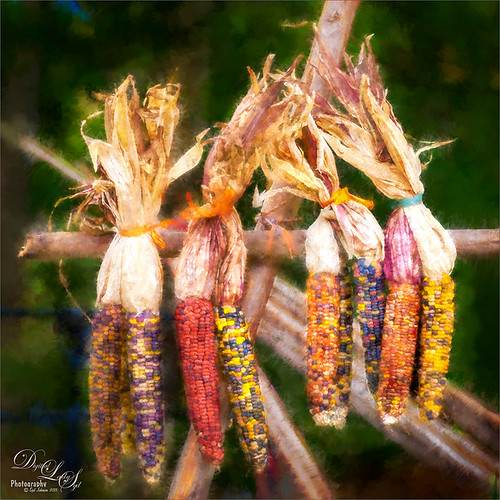
Loved this hanging batch of colorful corn or maize taken at the recent Native American Festival in Ormond Beach, Florida. In Lightroom Seim’s (see sidebar for website link) Workflow DreamScape preset was applied. Next Topaz (see sidebar for website link) Detail 3 was applied using just my basic Little Medium Large Detail preset (Medium Details 0.38, Large Details 0.16, and Contrast 0.30) where a black layer mask was added and just the corn was painted back. The background needed to remain soft. On several layers above a lot of clean up was done as the background was full of distractions. On a stamped layer (CTRL+ALT+SHIFT+E), my Topaz Impression Abstraction preset was applied (Stroke Type 12, Brush Size 1.00, Paint Opacity 0.38, Stroke Rotation 0, Stroke Color Variation 0, Stroke Width 0.85, Stroke Length -0.50, Spill 0.72, Smudge 0, and Coverage 1.00; Color Overall Hue 0.14, Sat 0.23, and Lightness 0.06; Red Lightness 0.14, Yellow Sat -0.11, and Green Lightness -0.36; Lighting Brightness 0.13, Contrast -0.23, and Vignette 0, Light direction X 0.34 and Y 0.05; and Texture Strength 0.19, Size -0.43, and Canvas I, Background type white solid and Background White). This layer was duplicated and taken back into Impression where the Ethereal Background by Blake Rudis preset was applied. A white layer mask was added and just the corn was painted out where I did not want the blurred effect to occur. This layer was set to Linear Burn at 53% layer opacity. On a new Stamped Layer, Nik Viveza 2 was applied to further enhance the focal point. It is so much fun to use the different filters to get different effects…..Digital Lady Syd
Digital Lady Syd Related Blogs:
How to Get the Most Out of Your “Not-So-Great” Images – contains link for Topaz Impression’s Ethereal Background by Blake Rudis
A Tuscan Blossom
Just loved how this little Yellow Wing Hibiscus blossom image turned out. Did very little to the original image other than apply 2 Lil’ Owls (see sidebar for website link) Spring Whispers 4 preset and sharpening of the shadow stamen. On a duplicate layer of the background, Topaz (see sidebar for website link) Clarity was applied using John Barclay’s Basic Settings preset (see My Glowing Porch Flowers blog for settings). Next went into OnOne’s (see sidebar for website link) Perfect Effects 9 and applied the PE4 Vintage preset. I believe that OnOne gave it away with an earlier version, probably Perfect Effects 4. Next Topaz Impression was opened and the new preset created from Blake Rudis’s blog called Ethereal Background was applied next (see Blake Rudis video called Atmospheric Backgrounds with Topaz Impression). A New Layer and some clean up was done, especially a little Mixer Brush painting on some of the edges to smooth. Painted Textures Creamsicle texture was applied (not sure this texture is still available) set to Linear Burn blend mode at 73% opacity. A Hue/Sat Adjustment Layer was clipped to the layer and the Saturation set to -56 so there was not a lot of color added to the image, just texture. A Curves Adjustment Layer was added to add back some contrast and the last step was Nik Viveza with a control point on the focal point, or for me the stamen shadow. It was fun to experiment with my arsenal of filters!…..Digital Lady Syd
A Reflecting Wood Stork
I guess this is what birds do when they are reflecting on their lives. Hum… Anyway, just the different iteration of an image I posted in my Fun Photoshop Blog recently (see How to Get the Most Out of Your “Not-So-Great” Images blog). I wanted to show how interesting it can be to change up an image just by running the same filter effect twice on the it. I used the same settings from my linked blog for the Flaming Pear Flood filter and Topaz (see sidebar for website link) Detail 3 using the same Soft Leaves preset. But this time the same Detail filter was applied twice using the same preset to get this sort of dreamy, natural effect. It gave the image a totally different feel. So this is just another example of how to change the ordinary to extra-ordinary!…..Digital Lady Syd
Hiding Out with a Red-Winged Blackbird

This beautiful bird was hiding in the brush at the Ritch Grissom Memorial Wetlands in Brevard County, Florida. I had not seen one in a long time. Not that much post-processing on this one. In Lightroom applied Seim’s (see sidebar for website link) Classic Holga preset. Opened in Photoshop and Topaz (see sidebar for website link) Detail 3 was used to give the photo a little more depth of field feel and the bird was painted out in a layer mask. The Sharpen Tool was used on the bird. Added Topaz Glow set to Soft Light. Nik Viveza 2 was used on the bird and Photoshop’s Camera Raw Radial filter was used to get the pretty vignette. Pretty standard workflow here……Digital Lady Syd


