
Digital Lady Syd’s Free Layer Style Frames

To download the free layer style frame above, a thinner version of it, and a nice black and white double edged frame, go to my Deviant Art site and click on the SJ Double Edge Frame Styles Download File button in upper right corner. To load into Photoshop, the Style Panel needs to be open (Windows -> Styles) – click on the upper right corner icon on panel to open pop-out menu and select Load Styles – navigate to folder where the file was downloaded and click Load. (To add them to listed styles in pop-out, load the style manually. If using Windows 7, go to Local C Drive/Users/user name/AppData/Roaming/Adobe/Adobe Photoshop CS6/Presets/Styles and move downloaded .asl file here – this adds file to Photoshop internal settings.) When using these styles, be sure the top layer is a complete layer (see Step 1 below) or it will not apply correctly.
TIP: If you want to use the colors from your image, just double click on the effect in the Layers Panel which brings up the dialog box for that effect. Click on the color swatch in the effect and when the Color Picker opens, sample image using the eyedropper that appears when hovering in your image – click to add that color into the frame. For the Inner Shadow effect, if you are not seeing any color update when sampling, change the Blend Mode to Normal from Multiply. Note that the next time you use the Layer Style, it will return to whatever colors you set originally, so save it as a New Layer Style if you want to keep the new color settings (see Step 5 below). Sampling colors from the image can often frame it beautifully!
Below are the steps on how to create my layer styles. I am using the frame colors seen above as they seem to look nice on many of my images.
1. Need to have an image layer on top for the layer style to work correctly. To do this, highlight the top layer in the Layers Panel and press CTRL+ALT+SHIFT+E to create a layer that combines all the active layers (eyeballs showing on left edge) in the image. Need to remember this shortcut as it is very useful when doing a lot of things in Photoshop!
2. Double-click on the top layer and the Blending Options dialog box appears. Be sure Blending Options: Default is highlighted on left side.
3. Check and click on Inner Shadow effect and change just these settings: Blend Mode to Multiply, Color Swatch set to brownish color (R165/G120/B0), Opacity 100, Distance 0, Choke 83, and Size 15 pixels.
4. Check and click on Inner Glow effect and change just these settings: Blend Mode Normal, Opacity 100, Color Swatch to greenish color (R115/G121/B42), Technique Softer, Source Edge, Choke 90%, and Size 19 pixels.
5. To save these settings as a Layer Style preset for using on other images, click the New Style button and name it and leave checked Include Layer Effects. Now click on Styles at top left in dialog box or open the Style Panel (Window -> Styles), and it will appear at bottom of the listed styles.
To create the little thinner frame around your image, in Step 3 set Size to 21 and in Step 4 set Size to 29. (For example, see my blog 32-Bit HDR Using Lightroom and CS6.) To create a nice Black and White framing, set Inner Shadow to Normal Blend Mode and Color Swatch to Black – still using Size 51 pixels, and Inner Glow to a White Color Swatch and Size 62 pixels. Of course you can adjust the sizes to look good on your image if they need it. If you do not like the way the style looks after applying, just CTRL+Z to delete and try another one. Try adjusting all the sliders and seeing if you can get an even nicer look.
This image of my pretty little purple Agapanthus bloom was processed using Nik Color Efex Pro 4 – BiColor User Defined filter set to white and light pink colors, Darken/Lighten Center centered on the flower center, and Glamour Glow filters. Two textures were added using Dr. Brown’s Paper Texture Panel (see my blog Russell Brown’s Paper Texture Panel Updated!) and Flypaper’s Apple Blush taster texture using Linear Light at 39% opacity and Creme Anglaise taster texture set to Overlay at 100 opacity. The last step was clicking on my SJ Double Edge Frame layer style in Styles Panel to apply.
Try using these layer styles – I think you will like them. The framing gives a clean sharp edge to an image, especially for posting on the internet……Digital Lady Syd
Which Tool to Use – Smudge or Mixer Brush?

I ran across an old tutorial that was in the very first Photoshop Creative magazine back in 2006. It was on how to create a digital painting by using the Smudge Tool. Well that was something I had to try out – couldn’t believe I had not tried this before! I really like the Mixer Brushes, which is what I usually use (see my blog Adobe Photoshop CS5’s Mixer Brushes). Once I started playing around with the Smudge Tool using different brushes and sizes and opacities, it was actually fun. My curiosity got the best of me and now I needed to know what IS the difference between the two tools – they create very similar results? I was able to find a reasonable answer on the Internet at Model Mayhem.com. Here is what they said:
“The Smudge Tool simulates the effect you see when you drag a finger through wet paint. The tool picks up color where the stroke begins and pushes it in the direction you drag……The Mixer Brush simulates realistic painting techniques such as mixing colors on the canvas, combining colors on a brush, and varying paint wetness across a stroke.”
I think this is a nice short explanation of what is happening. For my Peach Dahlia I found it was nice to use both tools. It seemed it was easier to blend colors with the Mixer Brush and then smooth edges and shape color using the Smudge Tool. The Photoshop Wow Book for CS3 and CS4 (still my favorite Photoshop book) had a nice section on painting with the Smudge Tool. They recommended using the Natural Brushes that come with Photoshop and start by using short strokes, which samples the color underneath more frequently. Then use a small brush size for detail.
To create this image, first a blank layer was placed on top. Then these two brushes were used to paint: Mixer Brush – created tool preset brush with these settings: Stipple Dense 26 pixels from Natural Brushes set (Options Bar: No Current Brush Load, Load the Brush After Each Stroke, Wet 100%, Load 1%, Mix 91%, Flow 100%, Check Sample All Layers). Smudge Brush Tool Preset created using Stipple 54 pixels from Natural Brushes preset with Options Bar set to Mode Normal, Strength 78%, and Checked Sample All Layers. Be sure to save these brushes as Tool Presets so the Options Bar settings are retained – if just saved as brushes, the settings might not be correct. Also, note that if the Finger Painting box is checked in the Smudge Tool options bar, the smear stroke will start with the Foreground color. If turned off, the color under the cursor is sampled first. At 100% Strength, only the first color sampled is applied – at lower settings it fades out the first color and picks up the new one. Then I just alternated mixing and smudging until I liked what I saw. The last step involved adding three textures to the image to give a real painting look: the first one is a light gray canvas texture (I created it by taking a picture of a portion of the canvas on a large oil painting in my dining room – try this – you might really like the results) set to Soft Light at 53% opacity; next ShadowHouse Creations Old Photo 2 set to Overlay at 100% opacity – it provides the interesting edging on the image; and Flypaper Textures Aquaflora taster set to Overlay at 80% opacity. I painted out a little bit of the texture on the top two textures just to direct the eye to the center of the flower. A Curves Adjustment layer was added on top to give just a small contrast boost. Overall it was really fun to try out a new tool and learn something about it!…..Digital Lady Syd
Unknown Little Girl Statue

Here is another beautiful little girl statue from an unknown sculptor at the Lightner Museum (old Hotel Alcazar) in St. Augustine, Florida. I decided to use several of my own textures on this image. First it was cropped, processed a little in Lightroom, brought into Photoshop CS6 where Nik Viveza 2 was used to sharpen only the statue. Nik Color Efex Pro was opened and Dark Contrast Filter and Glamour Glow filters were stacked. I then used four layers of my own textures that I created (two were made by painting on a white background with soft colors using a large Mixer Brush and one is of my lace curtains) and finally finished off with ShadowHouse Creations Old Photo 6 texture used twice – once as a Color Dodge layer at 43% and one as a Linear Burn at 88% on the background only. I loved the way it has an old Western look – she reminds me of Rebecca of Sunnybrook Farm. Textures are so much fun!…..Digital Lady Syd
Red Hibiscus + Textures = Beautiful Picture!

Since I did a recent Fun Photoshop Blog on Creating That Vintage Texture Feel, I thought I would display another one of my compositions using Sarah Gardner’s pointers from her new book Art Beyond the Lens: Working with Digital Textures. This red hibiscus from my front yard was first taken into Topaz photoFXlabs (see sidebar for website link) and on a duplicate layer inside the plug-in, the InstaTone tab using 500 px “Bright Spot” photo was used for the tonal effect. Adjustment tab settings of Exposure -.21, Contrast 4, and Dynamics 35 were applied to the layer. While in this interface, ShadowHouse Creations Entropy 2 texture was added as a new layer and set to Linear Light at 94% opacity, and these settings were applied from the Adjustment Tab to get the beautiful color in the texture: Temp 0, Tint 15, Sat 0, Dynamics 22, Sharpness -9, and Shadows 1. Back in Photoshop, ShadowHouse Creations Vintage Film 6 texture (gives the great framing edge) was applied using Hard Light blend mode at 100% opacity. The last step was to add a Curves Adjustment Layer to increase the contrast a little and that was it. Textures and flowers look so great together!…..Digital Lady Syd
Digital Lady Syd’s Related Blogs:
InstaTone in photoFXlabs – Great Fun and Great Results!
Using photoFXlab v1.1
Using Topaz photoFXlab to Replace Skies
Digital Lady Syd’s Review of Topaz photoFXlab v1.1
Little Girl Statue at Lightner Museum

If you follow my blog much, you know I am a big fan of the Lightner Museum. It is not that fancy and not that big, but totally interesting with their wide range of the late 18th and early 19th century items – lots of fun to just drop-in for an afternoon. And of course St. Augustine is a great city to visit as there is a lot to do, even just walking around is fun! This little girl is one of the beautiful statues that is located in the museum – I have no information on who created her but she has a wonderful expression. (To see a different view of this statue, see my Fun Photoshop Blog Getting that High-Fashion Desaturated Look.)
I initially was going to give a the whole image a painterly effect. I decided I liked just having the background with the artistic feel and keeping the actual statue very detailed but with a softer color. I was trying to follow the Photoshop Workbench – Watercolor Composite by Mark Johnson (his tutorials are great!) but I changed a lot of the steps for this image as I did not like the way it was turning out. Textures were added using using Russell Brown’s Texture Panel (see Russell Brown’s Paper Texture Panel Updated!) – Sarah Gardner’s Blush Cherry set to Overlay Blend Mode at 100% Opacity, Princess of Shadow Texture 3 Hard Light at 43% Opacity, and Shadowhouse Creations Oil Painting-2 set to Overlay at 49% Opacity. Then painting was done above for them to get the colorful background using Mark’s tutorial.
Just goes to show that Photoshop is so much fun! And it is fun to remember the beautiful art that I run across……Digital Lady Syd
Digital Lady Syd Related Blogs (all links related to Lightner Museum)
Lidden Urn from Carl Thieme
The Art Corner: Little Girl Knitting – A Mystery Sculpture!
Black and White Photo or Not? Give It a Try on That Difficult Image
Cafe Alcazar and Vintage Topaz Adjust
Photoshop’s CS6 (and Pixel Bender’s) Oil Paint Filter
Where Am I?
The Art Corner: Poetry and Music by Clodion

This Carrara marble artwork is found in the East Sculpture Hall of the National Gallery of Art in Washington, DC, and was sculpted in 1774-1778 in Paris by Clodion. Metal Chris, a great local DC concert photographer and founder of the DC Heavy Metal website, took all these these images for me recently as I missed it on my last trip to the National Gallery. What I love about this sculpture is that by viewing it from the different angles, which Chris did, you get a very different expression and feel of the art. Poetry definitely takes on a very different look depending on the view.


The Gallery’s site says “Clodion prepared a terracotta model for Poetry and Music, which is in the National Gallery and frequently on view in the ground-floor sculpture galleries. It provides a rare chance to compare an artist’s model with the final version in stone. In this case, Clodion modified the figure of poetry, “correcting” it to adhere to traditional representations: the terracotta figure had rested his head in his hand, but here he holds a writing stylus.” I will try to find this on my next trip to the Gallery – I think it would be fun to see. This is one of four sculptures that were meant to bring to life the abstract concepts of the arts and sciences. I did a previous blog called The Art Corner: Painting and Sculpture by Tassaert if you are interested in more information on both sculpture pieces. The last two pieces, Geometry and Architecture by Jean-Jacques Caffieri created in 1776 and Astronomy and Geography by Felix Lecomte created in 1778 are located at the National Trust, Waddesdon Manor, Buckinghamshire, England.
The first image was processed using Russell Brown’s Paper Texture Panel (see Russell Brown’s Paper Texture Panel Updated! blog to download) and Flypaper Textures Creme Anglais Taster set to Overlay Blend Mode at 93% Opacity and Touchstone Taster set to Overlay Blend Mode at 100% Opacity. Layer masks were added to clean up the faces and shadows a little and a large shadow on the wall was removed as it was very distracting. What really made this image so beautiful was OnOne PhotoFrame (see sidebar for website link) Maivre Background set to Overlay Blend Mode at 80% Opacity while still in the plug-in. It was actually just like adding another layer of texture. Once back in Photoshop, a layer mask was added to softly clear the face area of the texture. The left image of Poetry was converted to a black and white using Nik’s Silver Efex Pro 2 starting with the High Contrast preset. A little localized sharpening was done to the his face using the LAB sharpening method (see my Fun Photoshop blog Unsharp Mask Filter in LAB Mode) and some noise was removed from his body using Imagenomics Noiseware that I am trying out. The right image was hardly touched (only slight noise removal due to the dark lighting effect) – just a beautiful image and very much how the sculpture looks at the Gallery.
If you get a chance to go to this wonderful Art Gallery in DC, you will should try to see one of these beautiful sculptures…..Digital Lady Syd
Some Beach Fun!

Thought I would put up an image I created a couple years ago of Ormond Beach, Florida, where Granada Boulevard runs into the Atlantic Ocean – it is a beautiful stretch of beach if you are in the area. The old Hotel Ormond, a large 300-bed hotel that was built in 1887, was located near this beach. This was one of my first attempts at adding a texture to an image – not sure what texture this is, but it definitely is a watercolor texture that goes from a yellow tone on top to blues on the bottom – the layer was set to a Color Dodge Blend Mode at 30% opacity.
The image below is also of the same stretch of beach but from 1903 – there were beautiful houses instead of high-rises overlooking the ocean. In this winter image, the sails helped move the bikes on the hard sand beach coasting at up to speeds of 20-25 mph. The image is from Shorpy Historical Photo Archive – a great site to follow on a daily basis if you love American history like me as they post a new image every day from the past. To see this image in high resolution on their site, just click on it – and click here for a similar lower resolution shot of the same bikes racing a car. This beach is where the first official automobile race was held in 1903 and the town of Ormond Beach is still known as the “Birthplace of Speed.”

I hope to shoot more local images in the near future – it is fun to live in an area that has some great local historical interest. In the meantime, try out some textures to add a little interest and fun to your own images……Digital Lady Syd
Digital Lady Syd’s Related Blogs:
Where Am I?
Getting That Vintage Look!
Russell Brown’s Paper Texture Panel Updated!
Where Am I?

This is an image of San Francisco taken at night in February in a brisk and cold breeze. I just listened to another interesting webinar by Nichole Paschale from Topaz (see sidebar for website link) called Night Photography Enhanced with Adjust, Black and White Effects and Star Effects. I am always surprised how much I learn from these short videos – there were several good tips in this one, even though I know these programs pretty well. My image was not that great, but I needed a nighttime image to try some of the techniques on. Now I rather like the effect. Of course it uses one of my favorite plug-ins, Black and White Effects, so I am not surprised I like the results. The preset was set to my Old Vintage Effect (see Quad Tones in Topaz Black and White Effects Plug-in to create), one I use on a lot of my images. Next the Star Effects plug-in was used to enhance the streetlight using Sun Flare 1 preset. A Flypaper Texture Lemoncello Taster texture layer was added using the Multiply blend mode at 35% opacity. It still did not have the feel I wanted, so I added a Black and White Adjustment layer and mainly lowered the yellow and added some reds and greens and blues. The opacity was set to 26%. A layer style was added to frame the image. I can honestly say this is exactly how the street looked to me as I was walking to dinner on that cold dark night. If you have not tried out some of Topaz’s videos, give them a listen. Lots of cool things to try in them!…..Digital Lady Syd
Topaz Adjust’s French Countryside Preset – Beautiful!
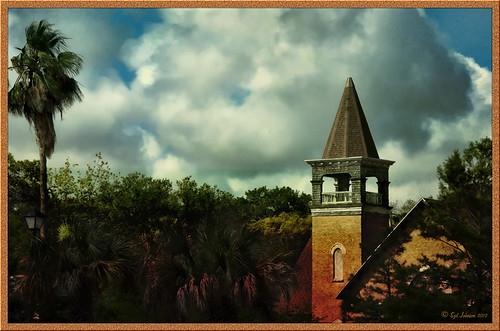 |
Thought I would do another Before and After where I show what one of my favorite presets in Topaz Adjust 5 (see sidebar for website link) looks like when applied. This image was taken in full light and I really took the image as a test shot before visiting some of the wonderful historic sites in St. Augustine, Florida. I really love steeples and cupolas on buildings. I had a hard time deciding what to do with it – it was a hand-held three HDR image. I processed it in Photoshop’s Merge to HDR Pro, only checking the Remove ghosts box before exiting to Photoshop (hover over image to see the tone-mapped image). Some image clean up was done, and two curves adjustment layers, one for contrast and one for color tone, were added since the image was not processed in Lightroom or Camera Raw. After much experimentation, I finally settled on using Topaz Adjust 5 and the French Countryside preset. It seems to soften the image just enough, yet retains some detail in the image – the trick is to adjust the Detail tab’s Threshold slider to bring back some of the details. Then I added Caleb Kimbrough Summer 4 Texture – one of my favorite textures to add the red and green tones into the image for that warm feel. (Also check out his site for many other wonderful textures.) The image took on a totally different feel. Try this preset if you have Adjust…..Digital Lady Syd
Digital Lady Syd Related Blogs:
Why I Love Topaz Adjust!
Topaz Adjust 5 Is Here! First Look!
Making An Ordinary Image Your Own
Soft Bokeh Texture for a Flower Image

This image of pink orchids in Hawaii had a background layer showing the flowers against a clear blue sky – perfect for adding textures. I really love the bokeh texture used in this image. As many of you know who follow me, I am a big fan of Shadowhouse Creations textures. This image stacked three of his beautiful textures to get this wonderful soft look: Oil Painting 5 set to Color Blend Mode at 100% opacity – a white layer mask was added and the flowers and part of the stems were painted in black lightly to bring back a little bit of the green and pink color; Gorgeous Tones Texture 3 (third one down) set to Screen Blend Mode at 32% opacity; and Bokeh Texture 4 set to Darken Blend Mode at 28% opacity. If you like the bokeh effect, this texture is one of the best…..Digital Lady Syd
Digital Lady Syd Related Blogs:
Russell Brown’s Paper Texture Panel Updated!
Soft-Look Flowers Using Textures
Tips for Flower Textures
Lidden Urn from Carl Thieme

The above image is of a beautiful porcelain Lidden Urn by Carl Thieme of Potschappel, Saxony in Germany from the late 19th century. It is on display at the Lightner Museum in St. Augustine, Florida. I have to be honest and say I did not have a good appreciation for this type of art, but after researching a little on the internet, I am fascinated by the history. If you have an interest, here is a link on the interesting history of the area called Antique Lamps-Dresden, A History Lost, and links to Live Auctioneer showing two similar pieces: piece one and piece two. I am actually very glad to have learned something different in the art world! Actually, I guess that is what a museum is all about – introducing people to new things!
To process this image, I did not do that much to it. ShadowHouse Creations has issued a new free painterly pack of textures and I had to try them out! I put them in a folder and used them with Russell Brown’s Paper Texture Panel (see my blog Russell Brown’s Paper Texture Panel Updated! to download). This effect was created by stacking Painterly-6 (Overlay Blend Mode at 60%) and Painterly-1 (set to Overlay Blend Mode at 100%). I painted out the texture from the painting on the lower part of the urn using a white layer mask and soft black brush at a low opacity so it shows up very clearly. OnOne PhotoFrame (see sidebar for website link) acid burn 12 was added using a color sampled from the image.
Try shooting images in museums, you might get something really interesting. And be sure to shoot any information about the piece too!…..Digital Lady Syd
Digital Lady Syd’s Related Blogs: (All related Lightner Museum links)
The Art Corner: Little Girl Knitting – A Mystery Sculpture!
Black and White Photo or Not? Give It a Try on That Difficult Image
Where Am I?
Hibiscus Flowers – I Love to Photograph Them!

These beautiful Red Chinese Hibiscus blooms appeared on Mothers Day last week so I had to take their picture! Used my favorite artistic plug-in – Topaz Black and White Effects (see sidebar for website link) – and applied a preset I had created earlier called Water Landscape Sunny (Adaptive Exposure section – Adaptive Exposure 0.18, Region as 26.10, Detail 1.11, and Detail Boost 1.09; Quad Tones which creates the interesting effect used Color 1 Region set to R1G1B12 and 9.60, Color 2 Region set to R63G78B85 and 95.97, Color 3 Region set to R216G211B129 at 141.2, and Color 4 Region set to R255G254B237 and 255.0; Edge Exposure set to Edge Size 0.19, Edge Exposure -0.43, and Edge Transition 0.27 for all sides; and Transparency set to 1.00.) While in the plug-in, the Detail brush was used to sharpen the center of the flowers and to go around the petal edges where they overlap each other. Next ShadowHouse Creations Marshmellow Skies texture set to Overlay at 100% opacity was added to give the soft green-turquoise feel to the background – a white layer mask and a soft black brush was used to take the texture effect off the flowers. A Curves Adjustment Layer was added and OnOne PhotoFrame (see sidebar for website link) grunge 04 set to 75% opacity was also added. Not hard and once again a really beautiful effect. I love Black and White Effects! I could do this all day! As you can see by the number of related blogs below, this is definitely one of my favorite plug-ins – check them out for several other examples on how to use it!…..Digital Lady Syd
Digital Lady Syd Related Blogs:
Black and White Effects on Outside Art
Cleaning Up a Messed Up Photo
Topaz Black and White Effects Quad Tones Are Great!
Sunny Preset for Topaz Black and White Effects
My Office Friend Ted
Loving Both Filters!
The Art Corner: Painting and Sculpture by Tassaert
Quad Tones in Topaz Black and White Effects Plug-in
Get Rid of Those Power Lines Fast – with Paths and Spot Healing Tool!
Topaz B&W Effects vs. Nik’s Silver Efex Pro
Just Another Topaz Black and White Effect Example
Topaz B&W Effects Plug-In-A Real Winner!
Orchids with Russell Brown’s Paper Textures Panel

This was so easy and turned out so pretty. Need to darken the background of your image to get this effect. The the Flypaper Texture Creme Anglaise was added to give the painted look (in group of textures provided with Russell Brown’s Paper Texture Panel – see blog links below to download). A Hue/Saturation Adjustment Layer was added to darken the texture a bit more with Master set to Hue -146, Saturation -59, and Lightness -14. The flowers were painted out in the layer mask so they would not be affected by the color change, but it still did not have enough purple tone. Therefore a Color Fill Adjustment Layer was added with the color set to a deep blue (R101G33B227) set to 37% opacity. The flowers were once again painted out on the adjustment layer mask. The last step was OnOne PhotoFrame airbrush_06 (see sidebar for website link) and the color was sampled from the image to finish up. Very quick and easy effect…..Digital Lady Syd
Digital Lady Syd Related Blog:
Russell Brown’s Paper Texture Panel – A Real Winner!
Russell Brown’s Paper Texture Panel Updated!
Russell Brown Texture Panel Landscape Image
Another Soft Hawaiian Landscape

Image was taken at Lapakahi Historical State Park of one of the homes the early Hawaiians lived in roughly 600 years ago on the western side of the Big Island.
For this image, the steps used were from my my blog Using Color Efex Pro and Texture for a Warm Hawaiian Landscape Effect for the second image. Same Lightroom preset, same textures (using Russell Brown’s Texture Panel (see my blog Russell Brown’s Paper Texture Panel Updated!), and same adjustment layers. Image was sharpened and a New Layer was added on top where a paint brush set to yellow at 20% opacity was used to paint in the blown out highlights on the roof of the house. (See my blog Getting Rid of Those Blown Out Areas in Your Image on how to do this.) A different OnOne PhotoFrame was added – Taufer_Texture_12. (See sidebar for website link.)
Not very realistic but definitely has that Hawaiian feel and that is okay!…..Digital Lady Syd
Using a Color Fill Adjustment Layer as a Spotlight

This image is of the Philippine Ground Orchid, a very dainty small pink flower. I am using this image as an example of how you can use a Color Fill Adjustment Layer as a subtle spotlight to direct the eye in the image but with a color vignette feel. I processed this image using Russell Brown’s Paper Texture Panel (I just love this panel and these textures – check out my blog Russell Brown’s Paper Texture Panel – A Real Winner! to download and use for free). Flypaper’s Apple Blush Texture was set to Hard Light Blend Mode at 71% Opacity and gave the image a very greenish look but with that great canvas texture. The Muscatel Texture was added next and set to Overlay Blend Mode at 29% Opacity to slightly darken the image and add some orange tones. Since I felt like the green was still a little overwhelming, a Color Fill Adjustment Layer was added – a royal blue color was selected and set to 54% Opacity. In the Color Fill Adjustment Layer’s white Layer Mask, a very soft large brush was set to 15% opacity and with black set as the color, the blue color was gently painted out to give the subtle spotlight effect from the light green tones underneath that will direct the eye. This is a great little trick if you need to draw the eye into a certain part of an image and works very well with flower images. I also like adding my own colors into an image. Have fun experimenting…..Digital Lady Syd
Digital Lady Syd’s Related Blogs:
That Soft, Dreamy Look
Russell Brown Texture Panel Landscape Image
Adding a Texture for Flair!
Keeping Focus Where You Want It Using Focal Point 2 and Color Fill Adjustment Layer
Topaz Simplify and Lens Effects Saves an Image!
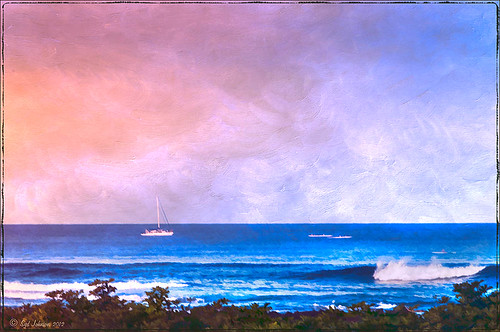 |
The catamaran is one of the whale watching boats you can take while on the Big Island in Hawaii (see Hawaii Ocean Sports for more information on this). This image was taken the day before my adventure and it was not a good at all (hover over image to see original RAW image) – but I really wanted a shot of the boat on the water. Therefore some improvisation had to be employed. After cropping and doing some RAW adjustments in Lightroom, Topaz (see sidebar for website link) came to the rescue. Topaz Simplify 3 was applied first to get rid of the focus issue – the BuzzSim preset was used as a starting point with these changes: Simplify Size slider was changed to 0.15, Brightness slider changed to 0.08, Saturation slider to 1.27, Edges: Color Edge Fine, and Edge Strength slider 1.50. Next Topaz Lens Effects was applied using the Filter Dual Tone Effect to create the warm feel in the sky with a preset I previously created called Sunrise Effect. (See below if you would like the settings for the preset.) Next Flypaper’s Paper Texture Creme Anglaise (one gorgeous texture!) was used via Russell Brown’s Paper Texture Panel for Photoshop CS5 and CS6 (see my blog Russell Brown’s Paper Texture Panel – A Real Winner!) and set to Divide Blend Mode at 100% opacity. A Curves Adjustment Layer was added to fix the contrast. Finally OnOne’s Photoframe grunge 09 was added (see sidebar for link). An image I would normally have trashed has now been turned into a beautiful picture that I really love. Give this technique a try if you own the Topaz plug-ins. The combination works great together, especially if you want to save an image!…..Digital Lady Syd
My Topaz Lens Effects Sunrise Preset contains these settings: Transition Adjustments – Region Size 0.45, Transition 0.35, and Angle 149.7; Region A Adjustments – Cyan Cast 0, Red Cast 0.20, Magenta Cast 0.01, Green Cast 0.03, Yellow Cast 0.70, and Blue Cast 0.24; Region B Adjustments – Cyan Cast 0.15, Red Cast 0.10, Magenta Cast 0.15, Green Cast 0.05, Yellow Cast 0, and Blue Cast 0.05; and Image Adjustments – Brightness 0.05, Contrast 0.08, and Saturation 0.07.
Digital Lady Syd Related Blogs:
Topaz Simplify and Topaz Detail Together
Simplifier and Simplify Filters
Russell Brown Texture Panel Landscape Image
Getting Rid of Those Blown Out Areas in Your Image
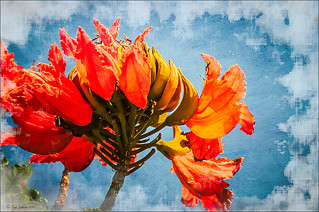 |
I thought I would give you a quick tip on how to get rid of those awful eye-drawing highlights on outdoor shots where you cannot control the light. Above are some beautiful African Tulip Tree flowers that I shot during the brightest time of day in Hawaii. It was so windy I felt lucky to get a fairly sharp shot much less control the light. Therefore, when the photo was opened up in Lightroom (or ACR), it became quickly apparent that there were several bright highlight areas that needed to be tamed. Hover over image to see original as brought into Photoshop. All my RAW adjustments were made before taking the image into Photoshop. (I used My Vivid Drawing Look preset which still works with Lightroom4 or ACR/Photoshop CS6 (note: change file extension to .xmp in zip folder to get file to work) – just be sure to adjust your new Highlights and Shadows sliders and the old Exposure slider-all other settings are the same.)
TIP: A New Layer was created right above the Background layer. Using a very soft round brush set to no more than 20% opacity, sample (ALT-Clicking the color right next to the blown out areas) and then gently paint over the white parts. Build up the color – if you overdo it, the layer opacity can be lowered or just add a Layer Mask to your painting layer and paint in white to remove or adjust the paint strokes.
Next Russell Brown’s Paper Texture Panel was opened and Flypaper Texture Dawn Grunge was added as a layer in Overlay Blend Mode at 100% opacity to give a very painterly feel to the image background. (See my Fun Photoshop Blog Russell Brown’s Paper Texture Panel – A Real Winner! for information on how to add this free panel to your program.) The turquoise and orange always makes a great combination for flower shots. Next a Curves Adjustment Layer was added to make the blue color pop in the background – by painting in the layer mask, the yellow fruit and green stalk color was brought back as it had become too dark. Finally OnOne PhotoFrame “napp frame 14” was added.
This is a great technique when you have a few distracting highlights and I find I use it a lot, but it won’t fix an overexposed image. Hope this helps you out a little…..Digital Lady Syd
Hyacinths and OnOne PhotoFrames

I recently did a blog called My Favorite Photo Frame Plug-In – OnOne PhotoFrames (hum!) on the really nice OnOne PhotoFrames (see sidebar for website link) that I use on many of my images. Here is another nice example of their beautiful frames. (This frame is the Taufer Frame 08 using a light beige color – Russell Brown’s Paper Texture Panel was used on this image – see my Fun Photoshop Blog Russell Brown’s Paper Texture Panel – A Real Winner!)
Give these frames a try – they are easy to use and can really enhance your final image. You can download a 30-day free trial at their website or while in website go to the Products header -> Free Products and select Edge and Framing Effects where you can download 30 frames to use for free! Give it a try! ….Digital Lady Syd
Russell Brown Texture Panel Landscape Image

I call this photo Hawaiian Horses Chatting – they look deep in conversation. Hum?? Anyway, this weekend I did a Fun Photoshop Blog called “Russell Brown’s Paper Texture Panel – A Real Winner!” (I seem to like real winners!) This is another one of his great free Photoshop panels that creates texturized images very quickly and allows you to experiment easily to get an interesting effect. Check out my other blog for the download links and details on how this panel works. I will say that Flypaper Textures has given you several beautiful textures to play with in the panel until Russell gets an update to include other textures. This image used three Flypaper textures stacked: Texture Aquarius set to Soft Light Blend Mode at 84% layer opacity, Texture Creme Anglaise set to Multiply Blend Mode at 100%, and Texture Colosseum Sienna set to Vivid Light Blend Mode at 46%. I had been having a hard time getting a look I liked for this image until I tried the texture panel – it really surprised me how beautiful the effect ended up. Give this panel a try if you have Photoshop CS5 or CS6 and you love textures like I do. Definitely worth the effort!…..Digital Lady Syd
Soft-Look Flowers Using Textures

These beautiful dahlia flowers are now planted in a flower bed in my front yard. To get this effect, it was a pretty simple process. I sharpened the center and darkened the green stems first. Next ShadowHouse Creations Subtle Tones ST-8 texture was set to Color Blend Mode. With a layer mask I painted out the texture over the flowers very lightly using a soft 13% opacity brush and building up the effect until it looked the way I liked it. Next ShadowHouse Creations 3 Assorted Texture Set T 2 texture was set to Hard Light Blend Mode to add a very feminine look – also a layer mask was used to clear the lacy texture from on top of the flowers. A Hue/Saturation Adjustment Layer was added on top to select the correct texture color by adjusting the Hue slider. The last step added OnOnePhotoFrames toner scratch 21 (see sidebar for website) with a very light purple-pink color. That was it. I loved the final result. I hope you will try using some of the beautiful textures from ShadowHouse Creations website where there is a huge selection of textures that can be downloaded for free. Major thanks for what he does to help us budget-minded Photoshoppers!…..Digital Lady Syd
The flowers were photographed on a table with a science fair 3-sided white board behind them and natural light from a window – shot with a Nikkor 60 mm Macro Lens set to F/3.2, 1/15 sec at ISO 400 with an attached Bower 0.5 x High Resolution Digital Lens with Macro lens, which gives the large depth-of-field effect.
Let’s Focus on OnOne’s Focus Point 2 – Nice Little Plug-in!

These beautiful pink and white orchids were captured at the Hawaii Tropical Botanical Garden on the Big Island in Hawaii – they had a huge assortment of orchids in their Orchid Island exhibit, many varieties I had never seen before! If you look closely, you will see a tiny white spider web connecting the blossoms.
On this image I used OnOne’s Focal Point 2 – a really wonderful plug-in that is part of the OnOne Perfect Photo Suite 6.0 (see sidebar for website link). I had not used it before but after listening to OnOne’s short video called “Selectively Draw the Viewer’s Eyes Where You Want It To Go” (scroll down to 1/9/12), it proved to be very easy to apply and quite effective. It uses the Focus Bug technology like its other products, and the effect can be painted in or out with the Focus Brush. A soft blurred vignette can easily be added also. ShadowHouse Creations Pseudo Film Scratches Texture Heavily Scratched 2 was added with the layer set to Divide which gave the bright splotches of color throughout the image. The Sharpen Tool was used to selectively sharpen the forward edges of the flowers, and a composite layer (CTRL+SHIFT+ALT+E) was created on top to add a Layer Style. In this case, an oldie but goodie layer style from a book I bought years ago called “Adobe Photoshop 7 One-Click Wow!” by Jack Davis and Linnea Dayton was added using Wow Frame 09. The cool thing about this little book is that is shows what all the styles look like when applied. These styles are also included on the accompanying DVD to my favorite Photoshop Book “Photoshop CS3/CS4 WOW! Book” by Linnea Dayton and Christen Gillespie, where the original book is basically reproduced in the Appendices. Give Focal Point a try if you like this type of effect – very easy to use and gives very dramatic portrait or landscape effects also…..Digital Lady Syd
More Texture Fun!
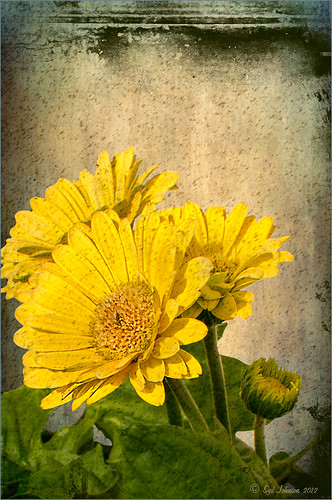 |
I did a Fun Photoshop Blog called Tips for Flower Textures last week and I thought I would show another example. Yellow is a very powerful color and it is not different for this image. Once again the texture opacities and blend modes are varied to get this effect. Hover over the image to see how the photo looks with just a few Lightroom adjustments applied. To create this look, the following steps were followed:
1. Duplicate the original layer.
2. Select the background with the Quick Selection Tool and then click the layer mask icon to create a mask that will remove the background.
3. Next a texture by ShadowHouse Creations called In the Beginning was copies and placed under the selected flower layer to create a new background set to Normal Blend Mode at 100% opacity.
4. ShadowHouse Creations texture Photo-Tints Orange Overlay was moved on top of the flowers and was set to Vivid Light Blend Mode and 52% opacity. A Layer Mask was added and the center of the yellow flowers was softly painted out so the orange color is only on the tips.
5. A Hue/Saturation Adjustment Layer was clipped (3rd icon at bottom of adjustment layer) to the layer and Master was set to Hue +22, Saturation -26 and Lightness +35 to soften the redness.
6. ShadowHouse Creations texture You’d Be Surprised was applied next and set to Color Dodge Blend Mode at 35% opacity. A Layer Mask was applied to the center of the front flower.
7. Sharpen Tool was used on the flowers only.
8. To get the grunge spots, Florabella’s Snow 3 (the link is to her Facebook page with the free download on the left side)was applied and set to Subtract Blend Mode at 37% opacity.
9. The last step involves adding OnOne’s PhotoFrame Taufer Texture 10 – link to OnOne software is on the right. They simply have the best frames!
I hope you will try to add some textures to your photos. As you can see, the original photo was not anything really exceptional, but with a few free downloadable textures, the whole look changes. And do not be afraid to try different blend modes – I love the way the snow texture turns into a more grunge look with the Subtract Blend Mode. Check out my related blogs below for more beautiful textures to download…..Digital Lady Syd
Digital Lady Syd Related Blogs:
Tips for Flower Textures
Adding a Texture for Flair
Elements & CS5 Friday: Adding a Texture for a Totally New Look to an Image
Fixing Up a Boring Picture
Combining Plug-ins for More Image Interest

Took this image of a red bloom from the hibiscus tree in my front yard – I love hibiscus flowers! A 60 mm Nikkor macro lens was used at F/6.7 for 1/60 sec. A Bower 0.5 x High Resolution Digital Lens with Macro was added to the lens. The camera raw shot was adjusted in Lightroom and brought into Photoshop. Some of the distracting background was cloned out, the image sharpened a bit, then Nik’s Color Efex Pro 4’s Darken/Lighten Center filter effect was applied. The image was taken into Nik’s Viveza 2 where the structure on the pistil and stamen was increased, and the background softened a little by setting the structure to -100. ShadowHouse Creations texture 5AT-2 was added and set to Soft Light at 62%. Next the new Topaz Star Effects plug-in was applied to the tips of the stigma to make it sparkle and a bit to the yellow anthers (see sidebar for Topaz’s website link). Finally OnOne PhotoFrame’s Taufer Texture 12 was applied to finish off the image (see sidebar for OnOne’s website link).
This is a good example of how several different effects can create more interest – it also helps to have a great color combination to work with too!…..Digital Lady Syd
Digital Lady Syd Related Blogs:
Trying Out Topaz Star Effects
Using NIK’s Color Efex 4 and Viveza Together
Where Am I?

This image was taken in London a few years back of The Royal Horseguards Hotel, a 5 star hotel that overlooks the River Thames near the London Eye. It is a beautiful old building that stands out from the treetops. Check out this virtual tour of the outside to see the size of the immense building!
The image was processed using OnOne’s Perfect Effects plug-in (see sidebar for website link) where a light blue-dark blue cross-processed layer was created. Next Nik’s Viveza was added to add more detail to the buildings since I cropped in pretty close from a much larger image. In Photoshop a Selective Color Adjustment Layer was next using only the Whites and adjusting the Yellow to +21 and the Black to -5 – this adds the sunny feel to the image. The Sharpen Tool was applied to the building tops and Curves Adjustment Layer to add contrast. Finally, one Florabella’s Snow Texture 3 (the link is to her Facebook page with the free download on the left side) was applied on top – the layer was set to Screen at 73% opacity. I am having so much fun playing with all the different looks you can get with the different plug-ins applied together. Try combining some of your plug-ins and see what great results you can get!…..Digital Lady Syd
Digital Lady Syd Related Blogs:
Digital Lady Syd’s Review of OnOne Perfect Effects
Another OnOne Perfect Effects Pix – Got To Love It!
Pseudo HDR in OnOne Perfect Effects
Using Nik’s Color Efex Pro 4 and Viveza Together
Digital Landscape Effects with Nik Software


