
Using the Hue/Saturation Adjustment Layer Temperature Slider for Color Change
 |
I tend to shoot HDR when I am at home photographing my flowers. I like having the different exposure options to choose from even if I do not create an HDR image. In this case an AF Micro Nikkor 60 mm lens at F/3.2, 180 sec, ISO 200 with a Bower 0.5 x High Resolution Digital Lens with Macro was used to shoot 5 exposures set to exposure compensations of -2, -1, 0, +1, +2. These five images were processed in CS5 using Photoshop’s Merge to HDR program – click on the image to see the original Photoshop HDR composite. (Here are the HDR settings used: Radius 350, Strength 1.86, Gamma 2.03, Exposure -0.45, Details 228, Shadow 100, Highlight -86, Vibrance 75, and Saturation -26 – a curve was created with points at Input 25 Output 43 and Input 58 and Output 65. I saved this down as a preset to use again.)
To get a little different look, I decided to use the red-green dynamic color combination. A Hue/Saturation Adjustment Layer was used to change the Reds to Hue +32, Saturation +33 and Lightness -7. To get the center green, while still in the Reds, I moved the temperature tabs on the slider at the bottom of the adjustment layer – see settings below. The center color totally popped! In Magentas the Saturation was set to +14. That was all it took change the colors to something really dynamic!

The final steps involved adding a few control points in Nik’s Viveza 2 for contrast and detail and a Sharpen Tool layer to emphasize the center. OnOne PhotoFrame Taufer Texture 07 was applied (see sidebar for website link). The background was changed to a darkish green to give more color contrast.
Once again, by just playing around in Photoshop and trying a few filters and different colors, you can make an ordinary image into something quite spectacular. Go try out the Hue/Saturation Adjustment Layer temperature slider too – it gives some very interesting results…..Digital Lady Syd
Trying Out Lightroom 4 Beta

Well it is here – it’s been almost two years since Lightroom 3 came out so the new version is ready for testing. Anyone can download it to beta test and it will be available for use until March 31, 2012. So give it a try – it now edits video. Adobe has replaced the Recover and Fill Light with Shadows and Whites sliders giving a much improved result. The Adjustment Brush and Gradient now have the same choices as the Basic Panel sliders so you can localize changes to particular parts of the image – this is a big upgrade IMHO. Clarity slider no long gives halos when set over 80 – another great enhancement. They now have a Book module where you can design your own photo books and a Map module to help with CPS classifying. There is soft-proofing for your images before printing to see how they will look when printed, and in the Print module, there are Brightness and Contrast sliders to help with the conversion from monitor to print media. Guess there are lots of other little things going on in the new version, but I have not had time to do a complete run through. The biggest drawback as far as I can tell is that the presets do now work great from Lightroom 3 because of the slider changes in the Basic Panel – this will take a while to adjust your old ones over to the new version. Otherwise it seems to be a great new upgrade. So far plug-ins seem to working – the image of above used OnOne’s Perfect Layers plug-in and it ran fine in Lightroom 4 beta. (The texture is Shadowhouse Creations Oil Painting 3.)
Download the beta version of Adobe Lightroom 4
Two great resources for information about the new features are :
Launch Center – Lightroom 4 from NAPP featuring Scott Kelby and Matt Kloskowski (Owner of Killer Lightroom Tips blog)
Introduction to Lightroom 4 Beta from Adobe featuring Julieanne Kost (One of my favorite gurus)
This program is definitely worth taking a look at if you do photography or Photoshop much at all. I love this program – the simplicity of the layout makes it very easy to use. Download the free beta version and see what you think! Once I get a chance to try out all the new features, I will report back – I am a Lightroom nut too!…..Digital Lady Syd
Blue Orchids?

Yep – that’s what you see. I snapped this jpeg with my little Canon Power Shot camera while shopping in the grocery store for final holiday goodies a couple weeks ago. Wow! I guess the soil has been treated to make the color in the orchids turn blue. I had to grab a few shots!
To process this image, I first lightened it as the colors were so blue the detail was totally missing. Then I added a free Florabella Snow Texture (the link is to her Facebook page with the free download on the left side) to give it that nice winter feel. Next Nik Color Efex Pro 4 was applied using the Bleach Bypass, Darken/Lighten Center, Tonal Contrast, and Vignette filters to get this effect. Finally OnOne’s PhotoFrame acid burned controlled 13 (see sidebar for website link) was added. Enjoy!…..Digital Lady Syd
Create a Great Shot with a Good Crop

Thought I would show you what a difference a good crop can do for turning an ordinary image into something that has some real eye appeal. The rain on the petals could not even be seen in the original shot.
For Lightroom Users: The above image was first cropped in Lightroom using the Crop Tool, but you can do this in Adobe Camera Raw or even Photoshop or Elements to get the correct look. I have found that by zooming in on an image using the Navigator at a canned magnification zoom like 2:1, then using the hand to move the image around, gives you a quick feel for what kind of crop you need. Then it was adjusted using the other sliders.
For Photoshop or Elements: Open your image in Adobe Camera Raw and select the Crop Tool from the Camera Raw Tools at top (6th icon over). Use the Zoom pop-down box in the lower left to try different zoom magnifications. Hold down the Space Bar to move image around to see how a crop would look. Click the little arrow in the right bottom corner of the Crop Tool – this should be set to Constrain to Image and in my case, 2 to 3 since I want a 4 X 6 image to print. There are corner tabs that can be pulled out to adjust the crop at this point and get the final look. Now do your adjustments in ACR and the final crop will be applied once it is opened in Photoshop or Elements. Similar steps can be done using the Crop Tool in Photoshop or Elements after exiting ACR.
Below is my original RAW file. As you can see, it was blown out a bit and not well composed. Note that sometimes the close-up cropping just does not work for the image. JPG’s usually do not have as much information as RAW files and may not have enough information to give a clean close-up crop. But it is still worth a try to see.

After applying ACR adjustments, the image was opened up in Topaz Black and White Effects plug-in using a Traditional Collection preset as a starting point. A Transparency of 1.00 was set to bring back the some color into the black and white image, and Quad Tones were added using the colors Black, Darker Blue, Light Blue and White to add the bluish tones. In Local Adjustments the center color was painted back in, details painted in, and a little dodge to add contrast.
Next time you think an image is just not going to work, try some different types of cropping. You might find a really interesting look!…..Digital Lady Syd
Digital Lady Syd’s Rule No. 5: Just Step Outside and Look Around!

If you find yourself bored because you have not taken any interesting images recently, just step outside and take a look around. I was feeling just this way this past week – with the holidays there just was not much time to go out and take some interesting pictures. So on Christmas Day, I decided to walk around outside just on the off chance there was something interesting. It was warmer than usual outside and there was this beautiful unexpected Monarch butterfly in my Purple Queen flowers. He seemed a little aggravated that I was taking his picture, but hey, I wasn’t really bothering him. (You can tell the butterfly is a male because of the black spot on his mid-hind wings in the vein.)
The image was shot with a Nikon D300 using my 18-200mm zoom lens at 200 mm, f/9.5, 1/90 sec, ISO 400 – did not have time to change to a macro lens or I would have missed the shot. I shot in burst mode and several of the shots were blurry as he was moving his wings so fast! Not used to taking pictures of butterflies! This image was processed using NIK Color Efex Pro 4 with the Detail Extractor Filter, Vignette Blur to get ride of distracting leaves and ground in the image, and a regular Vignette. Used the Sharpen Tool on another layer and a Curves Adjustment Layer to finish off.
It was fun to take more of a macro shot for a change I always love taking pictures of flowers. Great change of pace and it got me interested in working on my flower photos for a few days while the weather is pretty bad. In the meantime, take a look around outside your house and maybe you will find something interesting, like I did, that you had not noticed before!….Digital Lady Syd
Photoshop Elements Scene Cleaner
Since I am new to Photoshop Elements, I was surprised by the accolades Elements is receiving for their PhotoMerge capabilities, especially Scene Cleaner. It is something that cannot be done nearly as easily in Photoshop CS5 but has been in Elements since version 7. (For Photoshop CS5 people, Mike Hale’s Stack Mode Panel at Russell Brown’s website does have a panel that can be added to do this very thing.)

The image above is of a street corner in St. Augustine, Florida. Both the Scene Cleaner and the Saturated Slide Show effect were applied to this image. Here is how this was done:

1. For Scene Cleaner there must be at least two shots of the same image with the moving objects in different positions. In this case, it was the guy on the bicycle that road into my view while I was photographing. If lots of tourists are in your image, you will need several shots which you probably will have anyway if you shoot in bursts like most people do, especially if using a DSLR camera. If not, remember to do this when taking a picture of a famous place with lots of people around – this technique will save your picture!
2. Open Photoshop Elements and adjust all images at once in Adobe Camera Raw, trying to get their exposures as close as possible. (See my Tidbits Blog “Adobe Camera Raw – Not So Obvious in Photoshop Elements 10” on how to do this.) Click Open Image button and open all images up into Photoshop Elements. Do the adjustments this way so you do not have a bunch of layers to merge down before doing the next step.
3. Make sure the Project Bin at bottom is open (double click on the words Project Bin to toggle between open and closed) so all three images show up in it.
4. Go to Edit tab on right and select Guided, then PhotoMerge section, and finally Scene Cleaner. The program is now aligning the images. One of the images will appear in the left image box called the Source.
5. Need to look at all your images and decide which one is exposed the best for the final image. In the bin click and drag this image into the right Final image location. In the case above, the bottom image was used as the Final image and top image was the Source image. If more images had been available, different images can be changed out as the source image by just clicking on each one in the bottom bin.
6. Select a Source image that has an area cleared of any object or tourist that is ruining the other image. Select the pencil tool and set the brush size to about 35 pixels. This is key to getting this to work – Paint roughly in the Source image in the area where you think the interfering object is in the Final image – the object magically disappears in the other Final image. It may not be a perfect removal, but it does a pretty good job! A second image can be selected as a Source and marked up to remove other problem areas in the Final if needed. If you get lost, follow the Guide notes – they even have some advanced tips. The Show Regions box can be checked to see how each image is affecting the final result. Click Done to apply.
7. Use Crop Tool to cut away any mismatched white areas around Final image.
8. The image above still showed a bit of a hand. Therefore a Clone Layer was added and the hand blended out.
9. For the concrete shadow color issue (can see the different colors between the two images used above), the Lasso Tool was used to select the bad colored cement and it was placed on its own layer (with selection active, click CTRL+J). A Hue/Saturation Adjustment Layer was opened and the Colorize box was checked (these settings were set: Hue 210, Saturation 14, and Lightness -28) to match the cements.
10. The final step involved going to Edit -> Guided -> Saturated Slide Show Effect. It was applied 6 times to get the over-saturated look I liked.
This sounds like it was hard to do, but in reality it was really simple. The biggest issue is getting two or more shots that have different enough views to be able to remove the moving objects. Everyone says the Scene Cleaner is really a great addition and personally I wish they had it in Photoshop CS5. It has been fun learning a new technique in Elements. Give it a try!…..Digital Lady Syd
Defringe that Nasty Blue Edge from Trees On a Bright Blue Sky!
 |
This is a short but sweet way to get rid of most of those blue and cyan edges on trees shot in bright light against a blue sky. There are just times you have to take that image in the bright light of day and the fringe occurs frequently. These tips also work when you have a horizon line in a landscape shot that has similar issues.
Hue/Saturation Adjustment Layer: The image above has that very problem and this method was used to get rid of most of the fringe. Hover the above image to see the before defringing image.
1. Simply add a Hue/Sat Adjustment Layer in Photoshop and in the Master field drop-down, adjust the Saturation slider left quite a bit and possibly the Hue slider a little until the blue edging disappears. For the above both Blue (Saturation set to -50 and Hue set to -8) and Cyan (Saturation set to -64).
2. Then Fill the attached adjustment layer mask with black (click on mask and CTRL+Backspace).
3. Click on the black layer mask and use a white brush to paint around the edges at roughly 40% opacity to remove the fringe color. You may have to go over it a couple of times but it will look more natural than setting the brush to 100% and painting over just once. You may need to adjust the opacity of the brush down more so the desaturation is not so noticeable.
Sponge Tool Method: Perhaps the easiest way to get rid of any extra fringe that might still be lurking in the image is to select the Sponge Tool and set it to Mode Desaturate. Turn off Vibrance in the Options Bar since that will only work on the more or less saturated colors and not the already saturated colors which we want to get rid of. Brushed over the fringe areas but try not to discolor too much of the neighboring sky also – it will look white and not the natural blue sky color.
Camera Raw Method: Open image in Lightroom or ACR and go to the Lens Correction Panel Manual Tab in the Chromatic Aberration section, set the Defringe to All Edges and adjust the Red/Cyan slider to the left and Blue/Yellow slider to the right to get the best result. This may take a bit of adjusting to get the right balance and watch out for any color shifts in the sky area around the leaves. There is no way to use a Saturation Adjustment Brush effectively to paint out the fringe as it does not have the choice of colors to remove – it desaturates everything you paint over – and it is hard to just pinpoint the fringe.
Saturation Layer: Digital Lady Syd’s Favorite way to eliminate a slight fringe edge is with a tip I presented a while back in a Tidbits Blog called “Selective Desaturation – the Easy Way!” This is a very simple technique – simply add a New Layer on top of your image and set the blend mode to Saturation, select the Brush Tool, set color to black (white or gray will also work) and 15% opacity in the Options Bar. Paint over the area you want to desaturate several times until you get the look you are after. If too much desaturation occurs, add a layer mask back and use a black brush to paint back any areas that you did not mean to desaturate. I think this gives as good a result as the first method so give it a try if you do not like the results using any of the other methods. I would post the image again but it is very similar to after image above.
Here are four options to try: Bottom line, try it and if you don’t like the results, don’t use it and try something else!
The final thought is a great quote I found from TWCDM’s Blog: “While these tricks are fine and dandy the best way to fix purple fringing to is avoid it in the first place. You can prevent purple fringing by using high quality lenses, stopping down your lens (shooting at an aperature of f8-f22), and if you are using a zoom lens avoid using the maximum and minimum focal range. A lenses “sweet spot” is usually somewhere in the middle focal lengths.” If you shoot it right to begin with you will not have this problem. (That apparently is my problem – hum!)
Hope these tips help you on those bright outdoor daytime images…..Digital Lady Syd
Where Am I?

The above image was processed using the my regular Vivid Drawing Look Lightroom preset and my HDR Recipe for NIK Color Efex Pro 4. (See Fun Photoshop Blog “Pseudo HDR in NIK Color Efex Pro 4” and “Settings for Vivid Drawing Look ACR and Lightroom Preset and NIK Color Efex Pro 4 Pseudo HDR Recipe.”) The pseudo HDR treatment worked very well since the lighting was all over the place.
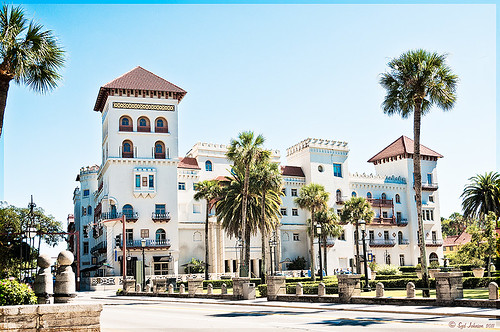
This is one of the most unusual places I have ever seen – it is in St. Augustine, Florida, and used to be part of the Hotel Alcazar, a Henry Flagler hotel opened in 1887, that was built across the street from the more famous and elegant Ponce de Leon Hotel (now Flagler College). This old hotel currently houses the City Hall, several businesses and shops, and the Lightner Museum. The above image is of the Cafe Alcazar that is located on the floor of the old hotel’s Casino Swimming Pool and gets very good food reviews. The top balcony level is the Old Ballroom that runs around the edge of the hotel and in the warm evenings, the roof was removed to see the night sky for the dancers.

This image shows how the Casino Swimming Pool looked in a by photo by William Henry Jackson in 1889 and is from Shorpy Historical Photo Archive site, a really interesting blog on old images. The water stayed at a steady 80 degrees because it was spring fed but it smelled like rotten eggs due to the sulfur in the water. The pool was 120 feet long and 50 feet wide and was from 3.5 feet to 6 feet deep. The National Women’s Swimming Championship was held here in 1925, and there was evening “pool entertainment” such as high diving, trapeze shows, water polo and swim racing.
To see this restaurant view, you need to pay to enter the Lightner Museum, that contains a very nice collection of paintings, glassware, and other collectibles – mostly from the Victorian era along with the views of the ballroom and pool area. Also there is a Russian steamroom that patrons used when it was still a hotel. Very interesting place to visit and definitely worth the small amount to enter. Check it out if you are in the area!…..Digital Lady Syd


