
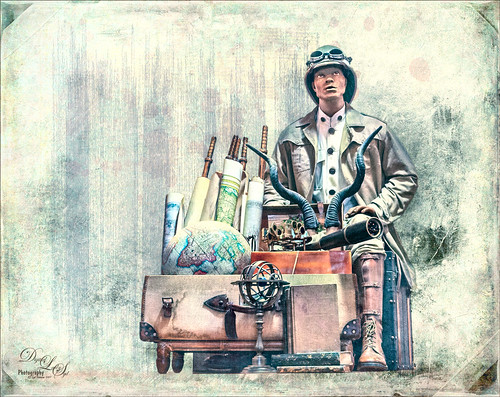
A Golden Snow on a Clock Tower
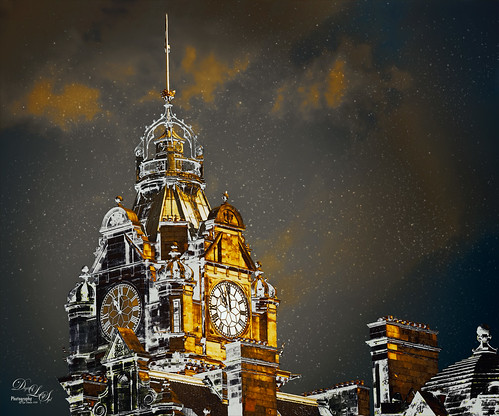
If you have ever been to Edinburgh, Scotland, you will probably recognize the historic Balmoral Hotel and Clock Tower that is near the Train Station (since 1902 the clock is set 3 minutes fast so people do not miss their trains). I was just playing around with the image thinking it might make a nice black and white image when I can up with this result. Started with a rather vintage looking preset from my LR 4 days. It gave that really nice warm feel that looked nice. Then it was cropped and Lucis Pro (no longer available) was applied to overall sharpen the image – it was way overdone. Not sure why I tried this, but I set the layer to Divide blend mode and got all this wonderful snow on the shadow side of the tower! A black layer mask was added to hide most of the effect and just painted in the white snow areas. The layer was then set to 92% layer opacity to let some of the sharpness show through. On a New Layer a particle brush created from Corey Barker’s video called Corey’s Universal Particle Brush was used to add the falling snow effect and set to 59% layer opacity. It looked pretty nice just this way. On a stamped layer (CTRL+ALT+SHIFT+E), Topaz (see sidebar for website link) ReStyle – one of my very favorite Topaz filters – was opened and this is basically what it looked like by using the Peat and Rock preset. This is why I love this filter – you always get some interesting results you had not thought of trying. It has not been incorporated with their Topaz Studio interface yet. Next used the Matt K vignette technique (see my How to Create a Subtle Vignette blog) to create a soft vignette effect. I kind of like the illustrative look created by using the Divide blend mode on this image. Lots of fun here!…..Digital Lady Syd
Festive Water Lilies

These water lilies were shot at the Philip Hulitar Sculpture Garden in Palm Beach, Florida. I decided to add a little color to them so this is how I did it. First did just the basic adjustments and a little highlighting on the leaves in Lightroom. In Photoshop, Luminar 2018 (see sidebar for website link) was opened on a duplicate layer and the Silver Fade preset was selected. (These settings were then changed: Color Temp: Temp 49, Tint 42; Tone: Contrast 11; Smart Tone 35, Highlights -41, Shadows 20, White -13, Blacks 20; Sat/Vibrance: Sat -30, Vibrance 58; HSL – Hue Yellow -21 and Green -20/Sat Red 7, orange 4, Yellow -25, Green -25, Aqua 16, Blue 5, Magenta -7; Lum Red 7, orange 7, Yellow -2, and Blue 5; Filters Amount 61.) A New Layer was created in Luminar and the Details Enhancer filter was added (Small Details 44, Medium Details 42, and Large Details 27). On another New Layer in Luminar, the Dodge and Burn Brush Filter was selected (Amount 100; used the Darken brush at 50% and then 16% to paint in dark areas within the whole image; used Lighten at 16% Strength to paint in the light parts of the pin flowers). Thought I would give you the detailed info so you can see that Luminar 2018 can build up some interesting effects by using different filters on different layers within their own software interface. Back in PS, the Luminar layer was set to Overlay blend mode at 50% layer opacity. On a stamped layer (CTRL+ALT+SHIFT+E), Topaz (see sidebar for website link) ReStyle was used to give the beautiful overall color scheme – it was from one of the presets I had created a long time ago so I am not sure what original preset was used. On another stamped layer, applied Nik Viveza 2 which really lit up all the colors. One of my free Double Edged Frames – Photoshop Layer Styles was used to finish up – the frame colors were sampled from the image.
Me and My Shadow
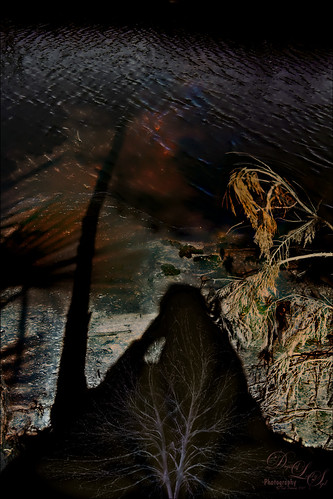
This image represents to me a contemplative mood – a connection with the Fall season and nature, and the nature of man with nature. It was a lot of fun to create. A tree from Pixelsquid was added into the shadow. Some of the colors are from using Lucis Pro. Topaz (see sidebar for website link) ReStyle’s Single Fawn was applied to the image. This image was taken into Luminar 2018 (see sidebar for website link) and the Adjustable Gradient Filter was added to the whole photo and the Sun Rays filter was added to just the foreground tree by using a layer mask. Loved how the tree turned out. PS Liquify filter was used to stretch the foreground tree where I wanted it. Some clean up layers and that was it. Love the whole concept of this image…..Digital Lady Syd
Dreaming

Have you ever had a dream that just seems so vivid that you remember several parts of it. Well that is what a lot of this image is showing – one of my very vivid dreams. I see a lots of stories going on here – like flowers actually filling the sky with planets or moons? Or bubbles being shot at a target? Really??? And what about those giant 3-leaf clovers guarding the bubble machines? Hum! So there you have it, the inside workings of my sleeping brain. So what I did here is basically just sketch this out and paint it. The clover is from PixelSquid, my favorite resource for all kinds of odd things. The bubbles were created using Grut’s FX IL Rinse Drip from his Inky Leaks Set (I love this brush set) and used Hue/Saturation Adjustment Layers with black layer masks to paint in the different color bubbles. The little bubbles were from Lizard Queen Water brush 8. The last step was using Topaz (see sidebar for website link) ReStyle Swamp and Sherpea Blue preset set to Screen blend mode in the plug-in and 44% layer opacity in PS to adjust the colors to match my dream. Sometimes things get a little crazy when you paint what you dream!…..Digital Lady Syd
A British Countryside
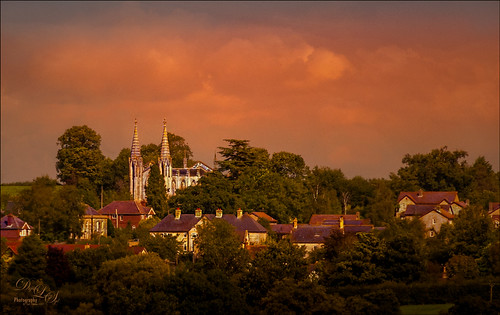
This image was taken of the British countryside on the way to Stonehinge. Lots of post-processing in Lightroom following Serge Ramirez’s instructions and using his very Sunset preset. Check out his My Most Liked Photos-Part 1: The Making of a Composition for basic info on this. Then in PS used Lucis Pro (no longer available) to really sharpen up the image. A couple Curves Adjustments layers, Topaz (see sidebar for website link) ReStyle to really add the nice color treatment, and Camera Raw Filter to add a top bluish gradient. A final little sky clean up and that was it. Really like the nice feel of the little town…..Digital Lady Syd
Going to Windsor Castle
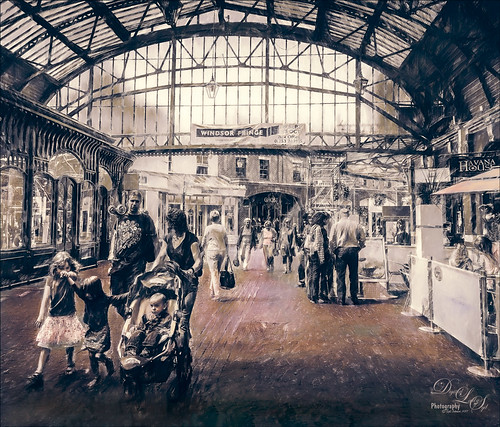
Enjoyed working with this image of a little shopping and restaurant area that led into Windsor Castle in England – lots of different tourists. I find this kind of image totally entertaining! Will just go over the basics as a lot of work went into this image. Mainly did basic adjustments in Lightroom including converting it to black and white. In Photoshop the image was taken into Topaz (see sidebar for website link) Studio where Precision Detail, Color Theme where some color was added back in some different gray color tones, and Impression where the default was used and the Painting Progress slider set to 0.43 – that is why it is not overly painterly. Added a little pink color, a Nik Viveza 2 filter to clean up some of the lighting issues, several Curves Adjustment Layers, and a Color Lookup to add more pink tones in. On a stamped layer applied Topaz ReStyle’s Wedgewood Blue and Tan preset set to Color blend mode and a Levels Adjustment Layer for final adjustment of contrast. It took a lot of tweaking as the people looked too crisp with some of the settings. I just really liked the feel created by the glass dome and all the activity. Lots of fun…..Digital Lady Syd
On Safari
This image was taken at Universal Studios-Florida in a gift shop. I thought it was a very interesting display. Just followed one of my basic image workflows for this one. First selected the display from the background. Then added underneath a Texture from 2 Lil Owls (see sidebar for website link), a texture I created a long time ago set to Darker Color at 46%, and an object of just vertical lines on top of it set to 46%. The actual cut-out layer was opened in Lucis Pro to get the almost illustrative effect. Then some clean up layers and Nik Viveza 2 to direct the eye properly. A Red Channel Luminosity layer, Topaz (see sidebar for website link) ReStyle’s Ash Gray and Eggshell on another layer, and a Camera Raw Filter to add grain were the final steps. That was it. I really like the overall effect…..Digital Lady Syd
Enjoying a Flower
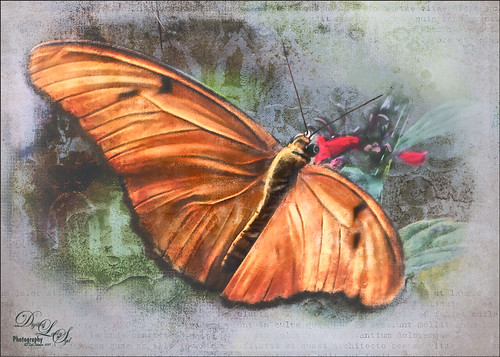
Love this Julia Longwing Butterfly – have never seen one like this around my home. The image was taken at the Palm Beach Zoo which is much further south in Florida. This male butterfly actually lives several months and loves the Passion Vine. The image was cropped way down to emphasize the butterfly. Then Lucis Pro (no longer available) was opened to sharpen up just the butterfly. On separate layers the wings were painted mainly using Gruts (see sidebar for website link) NM Pans Attic brush. 2 Lil’ Owls (see sidebar for website link) Dream freebie texture was set to Hard Light at 70% layer opacity. In a layer mask the butterfly was painted back. Kim Klassen’s 2170 with Script texture (not sure it is available anymore) was used around the butterfly. Nik Viveza 2 was applied to adjust the coloring in the image. Next Topaz (see sidebar for website link) Lens Effects’s Diffusion filter set to Moderate was applied. A black layer mask was added and just the diffusion effect was applied to the wings and flowers. A Color Lookup Adjustment Layer was added and the Crisp Winter preset was selected. It was set to Hard Light and 27% layer opacity. I decided the color palette was not quite right, so on a stamped layer Topaz Restyle was opened up. A preset was made of the image and then the colors in the palette were just slightly adjusted to get the final look. (See my How to Use a Topaz ReStyle Trick for Improving Your Image blog.) Wish these little beauties were in our local…..Digital Lady Syd
The Red Lion in the Tower
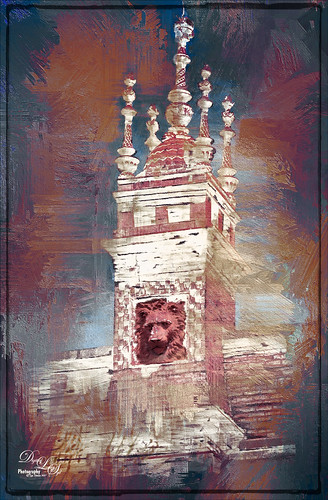
Took this image recently in St. Augustine of the back of the Alcazar Hotel (Lightner Museum) showing one of the beautiful red clay lions. Henry Flagler had these lions placed over both this hotel and the Ponce de Leon Hotel (now Flagler College) exteriors. To begin in PS, a free action by Chris Spooner called Engraved Effect Medium was used on the whole image. Lots of clean up with a mask. Then Topaz (see sidebar for website link) Impressions2 using a Van Gogh preset was applied and the effect was painted off back in PS on the lions face. Melissa Gallo’s Painted Textures Mist on the Lake (no longer available)) was applied twice – one set to Normal and one to Linear Burn at 55% layer opacity. A Hue Saturation Adjustment Layer was used to adjust the color. Then a stamped layer was created (CTRL+ALT+SHIFT+E) was placed on top and taken into Topaz ReStyle using the Cream and Plum preset (one of my favorites) was applied to the image and set to Hue blend mode at 76% layer opacity. On another stamped layer Nik Viveza2 was applied to adjust the contrast just right. Last step added just a simple line border. That was it. I love these beautiful clay lions – they are so striking!…..Digital Lady Syd
A Very Unusual Place!
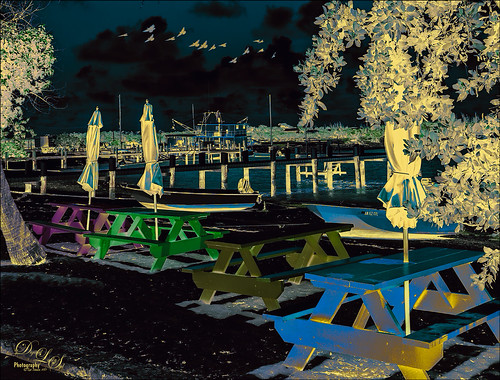
This image was taken at New Plymouth, Green Turtle Cay, the Bahamas. Had fun playing with several different adjustment layers and filters. On a New Layer above image, a bird brush was created using Aaron Nace’s Creating a Custom Brush video. Just added a little Angle Jitter to it. The layer was set to Multiply blend mode at 70% layer opacity. Then a Pattern Adjustment Layer was clipped to the birds and a coffee colored watercolor pattern was used – this is how the wings have a tipped color effect. (See my Patterns, Patterns, Patterns Fun Photoshop Blog for more on this.) A Black and White Adjustment Layer was set to Luminosity on top. Next a Levels Adjustment Layer to add some contrast. Then a Color Balance Adjustment Layer. The Color Negative preset was applied with a Color Lookup Adjustment Layer. Next a Hue/Saturation Adjustment Layer was added and the Master Hue was flipped to the end to get the color palette seen in the image. The Blend If This Layer black tab was split to 0/145 and Underlying Layer’s white tab was split to 130/210 (ALT click on the tabs to split) to let some of the color leak through. Another Black and White Adjustment Layer was added and set to Soft Light and adjusted to get just the right color effect. A Red Channel Luminosity Curve Adjustment Layer was added. A stamped layer was placed on top (CTRL+ALT+SHIFT+E) and Topaz (see sidebar for website link) Restyle’s Gunsmoke and Jordy Blue preset was applied – in the plugin, Restyle section was set to Screen blend mode at 41% opacity and Basic section set to Multiply blend mode and 64% opacity – a few changes were made to the Tint, Tone, and Detail sections. It basically added yellow where the color was white and really brightened up the image. That was it. Not sure I could do it again, but it was fun to figure out a new look!…..Digital Lady Syd
Hiding Out at the Rookery
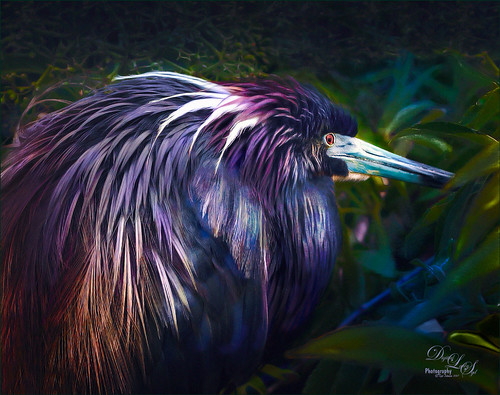
This Tricolored Heron was trying to be inconspicuous which meant I had to take his picture. He really did not want my attention at the St. Augustine Alligator Farm Rookery. Therefore he now has a beautiful bright-colored plumage to show off. Felt like getting back to my favorite type of Photoshop – painting and adding a few filters. I have done so many Tri-Colored Herons that adding the extreme color effect was fun to try. A technique by Glyn Dewis was presented in his How to Retouch a Dog Portrait video where he duplicates the background twice. On the first he applies PS Reduce Noise twice using just the Strength slider set to 10 and 4. On the top layer he applied a PS High Pass filter set to just 1 pixel to bring back sharpness. These layers were then grouped. It gives a very subtle painterly feel and gives a good place to start by smoothing over the background. On a couple layers on top, several blobs of color were added on the bird to make him more color. The layer opacity was set to around 50% and Overlay and Vivid Light blend modes. Had to clean up the background and fill in some holes. On a stamped layer (CTRL+ALT+SHIFT+E) the Camera Raw Filter was opened where several Radial Filters were used to direct light. On another New Layer new hair was painted in to fill out the color on the birds lower body. A Selective Color Adjustment Layer was used to add a bluish tint into the image. On a clean up layer, some of the too sharp leaves were painted to soften their effect. Then on two stamped layers, Topaz (see sidebar for website link) ReStyle was applied using on one layer the Rum Purple preset (set to Multiply blend mode at 45% layer opacity) and the Wedgewood Blue and Tan preset (set to 55% layer opacity) on the other. A layer mask was added to the Wedgewood layer and parts of the bird were painted back even more. An Exposure Adjustment Layer was used to sharpen the eye. On a New Layer set to Overlay blend mode and 71% layer opacity, a Spotlight effect was created to emphasize the face a little more. Nik Viveza 2 was used to further enhance the focal point. A subtle vignette using How to Create a Subtle Vignette blog was added. Last step involved adding a Lens Blur Noise effect on a stamped layer (see my 10 Now so Well Known Photoshop Tips blog – first tip). That was it. Got to love these beautiful herons!…..Digital Lady Syd
Summertime!
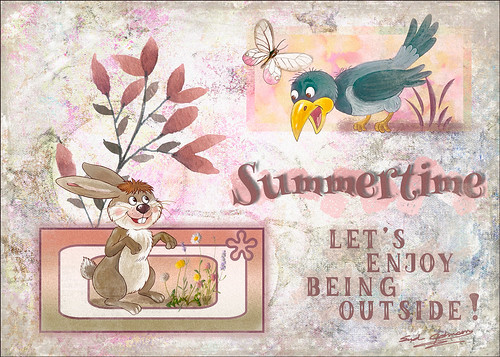
Just enjoying doing something a little different in Photoshop. I have not created a design effect in a long time. Can’t begin to thank all the people who have provided the large group of free resources that went into this image, but I will make an attempt. The first texture is one I created that is basically a bluish/gray painted effect. Then French Kiss’s (see sidebar for website link) Jubilant texture was placed on top for the colorful background effect and set to Linear Light at 76% layer opacity – a layer mask was used to remove part of the color in places that interfered with the text. Julia Mead’s Artistic Photo Overlays 8 was place on top and set to Hard Light – the Blur Tool was used to soften some of the black spots in texture. Next Lisa Glanz’s Magical Watercolor Graphics Vol 1 Sample Pink Bunch – this was duplicated twice to show up better and the top set to Multiply at 37% layer opacity. Two pink Vector blocks were created in Photoshop for both the characters to stand in. Layers styles were added to give the different edge effects. The bottom block also used a custom vector object from PS. Both the crow and hare are from the Cute Woodland Animals Bundle by Hasop. Both animals were paint to give a less graphic effect by painting over them using my SJ Pastel 3-painting Texture adder brush that I have talked about lots in my blogs. The Butterfly was from a Creative Live release called Aloha. The flowers in the hare box are called Clover 10 by Peolia. The Summertime font is Henny Penny and the other font is called LK Better Days.
Next step was to create a stamped layer (CTRL+ALT+SHIFT+E) to add noise (Tip 1 in my 10 Not So Well Known Photoshop Tips blog). Topaz (see sidebar for website link) ReStyle was opened and a preset from one of my other images was applied. What was done different is that the image was adjusted just for the animals and the Mask in ReStyle was used so that only the animals and reddish plant were affected. A frame from 2 Lil Owls Studio (see sidebar for website link) was created using a bonus texture and removing the white area – then saving as a PNG file. At the end a Blue Channel Luminosity Curves Adjustment Layer was applied. It is fun to try out different elements in a document just to see what you can get……Digital Lady Syd
A Pink Orchard
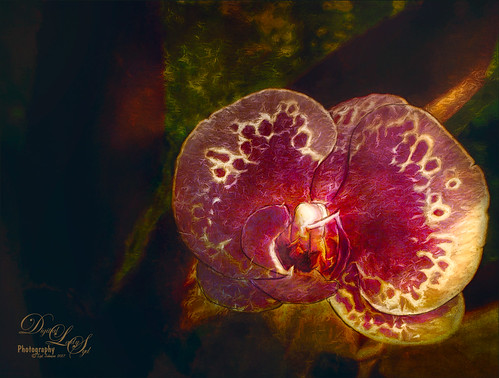
This orchard image was taken at the Harry P. Leu Gardens in Orlando, Florida – a wonderful place to take flower images if you are in the area. This image was started several weeks ago so I am not completely sure what I wanted as an end result. This flower began as a purple orchard, but Topaz (see sidebar for website link) Texture Effects 2 was opened and the Citronella Lily was applied with several adjustments. On a stamped layer (CTRL+ALT+SHIFT+E) Topaz Impression’s Fine Brush Scumble was applied. On another stamped layer, Topaz Detail 3 was applied, another composite layer and Lucis Pro was applied, and finally on yet another stamped layer, Topaz ReStyle’s Rustic Red and Orange preset. Sort of amazing all the Topaz effects in this little flower! I used my favorite line brush, Grut’s Ink Pin Clinger – to actually draw around just a little around the petals. Two textures were added: Kim Klassen’s August Trio Traverse blend mode set to Vivid Light at 18% and her Fav Collection Cinnamon set to Multiply blend mode at 65% layer opacity. A couple Curves Adjustment Layers and a Color Lookup Adjustment Layer set to Foggy Night at 55% layer opacity. Another stamped layer was created and Nik Viveza 2 was used to adjust the lighting in the image. A Red Channel Luminosity Curve was applied as a final step. Lots going on here……Digital Lady Syd
Native American Bottles, Pots and Dishes
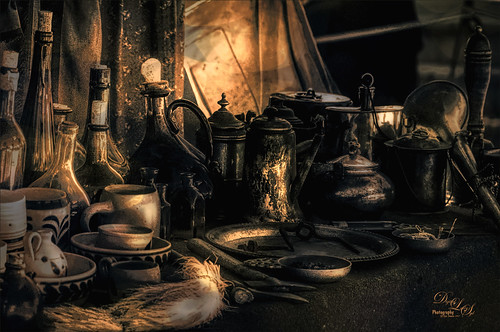
This image taken at the Ormond Beach Native American Festival was actually turned into a black and white in Lightroom. Painting in the highlights with an adjustment brush really made the light pop in the final iteration. In Photoshop, to remove a bit of noise, especially in the shadows, Topaz DeNoise 6 was used to remove it (used the Overall and Shadow sliders). Then Lucis Pro was opened to sharpen the details a little. It was set to Difference blend mode at 24% layer opacity and the Blend If sliders were used to further pull in the details. A Curves Adjustment Layer was used to add contrast. For color a Hue/Saturation Adjustment Layer was set to Colorize and a teal color effect was selected. Next another Hue/Saturation Layer was opened and a yellow-orange was applied to just the Highlights of the image. At this point the image looked really flat, but kind of old and vintage looking. I rather liked it. On a stamped layer (CTRL+ALT+SHIFT+E), Topaz ReStyle was opened and the Rustic Red and Orange preset was applied with a few adjustments and set to 74% layer opacity. On another stamped layer Topaz Texture Effects 2 was opened and A Little Dingy preset was applied. The Texture section was changed to a gold and black bokeh which enhanced the lighting effect. That was all that was done……Digital Lady Syd
An Engraved Leaf
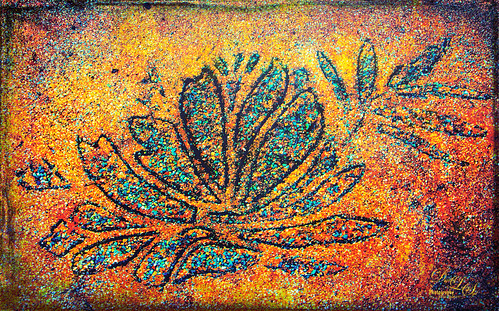
This image was taken at the Ormond Memorial Art Museum and Gardens of a pattern drawn into the sidewalk. The texture in the image was so nice, I decided to add a little pizzaz to it. First Topaz (see sidebar for website link) ReStyle preset Loulou and Mandy was applied. This gave it the bright orange and turquoise colors. Three adjustment layers were stacked: Color Lookup using Fuji F125 Kodak 2395, Levels, and Photo Filter using Cyan at 52% density. On a stamped layer (CTRL+ALT+SHIFT+E) Topaz Texture Effects2 was applied using a Dingy Cream preset. On another stamped layer, Nik Viveza 2 was applied to adjust corners. A Vibrance and Saturation Adjustment Layer was used. Then I decided to create a brush from the texture of a section selected using the Marquee Tool, turned to black and white, then painted out some more areas, and went to Edit -> Define Brush Preset. Now used the brush to paint in some added texture over the feather and flower and in blank parts of the image to add more texture. I really like the brush I created and hope to use it some more!…..Digital Lady Syd
The Pond Fairy…is always watching you
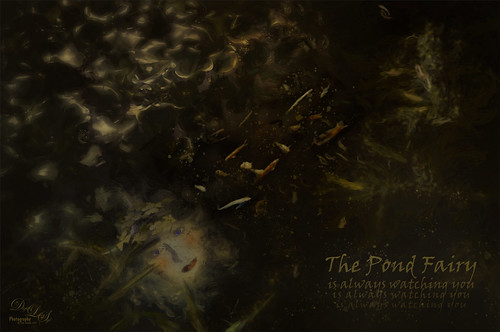
The Pond Fairy was a lot of fun to create. The original image was a lily pad pond image taken at the Ormond Memorial Art Museum and Gardens. The sun appeared in the water as a brilliant white glare where the face is located. The fairy face is made from a brush I created from a model’s face. Corel Painter’s ParticleShop Photoshop plug-in was opened and the Cluster brush set to a bright yellow with the Glow checked and was painted on the plant on the left side and little on the tips of the lily pads. A texture from 2 Lil Owl (see sidebar for website link) called Mosaic Set Aqua Grunge – this is one of her best sets in my opinion – was applied and set to Subtract blend mode at 19%layer opacity. Topaz (see sidebar for website link) Lens Effects was opened and the Diffusion filter was applied to really soften up her face and some of the sharp lily lines. Then it was removed in part of the image with a layer mask. Topaz Restyle was opened and a preset was made of the image at this point. Then the actual image sliders were changed to get a little bit different color palette. This is a great way to get the colors just like you want them, especially if they are pretty close to what you like. The other presets just did not work with this image. (See my How to Use a Topaz ReStyle Trick for Improving Your Image blog for how to do this.) A few splats were placed on a New Layer to give a little fairy dust and water bubble look. On a composite layer on top (CTRL+ALT+SHIFT+E) and opened Nik Color Efex Pro 4 – used Detail Extractor, Glamour Glow and Midnight filters. This layer was set to Multiply blend mode and 24% layer opacity. A group was created for the face layers where the eyes, cheeks and lips were painted. Also the clover hat was added to her image here. This was from my favorite object site – PixelSquid. The fish are from an image taken in Hawaii at the Hilton Waikoloa Village. It was layered on top of the water lily image, then free transformed to fit the pond area. A Black and White Adjustment Layer and Levels Adjustment Layer were set to get the correct tone and color in them. A layer mask was used to fine tune the fish into the area. Nik Viveza 2 was opened to adjust the focus. The text is a free font called Viner Hand ITC. Quite a few steps but lots of fun. So next time you look into a pond, check out The Pond Fairy who will be watching you…..Digital Lady Syd
An Urgent Plea
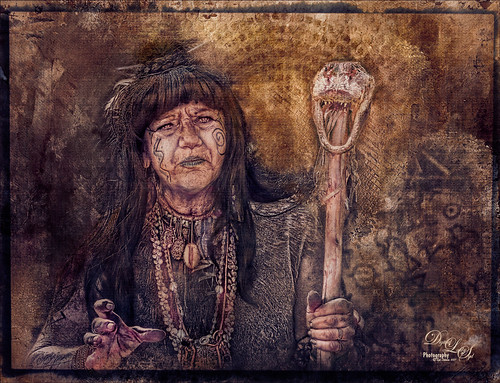
This is a lovely Native American woman I met at the recent Ormond Beach Native American Festival. She was actually doing a little presentation to the students from the local elementary schools on Native American traditions. I wish I could remember which was her tribe, but I would bet she is or was a teacher – very entertaining for the kids, and us adult kids too. Her expression reminded me of the past plight of the American tribes, and liked the fact that she represented how a female member would be attired. I can honestly say this image took me forever to finalize – just could not pull the whole look together. Finally the right textures fell into place and ended up just using my basic Photoshop workflow. Lucis Pro added the detail as an almost hyper-effect mode. Topaz (see sidebar for website link) ReStyle was used to get an interesting color palette and Topaz Texture Effects 2’s Fudge Brownie preset gave the vintage feel to the image. Then several clean up layers and of course, Nik Viveza 2 to draw attention to the face and the Alligator stick (hum). Needless to say, the kids loved that artifact. Just one image but three textures from 2 Lil Owls (see sidebar for website link) and one from Kim Klassen were used to get the final effect. Overall it turned out pretty much like I wanted…..Digital Lady Sy
Teasing the Bird Paparazzi
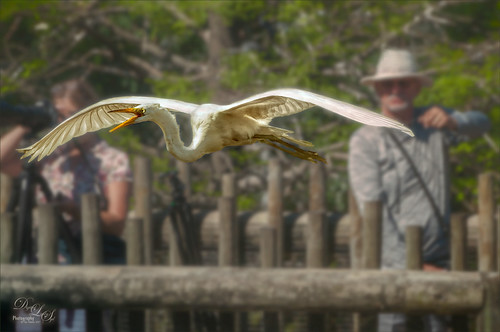
This beautiful snowy egret looks like he is having a great time showing off in front of the large group of photographers trying to get him centered in the cameras. I thought this was one of the funniest images I have taken at the St. Augustine Alligator Farm Rookery. Added Gaussian Blur to the whole image at Radius 12.5 and painted back the bird. The whole background was just too busy and the photographers way too distinct. On just the bird a little Topaz Clarity was used to bring out the detail in the bird’s wings especially. Used an Exposure Adjustment Layer to sharpen the eye. Then Topaz ReStyle’s First Steps preset was applied. Used Nik Viveza 2 to balance out the color in the image and on the birds wings. A Red Channel Luminosity Curves Adjustment Layer finished up the image. It was a little tricky to not over-sharpen the bird to keep it from looking like a composite. I had to spend a lot of time just toning down the edges to blend into the overall background. Still like the image…..Digital Lady Syd
Tiny Red Berries
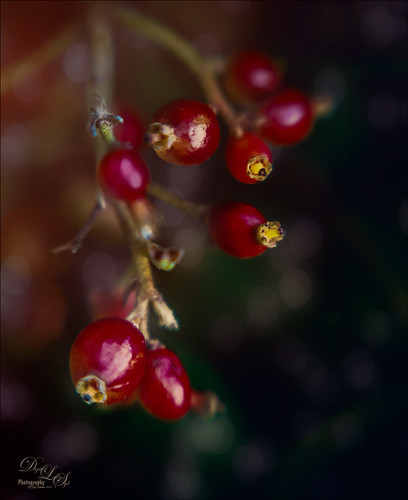
These little red berries were found growing on a shrub in my yard – they appear after some tiny white flowers fall off of it. This strand was only about 1 inch long and the image was taken with my Lensbaby Composer at F/4 using a Macro +4 Lens. In Lightroom a Scott Kelby Trendy High Contrast Look preset was applied and a lot of time was spent to sharpen the berries using the Adjustment Brush. This image had a lot of noise in the image so the Detail Sharpening Amount and Noise Reduction Luminance sliders were set to 0 so it could be removed more effectively in Photoshop. Once in Photoshop Topaz (see sidebar for website link) DeNoise 6 using the Raw Moderate preset was applied and did a much better job of removing the noise. This layer was duplicated and Topaz Texture Effects 2 was opened where the Fantasy Land II preset was added. A bokeh texture was inserted into the preset for the 2nd Texture section. In the Masking Enabled part of the Texture section, a black brush set to a Strength of 0.43 was used to lightly remove any bokeh effect from the berries. The Texture Effects layer opacity was set to 91%. On another duplicated layer, Topaz ReStyle was opened and the Swam and Sherpa Blue preset was applied and set to 50% opacity and Screen blend mode in the plug-in and once applied, the overall layer opacity was set to 85%. Just finished up with the Black & White Adjustment Layer set to 56% layer opacity pop the colors and set to Luminosity blend mode, a Red Channel Luminosity Curve Adjustment Layer to tone down highlights, and Nik Viveza 2 to adjust the focus and add a little vignetting. Pretty much my regular workflow. …..Digital Lady Syd
Palm Frond
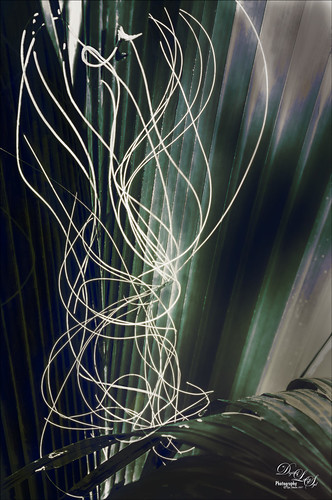
This rather abstract-looking palm frond was taken at the Ormond Beach Memorial Art Museum and Gardens. I was unable to figure out what the actual string-like material is – whether it is part of the palm or some type of Spanish Moss. Lucis Pro was used to sharpen the image. Topaz (see sidebar for website link) ReStyle’s Blue Shades preset was applied to the image. Next on a New Layer the String was selected and an Outer Glow layer style was added to emphasize it. A Levels Adjustment Layer was added and a Red Channel Luminosity Curves Adjustment Layer was applied. Nik Viveza 2 was applied on a stamped layer and then Matt K’s Vignette was applied. (See my Fun Photoshop How to Create a Subtle Vignette blog.) I am going to go back and see if I can find out more about this particular type of palm. ….. Digital Lady Syd
The Break Out
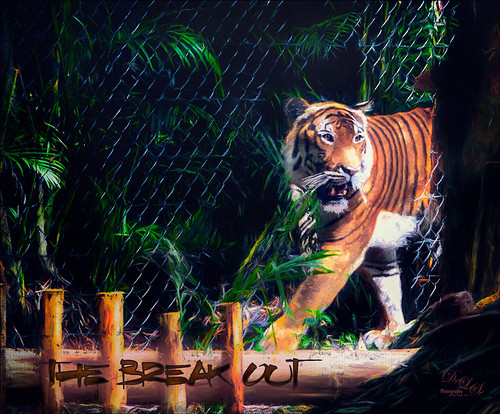
The Malayan Tiger image above was taken at the Palm Beach Zoo in Florida and he really was not trying to get out of his enclosure. He was actually checking out the tortoise in the next enclosure – apparently tigers like to eat tortoises according to his keeper. This image took an excessive amount of painting to get rid of the fence in front of his body. Luckily the eyes, nose and mouth structures were very sharp so the tiger could be reconstructed. Several paint layers were needed. Also several stamped layers (CTRL+ALT+SHIFT+E) were used for the following filters: Topaz (see sidebar for website link) Glow 2 did a great job adding a great effect on the tiger’s body using one of Blake Rudis’s wonderful presets called Room Glow set to Overlay blend mode. Topaz Impression 2 was applied at 82% layer opacity but I am not sure which preset was used to create a unique preset. Topaz ReStyle’s Tangerine Gauze preset, and Topaz Texture Effects 2 was used next. Finally Nik Viveza 2 was used to get the focal point correct. Lots of fun but lots of work……Digital Lady Syd
Getting Ready for Spring
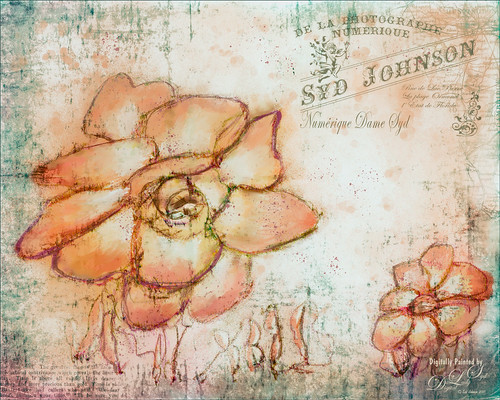
This started with just a little sketching in Corel Painter and ended up like this in Adobe Photoshop! The basic sketch was done with a real small sized brush I had created from a Corel Painter video. Then just used a basic oil brush to add in some color strokes on the petals – it actually started as pinkish tones. It was saved down as a PSD file and opened in Photoshop. Started by cleaning up the petals’ color a little but wanted keep it a little messy. A stamped layer (CTLR+ALT+SHIFT+) was added and a black texture from Kim Klassen called Magic Map was placed on top and set to Subtract blend mode at 47% layer opacity. Next a personal overlay created a while back was placed on top at 69% layer opacity that gave it a bit of a Parisian feel. (See my How to Create an Overlay Out of a Texture Fun Photoshop Blog for more on this.) A Solid Color Fill Adjustment Layer set to a pink color was clipped (ALT-Click between the two layers) and set to 71% layer opacity. Topaz (see sidebar for website link) ReStyle was applied using a preset I had created a while back and set it to 85% layer opacity – this turned the color scheme to the above. Several Splatter brush layers were created at different layer opacities. Some clean up and a Levels Adjustment Layer was added to finish up the image. This turned out to be a lot of fun to create…..Digital Lady Syd
A Cowboy in Montana
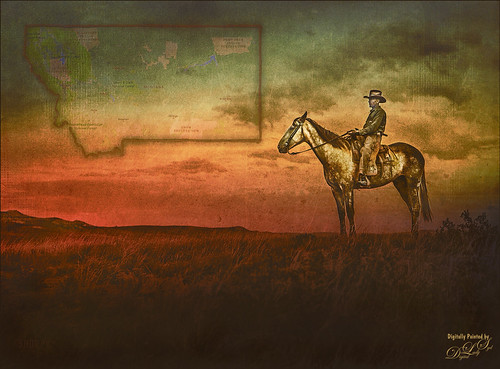
This image is from Shorpy.com, my favorite old image site, and was called Cowboy at Quarter Circle U Roundup in Montana in June 1939. Just had to try to add the hand-tinting and see if I could get that old West look that was so popular in the 60’s. This image was really not that hard to do – just followed the steps in my How to Colorize an Old Photo Fun Photoshop Blog using several Color Fill Adjustment Layers. On a stamped layer (CTRL++SHIFT+ALT+E) on top, used a Sunset Gradient 5 from Oilha Kozacheenko to get the beautiful sunset effect. The map was created by just going into one of the Map Apps and copying down a selection of Montana, removing all the roads, drawing a line around the state lines to thicken them, and removing the white in the map using Color Range. Then it was brought into the cowboy image. 2 Lil Owls (see sidebar for website link) Mosaic Set beneit grunge texture was applied and set to Linear Light blend mode at 25% layer opacity. Topaz (see sidebar for website link) Texture Effects 2’s Urban Grit preset was applied and then Topaz ReStyle’s Natural Brown Shades. It took a little bit of tweaking to get the final result, but it was a lot of fun! I like to hand-tint a good black and white image for a change of pace…..Digital Lady Syd
The Valentine Trees

Happy Valentines Day! Just had some fun painting my Valentine Trees – started in Corel Painted and ended up in Photoshop. Lots of layers here a few filters – used Topaz (see sidebar for website link) Impression (true – used after painting the image), Topaz ReStyle, Topaz Lens Effects Reflector, and Nik Viveza 2. Lots of layers for the grass and valentines added. Overall lots of fun to do. Have a great day!…..Digital Lady Syd


