
Whale Watching with Nik’s Color Efex Pro 4 & Viveza 2

One of the many photos of a great whale watching trip on the Big Island in Hawaii. (See Hawaii Ocean Sports for information on whale watching boat trip.) This image used one of the workflows I like to use for quick processing of my images. The RAW file was adjusted in Lightroom where the Highlights, Shadows, Whites and Blacks sliders were moved. Next the Exposure and Contrast sliders were adjusted, and finally it was straightened and cropped. The image was brought into Photoshop and opened in Nik’s Color Efex Pro where five filters were added in this stack order: B&W Conversion (Dynamic Contrast), Photo Stylizer (Cool Silver – Style 1), Low Key, Darken/Lighten Center, and Detail Extractor applied just to background area with Control Points. Not sure how I came up with this combination, but I really liked the final result. Nik’s Viveza 2 was used to sharpen up the whale and water blowing up behind him. OnOne PhotoFrame acid controlled 12 (see sidebar for website link) was added using a matching color from image. That was it!
The combination of Color Efex Pro and Viveza is a pretty powerful combination. I do not process any image now without at least going into Viveza – it is a fabulous finishing plug-in…..Digital Lady Syd
Digital Lady Syd Related Blogs:
Nik’s Viveza 2 Plug-In – A Hidden Gem!
Detail Pop Using Nik Color Efex Pro and Viveza
Using NIK’s Color Efex Pro 4 and Viveza Together
Beautiful Soft Flowers

Just loved the pink hyacinths I bought – hope they will come back next year! This image was taken with my Micro Nikkor 60 mm f/2.8 lens at f/9.5. Used Mike Moats workflow (see info on this in related blogs below) with Color Efex Pro 4 (stacking Tonal Contrast, Darken/Lighten Center, and Vignette filters) added first and then Viveza 2 to make the details sharp. OnOne PhotoFrame napp_frame_12 (see website link in sidebar) was added. Final result – beautiful!…..Digital Lady Syd
Digital Lady Syd Related Blogs:
Using NIK’s Color Efex Pro 4 and Viveza Together
Nik’s Viveza 2 Plug-In – A Hidden Gem!
The Macro Shot
Topaz Lens Effect Tilt & Shift with a Zoom!

These are a few of the kayaks that can be rented at the Waikoloa Beach Marriott Resort and Spa on the Big Island in Hawaii. I was listening to a webinar presented by Nicole Paschal at Topaz Labs called “Isolating Subjects with Lens Effects” – this webinar should be posted soon at Topaz Labs-YouTube. She presented six or seven different ways to use selective focus on your images using this plug-in.
For this image Topaz Adjust (see sidebar for website link) was first applied just to brighten up the image a little – added the Spicify preset. Next Topaz Lens Effects was opened. Nicole really likes to use the Camera Tilt & Shift effect to selectively isolate her subjects. That is what is applied here. The Tilt Shift Adjustment were set to: Focus Area Width to 0.20, Transition to 0.59, Blur Amount to 0.08 and Angle to 0.89 so that the blur runs across the back of the kayaks. The Image Adjustments were set to Brightness 0.11, Contrast 0.15 and Saturation to 0.03. In the Distortion Adjustments section, Tangential was clicked, and a 1.89 Distortion Scale was applied – this cropped the image centering it on the Tilt Shift Adjustments Blur point in Focus Area section. Each time the blur point is moved, you get a different result. This image ended up with the Effect Position at 560, 612.
There are several other effects discussed in this webinar which are fun to try. Listen to the webinar for more good tips. The above effect may give some very interesting results on different types of images. I will definitely be checking this out…..Digital Lady Syd
Digital Lady Syd Related Blogs:
Topaz Lens Effects Plug-In
Topaz Simplify and Lens Effects Saves an Image!
Combining Plug-ins – Double the Effect!
Topaz Lens Effect’s Artistic Flair!
Black and White Photo or Not? Give It a Try on That Difficult Image
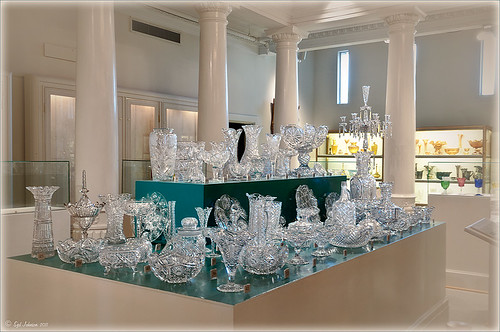 |
This image is of the beautiful cut glass display at the Lightner Museum located in the old Alcazar Hotel in St. Augustine. As you can see it is a very nice collection and I wanted to find out if the color in the image was distracting from actually seeing the ornate cut glass. See the black and white conversion by hovering over the color image. As I discovered, this image turned out to be a difficult choice to process no matter which effect you want.
Color Version
The top image was processed using the NIK Color Efex Pro 4 (CEP4) plug-in on a Smart Object layer (right click image and select “Convert to a Smart Object” since CEP4 will keep your settings and control points in case you want to adjust the results later) and stacking several filters including from top to bottom: Tonal Contrast, Darker/Lighten Center, Vignette, Glamour Glow, and Pro Contrast. Various control points were added to selectively choose areas for some of these effects. In Photoshop the cut glass edges were selectively sharpened using the Sharpen Tool on it own layer, and a final Curves Adjustment layer was added to get the correct contrast. Overall, this image is attractive since the blue-green sets off the glassware nicely.
Since there are some bright colors in the background that might be distracting from the main focus point, and the museum walls and columns have what I consider to be a rather bland creamy color to it, a black and white conversion might be appropriate to tone down some of the distraction and get rid of the creamy tones.
Black and White Version
I duplicated the cleaned up image layer and turned it into a Smart Object as above. Once in the NIK silver Efex Pro 2 (SEP2} plug-in, from the side preset panel the o14 Grad ND (EV -2) preset was selected and it really made the glass pop out clearly. In Photoshop the Sharpen Tool was used to bring out some of the glass edges (again, do this on a New Layer above the image) and the opacity of this layer is reduced so artifacts are not viewed. A final Adjustment Curve is added to give just the right amount of contrast. The items on the back wall initially appear to be more distracting than in the color image but the creamy tones did convert to the white tones nicely.
Conclusion
The image may not work as a black and white and the only way to figure this out is to try it. In this case SEP2 was used to convert the image to black and white, but the conversion can be done in lots of ways – in Adobe Camera Raw or Lightroom using a preset, or in Photoshop using a Black and White Adjustment Layer or Channels, as just a couple examples. NIK’s SEP2 is an excellent way to find out quickly since the presets allow you to glance over many black and white variations – if the image is really not going to look good as a black and white, you will know it.!
I am on the fence about which version I like best. The image was not the best choice to process to begin with and the glass creates a huge challenge just to get enough contrast to make the it stand out. Still it was good practice and I like the picture because I liked the cut glass collection. Just remember sometimes the image you want to process is not that great and does not work – but at least try a couple different effects including black and white and maybe there is a good shot hidden in there!…..Digital Lady Syd
Related Digital Lady Syd Blogs:
NIK’s Champion Plug-in – Silver Efex Pro 2
Topaz B&W Effects vs. Nik’s Silver Efex Pro
Topaz B&W Effects Plug-In – A Real Winner!
Loving Both Filters!
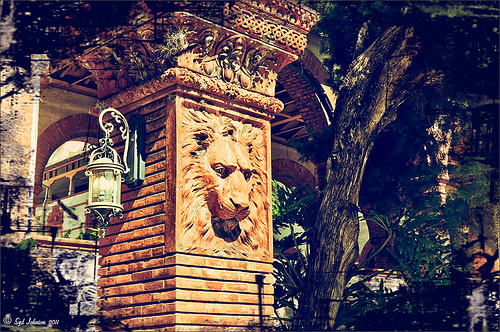 |
The above image is one of the beautiful Lion Posts outside Flagler College in St. Augustine, Florida, which used to be the Ponce de Leon Hotel built in 1887. Absolutely beautiful building. Cannot miss it if you go to this wonderful historic city.
Wow – all I can say is that I cannot decide which program I like best – NIK Color Efex 4 or Topaz Black and White Effects. So different and so much alike! I keep trying the same image in each program and get totally different looks but both are really nice! What to do, what to do!
The top image was processed with NIK Color Efex Pro 4 using the Film Efex: Vintage filter on Film Type 14; Detail Extractor filter; and Brilliance/Warmth filter. I used the Sharpening Tool in Photoshop to sharpen the eyes and mane of the Lion. Then Grunge 03 OnOne PhotoFrame was applied in a dark navy. I loved how it became very artsy and colorful. And the background detail is incredible!
Topaz Black and White Effect produced a very different feel that can be seen by hovering over the image. Same exact image from Lightroom except this time I wanted to see what how this image would look as a black and white. I used the new Platinum Collection – Platinum VI as a starting point. What really improved this image was using the Local Adjustment Dodge brush and Detail brush on the shadows in the face and the lamp. This really brought the eyes out very clearly. Using the Color brush, the lights was added back into the lamp. A black border, dark edge exposure, and dark vignette was added. In Photoshop the Sharpen Tool was used on the eyes a little more and the mane. Overall a very different feel to the same image.
I really love both filters and I do not believe I can recommend one over the other. Both totally great. Give the trials a try and see what you think!…..Digital Lady Syd
Related Digital Lady Syd Blog Links:
Topaz B&W Effects Plug-in – A Real Winner!
NIK Color Efex Pro 4.0 – First Try!
The New Film Efex-Vintage Filter from NIK CEP 4
Quad Tones in Topaz Black and White Effects Plug-in
Sunny Preset for Topaz Black and White Effects
NIK Color Efex Pro 4 – Digital Lady Syd’s Review!
The Art Corner: Painting and Sculpture by Tassaert
Pseudo HDR Using NIK Color Efex Pro 4
Sunny Preset for Topaz Black and White Effects
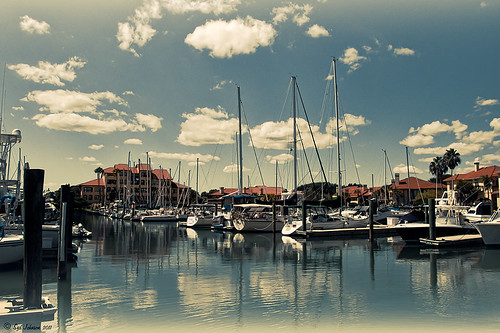 |
This image of Camachee Cove Yacht Harbor in St. Augustine, Florida, was adjusted using Topaz Black and White Effects. I wrote a longer blog on trying to achieve this same effect using other plug-ins on my Fun Photoshop Blog “Same Image – Different Plug-ins.” Hover over the image to see original. It took literally two minute to get this effect. There was just one further adjustment made in Photoshop which, unfortunately when adding most plug-ins, there is some noise created. I took the image back into Adobe Camera Raw (see my blog “Edit Layers with ACR Script“) which I prefer over the other Noise Reduction plug-ins. The Luminance was set to +75, Detail +37 and Contrast +48. I was really pleased with the color and how it looks on the water and the sky, especially around the horizon line. I wanted to share with you how I created this sunny preset in Topaz’s Black and White Effects.
First the Van Dyke Brown Collection was used with the Wenge Dynamic Preset. This gives the correct settings in the Conversion Section on Basic Exposure sliders and the Adaptive Exposure sliders.
In the Finishing Touches Section, Film Grain should be unchecked unless you want some graininess. This image does not use it. Next the Quad Tones needed to be changed for this effect. By clicking on each of the color swatches, the following colors can be changed: Color 1 Region set to R1G1B12 and slider to 9.60; Color 2 Region set to R63 G78 B85 and slider to 95.97; Color 3 Region set to R216G211B129 and slider to 141.2; and Color4 Region set to R255G254B255 and slider set to 237.0. This is the key to the effect and gives the preset the sunny feel.
The Edge Exposure area is optional but the above image used these settings. The Edge Exposure settings should be set to: Top – Edge Size o.26, Edge Exposure (-0.22), and Edge Transition 0.32; Bottom – Edge Size 0.19, Edge Exposure (-0.43), and Edge Transition 0.27; Right and Left set to their defaults since there is no edge on the sides – Edge Size 0.20, Edge Exposure 0.00, and Edge Transition 0.20.
Finally check Transparency and set the Overall Transparency slider to 1.00.
It is important to create a preset now either in My Collection or the individual Effects Presets so it can be reused again and again.
Hope this will give you a chance to try out a new Quad Tone look (see Tidbits Blog “Quad Tones in Topaz Black and White Effects Plug-in“) – I plan on making some more presets in this program soon. Try out this look and see if you like it as much as I do…..Digital Lady Syd
NIK Color Efex Pro 4 – First Try!
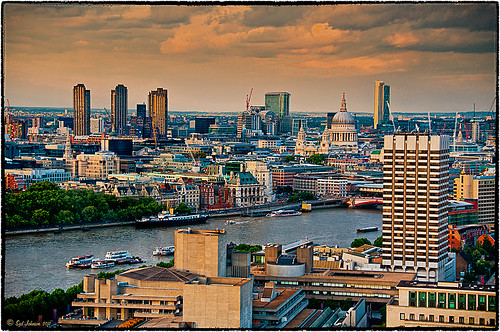 |
Well, here is my old standby image from the London Eye used as an example of what the long-awaited NIK Color Efex Pro 4 upgrade will do. Hover over image to see original. I am still sorting through all the new features they have added to this wonderful plug-in. Check out my Fun Photoshop Blog “Nik Color Efex Pro 4 – Digital Lady Syd’s Review” for a more in depth discussion.
One of the major new features allows you to stack any number of filters and save the whole group as a preset to use again. I really stacked up this image just to see what results I could get. The filters in the order they are stacked are: Tonal Contrast, Brilliance/Warmth, Vignette: Lens (a new filter), Contrast Color Range, Remove Color Cast (Plus Control Point set on faded green trees on left – click to see original problem area), Graduated Filter, and Image Borders.
I believe the final result is quite striking. In the meantime I will still be playing with the filters and trying different stacks to see what really looks good. If you get a chance, go download the trial version and see what you think…..Digital Lady Syd
Just a Tree!
Sometimes I find that combining recent effects I have learned in Photoshop can create something that is quite unique. Obviously not all things I create are that great, but even so, I am learning something about how all the different elements go together. This image is an example of this type of creativity. Just had fun putting together some of my favorite brushes and filters and came up with this tree.

The tree is one of Mels Winter Tree Brushes placed on a layer above the background, and on the next layer foliage was added using several of Gorguss Grunge Again (click on upper right – Photoshop Brushes) brushes. Both brush sets are favorites of mine. Two of ShadowHouse Creation Textures (5 Assorted Textures Set and Vintage Oil Painting Texture Set-2) were stacked underneath. A composite layer was made (CTRL+SHIFT+ALT+E) and opened up in Topaz B&W Effects plug-in (see sidebar for link) – a Cyanotype Collection preset was used to get the bluish appearance, and the Transparency was lowered so some of the colors showed through. Back in Photoshop a new layer was created on top and using Texturemate’s Rough Sand Texture brush 9 in blue on top at 70% opacity. That was it. I really like the effect.
It can really be a lot of fun to mix and match – give it a try!…..Digital Lady Syd
Just Another Topaz Black & White Effect Example

This image was taken at Edinburgh Castle in Scotland. I just keep playing around and finding new looks for images. The cannon and opening were selected and placed on their own layer, then a white layer was added below it, and a texture from ShadowHouse Creations Another Mixed Bag Texture Set (some really beautiful free textures on this site) was added. On several layers above and below using different colors from the image, various brush marks were added using Gorjuss Grunge Again brushes (unfortunately these are no long available), some really nice brushes to add a bit of color and detail. Create a composite and duplicate this layer. Next use the Topaz Black and White plug-in with the Opalotype Collection Effect and Yellow Lilac preset as a start. A lot of changes were made in the Conversion and Finishing Touches panels and Detail and Burn brushes were used to emphasize the stone. (See my Fun Photoshop Blog “Topaz B&W Effects Plug-in – a Real Winner!) and Tidbits Blog “Topaz B&W Effects vs. Nik’s Silver Efex Pro” for more information on this plug-in.) The plug-in layer was set to 52% opacity back in Photoshop. A Curves Adjustment Layer was added and some sharpening applied. It was a really fun image to do.
Hope you got an idea for creating a little different effect with this plug-in…..Digital Lady Syd


