
A Guilded Age Bathroom
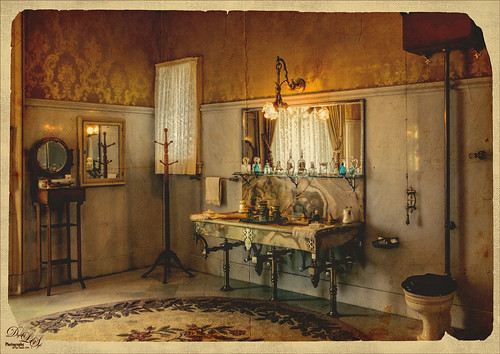
This image was taken at the Flagler Museum (Whitehall) in West Palm Beach, Florida. The image was actually post-processed without the border or vintage effect. Topaz (see sidebar for website link) Clarity, Lucis Pro (no longer available), Topaz ReStyle and Topaz Lens Effects were used to begin the process. I was actually really happy with the results, and then Adobe came out with Photoshop CC2017. If you open a New Document, now a New Document Dialog box opens – select the Photo tab at top and Templates is one of the choices. I scrolled down to Vintage Photo Effects which was downloaded and my image was placed on top. In the template I changed the background layer color and added a grunge overlay set to 47% layer opacity. I also clipped (ALT+click between the layers) a second texture under the Vintage Photo Paper. The Vintage paper texture was set to 47% layer opacity. Last step was to open up the now free Nik Viveza 2 to sharpen up the bottles and detail throughout the pix. The lighting was a little difficult to handle in this image due to the mirrors and the light coming in through a bright window off to the left. Try out Adobe’s free templates if you want a little different look……Digital Lady Syd
BFF’s!

These two guys are from different places – not BFF’s at all – the larger elephant is from that wonderful object program called PixelSquid (see my How To Use the PixelSquid Add-on In Photoshop blog), and the other is from an image I took of the elephant at the Jacksonville Zoo. Just a few steps here: the plants are from brushes created mainly from my favorite plant brushes by Frostbo Brush Grass Set2 with a Bevel and Emboss added to it; both elephants were worked on using Lucis Pro (no long available); Topaz (see sidebar for website link) ReStyle was used to get the correct color effect; and the now free Nik Viveza 2 was used to get the correct focus on the elephants. It actually took me several hours to get the effect, but I love the texture…..Digital Lady Syd
The Beautiful Snowbush
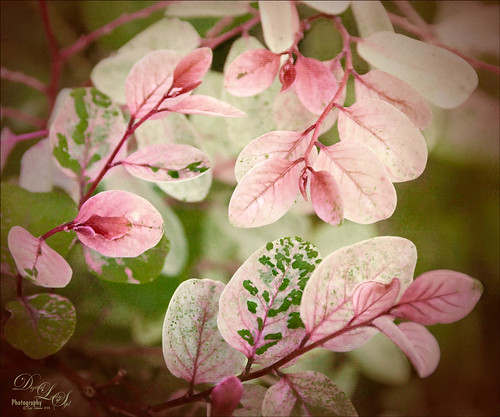
This a beautiful Snowbush growing in my front yard. I just love the colors and patterns in the leaves of this bush. Very simple post-processing here. Duplicated the layer and used Lucis Pro (no longer available) to sharpen the image. A black layer mask was added and just the leaves in the focal point were painted back. One of my Photoshop textures was applied on top (see my Get Rid of That Color! blog that used the same texture and free brush links). A Hue/Saturation Adjustment Layer was clipped (ALT+click between layers to clip) and set to a pinkish color. The texture layer was set to Soft Light blend mode at 68% layer opacity. Topaz (see sidebar for website link) Lens Effects’s Rusty Edges Vignette was applied. A Black & White Adjustment Layer was added on top using a Luminosity blend mode and the sliders were adjusted to get a nice color effect; then it was set to 64% layer opacity. It still needed a little more sharpening – I wanted a more depth in the image so Topaz Detail 3 was opened on a stamped layer on top (CTRL+ALT+SHIFT+E), and the Interior Detail I preset was applied – it looked over the top but there was just the right amount of sharpening in some places. A black layer mask was applied and just those areas that needed were painted back in white. I believe it did add that extra depth that really makes the image…..Digital Lady Syd
Vintage Pottery and Glassware
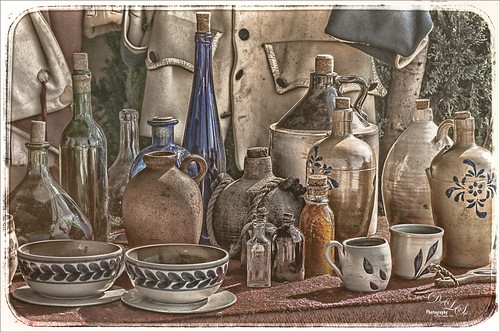
This image was taken at a Native American Festival of a pottery and glassware display. Since the items are so vintage, I decided to a add a vintage feel to the image. After doing some Basic Panel corrections in Lightroom, the image was duplicated in Photoshop and Lucis Pro 6.0.9 (no long available) was used to sharpen the image. A stamped layer (CTRL+ALT+SHIFT+E) was added on top the free Nik Analog Efex Pro plug-in was applied. This filter is really fun to play with and gives some beautiful vintage effects! These filter effects were stacked: Basic Adjustments, Light Leaks, Film Type, Frames, and Levels & Curves which includes a Luminosity curve which is very handy! If you have never used this filter, note that many of the sections allow you to move the effects around within the image. Back in PS, a Red Channel Luminosity Curve Adjustment Layer was created. (See my How to Use a Red Channel to Create a Nice Blended Image Effect blog for more info on this.) On another stamped layer, Nik Viveza 2 was used to emphasize the focal point. It was just slightly too bright for that vintage feel, so a Pattern Fill Adjustment Layer was added using a light cream color pattern set to a Color Blend Mode at 52% layer opacity. That was it! I love the vintage effect!…..Digital Lady Syd
Bird on a Bird Cage
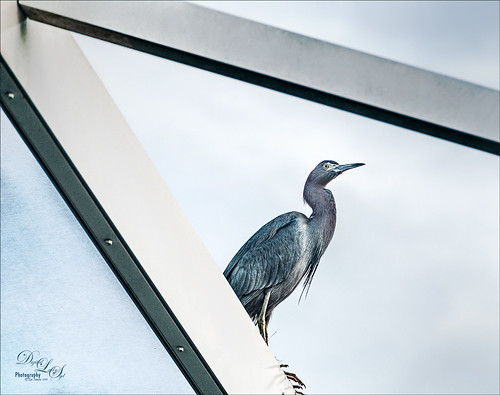
This Little Blue Heron decided to check in on us while we were having dinner on our back porch without electricity after Hurricane Matthew. The screen is blown out there I could get a really nice shot of him. He is a real beauty! Usually I paint these guys, but this time I decided to try out Lucis Pro 6.0.9 (no longer available) on the bird and really liked the results (Enhancement sliders R91/G101/B19 & Assign Original Image Color 5/95). Used the Camera Raw Filter to remove a slight amount of noise the Lucis Pro filter added. On a stamped layer above, Topaz Texture Effects 2 (see sidebar for website link) was applied using the Texture and Vignette filters. The filter mask was used to get the effect correct. Last step was to use the now free Nik Viveza 2 to draw more focus to the face of the bird. That was it. The birds are so pretty around here!…..Digital Lady Syd
Just Being Purple
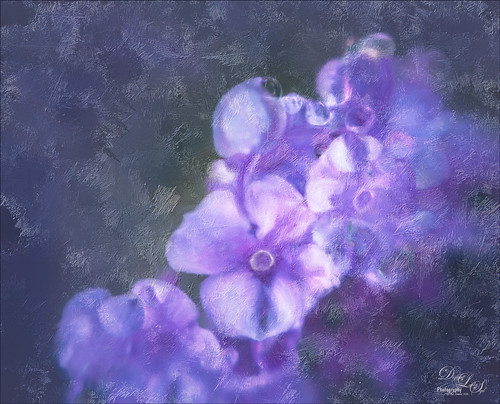
These pretty little purple lantana grown in my front yard and had some fresh water drops on them. Just found out in the reference link that their berries are poisonous and the leaves toxic to animals. It is considered an invasive plant in Florida – all this just to get a few butterflies! Used Lucis Pro (no longer available) to sharpen up the flower edges a little. In the now free Nik Color Efex Pro 4, the Vignette filter and Glamour Glow were used. Lots of petal clean up on separate layers , but what really made this image pop was the Melissa Gallo texture called Snowy Sky set to Linear Light blend mode. This texture gave a really nice icy look which I think goes with purple perfectly!…..Digital Lady Syd
Vintage Car
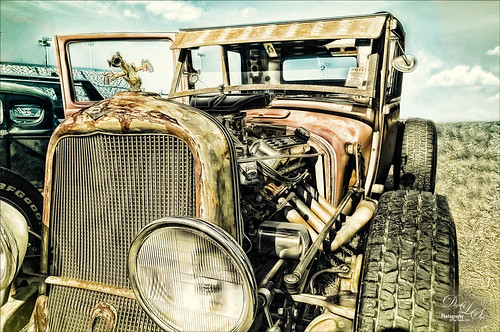
Took this image a while ago at a Turkey Run held in the infield of the Daytona International Speedway (see seats in upper left). Basically just used Lucis Pro (no longer available) set to Detail 65, then opened image in the now free Nik Silver Efex Pro 2 where the High Structure (Smooth) preset was applied. The layer was set to 37% opacity back in PS. Dodged and burned using Curves Adjustment Layers. Used On1 Photo 10 Effects (see sidebar for website link) and stacked these filters: Tone Enhancer, Color Enhancer, Glow, and Split Tone. Topaz (see sidebar for website link) Glow was then applied to a stamped layer above using the Morning Mist preset with some adjustments. It took a while to do this image but it was a lot of fun to try the different combinations of filters!…..Digital Lady Syd
Riding the London Eye
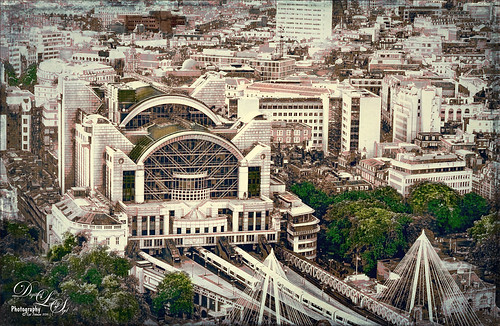
This image of a train station was taken from the London Eye. Topaz (see sidebar for website link) DeNoise 6 was used to get rid of the noise in the shadow areas. The now free Nik Silver Efex Pro 2 was used to convert image to a black and white. On a stamped layer above, Lucis Pro 6.0.0 (no longer available) was set to Enhance Detail 105 and Smooth Detail 95. This layer was set to a Difference blend mode, and the Blend If Underlying Layer white tab slider was used to bring back some of the white in the image. A Red to Gray Gradient Map Adjustment Layer was placed above at 47% layer opacity. On another stamped layer Topaz ReStyle was used to get the a good color balance. Last step was to add Topaz Texture Effects to get the vignette in the image. It was fun to see what stacking these filters would do!…..Digital Lady Syd
The Rosebud
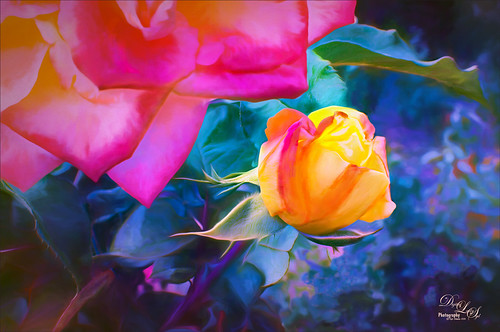
The image was taken at the Harry P. Leu Botanical Gardens in Orlando, Florida in the rose section. This is a beautiful place to photograph flowers – in this case the image was shot at F/22 with my Nikon 60 mm Macro Lens with a Bower 0.5 x High Resolution Digital Lens added to the lens. I know, odd settings but I was experimenting and loved the result. The key to getting this image effect was getting a very clear detailed shot. In Lightroom just basic changes were made and a little sharpening was applied to the bud with an Adjustment Brush set to Clarity 77 and Sharpen 83. Then in Photoshop Lucis Pro (no longer available) was set to Split Channel with Enhance sliders set to R157/G233/B59 and Green Smooth slider set to 25. On a stamped layer (CTRL+ALT+SHIFT+E) was placed above and Topaz (see sidebar for website link) Impression 2’s Georgia Okeefe II preset was applied. In a white layer mask some of the edges were painted out to keep them sharper. Next on another stamped layer Topaz Lens Effects Selective Vignette set to Olive Green preset with effect centered on the bud. Back in PS the layer opacity was set to 74%. Hope to be able to reproduce this result again!…..Digital Lady Syd
Blowing in the Wind!
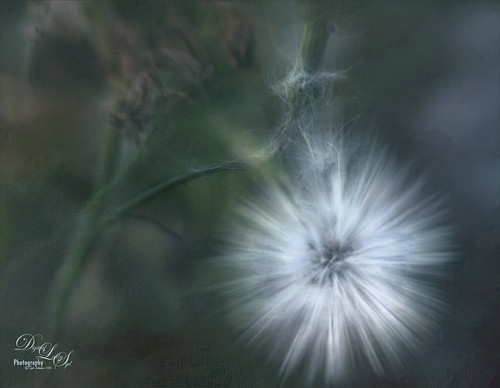
Had some fun with this little dandelion – it was taken using my Lensbaby Composer at F/4 using a Macro +4 Lens. In Lightroom just the regular basic adjustments. In Photoshop Nik Viveza 2 was used to lighten up the white strands in the flower. Then Lucis Pro 6.0.9 was applied using the Split Channels. Next Nik Color Efex Pro 4 was opened and 4 filters were added: Detail Extractor, Glamour Glow, Reflector Efex, and Darken/Lighten Center. Can you tell I was having a lot of fun with this one? Next Topaz (see sidebar for website link) Lens Effects was opened and the Motion filter Type Zoom was centered on the flower to straighten out the strands. In a black layer mask, just the strands were painted back. A Levels Adjustment Layer was used to lighten up the overall image. Next Topaz Texture Effects was used to apply one of my painted textures set to Blend mode Subtract in the plug-in. Back in PS, Melissa Gallo’s Trees in May texture was added and set to Linear Dodge blend mode and 40% layer opacity. That was it! It is so much fun just to play around with an image and I am sure this little dandelion did not care!…..Digital Lady Syd
Orchids Showing Off
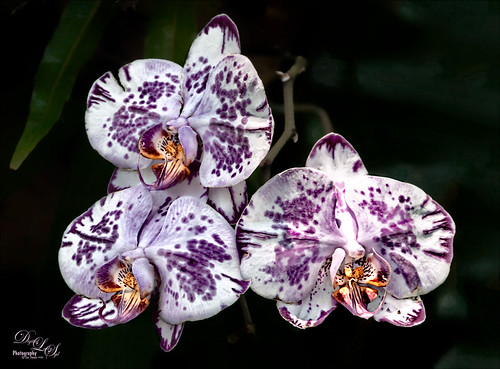
These little beauties were showing off at the Harry P. Leu Gardens in Orlando, Florida. Not much was done to them – just your basic adjustments in Lightroom. In Photoshop, Lucis Pro 6 (no longer available) was run twice – once to smooth the background by setting the Smooth Detail to 19, and once to sharpen the foreground adjusting the Detail settings in each channel (Red 109/Green 103/Blue 101) where the color dialed back to the original amount by setting the Assign Original Image Color at 20/80. Two Curves Adjustment Layers were used to darken certain areas and lighten in others to blend away some shadows. The now free Nik Viveza 2 was used to draw the focus to the center of the flowers. That was it. I really love these flowers!…..Digital Lady Syd
A Palace on Wheels
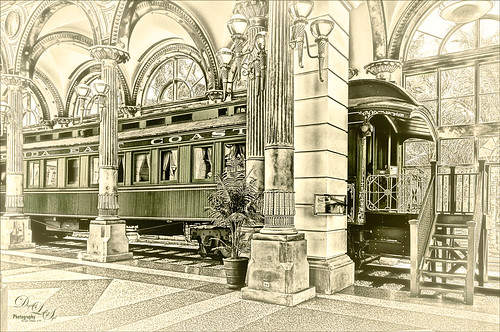
This image is of Henry Flagler’s Railcar No. 91 (see A History of Railcar for No. 91 for an interesting history lesson) or the so-called “Palace on Wheels” from the Guilded Age (CC 1912). It is available to walk through while visiting at the Flagler Museum in Palm Beach, Florida. This image was created using the exact same steps as in my recent Fun Photoshop Blog called How to Get a Great Illustrative Effect with Lucis Pro 6.0.9. First duplicated the background layer and opened up the free Nik Silver Efex Pro 2 using High Structure (Harsh) preset with a few changes for this image. This layer was duplicated and Lucis Pro was applied (Smooth 13/Enhance 97 and Mix with Original Image 81/19) and then duplicate this layer and open up Lucis Pro again with these settings (Split Channels Enhance Detail Red 159, Green 171, and Blue 177 with Smooth at 15). On top a Hue/Saturation Adjustment Layer was added and green color created (Hue 109, Saturation 11, and Lightness -41 with Colorize checked). The layer mask was turned black by CTRL+I in mask and a soft low opacity brush was used to paint back the green in the railcar and set to 44% layer opacity. Another Hue/Saturation Adjustment Layer was added (Hue 187, Saturation 8, and Lightness -7 with Colorize checked). The layer mask from below was copied (ALT+drag) and then invert the layer mask (CTRL+I in the mask). A stamped layer was created on top (CTRL+ALT+SHIFT+E) and Topaz (see sidebar for website link) Glow 2 Auto Shine preset was applied. A Gradient Map was added on the image using a cream to yellow gradient set to Color blend mode at 47% layer opacity. Last step involved another stamped layer and the also free Nik Viveza 2 was applied to adjust where the focal point is. That is it!…..Digital Lady Syd
Screaming On the Coaster!

This image definitely represents that so recognizable Lucis Pro look. Loved all the expressions on the riders – the older group on the top row and youngsters having a blast below! This was taken a few years ago of the Manta Roller Coaster at SeaWorld, Orlando, Florida – short video of actual ride. Lots of filters here – Topaz (see sidebar for website link) Adjust on just the sky edge, Topaz Clarity on the people, Lucis Pro 6.0.9 for overall sharpness, Topaz Detail for a final sharpening, and the now free Nik Viveza 2 to reinforce the focal point. Lots of fun here!…..Digital Lady Syd
The Dressing Table
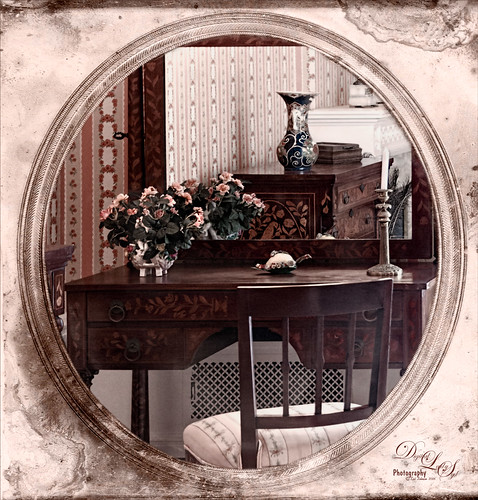
This is an image of a dressing table in one of several bedrooms at the Flagler Museum (Whitehall) in Palm Beach Florida. I really loved the effect of the furniture in the mirror – real vintage flavor here! Basically this image used several filters to get this result. Started with Lucis Pro 6.0.1 (AOIC 0/100; Red 207, Green 207, and Blue 79) (See my Fun Photoshop Digital Lady Syd Reviews Lucis Pro 6.0.9 (Now Affordable!) blog.); Topaz Detail 3 to sharpen it up a bit; the now free Nik Color Efex Pro 4 using Film Efex Vintage Film Type 11, Pro Contrast, and Midnight using Color Set Neutral and overall opacity at 64%. Darken and Lighten Curves Adjustment Layers were added. (See my Fun Photoshop How To use Curves Adjustment Layers to Dodge and Burn an Image blog.) Then on top a Vintage Film was used for the old frame opening. A Pattern Adjustment Layer was clipped to the frame (ALT+click between layers) and set to Color blend mode and a Solid Color Fill Adjustment Layer set to a brown tone was also clipped. Last step was to add a Luminosity Curves Adjustment Layer. (See my Fun Photoshop How To use a Red Channel to Create a Nice Blended Image Effect blog.) That was it – it was a lot of fun to do!…..Digital Lady Syd
Little Fern Flowers
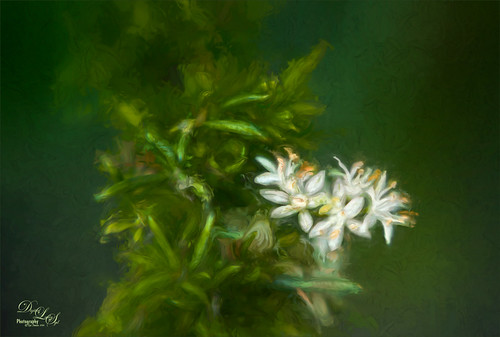
This image is of little white flowers growing out of the top of a Foxtail Fern or Asparagus Ferns in my yard. An older Lensbaby Composer was used – set to F/4 and using the Macro +10 lens. In Lightroom Seim’s (see sidebar for website link) Super Super HDR X preset was applied to the image before going to Photoshop. Used a Hue/Saturation Adjustment Layer to remove just a little haloing on the edges of the white flowers. On a stamped layer (CTRL+ALT+SHIFT+E) Lucis Pro was applied. (Settings: Assign Original Image Color 31%/69%; Enhance Red 147/Green 87/Blue 47.) See my Digital Lady Syd Reviews Lucis Pro 6.0.9 (Now Affordable!) blog for info on this. A black layer mask was added and just the white flowers were painted back. On another stamped layer Topaz (see sidebar for website link) Impression 2’s was opened and my SJ Renoir WC Look preset was applied at 71% layer opacity. (Settings: Stroke Type 13, Brush Size 0.73, Paint Volume 1.00, Paint Opacity 0.91, Stroke Rotation 0, Stroke Color Variation 0, Stroke Width 0.65, Stroke Length 0, Spill 0.79, Smudge 0.55, Coverage 0.67, Coverage Transition 0.30, Cover center X0/Y0; Color Overall Hue 0.07, Sat 0.15, and Lightness 0; Red Sat 0.50; Orange Sat 0.50; Purple Hue 0.85 and Sat 0.65; Lighting Brightness 0.08, Contrast 0.12, Vignette 0, Light Direction X-0.27/Y0.15; Texture Strength 0.11, Size 1.00, Background Type – solid white, and Background – #b25b41.) On a New Layer used the Smudge Tool to smooth some areas. On yet another stamped layer, the now free Nik Viveza 2 was applied to adjust the focal point just right. That was it! Was a lot of fun to take the shot and paint the image!…..Digital Lady Syd
Busy As a Bee!
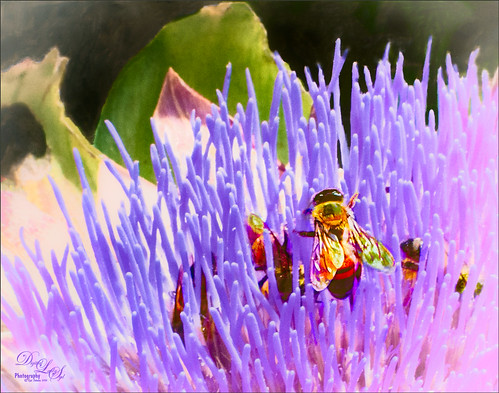
This little bee and his buddies were very busy checking out this magnificent specimen of a purple succulent at the Harry P. Leu Gardens in Orlando, Florida. I am not sure what kind of plant this was, but it was a gorgeous color! No wonder the bees were attracted to it! The image was opened in Photoshop and the background duplicated. Next JixiPix Spectral Art’s Dark Lines preset was applied to the layer – see my How to Use the Free Spectrel Art Plug-in blog to download. A black layer mask was added and the effect was only applied to the bees to give a little more detail to the wings. A stamped layer was created on top (CTRL+ALT+SHIFT+E) and Lucis Pro 6.0.9 (see my Digital Lady Syd Reviews Lucis Pro 6.0.9 (Now Affordible!) blog) was applied to further sharpen up the bees. Another black layer mask was added and the bees were painted out again and in the Properties bar, the Density was set to 80%. Some clean up was done on a layer. On another stamped layer the now free Nik Color Efex Pro 4 was applied using my favorite grouping of Film Efex: Vintage (set to Film Type 2), Darken/Lighten Center, and Monday Morning set to no Smear, Color Set Sepia, and overall Opacity 56%. On yet another stamped layer, Topaz (see sidebar for website link) ReStyle was opened up. The Sunflower Fields preset was applied and in the ReStyle Masks section, just the color was painted into the bees – this gives the really pretty golden color in the bees, and in the Basic section, the Detail Structure was set to -0.69 to soften everything but the bees. The last step was to create another stamped layer and apply the also free Nik Viveza 2 to the image to draw more focus to the bees. It always amazes me how these different plug-ins work together to get some great effects!…..Digital Lady Syd
A Beautiful Room
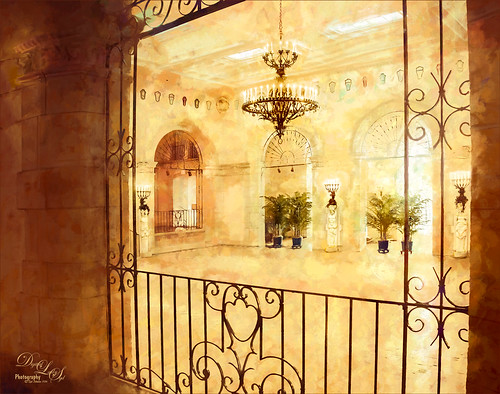
This image of the West Room is one of several beautiful areas at the Flagler Museum (or Whitehall) in West Palm Beach, Florida. It appears to be one of areas rented out for special occasions. When visiting this museum, it was a pleasant surprise to see all it contained, and with practically no other people around. A photographer’s paradise!
For post-processing, in Lightroom Trey Radcliff’s free preset called A Marshmellow Happysmell was applied – this gives it the warm colors in the image. In Photoshop, Lucis Pro 6.0.9 was applied (AOIC-0/100; R171/G155/B37) and then in a black layer mask, just areas I wanted sharpened were painted back. Created a stamped layer (CTRL+ALT+SHIFT+E) and added Topaz (see sidebar for website link) Impression 2’s Overpaint II preset as is. Next several painting and clean up layers were used to smooth out some of the rough edges. Added Nik Viveza 2 as a last step to emphasize the focal points. I like the effect this Impression preset added to the image…..Digital Lady Syd
Red-Winged Bug on a White Flower
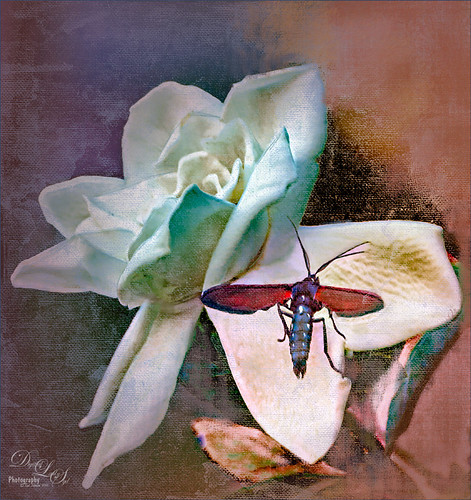
This was just a fun image to do – loved the colors in the bug. Just used my basic workflow – used Lucis Pro 6.0.9, Topaz (see sidebar for website link) Detail 3, Black and White Adjustment Layer, Topaz Lens Effects Reflector and Vignette filters, and Red Channel Curves Adjustment Layer along with lots of clean up. Used a Hatch Brush on lost of this image. Lots of fun to do!…..Digital Lady Syd
Let’s Hear It for the Mighty Fern!
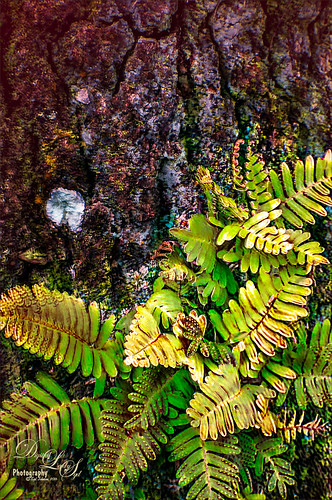
Took this image at the Harry P. Leu Gardens in Orlando, Florida, recently. These are Resurrection Ferns living in the bark of an Oak Tree. The bark was so detailed and colorful and competing with the ferns that both Lucis Pro (see my Digital Lady Syd Reviews Lucis Pro 6.0.9 (Now Affordable!) blog and Topaz ((see sidebar for website link)) Impression) were used to get a more pleasing effect. There were several adjustments layers used and lots of masking done to get the detail back into the leaves. Also used a Red Channel Curves Adjustment Layer to help blend total image. (See my How to Use a Red Channel to Create a Nice Blended Image Effect blog.) I really liked the darker colors in the bark – these filters embraced the color without overtaking the image with detail. These plants were so pretty in the sunlight……Digital Lady Syd
Sweet Alyssum Royal Carpet Flowers
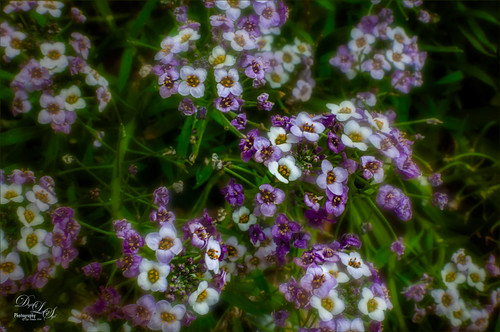
The beautiful little flowers called Sweet Alyssum Royal Carpet were found growing at the Harry P. Leu Gardens in Orlando, Florida this Spring. This background was duplicated (CTRL+J) in Photoshop and Lucis Pro 6.0.9 in Split Mode was applied (Settings: Mix With Original Image 45/55; Assign Original Image Color 0/100; Enhance Detail Red Channel 113/Green 233 with Smooth set to 19/Blue 199) – see my Digital Lady Syd Reviews Lucis Pro 6.0.9 (Now Affordable!) blog. Duplicated this layer and applied Topaz (see sidebar for website link) Lens Effects Generous Diffusion preset – a layer mask was added and the focal points were painted black to remove the softness in those areas. Duplicated layer again and added in Lens Effects the Soft Olive Green Vignette set to a Vignette Strength of -0.46 and a low opacity of 28.71. Last step was to add a Black and White Adjustment Layer to emphasize the focal points and set it to Luminosity – see my How To use a Black & White Adjustment Layer To See Contrast in an Image blog. These flowers look almost like little wildflowers growing along a road…..Digital Lady Syd
Totally Stuffed!
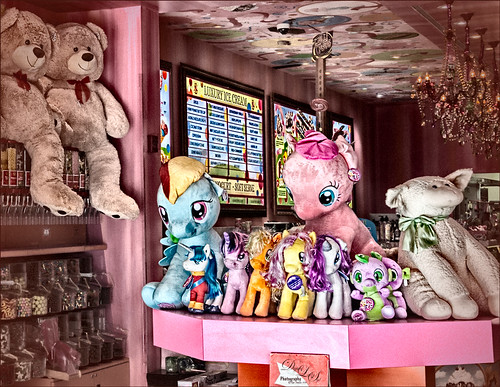
This image is of an Sloan’s Ice Cream at CityPlace in West Palm Beach, Florida – wish I knew the name of the store. In Lightroom just the Basic Panel adjustments were made. In Photoshop, a clean up layer was done to remove distracting sales tags, etc. Created a composite layer (CTRL+ALT+SHIFT+E) and Lucis Pro 6.0.9 was opened to apply the classic effect from this plug-in. (See my Digital Lady Syd Reviews Lucis Pro 6.0.9 (Now Affordable!) blog.) Settings for this plug-in were: Preview Scan Line 8 and Processing Scan Lines 50; Mix With Original Image 100%/0%; Assign Original Image Color 0%/100%; Red Enhance 53 and Smooth 23, Green 51, and Blue 39. Back in Photoshop the layer was duplicated and Topaz (see sidebar for website link) Lens Effects was opened where the Burnt Sienna preset was used with a few adjustments. That was it!…..Digital Lady Syd
Two Rough-Housing Grizzlies
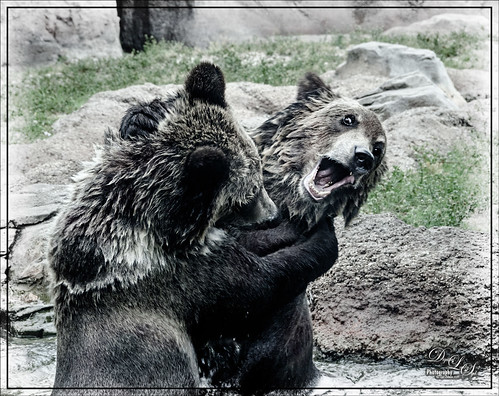
This image of what appears to be two Grizzlies going at each other in the Alaskan wilderness, but is actually just two bears playing in the water on a hot afternoon at the West Palm Beach Zoo, according to the Zookeepers. Definitely pretty exciting to watch though! In Lightroom Kim Klassen’s free Lightroom Sampler Dark 1 preset was applied and the eyes and teeth were sharpened with an Adjustment Brush. Opened image in Photoshop and Lucis Pro 6.0.9 was used to get that classic Lucis look (settings: Enhance Details Red Channel 161/Green 183/Blue 129 and Assign Original Image Color 0/100). (See my Digital Lady Syd Reviews Lucis Pro 6.0.9 (Now Affordable!) blog.) Did a little dodging and burning on eyes and teeth. Used a Black and White Adjustment Layer to fine-tune the focal point. Added the border using Smart Photo Editor‘s Brighten Border by Tony. (See my Digital Lady Syd Reviews Smart Photo Editor Photoshop Plug-In blog.) Then decided it had a little too much cyan in the fur so used a Color Balance Adjustment Layer to add a little dab of red to the Midtones and Shadows. Enjoyed how this image turned out – rather natural looking and just like I remember it. These bears were not making any loud noises, really just having fun!……Digital Lady Syd
The Sculpture Called Reaching
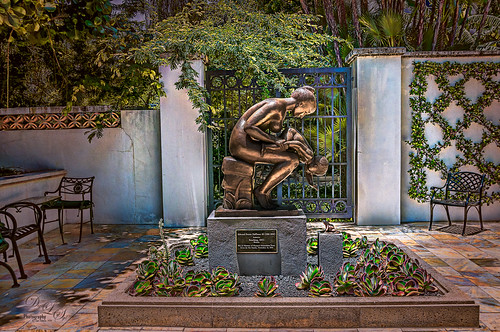
This bronze sculpture called Reaching was created by Edward Fenno Hoffmann, III, in 1963 and is very striking. The image was taken at the Society of the Four Arts’s Philip Hulitar Sculpture Garden in West Palm Beach, Florida. It used Technique 1 on the Lucis Pro 6.0.9 website where both their Single Channel mode (47% layer opacity) and Split Channel mode (73% layer opacity) are applied on separate layers. (Settings for the Single Channel mode layer were: Enhance Detail of 55, Smooth Detail of 10 , and Mix with Original Image of 10% processed and 90% original. Settings for the Split Channel mode layer were: same Enhance Detail and Smooth Detail settings as Single Channel mode but no Mix with Original Image.) This image shows how little an amount is needed to get that classic Lucis look we all love. The vignette is from Topaz (see sidebar for website link) Lens Effects – Add Vignette Selective filter set to Medium (Strength -0.46 and Opacity 39.60). Not much else was done to get this lovely effect on the beautiful sculpture. For more information on the Lucis Pro 6.0.9 plug-in, check out my Digital Lady Syd Reviews Lucis Pro 6.0.9 (Now Affordable!) blog……Digital Lady Syd


