
Darling Dahlia
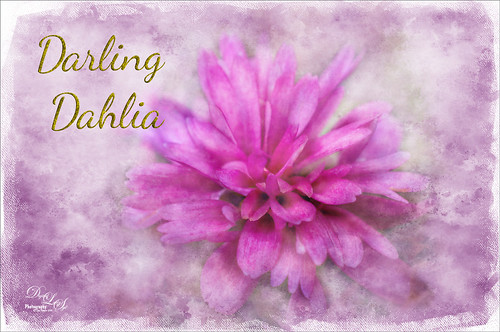
Image of a little dahlia that just poked up its head in my winter spring bed a month ago. It was only about 2 inches wide but just lovely! First sharpened the image using Photoshop’s Shake Reduction filter. Then sharpened again by duplicating the layer, setting it to Hard Mix blend mode, adding a Gaussian Blur set to Radius 3, and setting the Layer Fill slider to 5%. Next took Belle Fleur called Rose Garden texture into Alien Skin’s Snap Art 4 and set it to Watercolor Abstract preset (Brush Size 81, Photorealism 58, Coverage 57, Stroke Length 62, Color Variation 43, and Default Brush Style. It was set to Soft Light blend mode. Added another texture, one of mine named SJ The Phyllis Sky (created with Grut’s Charcoal Shin Ding Brush – painted a texture background in three colors – blue, turquoise and brown – gave a lovely texture and cloud feel that was saved to use again). A Hue/Saturation Adjustment layer was clipped to the texture so it became purplish in color (Hue 292, Saturation 19, and Lightness -8). A layer mask was added to paint out a lot of the flower to bring through the warm color of the flower from the texture underneath. On a layer above some painting clean up was done on some of the petals. Added a New Layer filled it with 50% gray using the Edit -> Fill. Set it to Soft Light blend mode and used a black and white brush to paint back areas for lightening or darkening the image. Added a Curves Adjustment Layer to add back some contrast – painted in the layer mask to lighten the effect in the center of the flower. Added a Text Layer using the Dancing Script OT font – in layer style turned on the Bevel & Emboss default settings and a Stroke effect using the Structure Size of 18, and Fill Type Pattern – Graphic 09 at 47% Scale. A Canvas Vignette was added on top to give a painterly look. This flower was so pretty…..Digital Lady Syd
Squirrel Resident at Universal Studios

This was probably not the greatest image but I loved the way the squirrel’s tail looked so I had to do some processing on this photo. This shot was actually taken once again at Universal Studios Orlando. I wanted a painterly look, but I did not want to spend a lot of time painting it since it was not the best original image. Trey Radcliff‘s Gradient Endless Weekend Lightroom preset was applied. The photo was opened in Photoshop CC and the Shake Reduction Filter was used. Next Topaz (see sidebar for website link) Detail 3 was used to overall sharpen the image. A black layer mask was added and just the squirrel and the closer plants were painted back. A stamped layer (CTRL+ALT+SHIFT+E) was created and turned into a Smart Object where Alien Skin’s Snap Art 4 was opened. I used a preset I had created in Snap Art 3 based on the Historic Oil Paint preset (settings were Background – Brush Size 14, Photorealism 23, Paint Thickness 77, Stroke Length 63, Color Variation 0, and Bristle Brush Brush Style; Detail Masking – on Squirrel, Effect Detail, Brush Size -10, Photorealism 100, Paint Thickness -40, Stroke Length -49, Color Variation 36 and Brush Style Bristle Brush; and on mid-back leaves, Effect Detail Brush Size 23, Photorealism -59, Paint Thickness 73, Stroke Length 79, Color Variation 85, and Brush Style Bristle Brush; and Colors Brightness -38, Contrast -14, Saturation 33, and Temperature 36; Lighting – Default; and no other settings used). Using Photoshop’s Flat Fan Single Bristle Wet Edge brush as a Mixer, the overly bright spots were blended in on a separate layer. Next Topaz ReStyle Rustic Red and Orange preset was used (the settings used are ReStyle Color Style Lum Third -0.48 and Fifth -0.39; Texture Strength 1.00; Basic Tone Black Level 0.11, Midtones -0.31, and White Level 0.30; and Detail Structure 0.11 and Sharpness 0.73). This turned the image color palette into a bit warmer feel. Nik Viveza 2 was added to add a little more tonality to just the squirrel and add some blue into the sky. The last step was to use Photoshop’s Radial Filter in Camera Raw on just the squirre to draw further attention to him. It was a lot of steps but always fun to do……Digital Lady Syd
The Candy Store Staircase

Just had to give a painterly look to this cute pink spiral stairway in a candy store in Harry Potter Land at Universal Studios Orlando. The original was not that great an image – not real sharp and or straight. I really liked the shot though so by adding Alien Skin Snap Art 4 plug-in and the Pastel preset on it, it became a really nice image. To be honest, this image took a long time to get the effect I wanted even with this great filter effect. The Camera Raw Filter’s Radial Filter was added to the light in upper left to make it the focal point and lighten it up a little more. Several Curve, Levels, and Selective Color Adjustments Layers were added. Several clean up and painted layers were added and even my Snow Overlay-slight blur was added at 6% layer opacity to add in a little white canvas feel. The last step was adding a simple painted border that I created in Painter. I have to say that Snap Art really does a pretty good job of painting…..Digital Lady Syd
Digital Lady Syd Related Blogs:
Digital Lady Syd Review Alien Skin Snap Art 4
Digital Lady Syd Reviews Alien Skin Snap Art 3
A Nice Illustrative Look

Another image that required a lot of adjustments but lots of fun to post-process. These Savannah homes had cars and trees and all sorts of things in the way so it is amazing that it turned out looking as good as has. I guess that is why I love Lightroom and Photoshop – it is so fun to see what you can do to an image!
Nothing special in Lightroom – just the basics. Next used Topaz (see sidebar for website link) Black & White Effects 2 to give a bit of an illustrative look to the image and to add a pretty vignette and border. Alien Skin Snap Art 4‘s Pastel Portrait – soft preset was applied and set to 60% layer opacity. Used a Selective Color Adjustment Layer to get the color adjusted. The Puppet Warp Tool was used to slightly spread the roof from the bottom on the right side as it was a little distorted. That was it but it seemed to take a while. Still, the final result turned out so nice…..Digital Lady Syd
Fire Brigade Bike
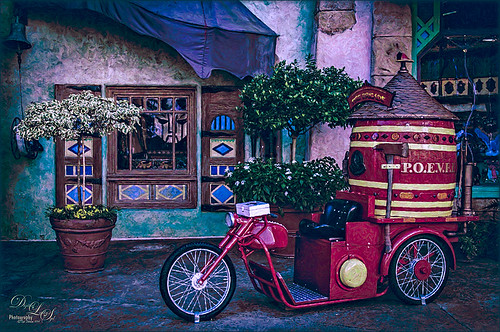
Finally got to see Universal Studios Islands of Adventure section in Orlando, Florida. This image of a Fire Brigade bicycle was one of the first things I saw – very unusual item so had to take a picture. Had to get a little creative though since that is what I do! This time Trey Radcliff’s Biting Icecream preset was applied in Lightroom along with some basic slider adjustments. In Photoshop Topaz (see sidebar for website link) Adjust 5’s Photo Pop preset was added next. Then just a bit of sharpening using Topaz Detail 3 was. Probably did not need it since next I went into Alien Skin’s Snap Art 4 and added the Factory Default settings from Snap Art 3 (which I manually created) and added a little more saturation – no mask layers. Back in Photoshop Topaz ReStyle was opened up and the bright oranges and reds were swapped out for blues and darker reds. I just liked theses colors better so that is what you see. Last step added a slight dark vignette around image using a Curves Adjustment Layer. This was such a nice colorful picture and the nice thing – no people around! Anyway, lots of fun to process using my favorite plug-ins…..Digital Lady Syd
What a Dolling Picture!
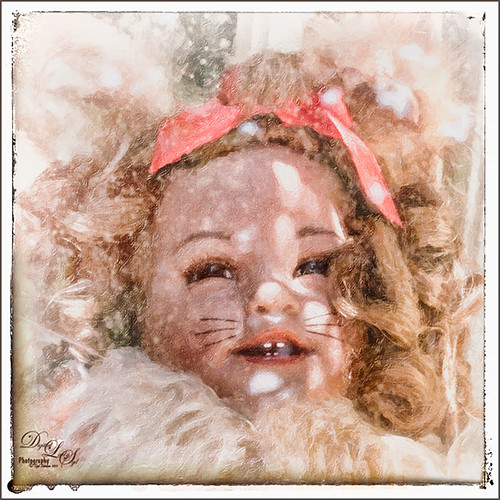
This is a rather crazy image of a doll in a lion outfit that I decided to do some processing on. The RAW image had a lot of window reflection, but for some reason I just liked the way the sun lit up the doll and hair on the right side. I do not even mind the white blown out spectral spots – it sort of added to the wintry old feel. In the original file had a lot of spectral highlights that looked like snow. Alien Skin Snap Art 4 was applied in Photoshop using the Impasto Detailed preset and two Detail Masks to bring in the facial features. Then I added my free SJ Snow2 slight blur overlay set to 34% layer opacity. A Solid Color Fill Adjustment Layer was clipped (ALT+click between layers) to the overlay to give a little light peach color to the snow. Nik Analog Efex Pro was applied for a little vintage feel. The last step was to add a Curves Adjustment Layer to add contrast to the image. That was it – for some reason I really like this image!…..Digital Lady Syd
Bamboo Forest Abstract
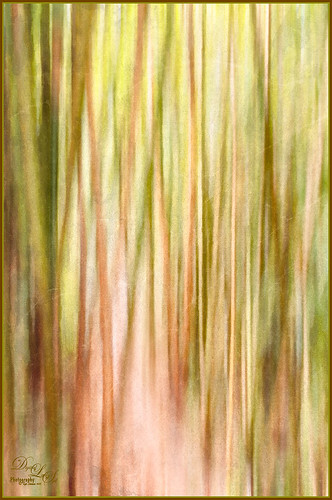
Got inspired by a short tutorial called Dustin Abbott’s Autumn Abstract with Snap Art 4 on Alien Skin’s website where he created this really interesting abstract painting. The image above is of a bamboo forest on the Big Island in Hawaii. I wanted a little less abstraction so some of the bamboo could be seen but the beautiful Hawaiian forest colors were the main interest. Therefore, I only used a Motion Blur Distance of 594 pixels. Next in Snap Art 4 Dustin Abbott’s Autumn Abstract preset (he graciously lets you download the preset in the tutorial link above) was applied. Back in Photoshop a layer mask was added where a few of the trees were painted back softly just to exaggerate the foreground tree shapes. Next Topaz ReStyle (see sidebar for website link) plug-in was added. (Started with Olivine Pastures preset to keep the Hawaiian green and pink colors intact. Color Style Hue Third -0.14, Sat Primary -0.28, Third 0.20, and Fifth -0.17, and Lum Third 0.63 and Fifth 0.59; Texture Strength 1.00; Basic Opacity 62%, Blend Mode Screen, Color Tint 0.16 and Sat 0.20; and Detail Structure 0.31.) The last step involved adding another of my favorite plug-ins, Nik Analog Efex Pro. (Used these filter settings: Basic Adjustments with Sat at 24%; Dirt & Scratches 82% using the last Organic thumbnail; Photo Plate Corroded – 2nd down 2nd over – at 20% Strength; and Levels & Curves with RGB and Luminosity Curves pulled just a little down and over at 81% Strength.) I think the image depicts exactly what I wanted to express – mainly emphasizing the gorgeous colors and the soft vertical feel of the forest. Give this technique a try and see what you can do……Digital Lady Syd
Digital Lady Syd Related Blogs:
Digital Lady Syd Reviews Alien Skin Snap Art 4


