
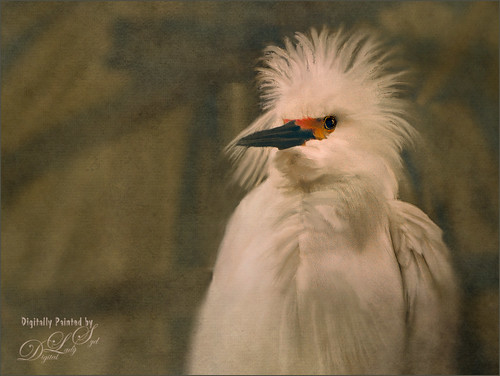
Hiding Out in the Wetlands
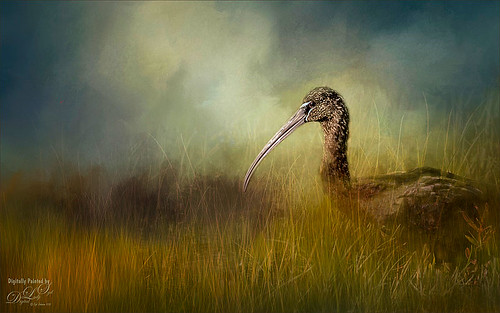
Took this image of a Limpkin bird a while back when photographing at the Ritch Grissom Memorial Wetlands in Brevard, Florida (also known as the Viera Wetlands) with my photo club. This was not actually how the bird appeared – he was trying to hide from all the tourists taking his picture by standing in a batch of grass and reeds. That was the challenge. I had heard that CC2015 had updated their Spot Healing Brush and it worked nicely on this image. I tried it in CS6 first and got marginal results. I have heard that a lot of people are having trouble with the update Healing Brush and Adobe is looking into it. So do watch the results if you are using it. Like I said, I had no problems in this image. Otherwise on a New Layer just added in some of my favorite and free Frostbo Set 2 Grass brushes 009 and 005 strokes to fill in some grass – need to lock the layer and paint over with Color Dodge and Multiply to get the natural feel. Set layer opacity to Color Dodge, duplicated layer, and adjusted opacities of both layers. Jai Johnson’s beautiful Clouds Over the Pasture texture was used and Nik Viveza 2 to add sharpness to the birds eye and beak. That was it. Love playing in Photoshop!…..Digital Lady Syd
Just a “Big Scoop”
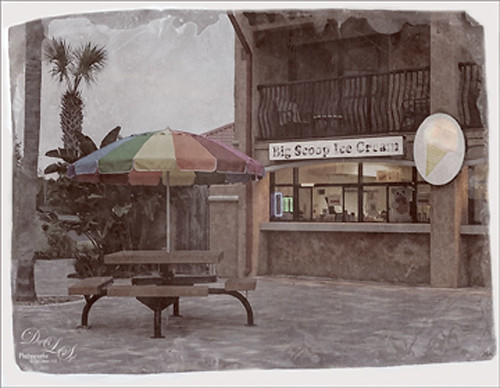
Loved the vintage result of my favorite local ice cream place. This was a phone image processed using OnOne Photo Suite 9.5 (see sidebar for website link) – used B&W Effects and Perfect Effects to get this look. The original layer was converted to a Smart Object so I could tweak later the results. In B&W Effects, the Daguerreotype Clean preset was selected with adjustments to its settings. In Perfect Effects the Bleach Bypass preset was set to Lighter. With the Lighten Paintbrush, the umbrella was painted and with the Detail Paintbrush, the inside of building and picnic table were painted. Since the B&W effect was too strong, I clicked the little icon on the right edge of the Perfect BW layer in Photoshop and the opacity was changed to 75%. Then a layer was added on top to paint back in solid white border where needed. Last step was to distort the letters as they totally draw the eye whenever letters appear in an image. Just painted over with a little grunge brush. Enjoyed creating this vintage look!…..Digital Lady Syd
London Back When????
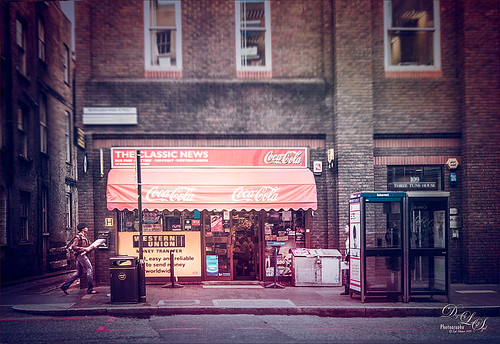
Just having some fun here with a technique that I learned from Colin Smith (he is a regular on CreativeLive and Photoshop guru) at PhotoCAFE. He created Photoshop Secrets: Photographic Effects videos using CS5, but there are some very good techniques in them. This one is from his Toy Camera video where he teaches you how to add some very nice light leaks. Oh yes, these are free to watch. This image was taken in London Borough High Street – loved the images I took of this store – so British looking!
I added a bit of a vintage feel in Lightroom by applying 2 Lil’ Owls (see sidebar for website link) At the Vineyard 7 preset before going into Photoshop. Then just followed Colin’s instructions. This image used both reddish and light green light leaks. Used the Blur Gallery Tilt Shift filter in CC2014 (Blur set to 14 pixels, Distortion 100%, and Symmetry turned on) to get a more blurred effect on the top and in the foreground of the image. The layer was converted to a smart object and the Camera Raw filter was opened. Two Radial Filters were used to direct the eye more to the left side of the image and on the storefront as the primary focal point, and on the person as a secondary focal point. The signage was also blurred slightly using the Blur Tool at 75% Strength on a separate layer since text really draws the eye. A Blue Solid Color Fill Adjustment Layer set to Color blend mode and layer opacity of 25% – I decided it looked more vintage using the cooler tones. A Curves Adjustment Layer was added for contrast. I just did not like how these old buildings were standing so finally got the buildings straight using the Perspective Warp Command and then the Crop Tool to clean up edges. That was it. Loved the effect!…..Digital Lady Syd
Digital Lady Syd Related Blogs:
How To Create/Use a Light Leak
Topaz Lens Effects Plug-In
Digital Lady Syd Reviews Nik Analog Efex Pro
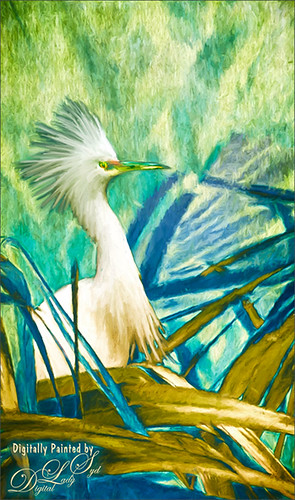
Cattle Egret Looking for Love

Loved this beautiful Cattle Egret who was checking out a group of egret ladies (they are more colorful during this time of year) at the St. Augustine Alligator Farm. Jai Johnson’s free texture called antiquebrownlight-canvas was used on this image. Lots of painting, Topaz (see sidebar for website link) Lens Effect and Topaz Impression were used to get this final image. I really love the mystical result……Digital Lady Syd
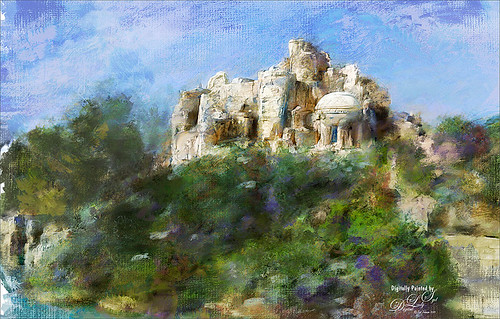
A Little Scottish Architecture
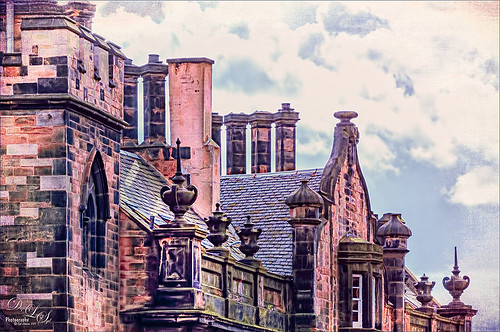
Just an image of the beautiful architecture taken near Edinburgh Castle in Scotland. The original image in Lightroom was major dark – not sure why. Used the Basic sliders to brighten up the image, but the noise was pretty bad. Therefore , in Photoshop Topaz (see sidebar for website link) DeNoise was used. Topaz Glow was used on a stamped layer above and my SJ Graph III preset was applied – layer was set to Overlay blend mode at 65% layer opacity. (Here are the settings: Primary Glow: Glow Type Dark, Glow Strength 0.17, Effect Sharpness 0.09, Electrify 0.23, Simplify Details 0.25, Edge Color 0.20, Detail Strength 18, Detail Size 0.24, Brightness 0.23, Contrast 0.17, Sat 0.01, Line Rotation 0.09, and Glow Spread 0.20; Secondary Glow: Glow Type Light, Glow Strength 0, Effect Sharpness 0.47, Electrify 0.17, Simplify Details 0, Brightness 0.36, and Contrast 0.62; Color Red Sat 1.00; Orange Sat 0.27; Yellow Sat 0.20 and Lightness 0.09; Aqua Sat 0.78 and Lightness -0.26; and Blue Sat 0.49; Finishing Touches: Effect Coverage 0, Smudge 0.00, Sharpness 0.25, Sharp Radius 0 and Vignette Size 0.) Also in the Layer Style, the sky was brought back using Blend If Underlying Layer slider and splitting the white tab (ALT+drag on tab to split) with settings of 122/145. Topaz Lens Effects Reflector filter was used to lighten up the face of the buildings (Type Golden, Strength 0.28, Transition 0.31, Position 0.49, and Angle 208.5). By adding a layer mask, the sky was painted black so the effect only applied to the buildings. Next on a stamped layer used Nik Color Efex Pro using Tonal Contrast, Brilliance/Warmth, and Vignette Lens. A vintage frame was added on top and set to Overlay blend mode. I love working on images from Scotland!…..Digital Lady Syd
Digital Lady Syd’s Rule No. 13: Paint Something Everyday
Have not done a rule in a long time, but if you are learning to paint, many of the really good digital painters are saying to “paint something everyday.” This will definitely help you improve your painting technique, and if you already have a technique, it will keep your skill level at a high level.
This guy was totally into looking around at the happenings at the St. Augustine Alligator Farm Rookery on this very busy day. When mating and building nests, the birds just do not even know you are there – it is truly amazing! For some reason, I just do not get tired of painting these guys! Just using the same Mixer Brushes that work with my style of painting. Still loving Fay Sirkis‘s (the Corel Master who makes fabulous Photoshop brushes also) Precious Oil Diamond Blender brush and a Pete Collins Portrait Smeary Mixer for the background (from KelbyOne Mixer Brush training by Pete). Used an Exposure Adjustment Layer for the eyes (see my How To Do a Quick Eye Sharpening in Photoshop ), a Color Lookup Adjustment Layer Gold Blue Abstract preset and Lighten layer blend mode, add Jai Johnson Brown-Gray canvas texture, and Nik Viveza 2 on stamped layer on top to emphasize his face. Is this guy awesome or what!…..Digital Lady Syd
Waiting For Spring
Just doing some practicing in Corel Painter. I do not do this enough, but the experts say that to actually be good you should paint every day. This image used three of the original Corel Masters brushes – Melissa Gallo, Karen Sperling and Marilyn Sholen brushes. If you get any of their brushes, you cannot go wrong. In Photoshop on a New Layer the brush I created in my Fun Photoshop Blog How To Use Photoshop’s Brush Texture Section for Painting Clean-up was used to clean up messy areas. (I really do use the techniques I present. HaHa!) Painted Textures Mist on the Lake texture was placed on top and set to Multiply blend mode. Then because I could, Topaz (see sidebar for website link) ReStyle was opened and a different color palette was selected. Sorry I do not have the settings but I think it involved the Peppermint Green preset. A Curves Adjustment Layer was added on top to add back contrast. Finally a little Nik Viveza 2 magic. That was it…..Digital Lady Syd
I See You! Checking Out a Snowy Egret
Another shot of a beautiful Snowy Egret from the St. Augustine Alligator Farm Rookery. This time it was painted twice – once using Mixer Brushes and once applying Topaz (see sidebar for website link) Impression Cezanne II preset. Photoshop’s Flat Angle Mixer was used to do a lot of the paint clean up……Digital Lady Syd
Painting The Lost Continent
This painted image was taken at Universal Studios of The Lost Continent. It looks like it is a really cool place, which is was, but it was all fake! The building is where The Eighth Voyage of Sinbad Stunt Show is presented. Just thought everyone would like to see something other than birds!
Well, not much was done in Lightroom, just added some contrast. Took image into Corel Painter. Three sources were used to draw color into the image. The new Particle Spring Worm Hole Cloner brush was used to create a very interesting flora effect along with several other brushes. In Photoshop more clean up was done with Photoshop’s Round Blunt Mixer Brush with a texture added. Two copies of Painted Texture’s October Paint texture were added and set to Vivid Light at 19% layer opacity and Color Dodge at 37% layer opacity. Last step, Nik Viveza 2 of course. That was it!…..Digital Lady Syd
Digital Lady Syd Related Blogs:
Texturizing at The Lost Continent
Where Am I?


