
Young Golfer of Long Ago

Since I am a golf fan and this weekend is the Ryder Cup, I thought I would post a golf picture I just found in my Scotland pictures. The image is of the monument at St. Andrews Cathedral of Young Tom (Tommy) Morris, who won four Open Championships (now called the British Open) in 1868-72, all before he was 22 years old. He also has the first recorded tournament “hole-in-one” and scored a course low of 77 on the Old Course at St. Andrews in 1868. Check out the link above for more interesting notes on his life. This image was processed in Photoshop using Nik Color Efex Pro 4 filters stacking: Detail Extractor at 88% opacity (otherwise it looked too grainy), Darken/Lighten Center, Brilliance/Warmth, Vignette, and Image Borders – simple black using Type 13. I love the way the Darken/Lighten Center can be used to direct the eye in an image. A Curves Adjustment Layer and some noise removal was applied – pretty much my basic workflow!…..Digital Lady Syd
Digital Lady Syd Related Blogs:
Where Am I?
The Old Course at St. Andrews
Same Image – Different Look!
I Didn’t Know That! Adobe Photoshop CS6 Help and Tutorials Download

If you are like me, I have been frustrated recently with all the software that does not come with a manual. Usually you can find the manual on line and that is OK, but I am a person that likes to have the “book” in my hands. I was lucky enough to find the newest info from Adobe and if you would like to download it like I did, here is the PDF link to the 765 page PDF file called the Adobe Photoshop Help and Tutorials. I have also included the website link for Help documents for Creative Suite CS5, CS5.1, CS5.5, and CS6 applications (PDF and HTML) for all their associated programs. I am hoping this will help when I have a problem in Photoshop. There is also a link to a 66 page reference file on Photoshop CS6 Adobe Bridge, Mini Bridge and Camera Raw specifically. So far I have not found one for Lightroom, but I am still looking. Hope you get some use from it also……Digital Lady Syd
Here is a quick explanation of how I created this image: Created New Document and then added a Color Fill Adjustment Layer and used the a sampled light blue color from the Photoshop logo. Created the Photoshop text using Comsi Script 40 that I have had for ages and added a layer style I created following a tutorial called Elegant Glass-Gorgeous Text Effect. Next I used a different font called Freshman – added my Thin Double Edge Frame Layer Style and used dark blue and light blue for colors. Caleb Kimbrough from Lost & Taken’s Summer 4 texture was applied placing it above the Color Fill Adjustment Layer and setting the layer to Overlay at 100% opacity. On a New Layer above it, using my SJ Cloud 5 brush enlarged to fit, a darkish blue color was brushed once to look nice – the layer was then set to 39% opacity. The CS6 text layer was rasterized and then Free Transformed to make larger – a layer mask was applied and the center of the letters was lightly painted out to show the water inside. A New Layer was created and some white water looking waves were placed along the bottom edge of the type to make it look like it was floating. This layer was set to 56% opacity. The ShadowHouse Creations Mask Overlay MO8-2912-5 was placed on top and set to Overlay blend mode to frame the image.
Statue Beauty

This beautiful image of a Buddha statue from Thailand was taken at the Hilton Waikoloa Village on the Big Island in Hawaii. It was a much larger picture that was cropped in close to the sculpture to make a much more interesting image. The original large image was a 3-shot HDR first processed in CS6’s Merge to HDR as a 32-bit tiff file and then it was brought back into Lightroom for Basic slider adjustments. Back in CS6, I decided to crop. Next it was processed using Topaz photoFXLab (see sidebar for website link) – one of my favorite new plug-ins. It has a Dynamic slider in the Adjustments tab that really gives great detail without being over-the-top. The Contrast and Exposure were also adjusted. Sharpening and a Curves Adjustment Layer finished up the image……Digital Lady Syd
Digital Lady Syd Related Blogs:
Digital Lady Syd’s Review of Topaz photoFXlab v1.1
Using photoFXlab v1.1
Digital Lady Syd’s Rule No. 7: Check Out Your Local History

Just because you don’t get to go on that exotic vacation this year, it can be very satisfying to visit some of the local historical places near you. I have been cutting out of the newspaper little articles of unknown treasures in the area and keeping them in a file for a day when I need something new to shoot. The image above is from the center living area of the beautiful old home known as The Casements (circa 1900), and purchased as John D. Rockefeller’s winter home in 1918. It was located across the street from the old (now non-existent Hotel Ormond). I have driven by this local landmark a hundred times and never stopped, but a few weeks ago I did. Not that large a place but really fun to explore.
A tonemapped Tiff file was created using 5 images and taking them into Nik’s new version of HDR Efex Pro 2. In Photoshop it was processed using Topaz (see sidebar for website link) photoFXlab using the Plugins tab and opening Black and White Effects. A Cyanotype Collection preset called Cerulean Tea Rose Dynamics was selected and adding the Color Filter with Hue set to 329.9 and Strength 0.84, and Overall Transparency set to 1.00. Back in photoFXlab in the Adjustment tab, the Dynamics slider was increased slightly. The Detail Brush was used at full strength and the door, lights, flowers and rugs were painted over to sharpen.
I hope to continue exploring locally this year and find some more close-by treasures. So don’t get discouraged – just pick up the local newspaper or surf on the internet for historical places in your area. Then do not forget to download your images and play in Photoshop – the best entertainment there is!…..Digital Lady Syd
Digital Lady Syd Related Blogs:
Digital Lady Syd Reviews Nik HDR Efex Pro 2
Black and White Effects on Outside Art
Digital Lady Syd’s Review of Topaz photoFXlab v1.1
InstaTone in photoFXlabs – Great Fun and Great Results!
Cold Dolphin Fountain in Florida

Sometimes I find I just need to do something sort of funny and just play around in Photoshop. That is how I got this crazy image of my cold dolphins instead of the warm Florida dolphin fountain in my front yard – actually it really was raining at the time I took this picture from the front porch. Essentially this image was just color corrected in Lightroom and brought into Photoshop where four textures were stacked using Dr. Brown’s Paper Texture panel (Ash texture 30, a bluish texture which is no long available, set to Hue at 74%; Bittbox Grunge Ice Texture set to Linear Dodge at 15%; Florabella Snow 3 texture, which may not be available anymore, set to Lighten at 15%; and ShadowHouse Creations Old Photo 6 texture set to Hard Light at 100% (see sidebar for blog link) – all are free except the Ash texture). Several Curves Layers were created to isolate and enhance parts of the image by filling the layer mask with black (CTRL+I on mask) and painting back using a low opacity brush. Not sure it is something I would put up on my wall, but it was a lot of fun to do!…..Digital Lady Syd
Digital Lady Syd Related Blogs:
Russell Brown’s Paper Texture Panel Updated!
Creating That Vintage Texture Feel
Click on Textures on right in Categories for more blogs
Butterfly Beauty!

Today I had a chance to get some wonderful shots of one of the beautiful butterflies that are flying all around my neighborhood. This is a female Palamedes Swallowtail Butterfly and she is loving the pink pentas in my front yard (the males are smaller and more black in color). I was so surprised that she stayed around while I shot several pictures. The trick to getting the shot since her wings are flapping like crazy – set your ISO to 1600 and shot at F11 and higher. I was able to get many very clear shots. Three textures were applied using Russell Brown’s Paper Texture Panel: ShadowHouse Creations Scratched Overlay set to Hard Light blend mode at 100% layer opacity and Softly Blurred Edges set to Overlayat 100% opacity (see sidebar for website link), and Gavin Hoey’s Grunge Border set to Overlay at 100%. All had layer mask applied and the butterfly was painted out completely using a black brush in the mask. A Curves Adjustment Layer was created to adjust just the blue channel curve to bring out her blue spots, then the mask was filled with black (with white Foreground color, CTRL+BACKSPACE to fill with mask with black). Just painted back in the blue dots in the Curves Layer Mask with a white brush. That is all that was done to the image – what a showgirl!……Digital Lady Syd
Digital Lady Syd’s Related Blogs:
Digital Lady Syd’s Rule No. 5: Just Step Outside and Look Around!
Clowning Around with Topaz!
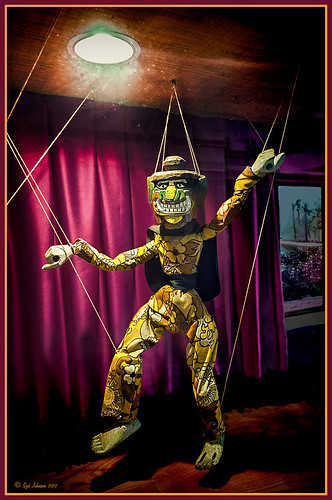 |
Here is another one of the beautiful puppets that lined the one-mile walkway between hotel accommodations and restaurants at the Hilton Waikaloa Village on the Big Island in Hawaii. To see original unprocessed raw file, hover over image. The image was first processed in Lightroom and opened up directly into the new Topaz photoFXlab (see sidebar for website link). Inside the plug-in the layer was duplicated and Adjustment tab sliders set using the wonderful Dynamics slider at 34. A stamped layer was created and the Plugin tab Black and White Effects preset (see my blog Hibiscus Flowers – I Love to Photograph Them! for settings) was applied to get a more calm darker feeling to the image. Back in photoFXlab the layer was set to the Darken blend mode. Another stamped layer was created and the Detail brush set to maximum strength was used to sharpen up the puppet only. Exit and the changes appeared on a TIFF copy back in Lightroom. Since I now had two Tiff files, they were highlighted to Edit In – > Open as Layers in Photoshop. The Topaz adjusted layer on top was set to 89% opacity. The difficulty with processing this image involved the terrible glass reflections. I decided that I needed something more so I opened up just Topaz Adjust and added a vignette effect just on the upper clown and light area – a little detail was added overall also. Back in Photoshop the image definitely need some noise reduction so Topaz DeNoise 5 was opened and the Overall Strength set to .18 – that’s all it needed! Next a Curves Adjustment Layer was added to darken some of the reflection – the clown was painted out to give more of a spotlight effect to it. A vignette was created around the image and selectively painted areas to further distract from the glass issue. A High Pass filter set to Overlay blend mode was used to sharpen the image – a black mask was added and the clown painted back to just sharpen that area. The last step was adding my Layer Style frame (see my blog Digital Lady Syd’s Free Layer Style Frames). There was also a lot of clean up on this image – more than I normally do. It amazes me how a pretty plain image can be brought to life by using several of Topaz’s wonderful plug-ins!…..Digital Lady Syd
Digital Lady Syd Related Blogs:
Using photoFXlab v1.1
InstaTone in photoFXlabs – Great Fun and Great Results!
Digital Lady Syd’s Free Layer Style Frames

To download the free layer style frame above, a thinner version of it, and a nice black and white double edged frame, go to my Deviant Art site and click on the SJ Double Edge Frame Styles Download File button in upper right corner. To load into Photoshop, the Style Panel needs to be open (Windows -> Styles) – click on the upper right corner icon on panel to open pop-out menu and select Load Styles – navigate to folder where the file was downloaded and click Load. (To add them to listed styles in pop-out, load the style manually. If using Windows 7, go to Local C Drive/Users/user name/AppData/Roaming/Adobe/Adobe Photoshop CS6/Presets/Styles and move downloaded .asl file here – this adds file to Photoshop internal settings.) When using these styles, be sure the top layer is a complete layer (see Step 1 below) or it will not apply correctly.
TIP: If you want to use the colors from your image, just double click on the effect in the Layers Panel which brings up the dialog box for that effect. Click on the color swatch in the effect and when the Color Picker opens, sample image using the eyedropper that appears when hovering in your image – click to add that color into the frame. For the Inner Shadow effect, if you are not seeing any color update when sampling, change the Blend Mode to Normal from Multiply. Note that the next time you use the Layer Style, it will return to whatever colors you set originally, so save it as a New Layer Style if you want to keep the new color settings (see Step 5 below). Sampling colors from the image can often frame it beautifully!
Below are the steps on how to create my layer styles. I am using the frame colors seen above as they seem to look nice on many of my images.
1. Need to have an image layer on top for the layer style to work correctly. To do this, highlight the top layer in the Layers Panel and press CTRL+ALT+SHIFT+E to create a layer that combines all the active layers (eyeballs showing on left edge) in the image. Need to remember this shortcut as it is very useful when doing a lot of things in Photoshop!
2. Double-click on the top layer and the Blending Options dialog box appears. Be sure Blending Options: Default is highlighted on left side.
3. Check and click on Inner Shadow effect and change just these settings: Blend Mode to Multiply, Color Swatch set to brownish color (R165/G120/B0), Opacity 100, Distance 0, Choke 83, and Size 15 pixels.
4. Check and click on Inner Glow effect and change just these settings: Blend Mode Normal, Opacity 100, Color Swatch to greenish color (R115/G121/B42), Technique Softer, Source Edge, Choke 90%, and Size 19 pixels.
5. To save these settings as a Layer Style preset for using on other images, click the New Style button and name it and leave checked Include Layer Effects. Now click on Styles at top left in dialog box or open the Style Panel (Window -> Styles), and it will appear at bottom of the listed styles.
To create the little thinner frame around your image, in Step 3 set Size to 21 and in Step 4 set Size to 29. (For example, see my blog 32-Bit HDR Using Lightroom and CS6.) To create a nice Black and White framing, set Inner Shadow to Normal Blend Mode and Color Swatch to Black – still using Size 51 pixels, and Inner Glow to a White Color Swatch and Size 62 pixels. Of course you can adjust the sizes to look good on your image if they need it. If you do not like the way the style looks after applying, just CTRL+Z to delete and try another one. Try adjusting all the sliders and seeing if you can get an even nicer look.
This image of my pretty little purple Agapanthus bloom was processed using Nik Color Efex Pro 4 – BiColor User Defined filter set to white and light pink colors, Darken/Lighten Center centered on the flower center, and Glamour Glow filters. Two textures were added using Dr. Brown’s Paper Texture Panel (see my blog Russell Brown’s Paper Texture Panel Updated!) and Flypaper’s Apple Blush taster texture using Linear Light at 39% opacity and Creme Anglaise taster texture set to Overlay at 100 opacity. The last step was clicking on my SJ Double Edge Frame layer style in Styles Panel to apply.
Try using these layer styles – I think you will like them. The framing gives a clean sharp edge to an image, especially for posting on the internet……Digital Lady Syd


