
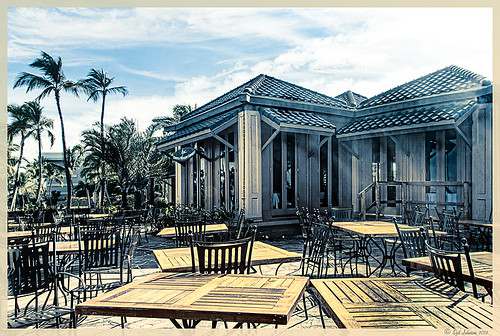
Another Soft Hawaiian Landscape

Image was taken at Lapakahi Historical State Park of one of the homes the early Hawaiians lived in roughly 600 years ago on the western side of the Big Island.
For this image, the steps used were from my my blog Using Color Efex Pro and Texture for a Warm Hawaiian Landscape Effect for the second image. Same Lightroom preset, same textures (using Russell Brown’s Texture Panel (see my blog Russell Brown’s Paper Texture Panel Updated!), and same adjustment layers. Image was sharpened and a New Layer was added on top where a paint brush set to yellow at 20% opacity was used to paint in the blown out highlights on the roof of the house. (See my blog Getting Rid of Those Blown Out Areas in Your Image on how to do this.) A different OnOne PhotoFrame was added – Taufer_Texture_12. (See sidebar for website link.)
Not very realistic but definitely has that Hawaiian feel and that is okay!…..Digital Lady Syd
Beautiful Soft Flowers

Just loved the pink hyacinths I bought – hope they will come back next year! This image was taken with my Micro Nikkor 60 mm f/2.8 lens at f/9.5. Used Mike Moats workflow (see info on this in related blogs below) with Color Efex Pro 4 (stacking Tonal Contrast, Darken/Lighten Center, and Vignette filters) added first and then Viveza 2 to make the details sharp. OnOne PhotoFrame napp_frame_12 (see website link in sidebar) was added. Final result – beautiful!…..Digital Lady Syd
Digital Lady Syd Related Blogs:
Using NIK’s Color Efex Pro 4 and Viveza Together
Nik’s Viveza 2 Plug-In – A Hidden Gem!
The Macro Shot
Cleaning Up a Messed Up Photo
 |
Here is another before and after for you. The image of the KPC Seafood Restaurant at the Hilton Waikoloa Village on the Big Island in Hawaii. At night it was wonderful to eat outside under the dark starlit sky with the ocean waves in the background. I wanted to add this image to a Hawaiian slideshow I am creating in Lightroom 4 and was really disappointed at how bad the original image appeared. I liked the tone in the wood and the sky was rally nice but otherwise, it was not too good an image. I tried several techniques, walked away from it for a day, and came back to it. I finally got the nice result shown above (hover over image to see the original). To get this result, I removed the palm tree going straight up to nowhere. Next I went into Nik’s Viveza 2 to get rid of the hazy feeling. I usually use this filter later in my workflow, but this image needed a quick tune-up before I could do anything else. Then I went into Topaz’s Black and White Effects (see sidebar for website link) and by playing with the Quad Tones, got this really nice result. (For settings, see below.) A Curves Adjustment Layer was added to enhance the contrast of the building, but the blue in the sky was painted black in the mask to keep it from being affected by the curve change – the blue of the sky competed too much with the blue tones in the restaurant. Noise was removed from the whole image (see Russell Brown ACR blog below to do this). Localized sharpening was done and Puppet Warp was used to straighten the vertical lines of the restaurant. I feel like I was able to save an otherwise very bad image by using these two plug-in filters, and I might add two of my very favorites. For information on how to do some of my workflow steps, see my blog links below. …..Digital Lady Syd
Digital Lady Syd Related Blogs:
Nik’s Viveza 2 Plug-In – A Hidden Gem!
Quad Tones in Topaz Black and White Effects Plug-in
I Didn’t Know That! Curves Adjustment Layers
Edit Layers with ACR (Adobe Camera Raw) Script
Straightening with Puppet Warp!
A preset was created in Topaz Black and White Effects using these settings as shown on the final version of image above: Conversion: Basic Exposure settings – Contrast 0.08, Brightness 0.05, Boost Blacks 0, and Boost Whites 0; Adaptive Exposure settings – Adaptive Exposure 0.56, Regions 7.06, Protect Highlights 0, Protect Shadows 0, Detail 2.17, and Detail Boost 1.04; and Color Sensitivity settings – Red (-0.15), Yellow (0.38), Green (-0.42), Cyan (0), Blue (-0.09), and Magenta (0). Finishing Touches: Silver and Paper Tone settings – Tonal Strength 0.63, Balance 0, Silver 32.00, Silver Tone Strength 0.50, Paper Tone 32.00, and Paper Tone Strength 0; Quad Tone settings: Color 1 Region (Color R0G0B0), 24.68, Color 2 Region (Color R86G102B136) 69.92, Color 3 Region (Color R229G223B164) 154.9, and Color 4 Region (Color R255G252B206) 255.0; Vignette settings – Center (2796,1607), Vignette Strength (-0.09), Vignette Size 0.53, Vignette Transition (0.63), and Vignette Curvature 0.75; and Transparency settings – Overall Transparency 0.59)
Humorous Shots Are Sometimes the Best

This image is one I found in my video I took while watching the dolphin program at the Dolphin Learning Center, one of the activities offered at the Hilton Waikoloa Village on the Big Island in Hawaii. When I processed this image, it seemed no one was paying any attention to the dolphin that is flying out of the water. Really struck me as a very funny shot! Anyway, thought I would share it.
The image was processed using two Virtual Copies of the image in Lightroom, one enhancing the water and dolphin and the other the people and pool. I selected the two Virtual Copies, right clicked and chose Edit In -> Open as Layers In Photoshop. This stacked the two Virtual Copies as layers in Photoshop. The one version layer created for the dolphin was masked out using a black layer mask. Then with a very low opacity white brush, the areas I liked from that version were painted back in on the black layer mask to give a little more contrast to the image. Really liked the result. This is a great way to pull detail out of a single image…..Digital Lady Syd
Creating a JPG From a Video in Lightroom 4

This whale came to visit the catamaran while I was whale watching (through Hawaii Ocean Sports) – I guess this is unheard of that a whale would come so close to the boat and hang out for 5 minutes like this guy did. Everybody on the boat including the boat personnel were going crazy as the whale would swim under the boat to the opposite side and then swim back under to the other side. He was so close you could almost touch him! He came up at the back of the boat and then turned around and raised his tail at the boat as he left. What a trip! Using my Sony Handycam HDR-XR500V video camera, I was able to get some nice video of the whale although it was hard to be at the right place at the right time with so many people around. What is really nice is that now Lightroom 4 has a limited video editing function. You can actually scrub through your video and select a frame that can be saved as a JPEG (click to open the square to the right of the video timeline and select Capture Frame) which can then be edited in both Lightroom and Photoshop. That is how I got this image.
The Exposure, Highlights, Shadows, and Blacks sliders all had to be reduced and the Contrast was increased to get a good image of his face. In Photoshop Topaz Adjust was opened using the Film Collection Effect Vintage Grunge IV preset. The Detail Strength was lessened a bit, the Warmth slider moved warmer a little, Grain and Vignette turned off, and Transparency slider set to o.25. Back in Photoshop a Hue Saturation Adjustment Layer was added to slightly desaturate and change the Hue in the Red tones on the whale. A Curves Adjustment Layer was added to improve contrast. Not bad for a fairly low resolution image. If you like Lightroom and have some video clips, you should take a look and see if you can use some of the frames you captured to add to your photo collection…..Digital Lady Syd
Nik HDR Efex Pro Example

The above image was taken at the Hilton Waikoloa Village on the Big Island in Hawaii. They have a lot of unusual sculptures located throughout the whole resort and this one is full sized. I used Katrin Eisman’s workflow to process this image without using Silver Efex Pro (see my blog HDR Using Photoshop Merge to HDR and Nik HDR Efex Pro and Silver Efex Pro? Wow!). This image used five images stacked in Merge to HDR in Photoshop. Then it was taken into Nik HDR Efex Pro and the Grannys Attic preset was used that gives a more cross processed vintage look. Viveza 2 was applied, then clean up and selective sharpening was done. I am starting to like this workflow a lot!
If you are interested in using HDR programs, check out RC Concepcion’s book called “The HDR Book: Unlocking the Pros’ Hottest Post-Processing Techniques” that covers them all and shows you how to get a similar look from each. I have found it to be the most helpful of all the books out there when it comes to understanding what each slider is doing – and he gives you some presets that are pretty nice too!
Digital Lady Syd Related Blogs:
Palace Tower Art at Hilton Waikoloa Village
Different Images – Same Look Using HDR!
Where Am I?
Topaz Lens Effect Tilt & Shift with a Zoom!

These are a few of the kayaks that can be rented at the Waikoloa Beach Marriott Resort and Spa on the Big Island in Hawaii. I was listening to a webinar presented by Nicole Paschal at Topaz Labs called “Isolating Subjects with Lens Effects” – this webinar should be posted soon at Topaz Labs-YouTube. She presented six or seven different ways to use selective focus on your images using this plug-in.
For this image Topaz Adjust (see sidebar for website link) was first applied just to brighten up the image a little – added the Spicify preset. Next Topaz Lens Effects was opened. Nicole really likes to use the Camera Tilt & Shift effect to selectively isolate her subjects. That is what is applied here. The Tilt Shift Adjustment were set to: Focus Area Width to 0.20, Transition to 0.59, Blur Amount to 0.08 and Angle to 0.89 so that the blur runs across the back of the kayaks. The Image Adjustments were set to Brightness 0.11, Contrast 0.15 and Saturation to 0.03. In the Distortion Adjustments section, Tangential was clicked, and a 1.89 Distortion Scale was applied – this cropped the image centering it on the Tilt Shift Adjustments Blur point in Focus Area section. Each time the blur point is moved, you get a different result. This image ended up with the Effect Position at 560, 612.
There are several other effects discussed in this webinar which are fun to try. Listen to the webinar for more good tips. The above effect may give some very interesting results on different types of images. I will definitely be checking this out…..Digital Lady Syd
Digital Lady Syd Related Blogs:
Topaz Lens Effects Plug-In
Topaz Simplify and Lens Effects Saves an Image!
Combining Plug-ins – Double the Effect!
Topaz Lens Effect’s Artistic Flair!
Using a Color Fill Adjustment Layer as a Spotlight

This image is of the Philippine Ground Orchid, a very dainty small pink flower. I am using this image as an example of how you can use a Color Fill Adjustment Layer as a subtle spotlight to direct the eye in the image but with a color vignette feel. I processed this image using Russell Brown’s Paper Texture Panel (I just love this panel and these textures – check out my blog Russell Brown’s Paper Texture Panel – A Real Winner! to download and use for free). Flypaper’s Apple Blush Texture was set to Hard Light Blend Mode at 71% Opacity and gave the image a very greenish look but with that great canvas texture. The Muscatel Texture was added next and set to Overlay Blend Mode at 29% Opacity to slightly darken the image and add some orange tones. Since I felt like the green was still a little overwhelming, a Color Fill Adjustment Layer was added – a royal blue color was selected and set to 54% Opacity. In the Color Fill Adjustment Layer’s white Layer Mask, a very soft large brush was set to 15% opacity and with black set as the color, the blue color was gently painted out to give the subtle spotlight effect from the light green tones underneath that will direct the eye. This is a great little trick if you need to draw the eye into a certain part of an image and works very well with flower images. I also like adding my own colors into an image. Have fun experimenting…..Digital Lady Syd
Digital Lady Syd’s Related Blogs:
That Soft, Dreamy Look
Russell Brown Texture Panel Landscape Image
Adding a Texture for Flair!
Keeping Focus Where You Want It Using Focal Point 2 and Color Fill Adjustment Layer
Topaz Simplify and Lens Effects Saves an Image!
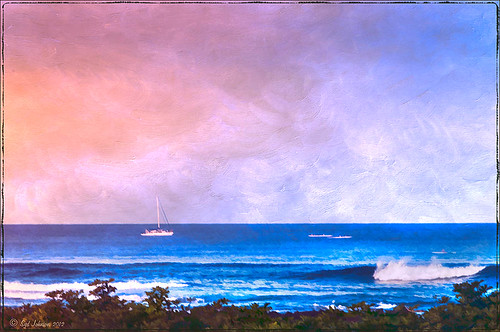 |
The catamaran is one of the whale watching boats you can take while on the Big Island in Hawaii (see Hawaii Ocean Sports for more information on this). This image was taken the day before my adventure and it was not a good at all (hover over image to see original RAW image) – but I really wanted a shot of the boat on the water. Therefore some improvisation had to be employed. After cropping and doing some RAW adjustments in Lightroom, Topaz (see sidebar for website link) came to the rescue. Topaz Simplify 3 was applied first to get rid of the focus issue – the BuzzSim preset was used as a starting point with these changes: Simplify Size slider was changed to 0.15, Brightness slider changed to 0.08, Saturation slider to 1.27, Edges: Color Edge Fine, and Edge Strength slider 1.50. Next Topaz Lens Effects was applied using the Filter Dual Tone Effect to create the warm feel in the sky with a preset I previously created called Sunrise Effect. (See below if you would like the settings for the preset.) Next Flypaper’s Paper Texture Creme Anglaise (one gorgeous texture!) was used via Russell Brown’s Paper Texture Panel for Photoshop CS5 and CS6 (see my blog Russell Brown’s Paper Texture Panel – A Real Winner!) and set to Divide Blend Mode at 100% opacity. A Curves Adjustment Layer was added to fix the contrast. Finally OnOne’s Photoframe grunge 09 was added (see sidebar for link). An image I would normally have trashed has now been turned into a beautiful picture that I really love. Give this technique a try if you own the Topaz plug-ins. The combination works great together, especially if you want to save an image!…..Digital Lady Syd
My Topaz Lens Effects Sunrise Preset contains these settings: Transition Adjustments – Region Size 0.45, Transition 0.35, and Angle 149.7; Region A Adjustments – Cyan Cast 0, Red Cast 0.20, Magenta Cast 0.01, Green Cast 0.03, Yellow Cast 0.70, and Blue Cast 0.24; Region B Adjustments – Cyan Cast 0.15, Red Cast 0.10, Magenta Cast 0.15, Green Cast 0.05, Yellow Cast 0, and Blue Cast 0.05; and Image Adjustments – Brightness 0.05, Contrast 0.08, and Saturation 0.07.
Digital Lady Syd Related Blogs:
Topaz Simplify and Topaz Detail Together
Simplifier and Simplify Filters
Russell Brown Texture Panel Landscape Image
Detail Pop Using Nik Color Efex Pro and Viveza

This little bee really wanted his picture taken so here it is. I am still not sure what flower this is – it was at the Hawaii Tropical Botanical Garden on the Big Island in Hawaii. To get the color so bright and the detail so sharp in this image, a Nik Color Efex Pro recipe was used following a link at the Nik website called My Go-To Recipe for Bringing Out Details with Ellen Anon. Next Nik Viveza 2 was added to soften the large leaves in the background (set Control Points in corners and move the Structure slider to -100 to get a soft smooth appearance). Very simple and easy to do. I still love using these two plug-ins together!…..Digital Lady Syd
Digital Lady Syd Related Blogs:
NIK Color Efex Pro 4 – Digital Lady Syd’s Review!
Using NIK’s Color Efex Pro 4 and Viveza Together
Combining Plug-ins for More Image Interest
The Macro Shot
Daisies are Everywhere!
Getting Rid of Those Blown Out Areas in Your Image
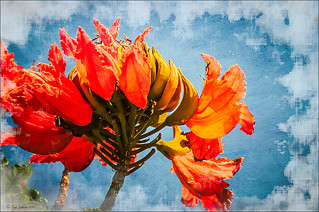 |
I thought I would give you a quick tip on how to get rid of those awful eye-drawing highlights on outdoor shots where you cannot control the light. Above are some beautiful African Tulip Tree flowers that I shot during the brightest time of day in Hawaii. It was so windy I felt lucky to get a fairly sharp shot much less control the light. Therefore, when the photo was opened up in Lightroom (or ACR), it became quickly apparent that there were several bright highlight areas that needed to be tamed. Hover over image to see original as brought into Photoshop. All my RAW adjustments were made before taking the image into Photoshop. (I used My Vivid Drawing Look preset which still works with Lightroom4 or ACR/Photoshop CS6 (note: change file extension to .xmp in zip folder to get file to work) – just be sure to adjust your new Highlights and Shadows sliders and the old Exposure slider-all other settings are the same.)
TIP: A New Layer was created right above the Background layer. Using a very soft round brush set to no more than 20% opacity, sample (ALT-Clicking the color right next to the blown out areas) and then gently paint over the white parts. Build up the color – if you overdo it, the layer opacity can be lowered or just add a Layer Mask to your painting layer and paint in white to remove or adjust the paint strokes.
Next Russell Brown’s Paper Texture Panel was opened and Flypaper Texture Dawn Grunge was added as a layer in Overlay Blend Mode at 100% opacity to give a very painterly feel to the image background. (See my Fun Photoshop Blog Russell Brown’s Paper Texture Panel – A Real Winner! for information on how to add this free panel to your program.) The turquoise and orange always makes a great combination for flower shots. Next a Curves Adjustment Layer was added to make the blue color pop in the background – by painting in the layer mask, the yellow fruit and green stalk color was brought back as it had become too dark. Finally OnOne PhotoFrame “napp frame 14” was added.
This is a great technique when you have a few distracting highlights and I find I use it a lot, but it won’t fix an overexposed image. Hope this helps you out a little…..Digital Lady Syd
I Didn’t Know That! Eyedropper Tool and Magic Wand Tied Together by Sample Size!

Adobe has come out with a Beta Version of Photoshop CS6 (Adobe download link) that is free to use for a couple months. While watching some of the videos on the new features, I came across an interesting comment by Deke McClelland, another Photoshop guru who does a lot of tutorials at Lynda.com and also does great Photoshop books. He has posted a series of short videos called Free Photoshop CS6 beta training at Lynda.com and in one called “Exploring the Wide World of Layer Enhancements,” he mentions that you can throw off how the Magic Wand Tool uses its Tolerance setting if the Eyedropper Tool is set to a very large Sample Size in its Options Bar – the two Tools are tied together! In previous versions of Photoshop, only in the Eyedropper Tool Options Bar could the Sample Size be set. If you had the Eyedropper Tool Sample Size field set incorrectly, the Magic Wand Tool would not function properly. I have always set mine to 3 pixels for more accurate color correction per Scott Kelby recommendations (head of NAPP and his Photoshop books are must-haves) – he says the larger sampling sizes are for “super-high-resolution” images. Now in the Magic Wand Tool’s Options Bar (see image above), it shows what the Sample Size setting is and now it can be changed without going back into the Eyedropper Tool options. Just remember if you change one tool, the other one automatically changes.
I do not know how important this is but it was a surprise these two tools had anything to do with each other! With higher resolution images now being shot with the new cameras, this might be a bigger issue. Thought I would pass this Tidbit along…..Digital Lady Syd
Hyacinths and OnOne PhotoFrames

I recently did a blog called My Favorite Photo Frame Plug-In – OnOne PhotoFrames (hum!) on the really nice OnOne PhotoFrames (see sidebar for website link) that I use on many of my images. Here is another nice example of their beautiful frames. (This frame is the Taufer Frame 08 using a light beige color – Russell Brown’s Paper Texture Panel was used on this image – see my Fun Photoshop Blog Russell Brown’s Paper Texture Panel – A Real Winner!)
Give these frames a try – they are easy to use and can really enhance your final image. You can download a 30-day free trial at their website or while in website go to the Products header -> Free Products and select Edge and Framing Effects where you can download 30 frames to use for free! Give it a try! ….Digital Lady Syd


