
Magnificent Macros with Nik Plug-Ins

The Jazze Rose Frost Alstroemeria flower is one of the prettiest perennials that you will find. This one resides in my front yard now. The same workflow with Nik products that really make your landscapes pop was applied to this macro. Silver Efex Pro 2 (same High Structure-Harsh preset with Color Filter set to Green), Color Efex Pro 4 (Darken/Lighter Center and Graduated Neutral Density filters stacked), and Viveza 2 to bring out details in the stamen structure were applied. That was it! Check out my Fun Photoshop blog “Use NIK Color Efex Pro 4 and Silver Efex Pro 2 Together to Create Fabulous Landscapes!” for more information.
Give this a try next time you want a different look for your macros!…..Digital Lady Syd
Aerial Shot Using a Point-And-Shoot Camera! Not Bad!

Thought I would show you what results you can get even when shooting with an inexpensive point-and-shoot camera. I got several wonderful images from the air, but this one of the Rockies was my favorite. (For a nice read on aerial photography, see Julieanne Kost’s book “Window Seat – The Art of Digital Photography & Creative Thinking.”) My little Canon PowerShot A1000 died last month so I had to quickly purchase another small camera. I wanted one that runs on batteries so I do not have to charge it all the time (since I do not use it that much) and I wanted something fairly cheap. I got a Kodak EasyShare 14 mp camera with a 5X zoom for $49 and it gets better pictures than my Canon did! This an example of what it can do. There was more noise in the JPEG image, but that is to be expected with a cheaper lens, and it definitely needed processing in Lightroom and Photoshop. In Photoshop, Adobe Camera Raw sliders were applied including the Noise Reduction sliders; then Nik’s plug-ins Color Efex Pro 4 (stacked filters Vignette: Lens, Detail Extractor, and Skylight Filters) and Viveza 2 (to even out the saturation in the corners) were used. This has been a great surprise to me. Definitely not as good as my Nikon DSLR, but not bad for a inexpensive point-and-shoot camera.
I guess this goes to show that even if you do not have the best camera, it sure beats missing the shot altogether, and you can get a really nice image!…..Digital Lady Syd
Scanning a Bloom for a Different Look

This is a blossom from my new Ballerina Blue Fuchsia plant. I got an idea from reading The Photoshop Darkroom by Harold Davis and Phyllis Davis to scan my flower into the computer using a black box. I actually used a black sunglasses case to cover the plant while I scanned it with my Epson Perfection 3200. I used VueScan Scanner Software (my scanner is so old that Epson would not support it in Windows 7, but this relatively inexpensive software will) set to 3200 dpi, print quality, output tiff as a camera raw file, opens in Adobe Camera Raw in Photoshop CS5. The black background needed a little cloning clean up first, then the flower had a few bad spots on the leaves to clean up, Nik Viveza 2 was used to even out the purple color evenly, and finally the Sharpen Tool was used on a few of the flower veins. That was it. I was surprised how easy and different the flower looks scanned in. If you have a scanner, give it a try for a change…..Digital Lady Syd
The Macro Shot

Recently I have been working on my Macro photography, especially since I have had some beautiful flowers on my porch due to the warm winter we are having in Florida this year. One of my favorite blogs is by Mike Moats called Tiny Landscapes where he gives some great advice on taking and processing macro images. A few things I am starting to try and the above chrysanthemums are the result of one of my efforts. A 60 mm Nikkor macro lens was used at F/19 at 1/20 to 1/350 sec. A Bower 0.5 x High Resolution Digital Lens with Macro was added to the lens. I created an HDR image from five shots which is how I got the large dynamic range in the photo. After that the processing was in Nik Color Efex Pro 4 using Tonal Contrast, Detail Extractor and High Key filter effects and Viveza 2. This is the basic workflow Mike Moats uses and it works very well on macro photos. My original shot was taken with a white background but I just did not like the way it looked. Mike says if you do not like the background feel, crop tight, which is what I did. I hope to try out some of his other tips in the near future – it is a lot of fun to take those close up shots…..Digital Lady Syd
Combining Plug-ins for More Image Interest

Took this image of a red bloom from the hibiscus tree in my front yard – I love hibiscus flowers! A 60 mm Nikkor macro lens was used at F/6.7 for 1/60 sec. A Bower 0.5 x High Resolution Digital Lens with Macro was added to the lens. The camera raw shot was adjusted in Lightroom and brought into Photoshop. Some of the distracting background was cloned out, the image sharpened a bit, then Nik’s Color Efex Pro 4’s Darken/Lighten Center filter effect was applied. The image was taken into Nik’s Viveza 2 where the structure on the pistil and stamen was increased, and the background softened a little by setting the structure to -100. ShadowHouse Creations texture 5AT-2 was added and set to Soft Light at 62%. Next the new Topaz Star Effects plug-in was applied to the tips of the stigma to make it sparkle and a bit to the yellow anthers (see sidebar for Topaz’s website link). Finally OnOne PhotoFrame’s Taufer Texture 12 was applied to finish off the image (see sidebar for OnOne’s website link).
This is a good example of how several different effects can create more interest – it also helps to have a great color combination to work with too!…..Digital Lady Syd
Digital Lady Syd Related Blogs:
Trying Out Topaz Star Effects
Using NIK’s Color Efex 4 and Viveza Together
Problems for Big Ben
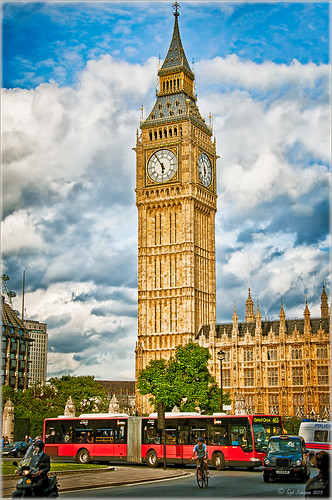 |
It is funny that I had just completed this image of Big Ben a few days ago and then it comes out that is has some tilting issues, 0.26 degrees NW or 18 inches off center at the top of the 314-foot tower. It will be thousands of years before Britain’s iconic landmark that houses the clock gets as bad as the Leaning Tower of Pisa in Italy. The rumor is Members of Parliament are meeting to discuss what to do including these two options: 1) Do costly repairs to both the Parliament Building and Big Ben, or 2) sell the entire complex to a rich foreign developer. Hum! For more information on this, check out The National Post article.
I tried to find an old famous painting of Big Ben but could not find one – can’t believe no one painted this gorgeous landmark in the 1800’s so my search is still on. In the meantime, I did find a site selling some very interesting Big Ben posters at Art.Com that I found very inspirational – give it a look to see some of the creative work others are doing (and for profit!).
How I processed this image? Believe it or not, this is just another pseudo HDR processed just like I do all my pseudo HDR’s. Used my SJ-Vivid Drawing Look preset in Lightroom 3 (download here if using Adobe Camera Raw) (note: change file extension to .xmp in zip folder to get file to work) and adjusted the Exposure, Blacks, Red Saturation (-45), Blue Saturation (+61), and Green Luminance (+3) sliders to make the image colors pop correctly. In fact the red bus was overpowering the image so the red saturation had to be reduced quite a bit. (Hover over image to see how it looked coming out of Lightroom.) I must say there was an amazing sky that day! Some clean up in Photoshop was done and the image was taken into Nik Color Efex Pro 4. All I did was add the SJ Pseudo HDR1 recipe (NOTE: This download link is broken if you click the Download button, but by right clicking on the button and choosing “Save Link As,” the file will download correctly.”) – I had to tone down the Detail Extractor and Contrast a little and change the Effect Radius to Large to get rid of the over-exaggerated HDR look. In Nik’s Viveza 2 I added a point on the clockface to make it really sharp but this could easily have been done with the Sharpen Tool in Photoshop. The last step was to add a Curves Adjustment Layer to brighten the whole image just a little. I was surprised how much detail came in from only applying the Lightroom preset without the Photoshop plug-ins. You could actually see the people riding inside the bus! It’s great when it all comes together with the light and composition to create a great shot!…..Digital Lady Syd
Digital Lady Syd Related Blogs:
Pseudo HDR Using NIK Color Efex Pro 4
Another Pseudo HDR Image with NIK CEP4 – Got to Love the Effect!
Where Am I?
Where Am I?

This image was taken in London a few years back of The Royal Horseguards Hotel, a 5 star hotel that overlooks the River Thames near the London Eye. It is a beautiful old building that stands out from the treetops. Check out this virtual tour of the outside to see the size of the immense building!
The image was processed using OnOne’s Perfect Effects plug-in (see sidebar for website link) where a light blue-dark blue cross-processed layer was created. Next Nik’s Viveza was added to add more detail to the buildings since I cropped in pretty close from a much larger image. In Photoshop a Selective Color Adjustment Layer was next using only the Whites and adjusting the Yellow to +21 and the Black to -5 – this adds the sunny feel to the image. The Sharpen Tool was applied to the building tops and Curves Adjustment Layer to add contrast. Finally, one Florabella’s Snow Texture 3 (the link is to her Facebook page with the free download on the left side) was applied on top – the layer was set to Screen at 73% opacity. I am having so much fun playing with all the different looks you can get with the different plug-ins applied together. Try combining some of your plug-ins and see what great results you can get!…..Digital Lady Syd
Digital Lady Syd Related Blogs:
Digital Lady Syd’s Review of OnOne Perfect Effects
Another OnOne Perfect Effects Pix – Got To Love It!
Pseudo HDR in OnOne Perfect Effects
Using Nik’s Color Efex Pro 4 and Viveza Together
Digital Landscape Effects with Nik Software
Daisies are Everywhere!

I wrote a Fun Photoshop Blog called “Using NIK’s Color Efex Pro 4 and Viveza Together” showing a great workflow using these plug-ins on the same Smart Object layer. Here are my daisies again shot at a different angle. (They were shot using my 18-200 mm zoom lens at 75 mm, F5.0, 1/60 sec, and ISO 400.) Different CEP4 filters were stacked to give a totally different result. (See settings below.) I really liked the way the color of the flower was altered to give this softer feel. Lightroom and ACR will give a fairly close look as to what Viveza achieves, but not exactly the same as discussed in the other blog. Give this workflow a try – download the trials and see what you get if you do not already own the plug-ins. This can be very addictive! Have fun…..Digital Lady Syd
Plug-in Settings for this image: CEP4 filters: Cross Processing (Method T04, Strength 86%, three controls in the background to remove the effect), Tonal Contrast (Highlights -80%, Midtones -80%, Shadows -80%, Saturation 20%, Contrast Type Fine, one control point on pink background flower, and Opacity Slider set to 62%), Darken/Lighten Center (#1, Center Luminosity -36%, Border Luminosity -2%, and Center Size 57%), and Vignette (Vignette Color set to light yellow, Shape 2, Adapt Edges 0%, Transition 84%, Size 46%, Opacity 38%, and one control point set on pink background flower to remove effect). Viveza used seven control points to adjust background and bring out the center of the flower.


