
Beautiful Maize
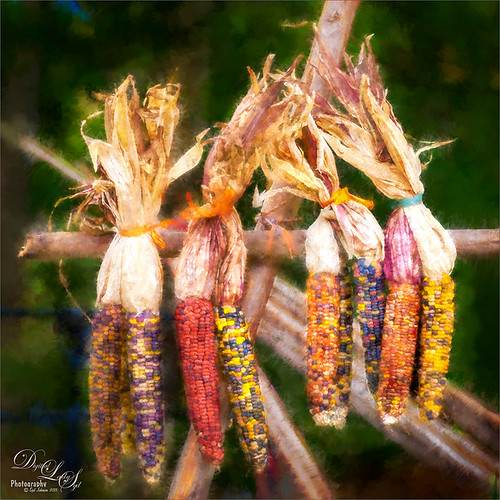
Loved this hanging batch of colorful corn or maize taken at the recent Native American Festival in Ormond Beach, Florida. In Lightroom Seim’s (see sidebar for website link) Workflow DreamScape preset was applied. Next Topaz (see sidebar for website link) Detail 3 was applied using just my basic Little Medium Large Detail preset (Medium Details 0.38, Large Details 0.16, and Contrast 0.30) where a black layer mask was added and just the corn was painted back. The background needed to remain soft. On several layers above a lot of clean up was done as the background was full of distractions. On a stamped layer (CTRL+ALT+SHIFT+E), my Topaz Impression Abstraction preset was applied (Stroke Type 12, Brush Size 1.00, Paint Opacity 0.38, Stroke Rotation 0, Stroke Color Variation 0, Stroke Width 0.85, Stroke Length -0.50, Spill 0.72, Smudge 0, and Coverage 1.00; Color Overall Hue 0.14, Sat 0.23, and Lightness 0.06; Red Lightness 0.14, Yellow Sat -0.11, and Green Lightness -0.36; Lighting Brightness 0.13, Contrast -0.23, and Vignette 0, Light direction X 0.34 and Y 0.05; and Texture Strength 0.19, Size -0.43, and Canvas I, Background type white solid and Background White). This layer was duplicated and taken back into Impression where the Ethereal Background by Blake Rudis preset was applied. A white layer mask was added and just the corn was painted out where I did not want the blurred effect to occur. This layer was set to Linear Burn at 53% layer opacity. On a new Stamped Layer, Nik Viveza 2 was applied to further enhance the focal point. It is so much fun to use the different filters to get different effects…..Digital Lady Syd
Digital Lady Syd Related Blogs:
How to Get the Most Out of Your “Not-So-Great” Images – contains link for Topaz Impression’s Ethereal Background by Blake Rudis
What the Worm Saw
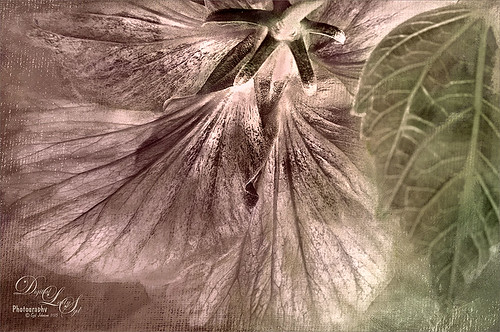
This was a macro image I took for a Photo Club Theme called What the Worm Saw. I did not submit it (got a little over creative actually and tried something not so great). This is the underside of a Red Hibiscus bloom and I just liked the result. Used Topaz (see sidebar for website link) Clarity to sharpen it overall. Used Nik Silver Efex Pro 2 to turn it to black and white. Next a Color Balance Adjustment Layer was used to add a little green in the Midtones. Painted Textures Trees in May texture was added next with a layer mask and the bloom and leaf were painted back in the mask. A Nik Viveza 2 filter was added to emphasize the focal point of the image. To get the pinkish tone on the flower, a light pink gradient layer was placed on top. The last step was a Curves Adjustment Layer to get back a little contrast. Something a little different for me…..Digital Lady Syd
Hiding Out with a Red-Winged Blackbird

This beautiful bird was hiding in the brush at the Ritch Grissom Memorial Wetlands in Brevard County, Florida. I had not seen one in a long time. Not that much post-processing on this one. In Lightroom applied Seim’s (see sidebar for website link) Classic Holga preset. Opened in Photoshop and Topaz (see sidebar for website link) Detail 3 was used to give the photo a little more depth of field feel and the bird was painted out in a layer mask. The Sharpen Tool was used on the bird. Added Topaz Glow set to Soft Light. Nik Viveza 2 was used on the bird and Photoshop’s Camera Raw Radial filter was used to get the pretty vignette. Pretty standard workflow here……Digital Lady Syd
Wetlands Getting Ready for Spring

Just another quick snap I took while at the Ritch Grissom Memorial Wetlands in Viera, Brevard County, Florida recently. It really did feel like Spring is on its way which I am really glad to see. I took this image because I thought the water looked interesting where it intersects the reeds. It turned out to be a lot of fun since I got to paint a sky in using Fay Sirkis’s Photoshop brushes to make it. (These brushes can be downloaded from KelbyOne if you are a member – just go to her Four Seasons webinars.) Used a couple Cloud Highlighter brushes and a Cloud blender. Created several layers and put them in a group which was set to Multiply blend mode at 35% group layer opacity. Also used Topaz (see sidebar for website link) Glow and my SJ Inter Web Variation preset (see Image 4 Information for settings at my How to Get the Soft Glow In Topaz Glow blog). This layer was set to Overlay Blend Mode at 61% layer opacity. Since it almost wiped out my sky, I copied my painted sky group on top to add it back in again with the same layer settings. Nik Viveza 2 was used to even out the image and add a focal point in the center of the image. Obsidian Dawn’s Flying Birds Grouping 1 was added just because the image needed them – the layer was set to Multiply at 77% opacity. On a New Layer above lightly painted in white to get a water bird look to the birds. Next 2 Lil’ Owls Studio (see sidebar for website link) Color Bokeh Grunge Set 1 was added and set to Color Dodge blend mode at 72% layer opacity. The last step was a Curves Adjustment Layer to bring back the contrast. Totally fun to do!…..Digital Lady Syd
Painted Apples
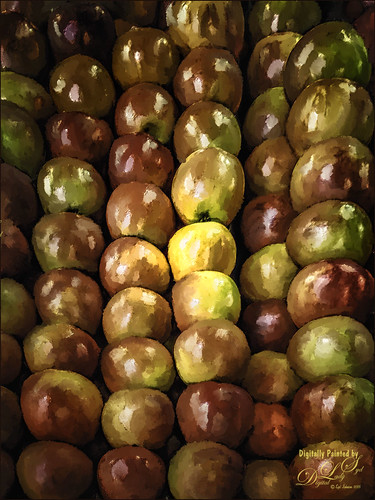
Not sure what inspired me to paint these apples from image taken at the local grocery store, but I did. The image was first opened in Lightroom where the basic image was adjusted, then in Photoshop. After some clean up, a stamped layer was created on top (CTRL+ALT+SHIFT+E) where Topaz (see sidebar for website link) Clarity was applied using the Landscape III preset. Next on a duplicate layer, Nik Color Efex Pro 4 was used (used Cross Processing Method L05 at Strength 27%; Darken/Lighten Center set to Shape 1, Center Luminosity 73%, Border Luminosity -46%, and Center Size 24%; Low Key Glow 0%, Standard Low Key 6%, Dynamics Low Key 0%, Sat 56%, Whites 3%, and Contrast 72%; and Detail Extractor 22%, Contrast 14%, Sat 25%, Shadow under ow, and Highlights under hl). On a New Layer above, used a Blender Mixer brush using property bar settings of Wet 100%, Load 1%, Mix 100%, and Flow 100% and set to Sample All Layers – turn off Load Brush After Each Stroke so it will just be a blender and mix the colors underneath. I am not sure which brush I used, but any brush you like should be a nice blender with the above settings. On a new Stamped Layer, Nik Viveza 2 was used to add focus to the center area. Last step was a Curves Adjustment Layer. I also painted this in Corel Painter and got a much more abstract look. Will probably show that version in a later post. Anyway, love the Photoshop Mixer Brush effect on these apples!…..Digital Lady Syd
A Particle Brush Flower
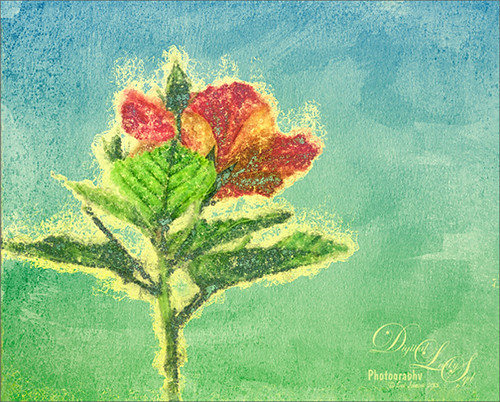
This beautiful Chinese Hibiscus bloom was painted in Corel Painter using one of their new particle brushes and following the short video called Painter 2015 Particle Brush Painting Featuring Karen Bonaker. The image started with auto-painting using the Oils category Particle Spring Oil Mop brush variant. So much fun. Then brought it back into Photoshop to apply the textures, although it could have been done the same way the video showed in Painter. The flower was selected by going to Select -> Color Range and choosing white. Then added a layer mask to the painted canvas layer so the flower is white and the background is black in the mask. Since I wanted the edging to be yellow around the flower, the Layer Style was opened and the B Channel was unchecked. Also the Blend If This Layer black tab was split (ALT+drag to split tab) and set to 133/158. Two textures from French Kiss (see sidebar for website link) were placed underneath: Colorwash Juin set to Normal at 100% Layer Opacity and Solstice Well Spring set to Multiply at 100% layer opacity. The Layer Style was opened up for the last texture and the Blend If This Layer white tab was split and set to 221/255 and Underlying White tab split to 195/226. The original Flower layer was placed on top with a black layer mask applied. Just the leaf veins in the front leaf and a few other details were lightly painted back in with white in the mask. A Curves Adjustment Layer was added to bring back some contrast. Last step was using Nik Viveza 2 to really add some focus to the center leaf. I really love how the particle brush created this rather interesting effect around the flower……Digital Lady Syd
Digital Lady Syd Related Blogs:
Corel Painter’s Auto-Painting Results – Not Bad!
HDR Tree
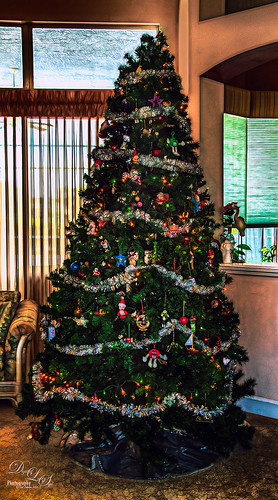
One last Christmas post this year. Someone said to take some HDR bracketed shots of your Christmas Tree and it will look really good – so that is what I tried here. As usual I get carried away with my favorite filters and started adding in some things, but I did process the three bracketed images in Nik HDR Efex Pro 2 using its Dark preset. Then in Lightroom Seims PW4 (see sidebar for website link) Super HDR and his Tint Warming 81A presets were applied before opening in Photoshop. Duplicated the Background layer and opened it up Topaz (see sidebar for website link) Glow – applied my SJ GrapIII Beach preset (settings listed at bottom) – this plug-in really added to the overall tone and color of the image, then set the blend mode to Color Dodge in Photoshop and the Fill to 74%. (Note: With Color Dodge blend mode, adjusting the Fill slider keeps the effect more pronounced than adjusting Opacity slider, which creates a more dull look). Did some clean up and applied Viveza 2 to add a slight vignette feel to the corners (could have used the Radial Filter in ACR). Next Topaz ReStyle was opened and the Dark Ecru preset was applied (these changes were done: ReStyle Opacity 73% and Texture Strength 0.44; Basic Color -0.31; Tone Black Level 0.11, Midtones -0.25, and White Level 0.08; Detail Structure -0.37 and Sharpness 0.56.). A Curves Adjustment Layer was used to add back a little contrast as the last step. It was a lot of fun to do an HDR – have not done this in a while…..Digital Lady Syd
(My SJ GrapIII Beach Topaz Glow settings: Primary Glow: Glow Type Dark, Glow Strength 0.17, Effect Sharpness 0.09, Electrify 0.23, Simplify Details 0.25, Edge Color 0.20, Detail Strength 18, Detail Size 0.24, Brightness 0.23, Contrast 0.17, Sat 0.01, Line Rotation 0.09, and Glow Spread 0.20; Secondary Glow: Glow Type Light, Glow Strength 0, Effect Sharpness 0.47, Electrify 0.17, Simplify Details 0, Brightness 0.36, and Contrast 0.62; Color Red Sat 1.00; Orange Sat 0.27; Yellow Sat 0.20 and Lightness 0.09; Aqua Sat 0.78 and Lightness -0.26; and Blue Sat 0.49; Finishing Touches: Effect Coverage 0, Smudge 0.00, Sharpness 0.25, Sharp Radius 0 and Vignette Size 0. For this image these changes were made to this preset: Changed Secondary Glow to Dark. Changed Red Sat to 0, Orange Sat to 0.79, Aqua Sat 0; and Green Hue 0.32, Sat 0.45, and Lightness -0.27.)
More Holiday Cheer!
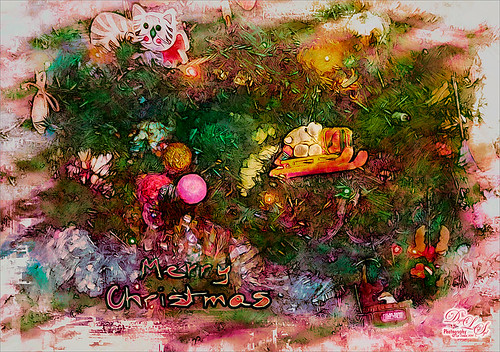
Just another Merry Christmas Card – hope all are enjoying the season. I was just adding different filters to layers to see what happens and this is what I got! Hum….. Anyway, this is what I did. Topaz (see sidebar for website link) Clarity was used to sharpen up the original tree ornament image. On a duplicate layer above, Topaz Glow’s Fur & Feather I preset was applied. Next Topaz Impression’s Abstract I preset was applied and I adjusted a couple sliders. In Photoshop the layer was set to Soft Light. Then the layer was duplicated and set to Normal blend mode at 77% layer opacity. A layer mask was added and some of the ornaments was painted back. I painted the text in Painter and placed it in as a layer with an Inner Glow layer style. On a stamped layer (CTRL+ALT+SHIFT+E) was created and taken into Smart Photo Editor. (Photo-art at a click 050; Changed Master fade to left just a little; Hue -0.298; and 2nd Hue 0.369. When brought into PS, it turned the color scheme very different but workable. Used Selective Color Adjustment Layers to get the color tweaked to where I wanted it.) The last step involved adding Nik’s Viveza 2 and adding focus on the ornaments. Just a lot of fun……Digital Lady Syd
On the Beach
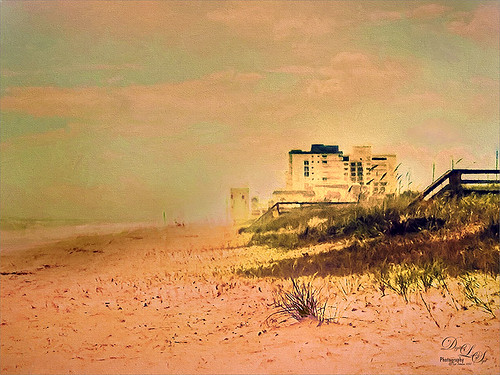
This is a nice little beach near my home called Ormond by-the-Sea. Thought I would try applying some of my new filters to this image. On a duplicate background layer in Photoshop, the Topaz (see sidebar for website link) Glow preset called Graphic III preset was applied. (Here are the adjusted settings I used: Secondary Glow: Glow Type Light, Glow Strength 0.23, Effect Sharpness 0.47, Electrify 0.17, Simplify Details 0, Brightness 0.36, Contrast 0.62, and the other two 0; Color: Red Sat 1.00, Orange Sat 0.27, Yellow Sat 0.20 and Lightness 0.09, Aqua Sat 0.78 and Lightness -0.26, and Blue Sat 0.49. Set to Multiply at 100% strength). This brought out the structure of the building very nicely. The background layer was duplicated again and placed on top. This time I used a preset I had created based on their Wonderland preset. (Here are the settings if you want to try them: Primary Glow: Glow Type Dark, Glow Strength 0.36, Effect Sharpness 0.29, Electrify 0.23, Simplify Details 0.21, Edge Color 0.13, Detail Strength 0, Brightness 0.37, Contrast 0.45, Sat 0.20, Line Rotation and Glow Spread 0; Secondary Glow: Glow Type Light, Glow Strength 0, Effect Sharpness 0.25, Electrify 0.11, Simplify Details 0, Brightness 0.77, and Contrast 0.60; Color Overall Hue -0.96, Sat 0.28, and Lightness 0; Red Sat 0.35; Orange Hue -0.46, Sat -0.34, and Lightness 0.79; Yellow Hue -0.34, Sat 0.41, Lightness 0.58; Green Hue -1.00; and Blue Sat 1.00; Finishing Touches: Effect Coverage 0, Smudge 0.05, Sharpness 0.30, Sharp Radius 0 and Vignette Size 0.) A layer mask was added and the sky and a little of the building was painted away so the first Glow preset settings appear above and the new ones below. Did a little clean up at this point using the Spot Healing Brush. A stamped layer was created on top (CTRL+ALT+SHIFT+E) and Topaz Impressions’s Dega Dancer I preset was applied as is. This really warmed up the image. Last, Nik Viveza 2 was used to add a little more focus on the large building in the distance. I believe this image is a pretty good representation of how it felt to be on the beach on a sunny early Fall day……Digital Lady Syd
Painting in a Vector Pattern
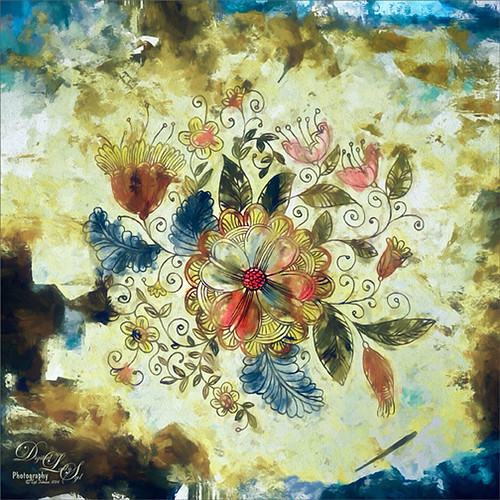
This is an image I was just having fun doing. Started with a layer that I placed a vector floral image on – Graphichive Floral vector flowers Swirls and Flowers 2 (there are some beautiful vectors on this site so check it out!). It was on a sheet with several other clip arts – had to open up the jpg, use the Rectangular Marquee Tool to select it and place on its own layer. Then select the background by going to Select -> Color Range – check Invert so that just the lines are selected and you now have transparent clip art that you can paint each flower and leaf the way you want. In this case I created a square file and copied the clip art layer over to this file. Used Free Transform (CTRL+T) and hold SHIFT key to adjust the size proportionately.
So to paint this, I used 6 different Pattern Fill Adjustment Layers – selected ones I liked, filled the Adjustment Layer masks with black (CTRL+I) inside the mask, and painted in white where I wanted that patterns to show up. If I did not like the color the pattern was, I just clipped a Solid Color Adjustment Layer set to Color Blend Mode to the Pattern Fill Adjustment Layer to change it. (ALT+Click between the layers to clip) I put all of the layers into a group by highlighting them and clicking on Create a New Group icon at the bottom of the Layers Panel. For a review of how to do this, see my Fun Photoshop Blog called How to Colorize an Old Photo. Next I placed a texture between the white background layer and the group – in this case it was Painted Textures Pilgrims’ Journey set to Pin Light blend mode. On top a Curves Adjustment Layer as added for contrast. Then because I could, Topaz (see sidebar for website link) Impression was applied using my SJ WC look on bldgs. (Settings used: started with Watercolor II preset and these were the final settings: Stroke Type 04, Brush Size 0.91, Paint Volume 0.42, Paint Opacity 0.87, Stroke Width 0.33, Stroke Length 0.89, Spill 0.23, Smudge 26, Coverage 1.00, Color Overall Hue 0.15, Saturation -0.20 and Lightness 0.06; Red Sat 0.47 and 0.14; Orange Sat 0.60 and Lightness -0.42; Yellow Sat -0.33 and Lightness 0.13; Green Sat 0.20 and Lightness -0.32; and Blue Sat 0.36; Lighting Brightness -0.04, Contrast 0.39, Vignette 0, and Light Direction X0.33 and Y0.06; and Texture Strength 0.78, Size 0.30, Canvas IV, Background Type solid white, and Background color used #d38967 – all other settings not listed at 0.) Next Topaz ReStyle using another one of my presets called SJ BW with greens – not sure how I got this one so I cannot give you the settings, but obviously I used some B&W setting in ReStyle. Last step involved Nik Viveza 2 to draw the eye to focal point, the main flower, in the image. It sounds like a lot of work, but it really was just experimenting and playing in Photoshop……Digital Lady Syd
Happy Thanksgiving from Digital Lady Syd

Just a Sand Crab wishing everyone in the U.S. a Happy Thanksgiving. I photographed him on Ormond By the Sea Beach a few weeks ago. First started in Lightroom and used Seim’s (see sidebar for website link) PW4 preset Les Miserables. In Photoshop the Shake Reduction filter was applied and then Topaz (see sidebar for website link) Impression’s Da Vinci Sketch I preset was applied (these are the adjusted settings: Strength 0.79, Stroke Brush Size 0.64, Paint Volume 0.08, Paint Opacity 0.74, Stroke Width 0.24, Stroke Length 1.00, Spill 0.24, Smudge 0.35, Coverage 0.55, and Coverage Transition 0.32; Color Orange Saturation 0.41 and Lightness -0.11; Yellow Hue 0.31, Saturation 0.70 and Lightness 0.01; and Texture Strength 0.24 Paper-1). Used a layer set to Overlay to darken the edges of the crab and an Exposure Adjustment Layer with just the eyes selected to sharpen them. Created a stamped layer (CTRL+ALT+SHIFT+E) and added Nicky Laatz,s paper 12. Painted back the crab and some of the surrounding sand. A Text Layer was added and the Architects Daughter font was used. Last step involved adding a little sharpening on the whole crab in Nik Viveza 2 by increasing the Structure and Contrast sliders……Digital Lady Syd
Fall Mums
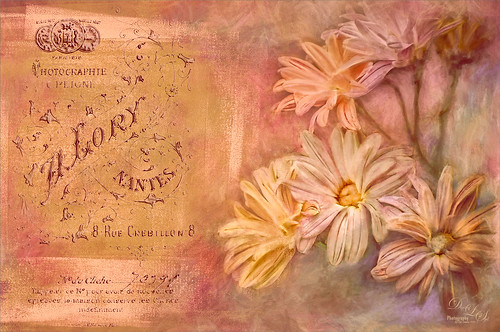
Just enjoyed playing in Photoshop with this image. Basically I put this image into Topaz (see sidebar for website link) Detail 3 to sharpen, added French Kiss (see sidebar for website link) Artiste Avril, a Feather Texture I created and set to 24%, Topaz Impression using Oil Glaze by Blake Rudis, than added two French Kiss Brayered Blocks, French Kiss Photo Studio2 Lory overlay with a Bevel and Emboss and Color Overlay layer styles, next a Curves Adjustments Layer, a New Layer with clean up painting, Nik Viveza 2 to selectively color and sharpen, another Curves Adjustment Layer, and another New Layer and paint clean up. This turned out to be quite a little project, but lots of fun to do! That’s why I love Photoshop!…..Digital Lady Syd
Hot Air Balloons the Disney Way
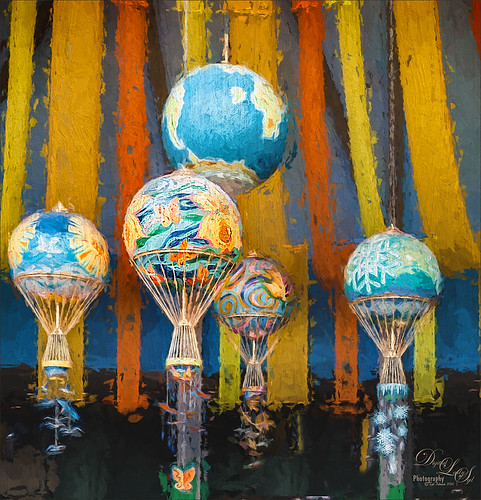
The beautiful Hot Air Balloons at Epcot in the The Land Pavilion. I always love the color and light in this pavilion. This image was processed very simply. In Lightroom Seim’s (see sidebar for website link) PW4 Clip Fixer and Gentle Blue was applied and with the Adjustment Brush, the detail was improved by using Clarity and Sharpen in the brush. In Photoshop the Shake Reduction filter was applied and then Topaz (see sidebar for website link) Impression was opened where my SJ Flower Impasto preset was applied which is based on the Impasto I preset. (These are the settings used in my preset: Stroke Brush Type 05, Brush Size 0.61, Paint Volume 0.76, Paint Opacity 0.75, Stroke Rotation 0.00, Stroke Color Variation 0.00, Stroke Width -0.34, Stroke Length 0.19, Spill 0.27, Smudge 0.18, and Coverage 1.00; Color section Overall Saturation 0.17; Lighting section Brightness 0, Contrast 0.29, and Vignette 0 – Light direction x-0.41 y-0.60; and Texture section Strength 0.30, Size 0.69, Canvas I, Background Type Solid White and Background Color #fff7eb. I changed the Spill slider to 0.20 and changed the Texture to Wood I.) Nik Viveza 2 was applied so that the focal point was emphasized, the front balloon, a little more. A Levels Adjustment Layer was applied as a last step. Lots of fun!…..Digital Lady Syd
Digital Lady Syd Related Blogs:
Digital Lady Syd Speaks Out on Topaz Impression
More Painting with Topaz Impression!
Some Epcot Fun! (And More Impression)
Romantic Venice
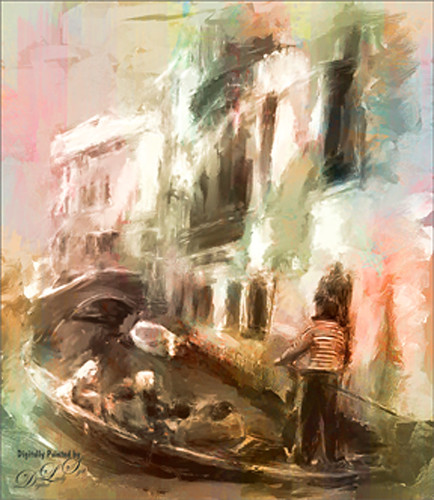
This is another image from Free Images that I downloaded and painted in Corel Painter. After painting some in Painter, the Modern Scheme was applied from the Underpainting Panel that really popped the colors. Painted Textures May Garden texture was added to the image and set to Color blend mode at 93% layer opacity. The Equalize plug-in was also added before taking the image into Photoshop. There Nik Viveza 2 was opened and the standing man was highlighted slightly. That is all that was done. I love the final soft painterly look of the image……Digital Lady Syd
Venetian Dreaming…..
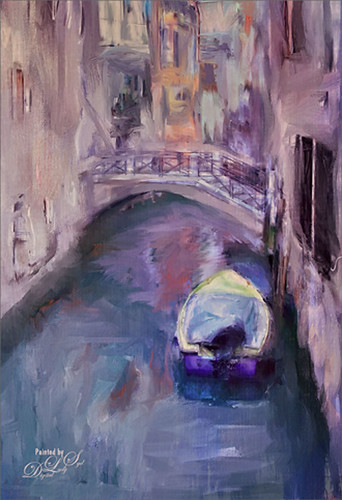
Just another Corel Painter image created following Melissa Gallo’s terrific Painter for Photographers instructions. Not exactly like Melissa’s beautiful images, but I think I am starting to get a style. Since I have not been to Venice in a long time, a free image from Free Images (used to be Stock.Xchng and image is linked) was selected to paint. The original colors were totally different to what is shown, but that is half the fun of painting! While in Painter I actually used Topaz (see sidebar for website link) ReStyle’s Cool and Clear preset with a few changes to get a different color scheme before painting the image. I will say that there were 13 iterative saves before I got to this final image. I am finding the Iterative saves are actually handy to have since I needed to go back to one due to some painting mistakes. The Painter image was saved as a psd file and taken into Photoshop where another Topaz ReStyle preset – my favorite Cream and Plum (you can really see the tones in this image) – was used along with Nik Viveza 2 to emphasize the boat a little more to finish up. Anyway, totally fun but it did take a little time to get it right.
Check out my Fun Photoshop blog this weekend for the same image but done totally with Topaz plug-ins in Photoshop…..Digital Lady Syd
Houses in Marsh Harbour
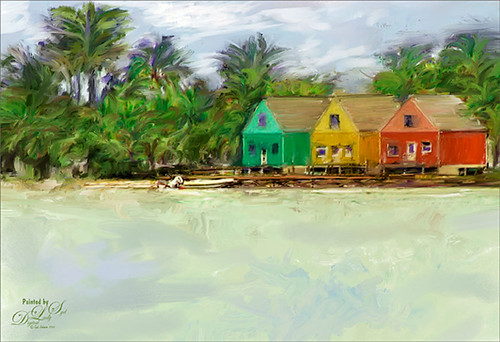
Just a quick post on this painting. The original photo was taken while actually leaving the channel at the small town of Marsh Harbour in The Bahamas. Still working on learning to use Corel Painter – Melissa Gallo’s Painter for Photographers Workshop is really helping me understand how to use this program. Lots to learn yet – this is really so much fun! I did do the final crop in Photoshop and used Viveza 2 to emphasize the focal point. Also a Curves Adjustment Layer and signature layers was added. Still not comfortable staying in Painter for this……Digital Lady Syd
A Little Dreamy Auto FX
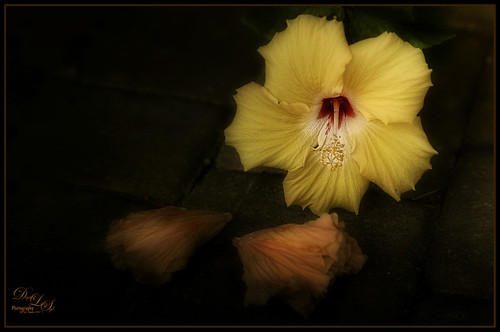
This simple yellow hibiscus flower image was taken on my back porch. When opened in Auto FX Software’s Free Sampler, I got a very nice sort of dreamy effect. (These were the settings used in the plug-in: First Layer – Mystical Tint Tone and Color – Soften Details – Used paintbrush and painted paver bkgd lines using Size 66, Opacity 70, Feather 100, and these Soften Details – Mode Brush On, Opacity 40, Vibrancy 20, Softness 20, Saturation -42, Brightness -18, and Contrast 0. Second Layer – Mystical Tint Tone and Color – Lighten and Sharpen – Used Mode Brush On and painted in center of yellow hibiscus to sharpen the stamen and red color using Size 65, Opacity 62, and Feather 69, and Lighten & Sharpen Opacity 84, Lighten 60, Tonal Range 84, Fuzziness 5 and Sharpen Details 76. Third Layer – Mystical Tint Tone and Color – Vitality Mode Global using these settings: Midtone Softness 71, MidTone Strength 40, Highlight Softness 52, Highlight Strength 17, Saturation 30, Brightness -1, and Contrast 20. Was able to brush on center to make white stand out more using Brush Palette Size 200, Opacity 97, and Feather 100. Fourth Layer – Dreamy Photo – Ghost Type Soft, Blur 10, Blend 70, Ghosting 2, Tint Color 25 (r229/g186/b160), Soften Mask 5, and Zoom offset 0.) Then Nik Viveza 2 was opened and four control points were used to get the correct brightness in each of the objects. Last step was added my free B&W Border Frame layer style – sampled the peach color for the Inner Glow color. Overall I think the image turned out to be very pretty!…..Digital Lady Syd
Checking Out the Feathers
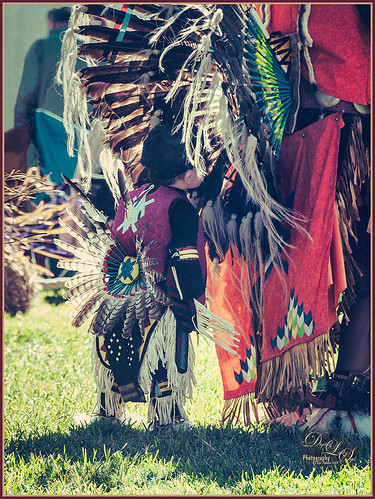
I am apparently going through a vintage feel period. Loved this little boy at the Native American Festival held in Ormond Beach, Florida, each year. He was extremely intrigued by the feathers in the beautiful costume the older man was wearing. Totally loved this shot! Not much to the post-processing in this image – in Lightroom applied Seim’s (see sidebar for website link) Magic Ugly Shade Fixer and Dave Delnea’s C+V Washed Vintage 001 preset. In Photoshop ran the Shake Reduction filter. Then Topaz (see sidebar for website link) DeNoise 5 due to the added artifacts from the Shake Reduction filter – set Overall to 0.31. A black layer mask was added to the layer (hold the ALT button while clicking on the Layer Mask icon at the bottom of the Layers Panel) and just painted back his face, hat and sleeve areas as I liked the grainy feel in the rest of the image. Added a Curves Adjustment Layer to add some contrast to the image. Nik’s Viveza 2 was opened and a control point was added to his face to lighten and direct attention to that area. Back in Photoshop a New Layer was added and some clean up was done. A Selective Color Adjustment Layer was added and some of the bright orange in the background was softened so it was not so distracting. Filled the layer mask black by CTRL+I in the mask to invert it and painted back just the distracting areas to soften. Created a Stamped layer on top (CTRL+ALT+SHIFT+E) and my free SJ Mid Size Double Edge Frame was applied using colors from the image. Lots of fun just to play with an image!…..Digital Lady Syd
Universal Family Fun!
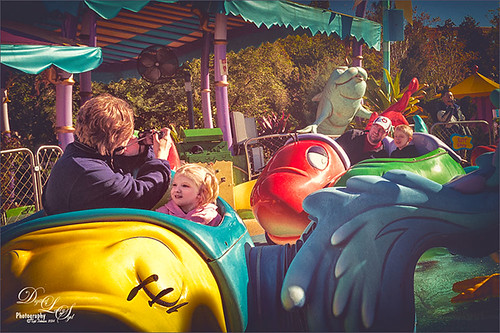
Just a quick fun picture taken at Universal Studios, Orlando, Florida, earlier this year. This is the Caro-Seuss-el ride, similar to the Flying Elephants at the Magic Kingdom. Added Seim’s (see sidebar for website link) Crosslight Warm preset in Lightroom. In Photoshop rand the Shake Reduction filter – seem to work really well on hand-held images. Next the Mixer Brush was used to remove the heavy shading on the children’s faces. Since I felt like doing a vintage image, ran Nik’s Analog Efex Pro 2 filter using a preset I created called Flat Vintage Look – used Basic Adjustments and two control points were placed on the kids; Light Leaks using the Soft leak 1st column and 2nd row – gave a really bleached out look coming from the right so the Strength was set way down to 28%; Lens Vignette – just a little setting Amount t0 -53% to slightly darken down the corners; Film Type Warm Nikko 2 set to a Strength of 24% and no grand (set to 470); and Levels and Curves adding some Luminosity and blue tones. Little more clean up on the faces and a Curves Adjustment Layer. Last step was Nik’s Viveza 2 with control points on the children’s faces to draw attention, especially to the little girl. That was it! ….. Digital Lady Syd
Squirrel Resident at Universal Studios

This was probably not the greatest image but I loved the way the squirrel’s tail looked so I had to do some processing on this photo. This shot was actually taken once again at Universal Studios Orlando. I wanted a painterly look, but I did not want to spend a lot of time painting it since it was not the best original image. Trey Radcliff‘s Gradient Endless Weekend Lightroom preset was applied. The photo was opened in Photoshop CC and the Shake Reduction Filter was used. Next Topaz (see sidebar for website link) Detail 3 was used to overall sharpen the image. A black layer mask was added and just the squirrel and the closer plants were painted back. A stamped layer (CTRL+ALT+SHIFT+E) was created and turned into a Smart Object where Alien Skin’s Snap Art 4 was opened. I used a preset I had created in Snap Art 3 based on the Historic Oil Paint preset (settings were Background – Brush Size 14, Photorealism 23, Paint Thickness 77, Stroke Length 63, Color Variation 0, and Bristle Brush Brush Style; Detail Masking – on Squirrel, Effect Detail, Brush Size -10, Photorealism 100, Paint Thickness -40, Stroke Length -49, Color Variation 36 and Brush Style Bristle Brush; and on mid-back leaves, Effect Detail Brush Size 23, Photorealism -59, Paint Thickness 73, Stroke Length 79, Color Variation 85, and Brush Style Bristle Brush; and Colors Brightness -38, Contrast -14, Saturation 33, and Temperature 36; Lighting – Default; and no other settings used). Using Photoshop’s Flat Fan Single Bristle Wet Edge brush as a Mixer, the overly bright spots were blended in on a separate layer. Next Topaz ReStyle Rustic Red and Orange preset was used (the settings used are ReStyle Color Style Lum Third -0.48 and Fifth -0.39; Texture Strength 1.00; Basic Tone Black Level 0.11, Midtones -0.31, and White Level 0.30; and Detail Structure 0.11 and Sharpness 0.73). This turned the image color palette into a bit warmer feel. Nik Viveza 2 was added to add a little more tonality to just the squirrel and add some blue into the sky. The last step was to use Photoshop’s Radial Filter in Camera Raw on just the squirre to draw further attention to him. It was a lot of steps but always fun to do……Digital Lady Syd
The Mighty Tulip

Just another photo of a very colorful red and yellow tulip and some pink daisies from my local grocery store. Just practicing my painting. This time using my basic workflow. Add Seim’s (see sidebar for website link) Power Workflow 4 Magic Flat Light Fixer. Next Topaz (see sidebar for website link) Detail 3 to sharpen up the image a little, and Topaz Simplify to use as a base coat to paint above. On a New Layer above, used Photoshop’s Flat Fan Single Bristle Wet Brush as a regular brush to paint over the yellow tulip and some of the greenery. French Kiss (see sidebar for website link) Atelier GA Brush created in my blog was painted on the next layer. (See my How to Paint with a Texture Brush from Your Image blog for how to make this brush.) Melissa Gallo of Painted Textures Desert Sky Canvas texture was applied twice to create two texture layers, first set to Hard Light at 56% layer opacity, and then set to Color Burn at 24%. Created a Stamped layer (CTRL+ALT+SHIFT+E) on top and then copied the Topaz Detail 3 layer and placed underneath since I had some bad places on the petals. In the stamped layer, added a white layer mask and lightly painted back part of the tulip that were not sharp enough. Then on a New Layer above, used my Chalk 60 brush as a mixer to smooth over the tulip. I decided this image needed some pizazz – it was just too yellow and bright green. On yet another New Layer took my Chalk 60 brush with the texture turned on and painted some bright colored blotches all over it in oranges and yellows and greens and pinks – kind of went crazy. Set this layer to Pin Light. Added a Curves Adjustment Layer and a Levels Adjustment Layer to add contrast. On a stamped layer, Nik Viveza 2 was opened up and Control Points were added to the yellow tulip and the purple daisy in front. Topaz ReStyle was opened on another stamped layer above. (Here are the settings: SJ Very Muted Sepia preset. Changes to preset were: Restyle Opacity 88%; Lum Primary -0.58, Third -0.36, Fourth -0.45, and Fifth 0.30; Texture 1.00; Basic Opacity 23% set to Hard Light blend mode; Color Temperature -0.11; Tone White Level 0.25; and Detail Structure 0.06 and Sharpness 0.83.) The last step involved adding the beautiful Canvas Vignette border by the wonderful Corel Master John Derry – can be downloaded from this link. This is the final image. Okay – it is a bit of workflow, but sometimes it just takes a lot of manipulation to get the look you like!….Digital Lady Syd
The Most Delicious Caramel Apples!
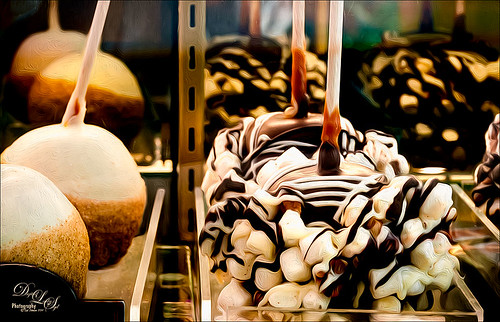
The above is what happens if I am in Photoshop when I am hungry! These delicious Rocky Road Candy Apples were located at Snookers Candy Store in Seuss Land at Universal Studios Orlando. May be the most tasty looking candy apples I have ever seen! Wanted to use this image as an example of just a subtle painterly effect added to an image for just a little enhancement. This image was processed in Lightroom where cropping and Seim’s Workflow 4 (see sidebar for website link) Hill and Lucas preset was applied. Photoshop’s Shake Reduction Filter was applied and it actually sharpened up the image just a little. Did lots of clean up since this was shot through a plastic case. Finally I went into Photoshop CC (CS6 also has it and Pixel Bender still has it for CS5) Oil Paint Filter – I am really sad this filter has been eliminated in the new CC 2014 version – I thought the marshmallows and chocolate would look nice with this effect. (Settings used: Brush Stylization 10, Cleanliness 10, Scale 1.14, Bristle Detail 10, Lighting Angular Direction 300, and Shine 1.35.) A layer mask was added and with my Chalk 60 brush, some of the effect was painted out in areas that looked overdone. To really make the image pop, Nik Viveza was applied – both globally and with control points to add just the right amount of vignette and sharpness. This filter is still just incredible! A Curves Adjustment Layer was added to lighten up the whites just a little more and a layer was used to add some burning to define the marshmallows in the front apple from the one further back. (See my The Best Dodging and Burning Technique! blog.) This was really a fun image to work with and just adding a little painterly effect really made it stand out!…..Digital Lady Syd
The Archaeologist
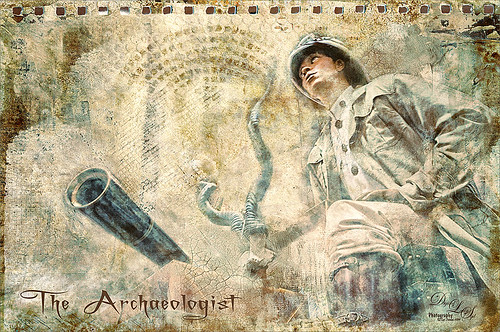
This is part of a really interesting display in one of the gift shops at Universal Studios Orlando. I shot the image up at a rather life-like mannequin and really liked the results. Seims (see sidebar for website link) Power Workflow 4 Magic Flat Light Fixer preset was used in Lightroom. In Photoshop the Shake Reduction Filter and Topaz (see sidebar for website link) Detail 3 was used to sharpen up the whole image. Kim Klassen‘s Autumn Burst was applied on top and a layer mask was added. Using my Chalk 60 brush in the mask at 30% brush opacity, the man and objects were lightly painted back so they show through the texture. Kim’s 1402 magic texture was placed on top and set to Soft Light at 32% layer opacity. Next 2 Lil’ Owls (see sidebar for website link) Ultimate Texture Collection’s Jewel Chalks was set to Divide at 33% layer opacity – this gives the bluish colors in the image. Next a Text layer was added using the font called A Charming Font Superexpanded at 70 pt. On a New Layer the Sharpen Tool was used on the person’s face. Nik’s Viveza 2 was used to sharpen up the face even a little more and to add a slight vignette effect in the corners of the image. That was about it. It turned out to be a really different image and the Difference blend mode turned an ordinary image into something quite interesting……Digital Lady Sydf
My Scottish “Secret Garden”
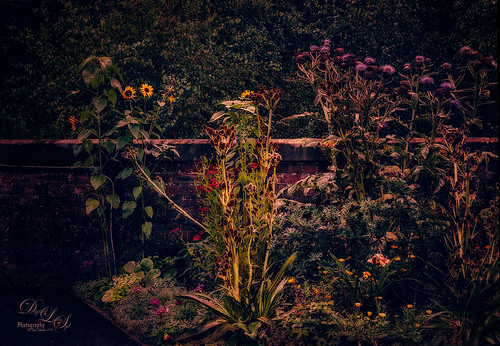
This was a pretty ugly image to start with – very light green and hardly any contrast – it was a good challenge to get something I liked from it! It was taken in some little town in Scotland that was on the way to the highlands. I actually used Topaz (see sidebar for website link) Infocus to sharpen it up a little and it did a pretty good job. This plug-in seems to be a lot like the Sharpen Shake Reduction filter in Photoshop CC. Did some clean up. Created a stamped layer (CTRL+ALT+SHIFT+E) and applied Nik Viveza 2 to the image Helped me direct the attention to the center flowers. Next Topaz ReStyle was applied TRS-Tangerine Gauze preset. (Settings were: no changes to ReStyle section; Basic Temperature 0.13, Tint -0.14, and Saturation 0.06; Tone Black Level -0.59, Midtones -0.12, and White Level 0.34; and Detail Structure -1.00. Masks paintd back the center flowers using Color Aware brush and sampling the green leaves in middle – paint with 1.00 strength and Hardness 0.62 just the center flowers, little pink flowers, and purple thistles.) On a new stamped layer Nik Color Efex Pro plug-in was opened and several filters were stacked. (The filters were: Detail Extractor with Detail set to 69%, Contrast 68% and Saturation 26% and a control point was set on just the center yellow plant; Darken/Lighten Center using Shape 1, Center Lum 39%, Border Lum -57%, and Center Size 44%; Midnight Color Set Neutral, Blur 35%, Contrast 36%, Brightness 65% and Color 77% and overall Opacity 81%; Film Efex Vintage using Film Type 16 and overall Opacity set to 31%; and Vignette Filter Shape 1, Adapt Edges 19%, Transition 38%, Size 27%, and Opacity 43% and the overall Opacity 67%.) On a New Layer did a little edge clean up using my Chalk 60 brush, a Curves Adjustment Layer to add some contrast back into the image, and the Sharpen Tool on the middle plant thistles to emphasize them a little more. This seemed to take a long time. Wanted to show you that with the Color Efex Pro filters, there is usually an overall Opacity slider after the control points section that can really help adjust the filter look the way you want it. Anyway, it was a little “Secret Garden” that I saw!…..Digital Lady Syd


