
Swimming in Circles
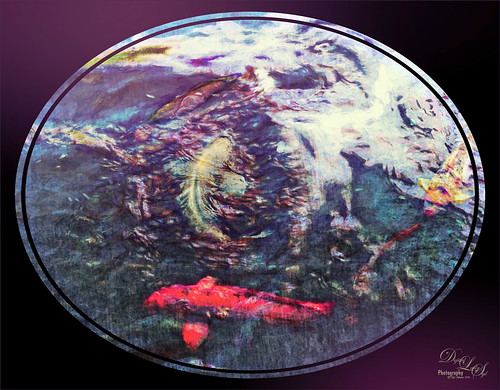
Lots of fun playing with this image of some Hawaiian fancy fish (koi) that was not that great – wanted to see what I could do with it since it had an abstract feel to begin with. In Lightroom, used the Basic Auto button, then backed off the Highlights to -12. Painted with the Adjustment Brush set to Clarity (60), Dehaze (45), and Sharpness (71) on the fish to bring them out just a little. Got to watch the Dehaze brush setting as it can overcook the results if too much is used. Topaz (see sidebar for website link) Glow Graphic Sketch II preset was applied and the layer was set to Overlay blend mode at 77%. On a duplicate layer (CTRL+J) applied Topaz Impression’s Cezanne I preset with changes to the Orange Hue and Saturation sliders. Created a New Layer and set to Overlay – used a black brush set to 12% brush opacity and burned in parts of the image where areas are blending too much together. On a stamped layer (CTRL+ALT+SHIFT+E) used Topaz Texture Effects’s Burning Effect preset. Changed the border to create the pretty oval effect. Finally applied Nik Viveza 2 (now free) to draw attention to the two middle fish. I thought it turned out to be an interesting effect…..Digital Lady Syd
Quietly Standing Out
Sometimes it just feels good to paint! Totally enjoyed trying out and practicing with Melissa Gallo’s Painting Spring brushes and paper (still have a lot to learn but enjoying it immensely). Once the basic background was painted, it was brought into Photoshop to finish up. The impasto effect was created using Kyle Webster’s Impasto Kit – Super Light Gesso 2 layer style with the Natural Media Knit Pin brush from Grut.com to paint in the snowy effect. Topaz (see sidebar for website link) Lens Effects’s Polarization filter using the Bottom Half 2 Stops preset was applied. The Fox was created on its own layer using a free brush from Fox-russdepress.com and adjusting it to match my image. Topaz Texture Effects’s 1 Color Burst II was added without the vignette effect. Last step was to add Nik Viveza 2 (now free) to really showcase the fox. That was it! Loved painting this image!…..Digital Lady Syd
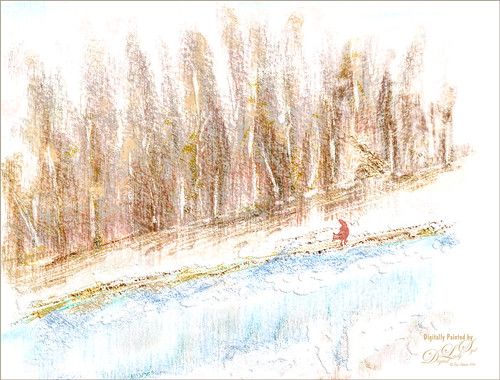
Waiting for Spring

Just had some fun painting in Corel Painter. This image was created using several of Melissa Gallo watercolor brushes from her Painting Spring class. Really nice course and am having a lot of fun watching the videos. The bird was painted in Photoshop using my friend Nicolai’s Ink brush Brezh Brow and Pastel brush Re-Cc – check out his huge variety of wonderful brushes at GrutBrushes.com and his free weekly brush. Nik Viveza 2 (now free) was used to emphasize the bird just perfectly. Lots of fun playing with these brushes!…..Digital Lady Syd
A Pretty Fancy Carousel Horse!
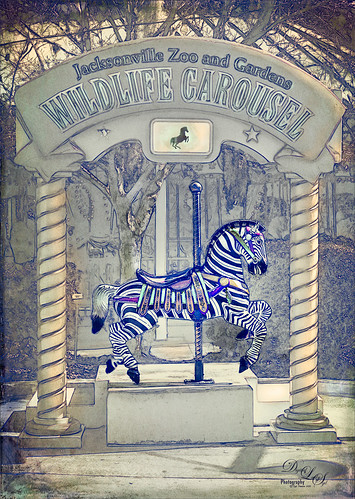
Just another fun pix from the Jacksonville Zoo the Wildlife Carousel photo op area. To get this rather interesting effect, an inexpensive action I purchased a while ago called Mix Art Sketch Painting Photoshop Action was applied to get this nice halftone sketch effect. It has a lot of choices to select when using it. After running the action, Topaz (see sidebar for website link) Texture Effect was opened and the Vibrant Grunge preset was applied. The layer was set to Multiply. Otherwise just some clean up layers and a little Nik Viveza 2 (now free!). Loved the effect. I need to work a little more with this action, but I see lots of possibilities……Digital Lady Syd
Hanging Out with the Family
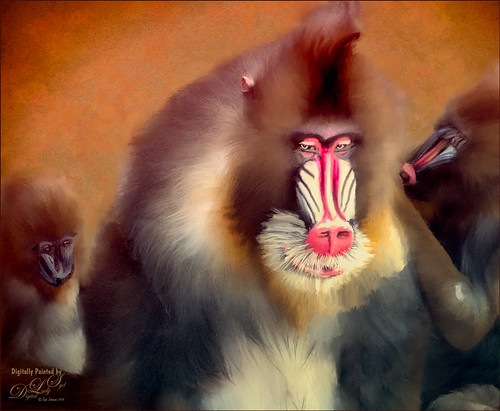
I decided to see if I could paint this interesting Mandrill family image a taken at the Jacksonville Zoo a few months ago. I wish I had had time to watch them for a little longer – the center monkey is a male with a female and male on the sides.
I was not sure how the fur would turn out painted, but with a little experimenting it can be done. I first separated the monkeys from their really dark busy background using Topaz (see sidebar for website link) ReMask 5 – still the best in my mind for doing this type of selection. Next a texture was added that I had created a long time ago – rather plain but with lots of texture in it. A Hue/Saturation Adjustment Layer was placed above the texture to make a pleasing color to match with the monkeys. The monkey ReMask layer mask was applied to the image so painting could begin – I always duplicate this layer and then turn off the original in case something was missed and the mask needs to be redone. Ten layers of painting were used to get the effect needed – all brushes were Fay Sirkis (it’s a shame but I do not think her Child Portrait or Pet Brushes are available anymore even from KelbyOne). Her Palette Knife Soft Blender was used to get the nice fur fluff look – moved the Shape of the brush to match the direction I was painting. Her Portrait Child Blender was used to get the detail areas for the faces. And her Portrait Children Single Hair Blender to add some individual hairs. On a stamped layer Topaz Lens Effects’s Toy Camera Awesomeness I preset with the Camera Shake set to 0 was applied. Last step was to use Nik Viveza 2 (now a free to download) to emphasize his eyes and get a soft overall vignette effect around the edges. Hope you enjoyed…..Digital Lady Syd
Some Blue Berries
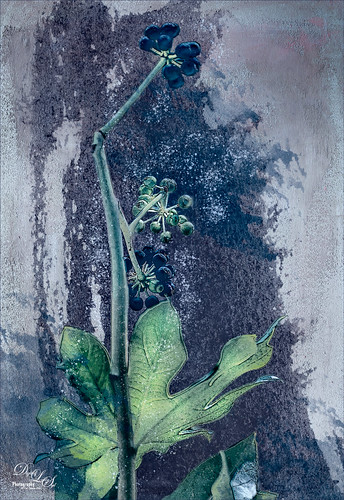
Just wanted to try something fun and creative. These beautiful blue berries were found growing at the Jacksonville Zoo a few months ago. The berries and leaves were selected in Topaz (see sidebar for website link) ReMask 5, mask was applied, and a French Kiss (see sidebar for website link) texture called Solstice Zenith was placed behind them. On the berries, a Photoshop Filter was used – Artistic -> Poster Edges set to 2/1/4 was applied. French Kiss Grunge Brush 15 was placed underneath the berries and Grunge Brush 14 was applied to add some texture. A spatter brush was used around the berries just to give a magical feel to the image and set to 67% layer opacity. Topaz ReStyle was used to give a slightly different color palette and finally Nik Viveza 2 (now free) was used to direct attention more fully to the green foreground leaf. Just a lot of fun!…..Digital Lady Syd
Taking a Break!
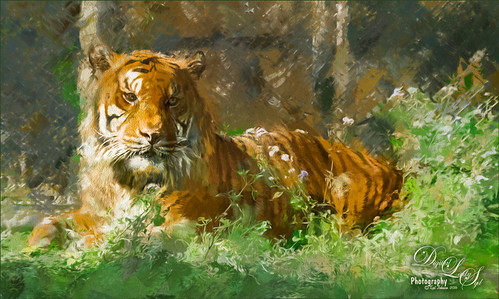
Just another of my tiger pictures from the Jacksonville Zoo. This guy so looked so relaxed. This time used On1 (see sidebar for website link) Effects 10 and the following filters: Tone Enhancer, Color Enhance, Sunshine, and HDR Look. This made a huge difference in the color and contrast! I am still experimenting with the updated and more stable plug-in. On a stamped (CTRL+ALT+SHIFT+E) layer, Topaz (see sidebar for website link) Impression was opened and used my SJ Building preset on it. Then I used the Spot Healing brush to remove the chain effect behind him but leave a little bit of effect. I really liked the results. (See my How to Use the Spot Healing Brush – Really Improved Now! blog.) A little Nik Viveva 2 (remember it is free now) and that was about it. Need to get back to the zoo and take some more pics of these beautiful animals!…..Digital Lady Syd
Heron on Watch Duty
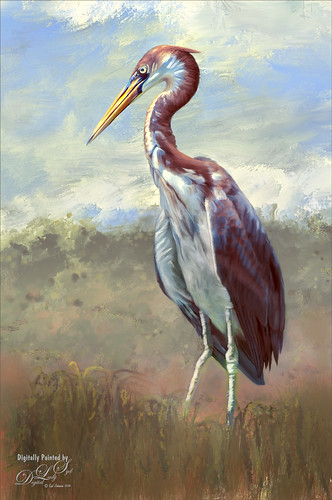
Just having fun painting yet another of my favorite subjects, the birds. This guy is a tri-colored heron taken at the St. Augustine Alligator Farm a few years ago and I just missed him. I loved all the beautiful colors of feathers he was displaying! This was done using my standard workflow where the bird is selected in Topaz (see sidebar for website link) ReMask 5, then the bird is painted on top of a new background texture, one I painted in Painter. Used Grut’s Photoshop mixer brush called Twig Scuffle for the fore grass plants. Topaz ReStyle’s Silver and Ivory Cloak preset was used to adjust the color palette a little. Last step was to apply Nik Viveza 2 to even out the focal point to his head. That was it – I just love to paint these birds!…..Digital Lady Syd
Standing Guard
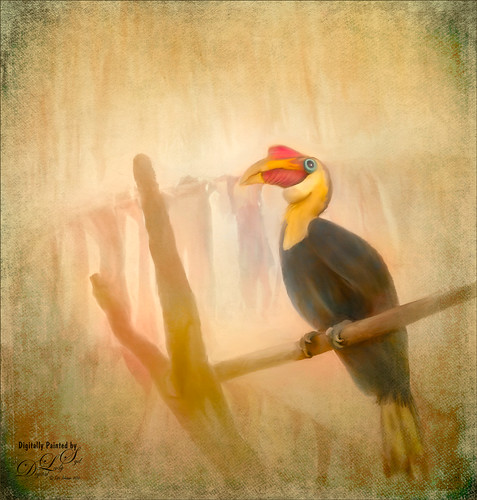
This Wrinkled Hornbill bird was taken at the Jacksonville Zoo. These birds looked like they were having so much fun flying across their enclosure and trading places on the various tree branches. Looked like a marvelous game from my childhood! This image took a long time to paint. Just followed my normal process of selecting the bird and in this case some branches in Topaz (see sidebar for website link) ReMask 5. Underneath he original background was actually kept, but one of my Corel Painter backgrounds was added above and set to Darken blend mode at 82% layer opacity. The background details are actually a large plant that was hanging across the back. The texture changed how they look. Lots of painting layers and Topaz Lens Effects was used to add some golden reflector effect. Nik Viveza 2 was used to adjust the focal point. 2 Lil’ Owls (see sidebar for website link) overlay texture Color Bokeh Grunge Set 3 was used on top and a layer mask was used to bring back the bird. That was it – pretty standard. These birds are so much fun to paint!…..Digital Lady Syd
A Spring Scene
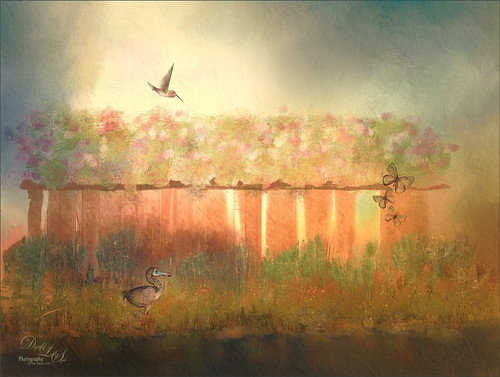
Just having some fun here. Created the original image in Corel Painter – got stuck and came into Photoshop to finish up the image. The basic structure, flowers and plants were created in Painter using various brushes. In Photoshop the DoDo bird Hummingbird were from a scrapbook set called HappyUnBday by Mischief Circus (this is one of my favorite sets) and the Butterflies are from a set called Intermixture Elements & Papers by Algera Designs. A texture called Clouds Over the Pasture from Jai Johnson was added underneath and set to Hard Light blend mode – it gives the beautiful light around the bird. Several layers were added where some texture was added in using plant brushes and texture brushes. Nik Viveza 2 was used twice and Topaz (see sidebar for website link) Lens Effects three times to get this final result. Also some Impasto layers were used on the plants to give a little 3-D effect to the image. This actually took quite a while as I just could not get the feel I liked. I think it is now complete!…..Digital Lady Syd
Reflection of Blue Trees

This is what I consider is a rather unusual image of tree trunks and branches painted blue on several trees at the Jacksonville Zoo’s Asian Bamboo Gardens. There was a lot of bamboo around, but not in this reflection shot. This image took a while for me to figure out what I wanted to do with it as I really wanted to give that beautiful reflection justice in the image. Did basic adjustments in Lightroom, then in Photoshop added Topaz (see sidebar for website link) Clarity’s Sunny Day Blue Sky preset. Next the Spot Healing brush was used to clean up a lot of little bits of stuff floating in the water. On a stamped layer (CTRL+ALT+SHIFT+E) the Topaz Black and White Effects plug-in was opened. What made this different is that the Transparency was set to 0.89 so almost 50% of the image in color through the black and white setting. In the Creative Effects section, Simplify as is and Diffusion set to a fairly high setting of 0.97. In PS a layer mask was added and the effects were painted out gently over the reflection which was soft and diffused already. On another stamped layer Topaz Impression’s Palette Knife II preset was added with no texture. In a layer mask, once again the reflection was painted out so it applied only to the top portion of the image. On a New Layer the Mixer brush was used to blend some of the harsh edges in the top part of the image – this evened out the colors a little. On yet another stamped layer, Nik Viveza 2 was used to draw the eye to the blue tree area. Two textures were added on top – one of mine that is a lot of light yellows painted in Painter and was set to Multiply at 70% layer opacity and one of Jai Johnson, Soulful Sea Breeze, set to Set to Multiply at 70% layer opacity. On top texture a layer mask was added and the top area was painted out so a vignette feel was created at the top. That was it. Just a lot of experimenting!…..Digital Lady Syd
Only in Florida!
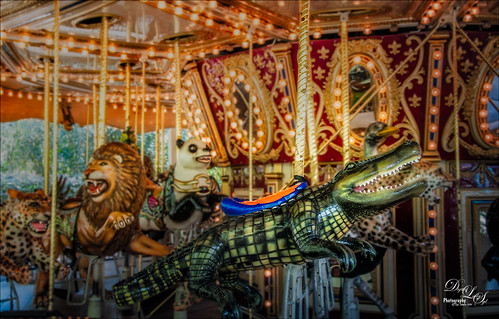
Had to take this image of the alligator that can be ridden on the Jacksonville Zoo‘s Merry-Go-Round in Florida. I had to take it quick when it was stopped. I could not get the angle I wanted, but the lion and polar bear look kind of nice behind my main subject, so I think it actually looks like a zoo carousel. This took a lot more work than I wanted since in the original image it looks like the alligator is swallowing a jaguar whole with an ostrich head coming out of the top of his head. What a disaster! About all I could do was to blur the background with a Gaussian Blur set to Radius of 5 and paint the foreground back in. Got the nice color effect using Nik Color Efex Pro 4 using Darken/Lighten Center, Glamour Glow, and Pro Contrast filters. Had to do some selective dodging and burning using layers set to Overlay blend mode and using black and white brushes set to 12% brush opacity. Last step was using Nik Viveza 2 to direct attention to his head. I really wanted to ride that alligator!…..Digital Lady Syd
The Mighty Jaguar
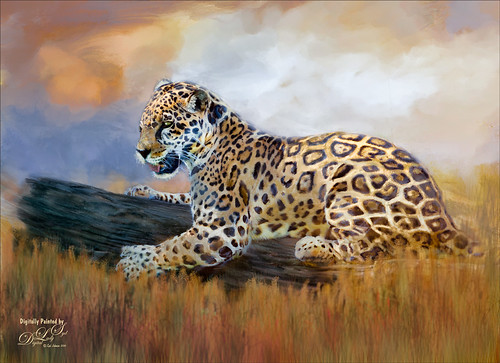
Took this image at the Jacksonville Zoo a couple days ago – the original is totally unremarkable and I did not think it would turn out nice at all. Just thought it would be a good challenge to see what I could do with it. I will actually post some much better pictures of these beautiful cats later. Normally I would give you step-by-step, but this was a pretty heavy workflow so I will just tell you what all it took. The biggest problem was the chain-length fence that went through his body. Since I could not get close enough to the fence to get rid of the distortion, I had to paint it away. The fence was selected and a Curves Adjustment Layer was used to reduce the effect. Then three more Curves Adjustment Layers before I was ready to paint him. Topaz (see sidebar for website link) Adjust using French Countryside (my favorite) preset and several slider adjustments to get the color in the cat that I liked. Then I went into Corel Painter and painted a background that matched his colors. Put the background on top of the cat and painted the cat in with a layer mask. Next painted using 7 layers and both mixers and regular brushes (my SJ Pastel 3 painting brush mainly – do a search at my Fun Photoshop Blog for settings). Used Nik Viveza 2 to emphasize his face. Used Blur Gallery to soften the foreground, Liquify Filter to make his eye a little larger, Topaz Lens Effects for some special reflector and graduated filter effects, and Camera Raw Filter to bring out the orange effect just a bit more. Last step, Topaz Restyle using the Tawny Tint. That about did it but it was a pretty big process. I just love painting the big cats!…..Digital Lady Syd
Desolate Roller Coaster
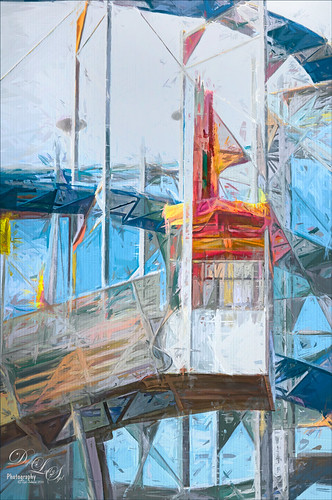
I really enjoyed doing this image – lots of structure and texture in this coaster image. Just Basic slider adjustments in Lightroom before opening up in Photoshop and duplicating the layer. Topaz (see sidebar for website link) Simplify was opened and the BuzSim preset was applied with a couple of changes (Simplify Size 0.76, Feature Boost 1, and Structure 2.38). This caused lots of webbing up in the track that really looked good – usually don’t but it made this picture more interesting. This layer was duplicated and Topaz Impression was added. I created a new preset to get this effect called SJ Illustrative Painting Effect (SJ Illustrative Painting Effect preset – Settings: Brush Type 01, Brush Size 0.70, Paint Volume 0.42, Paint Opacity 0.72, Stroke Rotation 0, Stroke Color Variation 0, Stroke Width -0.65, Stroke Length 0.20, Spill 0.48, Smudge 0 and Coverate 1.00; Color only – Red Sat 0.38 and Lightness 0.10; Orange Sat 0.75, Yellow Sat 0.68, Aqua Hue -0.15, Sat -0.47, and Litness -0.60; and Blue Hue 0.10, Sat -0.34, and Lightness 0.41; Lighting 0.25, Contrast 0.04, Vignette 0.18, Vignette Transition 0.34, Vignette Center x: 0.32 and y: -0.03; and Light Direction x: 0.59 and y: -0.01; and Texture Metal Sheet Strength 0.60, Size 0, Background Type solid white, and Background white.) A layer mask was added to remove some of the paint in areas that did not look quite right using a low opacity and flow black brush. The last step was to use Nik Viveza 2 to emphasize the focal point where the loading area is. That was it – just liked the sort of grungy painterly look that resulted. Lots of fun here!…..Digital Lady Syd
A Windy Beach!
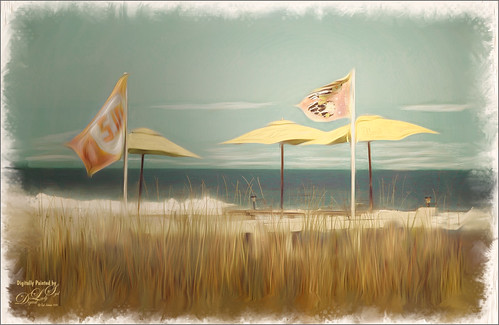
One of my favorite local place, beautiful Flagler Beach on the Atlantic Ocean in Florida, shows a pretty windy day. This image was one I was experimenting on and came up with this effect. The Oil Paint Filter was used on the image and on a layer mask the sky was painted out so the filters only affected the foreground, flags and umbrellas. The original image had red umbrellas and a much brighter blue sky. I wanted to use softer colors so the color palette was changed in Topaz (see sidebar for website link) ReStyle that used the tones from another image. (See How To Use a Topaz ReStyle Trick for Improving Your Image showing which image colors were used here.) On a stamped layer Nik Color Efex Pro 4 was used to further soften and tweak the colors. On several New Layers the mixers were used to create the edges and Nik Viveza 2 was used to add a little focal point emphasis. I really love the final colors!…..Digital Lady Syd
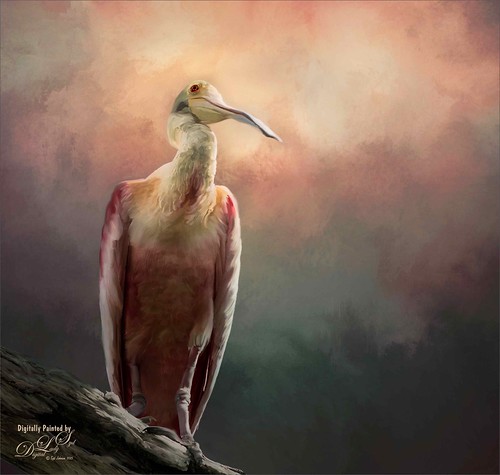
Putting Your Best Side Forward
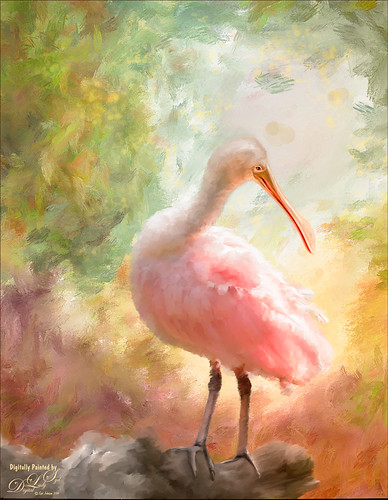
This lovely Roseate Spoonbill is totally enjoying a beautiful morning. This type of bird always seems to have a happy expression on their face – totally a joy to watch them. This image was taken at my favorite bird place, the St. Augustine Alligator Farm. Not much new with the painting workflow – just a painted background I did in Corel Painter and some Mixer brushes and Regular brushes in Photoshop. As you know I am a big fan of Fay Sirkis’s Photoshop Mixer brushes and this image used her Palette Knife Tap n Blend brush to get the fluffy effect on the body. The only place I know where her brushes are available is over at KelbyOne, and sometimes at Photoshop World when she is presenting. The light effect was created using Topaz (see sidebar for website link) Lens Effects’ Reflector filter set to Gold Right preset – gives a soft subtle light effect. Used Nik Viveza 2 to bring the face in focus. Totally enjoyed painting this beautiful bird!…..Digital Lady Syd
Happy New Year!
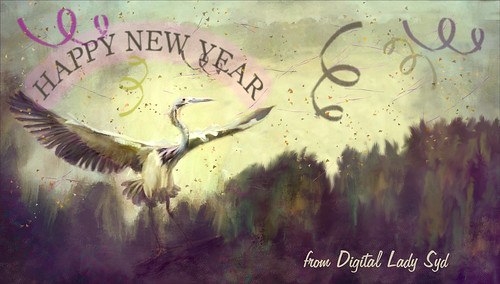
Just one of my favorite birds, the Great Blue Heron, celebrating along with everyone the coming new year. Actually a lot of was done to this image that was taken at the St. Augustine Alligator Farm. He was painted in Photoshop with mixers and regular brushes and the background was painted in Corel Painter. Just my basic painting workflow. Separate layers used Confetti and Streamer brushes from Morgan BW on Deviant Art. The last step used Nik Viveza 2 – always the perfect final touch. Happy New Year from Digital Lady Syd…..See ya next year!
Underwater Fantasy
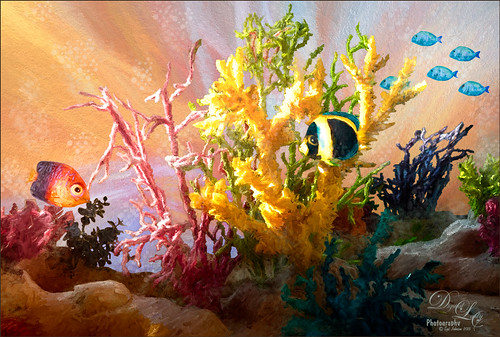
This image took a lot longer than I expected to complete – but still a lot of fun to do. I had the image of some coral in a case at a SeaWorld Orlando store and wanted to use it in an underwater adventure image. It turned out totally different from what I expected but that still is a lot of fun to just see what happens!
Basically the coral was cut from the image using Topaz (see sidebar for website link) ReMask 5. It did a fair job and a lot of touch up of the layer mask had to be done once back in Photoshop due to the complexity and similar background color to the coral in the image. My next step was to add a couple PixelSquid fish into the image (see my How To Use the PixelSquid Add-On in Photoshop blog). One of my spiral textures was used for the background and the layer was taken into Topaz Impression where the Turner Sunset II preset was applied. The fish and coral layers were grouped, duplicated and top group merged to create a single layer. This layer was then taken into Topaz Impression and Edward Hopper II preset was applied to it. Some bubbles were added using using the Glitter Brush created in my Some Christmas Cheer and Resources blog was used to add some softening effect around the coral, and on some separate layers, Fay Sirkis’s Bubble Wrap Highlights Mixer brush was used to add in the more obvious bubbles. Next the eyes were sharpened using the Exposure Adjustment Layers. On a stamped layer (CTRL+ALT+SHIFT+E), Topaz Lens Effects was opened and the Reflector filter brightening the left side of the image and the Graduated Neutral Density Filter to darken the bottom part of the image was applied. Last step used Nik Viveza 2 to direct focus to the main fish. Whew! Hope you have a wonderful holiday!…..Digital Lady Syd
Feeling Spiffy!
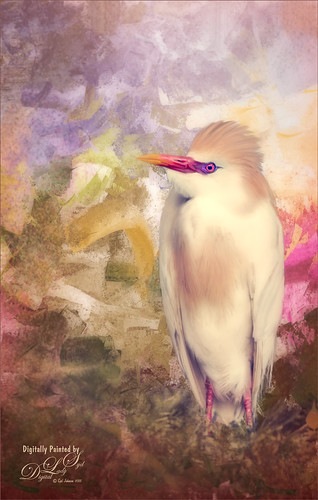
The reason I like this photo is that it was really sharp out of camera even though this Cattle Egret was trying to stay a little hidden in a very green tree covered area. He just seemed to need a nice background, so here it is. It was painted Corel Painter and matched the color in his beautiful beak. Since I wanted some of the original background to show through around his feet, the texture was placed above the bird and the bird’s layer mask (from Topaz – see sidebar for website link – ReMask 5) was used so the bird appears. Then I could use a low opacity brush on the bottom of the bird layer mask to paint in some of the grass detail where he was standing. Several layers of painting before Topaz Texture Effect’s Soft Warm Breeze preset was applied on a stamped layer (CTRL+ALT+SHIFT+E). (I changed the Overlay color from orange to black and Diffusion Strength to 0.62.) The eyes and beak were sharpened and Nik Viveza 2 was used to finish up the overall effect. Really fun to paint!…..Digital Lady Syd
Visiting with a Friend
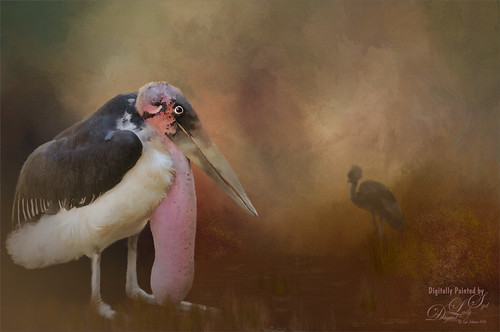
This Marabou Stork resides at the St. Augustine Alligator Farm in Florida. He and the West African Crowned Crane are there to greet you when you visit the Birds of Africa section. I so enjoy painting the birds that do not have a very distinguished look about them and give them a more beautiful place to enjoy. I get the sense this guy is totally content living in St. Augustine although far away from his normal habitat.
Just followed my regular painting workflow from previous blogs. This time added some grain in Topaz (see sidebar for website link) as it gave it sort of a magical old feel. The hardest part about this image was how sharp he appears – very hard to soften his edges and look natural, especially his feet. Topped off the image using my favorite plug-in of all time – Nik Viveza 2……Digital Lady Syd
Wading in the Water
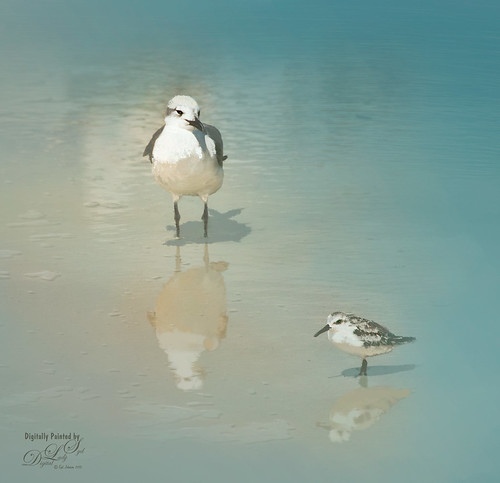
These little guys were enjoying the tidal waters at Daytona Beach, Florida. I believe the bigger bird is a Laughing Gull and smaller one a Sanderling from the Sandpiper family. These birds were all over the place and seemed quite tame on the beach. These birds were painted in Photoshop. Added a solid color turquoise layer and in a layer mask painted back area to be seen. Used one of my Corel Painter textures that was a very smooth beige tone. Then used Fay Sirkis’s Photoshop Erodible Tip Pastels to paint the birds and reflections. Used Topaz (see sidebar for website link) Lens Effects Reflector Filter to add some directed light and warm up the scene. The beaks and eyes were sharpened. A little Nik Viveza 2 to finish up so the focus is on the birds and less on the reflections. Very simple process but fun to do!…..Digital Lady Syd
Basking in the Sun
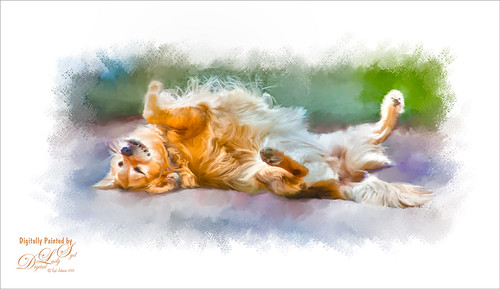
This beautiful golden retriever dog was totally enjoying the warm sun in a park in Savannah, Georgia. I had a very similar looking dog a long time ago so I just had to paint him as my first dog painting I have tried. It is hard to find people doing Photoshop training. I learned from Corel Master Fay Sirkis and her Photoshop Pet Portraits Webinar from several years ago. Since she was using CS6, the downloadable brushes and techniques worked out great! If you are a KelbyOne member, you have access to this webinar that is currently on the old NAPP website. (They will be closing this website at the end of the month so I am not sure if it will be available after that.) All the webinars in her Portrait Series a very good. As a final step, I used Nik Viveza 2 to direct the attention to the face just a bit more. This was a little more of a challenge than my bird images as the dog had a lot more hair and I did not extract him from his surroundings. Overall this was a lot of fun to do!…..Digital Lady Syd
Showing Off My New Hairdo
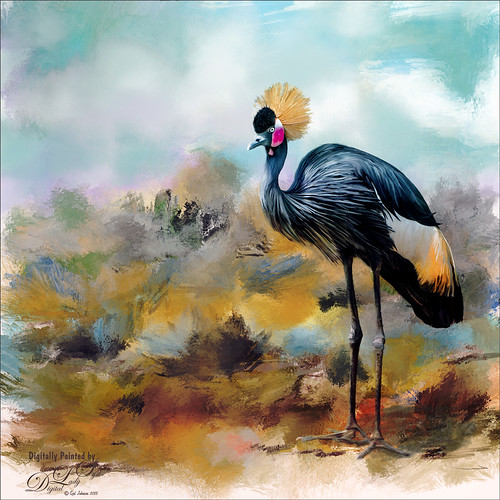
Just enjoying painting another beautiful bird. They are so much fun to do! This is a West African Crowned Crane taken a while ago at the St. Augustine Alligator Farm and is one of the regular exhibits so he can be seen anytime. He just sort of match this Corel Painter texture I had made, so there he is. In his document Topaz (see website link in sidebar) Clarity, Detail, and ReMask were used to adjust the bird itself. Then the ReMask layer was moved into the texture to place it where I wanted him to be. After that just painted the bird on several different layers using the Mixer Brush. Used two different Exposure Adjustment Layers, one for the eye and one for the beak to bring out some sharpness. Then duplicated the original texture twice and set on top – set one to Color Burn at 46% layer opacity and the other to Soft Light at 32%. Created a stamped layer (CTLR+ALT+SHIFT+E) on top and added the Topaz Lens Effects’ Toy Camera filter set to Awesomeness I preset with changes. Back in Photoshop that was set to 39% layer opacity. The last step was to add Nik Viveza 2 to really drill in on the birds face and head feathers. Hope you enjoyed my little bird painting…..Digital Lady Syd
Rookery Security Guard
Just another one of the beautiful birds at the St. Augustine Alligator Farm Rookery – this time a rather elderly looking Roseate Spoonbill who seems to be keeping a careful watch over everything going on. I love the color in this type of bird. Pretty much my standard workflow – using Topaz (see sidebar for website link) ReMask to cut out the bird from its original surrounding; then placing a texture underneath; adding a New Layer on top and painting over the bird with a Mixer Brush; stacking more texture on top trying different blend modes; adding an Exposure Adjustment Layer to sharpen up the eye; applying Nik Viveza 2 to get the correct tone in the sky around his head; and finally adding a Curves Adjustment Layer for contrast. I never seem to get tired of painting my bird buddies!…..Digital Lady Syd


