
Fountain Grass
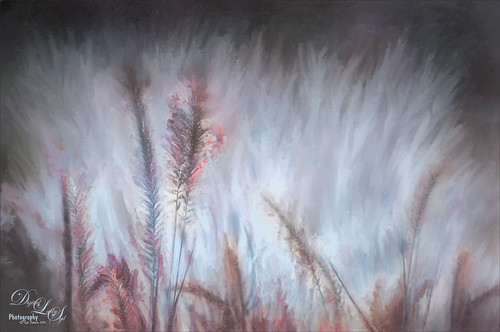
Took this image of fountain grass in my front yard. The original image shows the yard of my neighbor across the street so the first step was to blur the image to get rid of their yard. Used Photoshop’s Blur Gallery set to Iris Blur at Blur of 220 px. Individual stamped layers (CTRL+ALT+SHIFT+E) were created for each of the following filters: Topaz (see sidebar for website link) Black & White Effects was used to give a soft purplish tone, Topaz Clarity was used to sharpened just the foreground stalks, and Topaz Impression (Fine Brush Scumble II preset) was applied and the foreground stems painted back in a mask – then on a New Layer above, the Mixer Brush was used to smooth out the background. On another stamped layer Topaz ReStyle was opened and the Brown and White Pooch preset was used with adjustments – then in a white mask the foreground stem were painted back. Several mixer brush painting layers were added to give the water spray feel. The last step was to use Nik Viveza 2 to give a light vignette effect in the corners. This image was a lot of fun to paint!…..Digital Lady Syd
BFF’s!

These two guys are from different places – not BFF’s at all – the larger elephant is from that wonderful object program called PixelSquid (see my How To Use the PixelSquid Add-on In Photoshop blog), and the other is from an image I took of the elephant at the Jacksonville Zoo. Just a few steps here: the plants are from brushes created mainly from my favorite plant brushes by Frostbo Brush Grass Set2 with a Bevel and Emboss added to it; both elephants were worked on using Lucis Pro (no long available); Topaz (see sidebar for website link) ReStyle was used to get the correct color effect; and the now free Nik Viveza 2 was used to get the correct focus on the elephants. It actually took me several hours to get the effect, but I love the texture…..Digital Lady Syd
Beautiful Flower
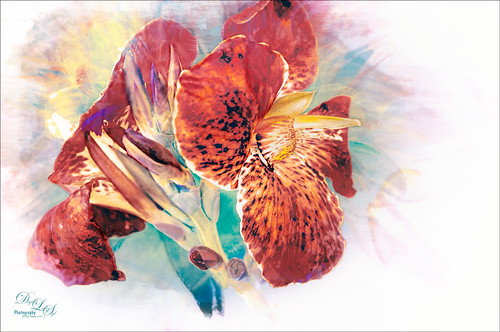
The flower in this image was an orange Canna Lily that grow really well in Florida. Topaz Detail 3 was applied to sharpen the image first in Photoshop. On a stamped layer, the Topaz (see sidebar for website link) Impression 2 preset as created in my Adding a Creative Touch in Topaz Impression 2 was applied, but this time the Coverage was set to 0.12, Coverage Transition 0.03, and Coverage Center X -0.13/Y 0.31. In the Masking section, the Spot Transition was set to 0.93 and Color Aware was set to 0.27 and the effect was placed on the center of the flower. The really bright colorful background could be controlled this way. Next a Black & White Adjustment Layer was added and set to Luminosity blend mode to get the tones correct. (See my How to Use a Black & White Adjustment Layer to See Contrast in an Image for more information on this.) On another stamped layer, Topaz ReStyle was applied a preset that used some colors from a previous image I had processed. (See my How to Use a Topaz ReStyle Trick for Improving Your Image blog to do this.) Two Curves Adjustment Layers were used to apply dodging and burning in the image. (See my How to Use Curves Adjustment Layers to Dodge and Burn an Image blog on how to do this.) On top of those, a Color Lookup Adjustment Layer was applied using the Filmstock_50.3dl filter. A light pink Color Fill Adjustment Layer was placed on top and set to Color blend mode. Last step used the now free Nik Viveza 2 plug-in to draw attention to the focal point. Lots of fun to do!…..Digital Lady Syd
Vintage Pottery and Glassware
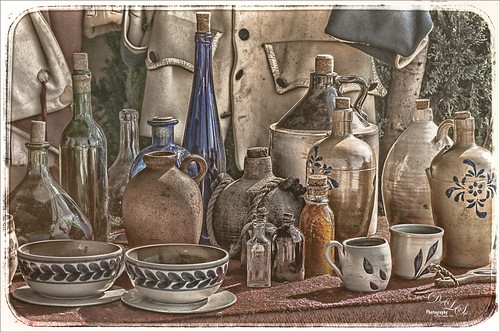
This image was taken at a Native American Festival of a pottery and glassware display. Since the items are so vintage, I decided to a add a vintage feel to the image. After doing some Basic Panel corrections in Lightroom, the image was duplicated in Photoshop and Lucis Pro 6.0.9 (no long available) was used to sharpen the image. A stamped layer (CTRL+ALT+SHIFT+E) was added on top the free Nik Analog Efex Pro plug-in was applied. This filter is really fun to play with and gives some beautiful vintage effects! These filter effects were stacked: Basic Adjustments, Light Leaks, Film Type, Frames, and Levels & Curves which includes a Luminosity curve which is very handy! If you have never used this filter, note that many of the sections allow you to move the effects around within the image. Back in PS, a Red Channel Luminosity Curve Adjustment Layer was created. (See my How to Use a Red Channel to Create a Nice Blended Image Effect blog for more info on this.) On another stamped layer, Nik Viveza 2 was used to emphasize the focal point. It was just slightly too bright for that vintage feel, so a Pattern Fill Adjustment Layer was added using a light cream color pattern set to a Color Blend Mode at 52% layer opacity. That was it! I love the vintage effect!…..Digital Lady Syd
Bird on a Bird Cage
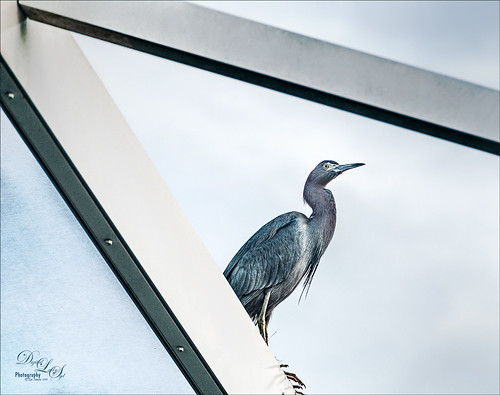
This Little Blue Heron decided to check in on us while we were having dinner on our back porch without electricity after Hurricane Matthew. The screen is blown out there I could get a really nice shot of him. He is a real beauty! Usually I paint these guys, but this time I decided to try out Lucis Pro 6.0.9 (no longer available) on the bird and really liked the results (Enhancement sliders R91/G101/B19 & Assign Original Image Color 5/95). Used the Camera Raw Filter to remove a slight amount of noise the Lucis Pro filter added. On a stamped layer above, Topaz Texture Effects 2 (see sidebar for website link) was applied using the Texture and Vignette filters. The filter mask was used to get the effect correct. Last step was to use the now free Nik Viveza 2 to draw more focus to the face of the bird. That was it. The birds are so pretty around here!…..Digital Lady Syd
The Red Bromeliad
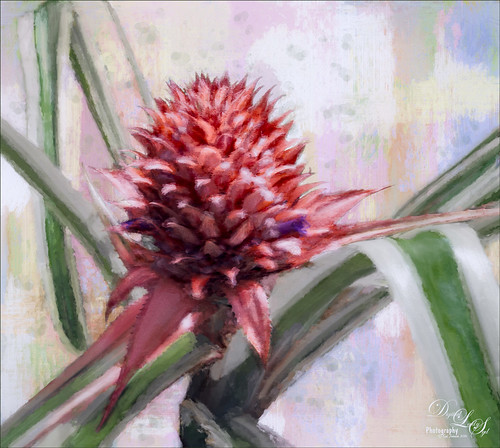
This is a red Bromeliad taken at the Harry P. Leu Gardens in Orlando, Florida. In Lightroom just basic adjustments were done on the RAW file. In Photoshop, the plant was selected using the Quick Selection Tool and then the Select and Mask Panel was used to clean up the selection. This is a wonderful addition to the latest version of CC. One of my Corel Painter textures was placed behind the the selection. Topaz (see sidebar for website link) Impression 2 was opened one of my Impressionistic textures was applied. A Brightness/Contrast and Curves Adjustment Layers were placed on top and the layer mask converted to black by CTRL+I inside the mask. Then just areas I wanted brightened or more contrast added into were painted back. On a New Layer above, a lot of painting using a regular brush to smooth out rough edges from the plug-in was used. Nik Viveza 2 was used to set the focal point in the flower and the last step was to add Topaz ReStyle to get a nice pleasing color palette. Love the final effect!…..Digital Lady Syd
Blowing in the Wind!
Had some fun with this little dandelion – it was taken using my Lensbaby Composer at F/4 using a Macro +4 Lens. In Lightroom just the regular basic adjustments. In Photoshop Nik Viveza 2 was used to lighten up the white strands in the flower. Then Lucis Pro 6.0.9 was applied using the Split Channels. Next Nik Color Efex Pro 4 was opened and 4 filters were added: Detail Extractor, Glamour Glow, Reflector Efex, and Darken/Lighten Center. Can you tell I was having a lot of fun with this one? Next Topaz (see sidebar for website link) Lens Effects was opened and the Motion filter Type Zoom was centered on the flower to straighten out the strands. In a black layer mask, just the strands were painted back. A Levels Adjustment Layer was used to lighten up the overall image. Next Topaz Texture Effects was used to apply one of my painted textures set to Blend mode Subtract in the plug-in. Back in PS, Melissa Gallo’s Trees in May texture was added and set to Linear Dodge blend mode and 40% layer opacity. That was it! It is so much fun just to play around with an image and I am sure this little dandelion did not care!…..Digital Lady Syd
Orchids Showing Off
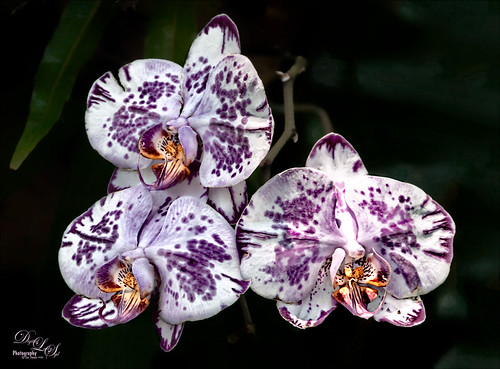
These little beauties were showing off at the Harry P. Leu Gardens in Orlando, Florida. Not much was done to them – just your basic adjustments in Lightroom. In Photoshop, Lucis Pro 6 (no longer available) was run twice – once to smooth the background by setting the Smooth Detail to 19, and once to sharpen the foreground adjusting the Detail settings in each channel (Red 109/Green 103/Blue 101) where the color dialed back to the original amount by setting the Assign Original Image Color at 20/80. Two Curves Adjustment Layers were used to darken certain areas and lighten in others to blend away some shadows. The now free Nik Viveza 2 was used to draw the focus to the center of the flowers. That was it. I really love these flowers!…..Digital Lady Syd
Firebush Plant Spinning Out of Control!
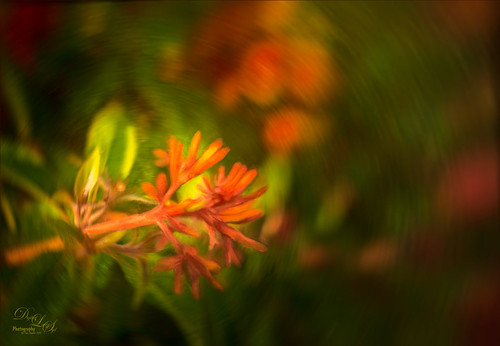
This bright orange-red Firebush Plant has taken over my front yard – I bought it a little over a year ago in the damaged good area for 75 cents. Wow! This image was taken with my older Lensbaby Composer at F/4 with a Macro +10 Lens attached. In Photoshop the image was duplicated and JixiPix Spectrel Art was applied using the Darken Detail preset – the layer was set to Screen blend mode at 48% layer opacity. On a New Layer Grut Brushes MI Swish Mini Mixer Brush was used to paint the plant and red floral areas. Jai Johnson‘s Soulful Sea Breeze texture was placed above and set to Color Dodge blend mode at 64% layer opacity. Then Melissa Gallo’s Mountain Range Texture (not sure her textures are available anymore) was applied above and set to Color Dodge at 34% layer opacity. A Hue/Saturation Adjustment Layer was clipped to this layer (CTRL+ALT between the layers) and the Saturation was set to 0 so no color comes through, just the painterly texture. On a stamped layer above (CTRL+ALT+SHIFT+E) Topaz (see sidebar for website link) Lens Effects Motion Blur filter centered on the flower. On another stamped layer, the now free Nik Viveza 2 was used to further emphasize the focal point. Have a great day!…..Digital Lady Syd
A Palace on Wheels
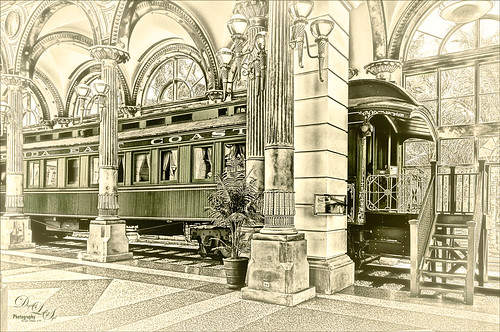
This image is of Henry Flagler’s Railcar No. 91 (see A History of Railcar for No. 91 for an interesting history lesson) or the so-called “Palace on Wheels” from the Guilded Age (CC 1912). It is available to walk through while visiting at the Flagler Museum in Palm Beach, Florida. This image was created using the exact same steps as in my recent Fun Photoshop Blog called How to Get a Great Illustrative Effect with Lucis Pro 6.0.9. First duplicated the background layer and opened up the free Nik Silver Efex Pro 2 using High Structure (Harsh) preset with a few changes for this image. This layer was duplicated and Lucis Pro was applied (Smooth 13/Enhance 97 and Mix with Original Image 81/19) and then duplicate this layer and open up Lucis Pro again with these settings (Split Channels Enhance Detail Red 159, Green 171, and Blue 177 with Smooth at 15). On top a Hue/Saturation Adjustment Layer was added and green color created (Hue 109, Saturation 11, and Lightness -41 with Colorize checked). The layer mask was turned black by CTRL+I in mask and a soft low opacity brush was used to paint back the green in the railcar and set to 44% layer opacity. Another Hue/Saturation Adjustment Layer was added (Hue 187, Saturation 8, and Lightness -7 with Colorize checked). The layer mask from below was copied (ALT+drag) and then invert the layer mask (CTRL+I in the mask). A stamped layer was created on top (CTRL+ALT+SHIFT+E) and Topaz (see sidebar for website link) Glow 2 Auto Shine preset was applied. A Gradient Map was added on the image using a cream to yellow gradient set to Color blend mode at 47% layer opacity. Last step involved another stamped layer and the also free Nik Viveza 2 was applied to adjust where the focal point is. That is it!…..Digital Lady Syd
The Perfect Plant
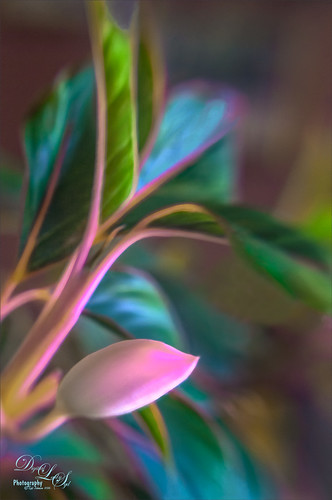
This pretty plant sits on my kitchen table and I am not sure what kind of plant it is, possibly a Sherbert Ti. It creates pod looking objects that open up into leaves. This image was taken with my old Lensbaby Composer and was set to F/4 with the +10 Macro Lens attached. On a duplicate layer in Photoshop, Topaz (see sidebar for website link) DeNoise was opened and the Overall slider was set to 0.10 and Shadows to 0.20 – not much adjustment at all. Topaz Glow 2 was applied on a stamped layer (CTRL+ALT+SHIFT+E) using Blake Rudis’s Glow for Animals Settings preset and set to Color Dodge blend mode. (To download the presets that were for Glow but work fine in Glow 2, click on his Topaz Glow Webinar.) The now free Nik Viveza 2 was opened on a stamped layer and two control points were used – one to sharpen the pod as the main focal point and one to soften the blue in the background leaf. A Luminosity Red Channel Curve Adjustment Layer was added on top. (See my How To Use a Red Channel to Create a Nice Blended Image Effect blog for more info on this.) A little clean up layer and that was about it. Love what this Lensbaby does for a macro effect!…..Digital Lady Syd
Flagler Museum
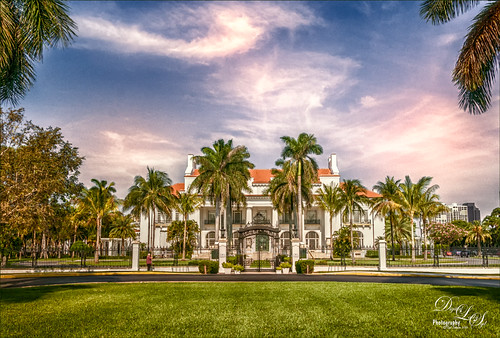
This is the outside of the magnificent Flagler Museum, also called Whitehall, last home of Henry Flagler in Palm Beach, Florida. It is one of the images used in my Fun Photoshop How To Create a Quick Montage blog. This is a great place to take images if you are in the area and has wonderful history! Nik’s free plug-ins HDR Efex Pro 2, Viveza 2, and Color Efex Pro 4 using Midnight filter at 51% and Detail Extractor filter on just the foreground and museum were applied all in one Smart Object. Nik Define was used at default for a little noise removal and that was it. …..Digital Lady Syd
Screaming On the Coaster!

This image definitely represents that so recognizable Lucis Pro look. Loved all the expressions on the riders – the older group on the top row and youngsters having a blast below! This was taken a few years ago of the Manta Roller Coaster at SeaWorld, Orlando, Florida – short video of actual ride. Lots of filters here – Topaz (see sidebar for website link) Adjust on just the sky edge, Topaz Clarity on the people, Lucis Pro 6.0.9 for overall sharpness, Topaz Detail for a final sharpening, and the now free Nik Viveza 2 to reinforce the focal point. Lots of fun here!…..Digital Lady Syd
Spotlight on the Canna Lily
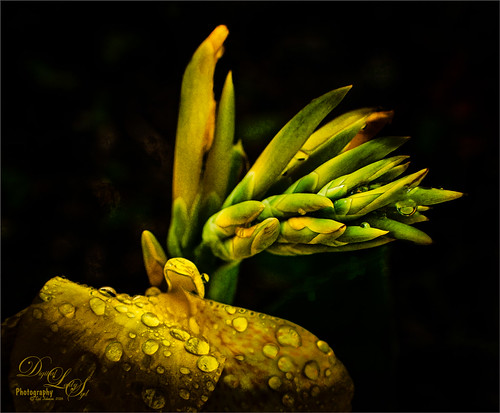
This is a macro image of a Canna Lily in my front yard taken after a recent rain. It was taken at F/2.8 with my Nikon 60 mm Macro Lens with a Bower 0.5 x High Resolution Digital Lens with Macro added to the lens.In Photoshop Topaz (see sidebar for website link) Simplify using BuzSim preset, the currently free JixiPix Spectral Art Dark Lines preset, and free Nik Viveza 2 to drive the focal point home. Last step was to add my free Cat Painting Canvas set to Overlay blend mode on top. That was it. Really simple image but I love the water drops!…..Digital Lady Syd
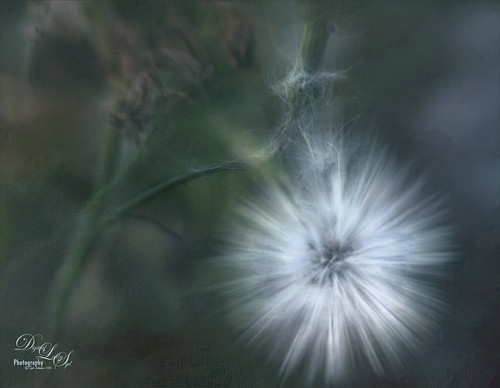
Ghostly Dandelion
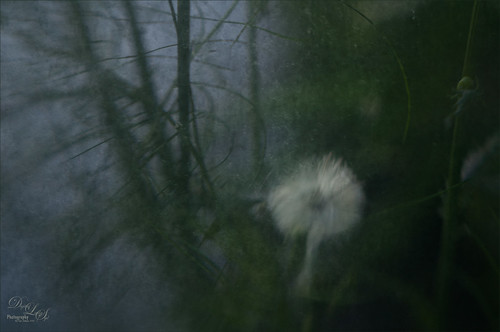
This is another in a series of Dandelion images I took of this humongous weed growing by my front door???? This time my old Lensbaby Composer was set it to F/4 with the +10 Macro Lens attached. In Photoshop all that was done was to add two free rust textures which can give an almost wintry feel to an image when the blend mode is changed. The first was called Texturez Rust Texture 3559 and set using Soft Light blend mode at 28% layer opacity – then a Hue Saturation Adjustment Layer was clipped to the texture (ALT+click between the layers to clip) and the Saturation slider was set to -100 to remove all the color of the texture, just leaving the pattern. A layer mask was added to the texture layer and just the Dandelion was painted out so it was no texture covered it. Next another texture called Hrt Rust Metal 7 was added on top and set to Hard Light at 31% layer opacity. Another Hue/Saturation Adjustment Layer was clipped to it and the Saturation slider was also set to -100. A Layer Mask was also set on this texture layer. The last step was to use the now free Nik Viveza 2 plug-in to further drive the focal point to the dandelion. The flower was brightened and structure increased while the corners of the image were slightly darkened to give a gentle vignette effect and drive the eye to the dandelion. That was it. I really like the moody feel to the image…..Digital Lady Syd
Little Fern Flowers
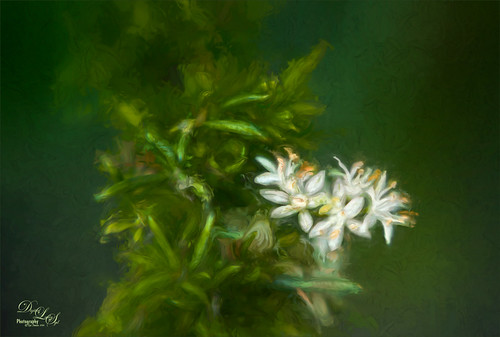
This image is of little white flowers growing out of the top of a Foxtail Fern or Asparagus Ferns in my yard. An older Lensbaby Composer was used – set to F/4 and using the Macro +10 lens. In Lightroom Seim’s (see sidebar for website link) Super Super HDR X preset was applied to the image before going to Photoshop. Used a Hue/Saturation Adjustment Layer to remove just a little haloing on the edges of the white flowers. On a stamped layer (CTRL+ALT+SHIFT+E) Lucis Pro was applied. (Settings: Assign Original Image Color 31%/69%; Enhance Red 147/Green 87/Blue 47.) See my Digital Lady Syd Reviews Lucis Pro 6.0.9 (Now Affordable!) blog for info on this. A black layer mask was added and just the white flowers were painted back. On another stamped layer Topaz (see sidebar for website link) Impression 2’s was opened and my SJ Renoir WC Look preset was applied at 71% layer opacity. (Settings: Stroke Type 13, Brush Size 0.73, Paint Volume 1.00, Paint Opacity 0.91, Stroke Rotation 0, Stroke Color Variation 0, Stroke Width 0.65, Stroke Length 0, Spill 0.79, Smudge 0.55, Coverage 0.67, Coverage Transition 0.30, Cover center X0/Y0; Color Overall Hue 0.07, Sat 0.15, and Lightness 0; Red Sat 0.50; Orange Sat 0.50; Purple Hue 0.85 and Sat 0.65; Lighting Brightness 0.08, Contrast 0.12, Vignette 0, Light Direction X-0.27/Y0.15; Texture Strength 0.11, Size 1.00, Background Type – solid white, and Background – #b25b41.) On a New Layer used the Smudge Tool to smooth some areas. On yet another stamped layer, the now free Nik Viveza 2 was applied to adjust the focal point just right. That was it! Was a lot of fun to take the shot and paint the image!…..Digital Lady Syd
Busy As a Bee!
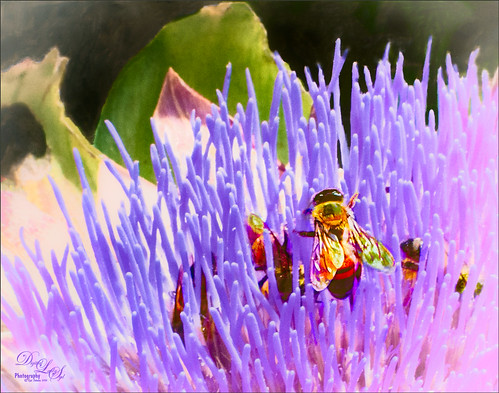
This little bee and his buddies were very busy checking out this magnificent specimen of a purple succulent at the Harry P. Leu Gardens in Orlando, Florida. I am not sure what kind of plant this was, but it was a gorgeous color! No wonder the bees were attracted to it! The image was opened in Photoshop and the background duplicated. Next JixiPix Spectral Art’s Dark Lines preset was applied to the layer – see my How to Use the Free Spectrel Art Plug-in blog to download. A black layer mask was added and the effect was only applied to the bees to give a little more detail to the wings. A stamped layer was created on top (CTRL+ALT+SHIFT+E) and Lucis Pro 6.0.9 (see my Digital Lady Syd Reviews Lucis Pro 6.0.9 (Now Affordible!) blog) was applied to further sharpen up the bees. Another black layer mask was added and the bees were painted out again and in the Properties bar, the Density was set to 80%. Some clean up was done on a layer. On another stamped layer the now free Nik Color Efex Pro 4 was applied using my favorite grouping of Film Efex: Vintage (set to Film Type 2), Darken/Lighten Center, and Monday Morning set to no Smear, Color Set Sepia, and overall Opacity 56%. On yet another stamped layer, Topaz (see sidebar for website link) ReStyle was opened up. The Sunflower Fields preset was applied and in the ReStyle Masks section, just the color was painted into the bees – this gives the really pretty golden color in the bees, and in the Basic section, the Detail Structure was set to -0.69 to soften everything but the bees. The last step was to create another stamped layer and apply the also free Nik Viveza 2 to the image to draw more focus to the bees. It always amazes me how these different plug-ins work together to get some great effects!…..Digital Lady Syd
Just a Little Flower
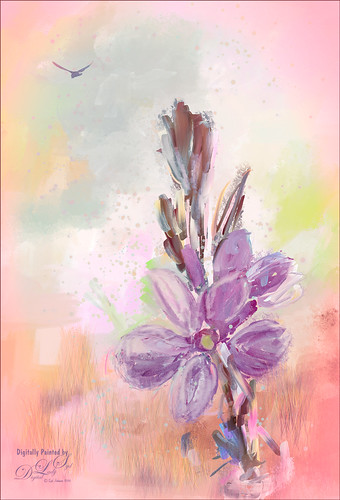
This image was created by painting over a flower taken at the Harry P. Leu Gardens in Orlando, Florida. The flower was actually selected from its background with Topaz (see sidebar for website link) ReMask 5 and saved as a PSD file to take into Paintstorm Studio. This program has some beautiful paint brushes at a very reasonable price. Several different layers were painted with different brushes including the watercolor spots before saving as a PSD and re-opened into PS. A bird was added and my Corel Painter Fresh Air texture was used behind the flower. Added a little grass using Frostbo Set 2 Grass 005 brush to add some ground. Used Kyle T. Webster’s free Animator Pencil to draw around the petals a little and the free Nik Viveza 2 to adjust the focal point. It was a lot of fun to paint!…..Digital Lady Syd
A Beautiful Room
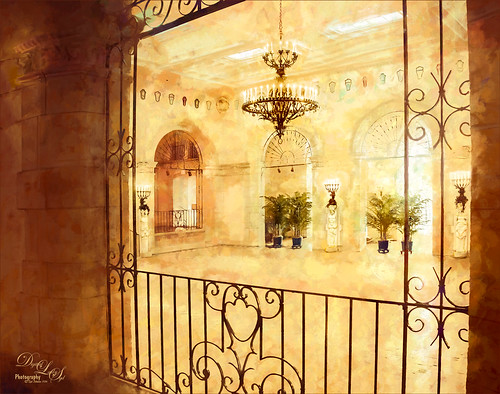
This image of the West Room is one of several beautiful areas at the Flagler Museum (or Whitehall) in West Palm Beach, Florida. It appears to be one of areas rented out for special occasions. When visiting this museum, it was a pleasant surprise to see all it contained, and with practically no other people around. A photographer’s paradise!
For post-processing, in Lightroom Trey Radcliff’s free preset called A Marshmellow Happysmell was applied – this gives it the warm colors in the image. In Photoshop, Lucis Pro 6.0.9 was applied (AOIC-0/100; R171/G155/B37) and then in a black layer mask, just areas I wanted sharpened were painted back. Created a stamped layer (CTRL+ALT+SHIFT+E) and added Topaz (see sidebar for website link) Impression 2’s Overpaint II preset as is. Next several painting and clean up layers were used to smooth out some of the rough edges. Added Nik Viveza 2 as a last step to emphasize the focal points. I like the effect this Impression preset added to the image…..Digital Lady Syd
Hiding from the Sun
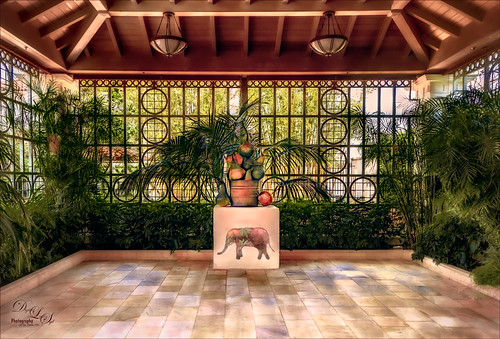 This restful place was located at the Philip Hulitar Sculpture and Botanical Gardens in West Palm Beach, Florida. This particular bronze sculpture was called Harvest Pears and was in this building with a fountain and another sculpture called the Monumental Apple Basket – both sculptures are by Luis Montoya and Leslie Ortiz.
This image used Topaz (see sidebar for website link) Glow on a duplicate layer – using one of my presets called SJ Painterly Wonderland (see my Tidbits Blog called My Glowing Porch Flowers for preset settings). On a stamped layer (CTRL+ALT+SHIFT+E) applied Lucis Pro 6.0.9 (Settings were: Assign Original Image Color – 0/100 original and Smooth 4791 and Enhance 45589). The Elephant on the stand is from Design Cuts Elephant Children’s Book Freebie Pack-77. A lot was done to make the elephant fit into the image like softening the edges and adding some defining lines. On another stamped layer Nik Color Efex Pro 4 (now free) was added using these filters: Film Efex Vintage, Glamour Glow, Darken/Lighten Center, Monday Morning, Detail Extractor, and Sunlight. Last step was to add Nik Viveza 2 to emphasize the focal point. This took a long time to do, but it is always worth it when I take my time on post-processing……Digital Lady Syd
A Peaceful Place
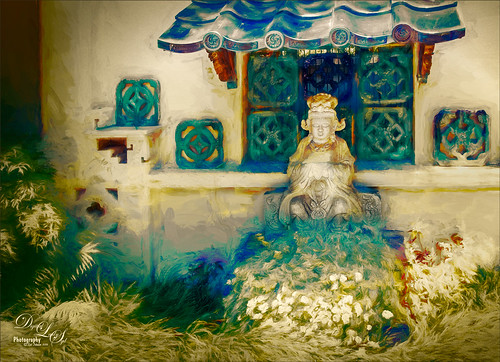
This image is a of a nice quite place at the Philip Hulitar Sculpture Garden in West Palm Beach, Florida. In Photoshop two layers were opened in Topaz (see sidebar for website link) Impression and different presets were used to get this effect. The first preset was one of mine that was based on a Colored Pencil preset. But I did not like the effect on the bottom foreground grassy area. Therefore one of Blake Rudis called Abstract Settings was used for this area by removing the effect from the top of the image in a layer mask. Then on two more different layers Topaz Lens Effects was opened using Toy Camera Soft and Dreamy preset with the Vignette and Camera Shake turned off, and a Selective Vignette using the Soft Olive Green preset. As a final step, Nik Viveza 2 was used to draw the focus to the statue a little more clearly. I really like the way the painterly effect turned out!…..Digital Lady Syd
Get the Boy Something He Wants!
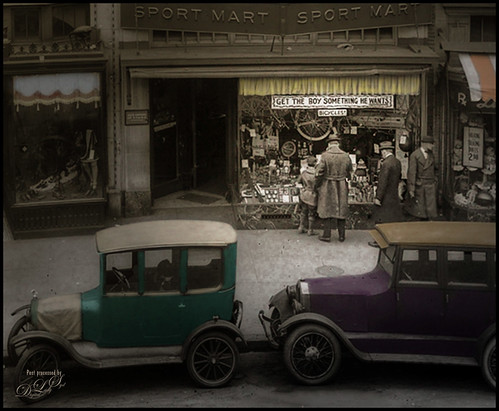
This image was downloaded from Shorpy.com of the Sport Mart on F Street NW in Washington. DC around 1922. I had originally started tinting the whole image as I thought the old cars were quite interesting. Once zoomed into the people, the image took on a whole different perspective! Therefore it was cropped tight to see the boy and his father and/or grandfather looking at the bicycles and other items in the store window. The sign sort of capped off what I consider a great story! All I could think about is what the little boy wanted.
The tinting was done using the technique and brush in my How to Hand Tint a Vintage Image and Create a Brush to Do This blog. After resizing and cleaning up the image a little, several layers were painted with the Tint Brush created in the linked blog. Then image was cropped as the cars looked good still in front of the store. On a stamped layer (CTRL+ALT+SHIFT+E), Nik Color Efex Pro 4 (now free) was used to create the rather dewy soft vintage feel in the image. (These filters were used: Glamour Glow, Midnight with Blur turned off and set to 52% opacity, Reflector Efex, Vignette Filter and Image Borders.) Nik Viveza 2 (also free) was used to focus on the store window a little more. On another stamped layer Photoshop’s Camera Raw filter was opened and using the Detail section, some color noise was removed in the coats of the people. Adding a black layer mask (CTLR+I in white mask) to the layer, just the coats and any colored noise areas were painted over with a white brush to remove the noise. On another stamped layer the Camera Raw Radial Filter was used to lighten just the people and sign using the Brush in the filter to pinpoint just them. This layer was set to 55% layer opacity. Next a Red Channel Curves Adjustment Layer was used to brighten up the luminous areas just slightly. (See my How to Use a Red Channel to Create a Nice Blended Imaged Effect blog.) That was all that was done. I am really enjoying this technique!…..Digital Lady Syd
Looking Innocent!
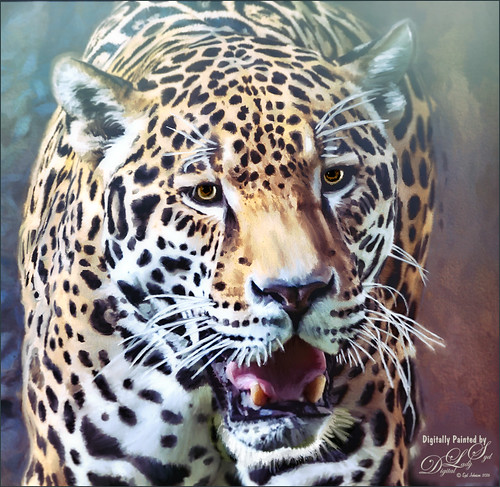
Loved how this beautiful Jaguar turned out taken at the Jacksonville Zoo in Florida. In Lightroom tried to really bring out the colors so image could be painted in Photoshop. This image was actually of the cat walking, but his face was so beautiful, I decided to crop close. First the image was painted on several different layers using mostly mixer brushes. Brightened eyes using an Exposure Adjustment Layer (see How To Do a Quick Eye Sharpening in Photoshop blog). Topaz (see sidebar for website link) Reflector filter’s Gold Left was used to lighten the left side of the face. On a composite layer (CTLR+ALT+SHIFT+E) Topaz Texture Effects’s Crisp Morning Run preset (with these changes: Basic Adjustment Brightness -0.27, Shadow -0.29, Highlight 0.17, Clarity -0.60, Sat 0.11, Temp -0.40, Tint 0.05, and Opacity 0.80). On a new Composite Layer, Nik Viveza 2 (now free) was applied to just the nose to brighten it up just a little more in the image. And as a final step, a Black and White Adjustment Layer was opened to just make sure my focal point stood out correctly (see How To See If you Captured the Focal Point). Really liked the final effect!…..Digital Lady Syd
Feeling Peachy

Just felt like playing with one of my beautiful peach colored hibiscus blooms that are growing on my back porch. In Lightroom’s Basic Panel, just pressed Auto and reduced the Exposure slider a little (usually the Auto button tends to over-expose the image), added some Clarity, and used the Adjustment Brush to paint in some of the flower focal point details using the Clarity and Sharpness sliders. In Photoshop, Topaz Impression’s Watercolor IV preset was applied with no changes to the image. A layer mask was added and using Grut’s Natural Media Knit Pin brush, small lines were painted to bring the original color from underneath – looks like a light outline in places. Really liked this effect and it is easy to do. On a New Layer above, Grut’s Charcoal Dale Haze brush set to 35 pixels was used to blend away areas that were drawing attention from the focal point, mainly the bud and some of the edges had bright colors in them. Check out Grut.com brushes – each week he offers a free brush to try out and that is how I got the two used here. Nik Viveza 2 (now free) was used to add a slight vignette on the outside edges and to add a little more detail to the focal point. These flowers are so beautiful!…..Digital Lady Syd


