
Unknown Little Girl Statue

Here is another beautiful little girl statue from an unknown sculptor at the Lightner Museum (old Hotel Alcazar) in St. Augustine, Florida. I decided to use several of my own textures on this image. First it was cropped, processed a little in Lightroom, brought into Photoshop CS6 where Nik Viveza 2 was used to sharpen only the statue. Nik Color Efex Pro was opened and Dark Contrast Filter and Glamour Glow filters were stacked. I then used four layers of my own textures that I created (two were made by painting on a white background with soft colors using a large Mixer Brush and one is of my lace curtains) and finally finished off with ShadowHouse Creations Old Photo 6 texture used twice – once as a Color Dodge layer at 43% and one as a Linear Burn at 88% on the background only. I loved the way it has an old Western look – she reminds me of Rebecca of Sunnybrook Farm. Textures are so much fun!…..Digital Lady Syd
Big Sky Preset for Lightroom 4.1

This is my “big sky” view above my little lake and what I have been seeing every afternoon this summer in Florida. Beautiful but very scarey! I wanted to try out Matt Kloskowski‘s (one of the Photoshop Guys from NAPP) new free Lightroom presets called Big Sky as a starting point – Strong in this case. After making adjustments in Lightroom, the image was taken into Photoshop and first Nik’s Color Efex Pro 4 was applied stacking these filters: Brilliance/Warmth with Sat at 32%, Warmth 49%, and Perceptual Sat 40%; High Key With Dynamic High Key set to 61%; and Pastel Using Method 2. Next two Selective Color Adjustment Layers were created with black filled into their layer masks. One Adjustment layer was for the green grass so in the layer mask I painted back just the green area for that layer and the other targeted for the slight reddish color in the roofs. Next the new Color Lookup Adjustment Layer set to 3DLUT DropBlues.3DL was added – the sky was then painted over with a light gray to soften the change. (To learn more about Color Lookup, see TipsSquirrel’s Richard Hoffman’s short video here.) Next Nik Viveza 2 was used to smooth out the clouds and sharpen the house lines. Finally Imagenomics Noiseware was set to Full Stronger Noise preset. The last steps created a Curves Adjustment Layer for a little more blue using just the Blue Channel to increase the color and set to 70% opacity. Finally my Layer Style frame was used sampling the colors from the image (see DLS Free Layer Style Frames). I liked the way the preset worked – it looks very similar to how it appeared originally in Lightroom without all the adjustments and blue cast. The final result looks a bit like an architectural rendering seen in house brochures. And you got to love the clouds!…..Digital Lady Syd
Soft and Sharp Image at the Same Time!

Holoholkai Beach, a lava filled beach, on the Big Island in Hawaii. I just really like this image. It was a 3-shot HDR image processed in Photoshop CS6 Merge to HDR. This was done before the Lightroom upgrade to allow 32-bit processed Tiff images for processing. This image actually has 13 control points in my favorite plug-in ever, Nik’s Viveza 2, that sharpened some of the Lava rock and smoothed out the rough water to lead the eye through the image. Next Nik’s Color Efex Pro 4 was used stacking Film Efex: Nostalgic filter using Film Type 4, Brilliance and Warmth using 34% warmth to warm up the image, and Glamour Glow which gives the image that soft look – a control point was placed at the focus point of the image to keep it sharp in that area. A Curves Adjustment Layer was used to for contrast and my Thin Layer Frame was applied (see DLS Free Layer Style Frames). Love the final result!…..Digital Lady Syd
Lightner Museum’s Unusual Chandelier

Sometimes you just like an image and that is what this is. The shot was taken at the Lightner Museum in St. Augustine, Florida and I am having trouble finding any information about the chandelier. Very simple processing using Nik Color Efex Pro 4 filters stacking Tonal Contrast, Darken/Lighten Center, Detail Extractor, and Vignette. Next Nik Viveza 2 was applied to bring out the color a little more on the green grapes and a couple of the glass flowers. Imagenomics Noiseware was applied at Full Noise Reduction preset as the image was quite noisy due to the high 1250 ISO value needed to shoot in the museum. The last step added the OnOne PhotoFrame Vincent Versace photo wide frame (see sidebar for website link). I got a chance to play around with some of my favorite plug-ins!…..Digital Lady Syd
Digital Lady Syd Related Blogs:
Little Girl Statue at Lightner Museum – contains all my other Lightner links at bottom of blog
32-Bit HDR Using Lightroom and CS6

This is a beautiful little town called Honomu is on the road to Akaka Falls on the Hilo side of the Big Island. I love how this image turned out – the original tonemapped file was totally flat. This image was processed as a 32-bit HDR image in Photoshop CS6’s Merge to HDR program, then brought back into Lightroom 4.1 as a TIFF file where it was adjusted using mainly the Basic sliders, then edited back in Photoshop CS6 as a 16-bit PSD file. From there, Nik’s Color Efex Pro 4‘s was opened and these filters stacked: Detail Extractor at 68%, Graduated Filters using Blue No.1 as the sky was an ugly gray color, and finally the Film Efex Vintage set to Film Type 21. Next Nik’s Viveza 2 was added and that is what really made the difference in this image – the detail was popped in the signage areas but smoothed in the sky. Imagenomics Noiseware was added to smooth out the roughness of the whole image. The frame I used is called SJ Thin Double Edge Frame and can be downloaded at my Tidbits Blog DLS Free Layer Style Frames. The colors for frame were sampled from the image. Once again an image that did not have too much going for it turned out really nice……Digital Lady Syd
Digital Lady Syd Related Blogs:
New Lightroom and Photoshop 32-bit Processing Capability
Hawaiian Bliss!

Every now and then I have to post another image from this wonderful resort! I know, a lot of people may consider it a little touristy, but I guess I am just a big tourist at heart and totally loved it!. This of course is the Hilton Waikoloa Village on the Big Island in Hawaii. A three shot HDR image was taken, processed in Photoshop’s Merge to HDR with no changes – just Remove Ghosting checked, then Nik’s Color Efex Pro 4 (stacked these filters: Film Efex Vintage – Film Type 11, Detail Extractor using overall strength of filter to 86%, and Image Border – Type 11), and Nik’s Viveza to darken the corners a little and bring out the detail in the center of the image. Not very difficult but then when it is as beautiful as Hawaii, it is pretty easy to get great pictures!…..Digital Lady Syd
Digital Lady Syd’s Related Blogs:
Nik’s Viveza 2 Plug-In – A Hidden Gem!
Whale Watching with Nik’s Color Efex Pro 4 & Viveza 2
Using NIK’s Color Efex Pro 4 and Viveza Together
Blue Flowers and Layer Style Frame

This image is actually of my pink and white Jazze Rose Frost Alestroemeria (see my blog Magnificent Macros with Nik Plug-Ins) but the colors were changed to purple and blue. I first tried this in a blog called Purple Lily Pads! using a slightly different technique with similar results. Just couldn’t resist posting again how easy it was to do this. First I applied the Topaz (see website link in sidebar) Simplify filter to get the soft petal look. I used a Simplify Size of .85 and Feature Boost of .78 to get a really painterly feel. In Nik’s Viveza (my favorite overall plug-in), the color sliders were changed to get the blue and purple colors. Control Points were added to adjust the background and parts of the flowers to get good detailed structure. The frame was created by just making a Photoshop Layer Style. In the Stroke tab the Size was set to 54 pixels, Inside Position, and Fill Type Pattern – just select any pattern that fits your image colors. I am using a pattern from Victorian Dreams by Princess of Shadows – texture 10 at a Scale of 1000. In the Inner Shadow tab set the Size t0 70. It is very easy to make frames for your images this way since there are so many patterns available to use. Anyway, it was a lot of fun to do!…..Digital Lady Syd
White Daisies! Using Color Efex Pro Midnight Filter
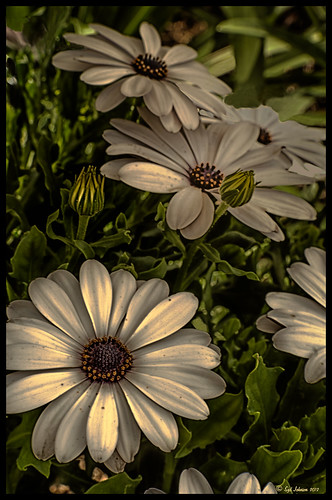
These beautiful daisies are growing in my front yard – first time I had seen this variety with the navy and orange centers. (Hover over image to see the image as it came from Lightroom.) Got a chance to try out the new Color Section in the Lens Correction Panel in Lightroom 4’s update (Adobe Camera Raw 7.1 for Photoshop) and it worked great! See New Color Fringe Correction Controls for information on this new tool. Next used Nik Color Efex Pro 4 with Detail Extractor, Midnight and Image Borders filters stacked. The Midnight Filter set to Sepia Color Set really gave this image the lovely soft feel. Added a few control points in Nik Viveza 2 to bring out the structure of the flower centers and buds. Added a Curves Adjustment Layer and painted out a few of the distracting light points. That was it……Digital Lady Syd
Digital Lady Syd Related Blogs:
NIK Color Efex Pro 4 – Digital Lady Syd’s Review!
Nik’s Viveza 2 Plug-In – A Hidden Gem!
Nik Color Efex Pro 4 Just Does It Right!
Whale Watching with Nik’s Color Efex Pro 4 & Viveza 2

One of the many photos of a great whale watching trip on the Big Island in Hawaii. (See Hawaii Ocean Sports for information on whale watching boat trip.) This image used one of the workflows I like to use for quick processing of my images. The RAW file was adjusted in Lightroom where the Highlights, Shadows, Whites and Blacks sliders were moved. Next the Exposure and Contrast sliders were adjusted, and finally it was straightened and cropped. The image was brought into Photoshop and opened in Nik’s Color Efex Pro where five filters were added in this stack order: B&W Conversion (Dynamic Contrast), Photo Stylizer (Cool Silver – Style 1), Low Key, Darken/Lighten Center, and Detail Extractor applied just to background area with Control Points. Not sure how I came up with this combination, but I really liked the final result. Nik’s Viveza 2 was used to sharpen up the whale and water blowing up behind him. OnOne PhotoFrame acid controlled 12 (see sidebar for website link) was added using a matching color from image. That was it!
The combination of Color Efex Pro and Viveza is a pretty powerful combination. I do not process any image now without at least going into Viveza – it is a fabulous finishing plug-in…..Digital Lady Syd
Digital Lady Syd Related Blogs:
Nik’s Viveza 2 Plug-In – A Hidden Gem!
Detail Pop Using Nik Color Efex Pro and Viveza
Using NIK’s Color Efex Pro 4 and Viveza Together
Nik Color Efex Pro 4 Just Does It Right!

Loved the beautiful old puppets on display in one of the walkways at the Hilton Waikoloa Village on the Big Island in Hawaii. It seemed like a perfect time to once again add the Nik Color Efex Pro 4’s new Film Efex – Vintage filter. The Colorize Filter, Midnight Filter, and Image Border were then stacked on top. Finally a little Nik Viveza 2 to sharpen the elephant a bit and that was it! Love the results!…..Digital Lady Syd
Digital Lady Syd Related Blogs:
The New Film Efex-Vintage Filter From NIK CEP 4
Beautiful Daisies with Film Efex: Vintage in Nik Color Efex Pro 4
Unsharp Mask Filter In LAB Mode
(Here are my settings for the filters: Film Efex-Vintage – Saturation 10%, Warmth 79, Vignette 63, Brightness -2, Grains per pixel 500, Film Strength 80%, and Film Type 13; Colorize – Method 6, Color R143G209B219, Strength 5%; Midnight – Color Set Neutral, Blur 0, Contrast 30, Brightness 60, Color 57, Shadows 20, and Overall 78%; and Image Border – Type 3, Size 60%, and Spread 98%.)
Beautiful Soft Flowers

Just loved the pink hyacinths I bought – hope they will come back next year! This image was taken with my Micro Nikkor 60 mm f/2.8 lens at f/9.5. Used Mike Moats workflow (see info on this in related blogs below) with Color Efex Pro 4 (stacking Tonal Contrast, Darken/Lighten Center, and Vignette filters) added first and then Viveza 2 to make the details sharp. OnOne PhotoFrame napp_frame_12 (see website link in sidebar) was added. Final result – beautiful!…..Digital Lady Syd
Digital Lady Syd Related Blogs:
Using NIK’s Color Efex Pro 4 and Viveza Together
Nik’s Viveza 2 Plug-In – A Hidden Gem!
The Macro Shot
Cleaning Up a Messed Up Photo
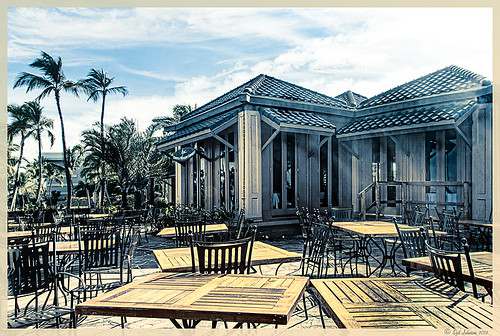 |
Here is another before and after for you. The image of the KPC Seafood Restaurant at the Hilton Waikoloa Village on the Big Island in Hawaii. At night it was wonderful to eat outside under the dark starlit sky with the ocean waves in the background. I wanted to add this image to a Hawaiian slideshow I am creating in Lightroom 4 and was really disappointed at how bad the original image appeared. I liked the tone in the wood and the sky was rally nice but otherwise, it was not too good an image. I tried several techniques, walked away from it for a day, and came back to it. I finally got the nice result shown above (hover over image to see the original). To get this result, I removed the palm tree going straight up to nowhere. Next I went into Nik’s Viveza 2 to get rid of the hazy feeling. I usually use this filter later in my workflow, but this image needed a quick tune-up before I could do anything else. Then I went into Topaz’s Black and White Effects (see sidebar for website link) and by playing with the Quad Tones, got this really nice result. (For settings, see below.) A Curves Adjustment Layer was added to enhance the contrast of the building, but the blue in the sky was painted black in the mask to keep it from being affected by the curve change – the blue of the sky competed too much with the blue tones in the restaurant. Noise was removed from the whole image (see Russell Brown ACR blog below to do this). Localized sharpening was done and Puppet Warp was used to straighten the vertical lines of the restaurant. I feel like I was able to save an otherwise very bad image by using these two plug-in filters, and I might add two of my very favorites. For information on how to do some of my workflow steps, see my blog links below. …..Digital Lady Syd
Digital Lady Syd Related Blogs:
Nik’s Viveza 2 Plug-In – A Hidden Gem!
Quad Tones in Topaz Black and White Effects Plug-in
I Didn’t Know That! Curves Adjustment Layers
Edit Layers with ACR (Adobe Camera Raw) Script
Straightening with Puppet Warp!
A preset was created in Topaz Black and White Effects using these settings as shown on the final version of image above: Conversion: Basic Exposure settings – Contrast 0.08, Brightness 0.05, Boost Blacks 0, and Boost Whites 0; Adaptive Exposure settings – Adaptive Exposure 0.56, Regions 7.06, Protect Highlights 0, Protect Shadows 0, Detail 2.17, and Detail Boost 1.04; and Color Sensitivity settings – Red (-0.15), Yellow (0.38), Green (-0.42), Cyan (0), Blue (-0.09), and Magenta (0). Finishing Touches: Silver and Paper Tone settings – Tonal Strength 0.63, Balance 0, Silver 32.00, Silver Tone Strength 0.50, Paper Tone 32.00, and Paper Tone Strength 0; Quad Tone settings: Color 1 Region (Color R0G0B0), 24.68, Color 2 Region (Color R86G102B136) 69.92, Color 3 Region (Color R229G223B164) 154.9, and Color 4 Region (Color R255G252B206) 255.0; Vignette settings – Center (2796,1607), Vignette Strength (-0.09), Vignette Size 0.53, Vignette Transition (0.63), and Vignette Curvature 0.75; and Transparency settings – Overall Transparency 0.59)
Detail Pop Using Nik Color Efex Pro and Viveza

This little bee really wanted his picture taken so here it is. I am still not sure what flower this is – it was at the Hawaii Tropical Botanical Garden on the Big Island in Hawaii. To get the color so bright and the detail so sharp in this image, a Nik Color Efex Pro recipe was used following a link at the Nik website called My Go-To Recipe for Bringing Out Details with Ellen Anon. Next Nik Viveza 2 was added to soften the large leaves in the background (set Control Points in corners and move the Structure slider to -100 to get a soft smooth appearance). Very simple and easy to do. I still love using these two plug-ins together!…..Digital Lady Syd
Digital Lady Syd Related Blogs:
NIK Color Efex Pro 4 – Digital Lady Syd’s Review!
Using NIK’s Color Efex Pro 4 and Viveza Together
Combining Plug-ins for More Image Interest
The Macro Shot
Daisies are Everywhere!
Magnificent Macros with Nik Plug-Ins

The Jazze Rose Frost Alstroemeria flower is one of the prettiest perennials that you will find. This one resides in my front yard now. The same workflow with Nik products that really make your landscapes pop was applied to this macro. Silver Efex Pro 2 (same High Structure-Harsh preset with Color Filter set to Green), Color Efex Pro 4 (Darken/Lighter Center and Graduated Neutral Density filters stacked), and Viveza 2 to bring out details in the stamen structure were applied. That was it! Check out my Fun Photoshop blog “Use NIK Color Efex Pro 4 and Silver Efex Pro 2 Together to Create Fabulous Landscapes!” for more information.
Give this a try next time you want a different look for your macros!…..Digital Lady Syd
Aerial Shot Using a Point-And-Shoot Camera! Not Bad!

Thought I would show you what results you can get even when shooting with an inexpensive point-and-shoot camera. I got several wonderful images from the air, but this one of the Rockies was my favorite. (For a nice read on aerial photography, see Julieanne Kost’s book “Window Seat – The Art of Digital Photography & Creative Thinking.”) My little Canon PowerShot A1000 died last month so I had to quickly purchase another small camera. I wanted one that runs on batteries so I do not have to charge it all the time (since I do not use it that much) and I wanted something fairly cheap. I got a Kodak EasyShare 14 mp camera with a 5X zoom for $49 and it gets better pictures than my Canon did! This an example of what it can do. There was more noise in the JPEG image, but that is to be expected with a cheaper lens, and it definitely needed processing in Lightroom and Photoshop. In Photoshop, Adobe Camera Raw sliders were applied including the Noise Reduction sliders; then Nik’s plug-ins Color Efex Pro 4 (stacked filters Vignette: Lens, Detail Extractor, and Skylight Filters) and Viveza 2 (to even out the saturation in the corners) were used. This has been a great surprise to me. Definitely not as good as my Nikon DSLR, but not bad for a inexpensive point-and-shoot camera.
I guess this goes to show that even if you do not have the best camera, it sure beats missing the shot altogether, and you can get a really nice image!…..Digital Lady Syd
Scanning a Bloom for a Different Look

This is a blossom from my new Ballerina Blue Fuchsia plant. I got an idea from reading The Photoshop Darkroom by Harold Davis and Phyllis Davis to scan my flower into the computer using a black box. I actually used a black sunglasses case to cover the plant while I scanned it with my Epson Perfection 3200. I used VueScan Scanner Software (my scanner is so old that Epson would not support it in Windows 7, but this relatively inexpensive software will) set to 3200 dpi, print quality, output tiff as a camera raw file, opens in Adobe Camera Raw in Photoshop CS5. The black background needed a little cloning clean up first, then the flower had a few bad spots on the leaves to clean up, Nik Viveza 2 was used to even out the purple color evenly, and finally the Sharpen Tool was used on a few of the flower veins. That was it. I was surprised how easy and different the flower looks scanned in. If you have a scanner, give it a try for a change…..Digital Lady Syd
Combining Plug-ins for More Image Interest

Took this image of a red bloom from the hibiscus tree in my front yard – I love hibiscus flowers! A 60 mm Nikkor macro lens was used at F/6.7 for 1/60 sec. A Bower 0.5 x High Resolution Digital Lens with Macro was added to the lens. The camera raw shot was adjusted in Lightroom and brought into Photoshop. Some of the distracting background was cloned out, the image sharpened a bit, then Nik’s Color Efex Pro 4’s Darken/Lighten Center filter effect was applied. The image was taken into Nik’s Viveza 2 where the structure on the pistil and stamen was increased, and the background softened a little by setting the structure to -100. ShadowHouse Creations texture 5AT-2 was added and set to Soft Light at 62%. Next the new Topaz Star Effects plug-in was applied to the tips of the stigma to make it sparkle and a bit to the yellow anthers (see sidebar for Topaz’s website link). Finally OnOne PhotoFrame’s Taufer Texture 12 was applied to finish off the image (see sidebar for OnOne’s website link).
This is a good example of how several different effects can create more interest – it also helps to have a great color combination to work with too!…..Digital Lady Syd
Digital Lady Syd Related Blogs:
Trying Out Topaz Star Effects
Using NIK’s Color Efex 4 and Viveza Together
Problems for Big Ben
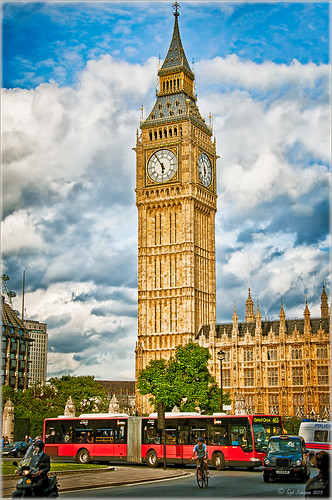 |
It is funny that I had just completed this image of Big Ben a few days ago and then it comes out that is has some tilting issues, 0.26 degrees NW or 18 inches off center at the top of the 314-foot tower. It will be thousands of years before Britain’s iconic landmark that houses the clock gets as bad as the Leaning Tower of Pisa in Italy. The rumor is Members of Parliament are meeting to discuss what to do including these two options: 1) Do costly repairs to both the Parliament Building and Big Ben, or 2) sell the entire complex to a rich foreign developer. Hum! For more information on this, check out The National Post article.
I tried to find an old famous painting of Big Ben but could not find one – can’t believe no one painted this gorgeous landmark in the 1800’s so my search is still on. In the meantime, I did find a site selling some very interesting Big Ben posters at Art.Com that I found very inspirational – give it a look to see some of the creative work others are doing (and for profit!).
How I processed this image? Believe it or not, this is just another pseudo HDR processed just like I do all my pseudo HDR’s. Used my SJ-Vivid Drawing Look preset in Lightroom 3 (download here if using Adobe Camera Raw) (note: change file extension to .xmp in zip folder to get file to work) and adjusted the Exposure, Blacks, Red Saturation (-45), Blue Saturation (+61), and Green Luminance (+3) sliders to make the image colors pop correctly. In fact the red bus was overpowering the image so the red saturation had to be reduced quite a bit. (Hover over image to see how it looked coming out of Lightroom.) I must say there was an amazing sky that day! Some clean up in Photoshop was done and the image was taken into Nik Color Efex Pro 4. All I did was add the SJ Pseudo HDR1 recipe (NOTE: This download link is broken if you click the Download button, but by right clicking on the button and choosing “Save Link As,” the file will download correctly.”) – I had to tone down the Detail Extractor and Contrast a little and change the Effect Radius to Large to get rid of the over-exaggerated HDR look. In Nik’s Viveza 2 I added a point on the clockface to make it really sharp but this could easily have been done with the Sharpen Tool in Photoshop. The last step was to add a Curves Adjustment Layer to brighten the whole image just a little. I was surprised how much detail came in from only applying the Lightroom preset without the Photoshop plug-ins. You could actually see the people riding inside the bus! It’s great when it all comes together with the light and composition to create a great shot!…..Digital Lady Syd
Digital Lady Syd Related Blogs:
Pseudo HDR Using NIK Color Efex Pro 4
Another Pseudo HDR Image with NIK CEP4 – Got to Love the Effect!
Where Am I?


