
Red Carnations on a Bright Sunny Texture
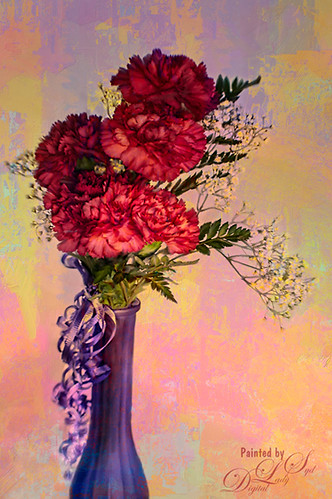
Just doing a little painting on some beautiful red carnations my daughter-in-law got for her birthday. Used Topaz (see sidebar for website link) Detail 3 to do an overall sharpening up of the image. Used Photoshop’s default brush Pastel Medium Tip as both a mixer and regular brush on this image and loved the brush strokes. Stacked two of Melissa Gallo of Painted Textures textures – August Copper set to Hard Light at 76% layer opacity and Spring Sky at Hard Light 78%. Last step was using Nik Viveza 2 to highlight the flowers in the center where I wanted the focus to be. It is a little bright, but I kind of like it – that is what is fun about stacking textures, you get some unexpected results! …..Digital Lady Syd
My Turtle Friend

Been enjoying my turtle pictures from the Ormond Beach Memorial Art Museum and Garden in Ormond Beach, Florida. This guy was just minding his own business and enjoying the Florida sun when I snapped him. Just basic adjustments were done in Lightroom. In Photoshop I used Nik Viveza 2 to sharpen his turtle lines and to draw focus to his face, and then the Camera Raw filter was applied using the Radial filter for a vignette effect. Really liked how this guy turned – just fun to do!…..Digital Lady Syd
Soft Pink Calla Lilies!
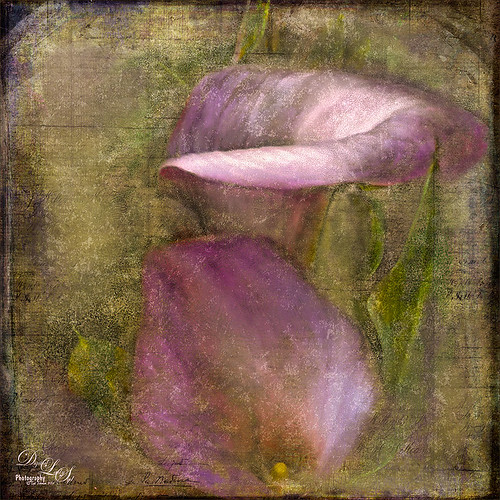
Just wanted to play with this beautiful image of soft pink calla lilies – love their color! Took them with my Android phone in the grocery and loved the result. Did nothing special to them in Lightroom – just the basics, then did a little clean up on the image in Photoshop before adding 2 Lil’ Owls (see sidebar for website link) Carnavale texture. Painted back the flowers in a layers mask attached to the texture and topped it off with Kim Klassen‘s Cloth & Paper Collection’s Magicfilm set to Soft Light blend mode at 45% layer opacity. This completed the vintage feel. The colors just did not look quite right to me and I had a hard time figuring out what to do to get the final look I liked. Then it hit me – go to my favorite plug-in – Nik’s Viveza 2 – and sure enough, with just two control points on the flower petals, I got just the color effect I wanted. Once again, lots of fun to do on boring Monday!…..Digital Lady Syd
Lantern at Stetson
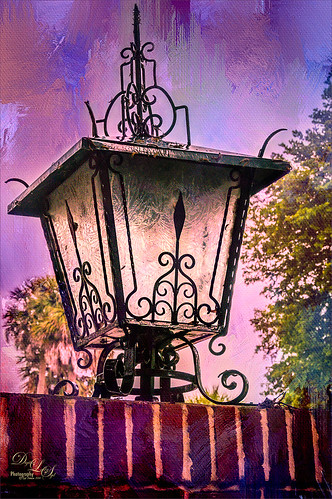
This beautiful large lantern was sitting on top of a large brick wall introducing Stetson University in DeLand, Florida, where my son goes to school. This was an easy image to post-process – just a little detail sharpening using Topaz (see sidebar for website link) Detail 3 so the glass etching could be seen better. Used a black layer mask and just painted back the glass areas. Next I used Mellisa Gallo (one of my favorite texture people) of Painted Textures November Twilight texture set to Linear Light blend mode at 100% layer opacity and April Impasto texture set to Multiply at 52% layer opacity – these were both from great deals she runs on her website each month. The lantern was painted back softly in a layer mask on each texture so the etchings still show up nicely. Now to get the lantern to light up just a little, I tried several different things and it just did not look right. My last attempt was using Nik’s Viveza 2 and setting a Control Point in the lantern. Then the Warmth was set to 44%, Brightness 36%, Contrast -32%, Saturation 52%, and Shadow Adjustments 100% to get the soft glow in the lantern. This filter never lets me down! Anyway, this image is just the way I wanted it!…..Digital Lady Syd
Using Pattern Overlay Layer Style to Get a Retro Feel

Had to visit Kokomo Cafe on Flagler Beach in Florida since I grew up in Kokomo, Indiana. Wonderful little place to get a nice breakfast (the pastries are to die for) or lunch and only a block off the beach. Did the regular processing in Lightroom before opening up in Photoshop. Painted Textures Mist was added and the Layer Style was opened. A Gradient Overlay using a Linear Dodge (Added) at 24% opacity and using Grad 2 gradient and a Pattern Overlay was added using the original image turned into a pattern (on background layer go to Edit -> Define Pattern – it appears at bottom of list) and set to blend mode Hard Light at 54% opacity and Scale to 120%. Now you can actually turn off the bottom layer and image shows up in the texture. Pretty cool! A Levels Adjustment Layer was added with black tab setting of 14 and Midtone setting of 0.71 to add contrast back into the image. Topaz (see sidebar for website link) ReStyle was added using the Hanging Orangutan preset. (Plug-ing settings were: ReStyle Opacity to 76%, Color Restyle changes: Sat Third (-0.41) and Fourth (-0.39); and Texture Strength 0.73; Basic Tone Midtones (-0.23); and Detail Structure (-0.67) and Sharpness 0.81.) Nik Viveza 2 was added using three control points to direct attention into the center of the image. The last step involved adding my free SJ Thin Double Edge Frame, sampling the Inner Glow color from the image. Once again there is a nice retro feel to this image, which so fits the area…..Digital Lady Syd
Digital Lady Syd Related Blogs:
How to Add a Little Retro to Your Shots
The Boy in the Bubble

This looks like so much fun – wish I could try it! This boy is riding in one of 4 giant floating bubbles at the 2014 Native American Festival in Ormond Beach, Florida, this past weekend. The kids don’t get wet andhave a great time trying to stand up and run. Very little processing was done on this image, which is unbelievable since he is behind a thick piece of soft vinyl. In Lightroom, after some basic adjustments and cropping, Dave Delnea’s Forest Walks Look 3 preset was applied – but I used The Fader to reduce the preset effect to just 61%. Really brought out just the right amount of greens and blues. In Photoshop Topaz (see sidebar for website link) DeNoise 5 was set to an Overall Setting of 0.19. Some clean up was done where the water looked funny on his face. Nik Viveza 2 was used to slightly tone down the bright specular light in the upper left side of the image and to even out the face color. That was it. I like the natural texture the vinyl created. What a cool amusement – looks like he is really is floating!…..Digital Lady Syd
A Secret Garden
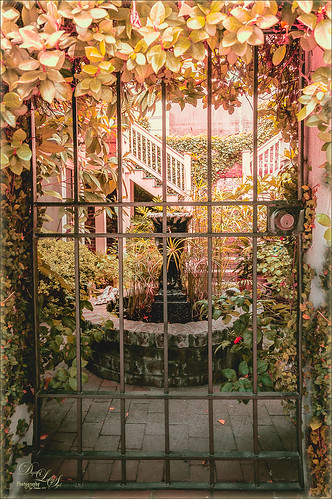
This was one of my favorite images from Savannah, Georgia, when visiting last month. Not a lot was done to this image although the Puppet Warp command had to be used to straighten out the walls due to the lens distortion. Also Topaz (see sidebar for website link) ReStyle was applied to get the pretty soft light effect – the settings were from a Test Preset when I first got the program so I am not sure where I started. Finished up with a little Nik Viveza 2 to direct the eye to the stairs. This image uses some of my favorite colors……Digital Lady Syd
Zebra Butterfly Showing Off

I found this beautiful Zebra Longwing Butterfly on my Lantana flowers in my front yard. She did not like having her picture taken – was very skiddish! Still got a couple nice ones of her. Apparently this is the Florida State Butterfly – who knew we had a State Butterfly? There is a very nice short video at the Florida State site showing the butterfly in action. I think my butterfly looks nicer than the ones in the video. In Lightroom a preset I created using Allen Mowery’s free preset was applied (see my Fun Photoshop Blog How to Add a Little Retro to Your Shot – 2nd paragraph has the settings used in my preset.) In Photoshop first Topaz (see sidebar for website link) Detail 3’s Overall Detail II preset was applied. On a duplicated layer Nik’s Viveza 2 was applied and 12 control points were added to make the butterfly and flower she was standing on pop forward. A little vignetting was added and a free texture from Wustenhagen Imagery Texture Green Pastel Brush was added twice, once set to Color Burn blend mode at 47% layer opacity and then Vivid Light blend mode at 17% layer opacity. This great texture really gives the painterly look to the image. He has some really nice textures for sale also. Really liked the final result!…..Digital Lady Syd
Light on the Plant

This is an image of the Canna MACtro flowers that grows in my crazy front yard – always has healthy blooms for me! It was mainly processed in Lightroom. The image in Lightroom was first turned to black and white by going to the HSL Saturation panel and setting all the colors to -100. Then the colored sliders were adjusted until I got a pleasing color balance. With an Adjustment Brush, the flowers were sharpened. I used a preset I made from David duChemin older Refining Your Vision in Adobe Photoshop Lightroom book (still a great read) that I call duChemin Classic India preset. Dave Delnea’s Backlight Horizontal Left preset was applied to light up the flowers and last free Matt Kloskowski’s Vignette (Strong) was applied. The image was now ready for Photoshop where Nik Viveza 2 was opened and control points placed on the flowers to sharpen a bit more, and on the background areas to further darken the distractions. My free SJ B&W Border Style was applied and the Inner Glow changed from white to a sampled color in the image. That was it!…..Digital Lady Syd
Digital Lady Syd Related Blogs:
How to Pop a Picture in Lightroom 5
How to Use Adobe Camera Raw (ACR) or Lightroom 4 Quickly
I Didn’t Know That! Converting Lightroom Preset to Adobe Camera Raw Preset
Who’s Watching Who?

Got inspired recently after attending my first Photography Club of Flagler County meeting. They had a wonderful guest presenter, Joe Campanellie, who is a portrait and nature and wildlife photographer. His business is called Campanellie’s Portraits of Palm Coast, Florida – check out the icon under his Home button to see some of the beautiful wildlife images he has created. His eagle images are incredible!
The presentation got me thinking about wildlife photography so I decided to process one of my older images from the St. Augustine Alligator Farm. (Here are a couple links from my Flickr site showing a few more of my images: Snowy Egret Chicks, Cattle Egret, and The Birds of the Rookery.) This egret above was cropped in Lightroom to get the head shot. In Photoshop I added a Curves Adjustment Layer to get rid of some shadows on his face I did not like. (See my Using Curves Adjustment Layers to Get Rid of Shadows and Highlights blog for more info on this.) Nik Viveza 2 was used to soften the background a little and sharpen his face. Then Alien Skin’s Snap Art 3 was applied to give a little different effect to this image. The Oil Paint (dry brush) preset was applied with three layers – one to sharpen the face, one for the hair, and one to darken some of the bright highlights in the background. Another Curves Adjustment Layer was added to give a warmer feel to the image. Topaz (see sidebar for website link) Detail 3’s Micro Contrast II preset was applied to just sharpen the eyes and some of the feathers. A dark Inner Glow Layer Style was added. Since the image was very small due to the large crop, the image was taken into Perfect Resize (see sidebar for website link) and set to 200%. This program does a great job increasing image size without losing quality of the image. I am now wishing I had gotten back to the Alligator Farm this year – great place to watch the birds!….Digital Lady Syd
Digital Lady Syd Related Blog:
Making An Ordinary Image Your Own
Calendar Template for 2012
Fly Like a Butterfly!

Just had to post this image of a beautiful Palamedes Swallowtail Butterfly flying mid-air in my pink penta flowers. I love the soft effect I got in this image even though the colors are so bright. So how did I get this pretty image? First I added the Retro Vintage preset I created earlier (see my Fun Photoshop How to Add a Little Retro to Your Shots Blog under Create a Lightroom Preset For a Vintage Feel) at 145% Strength by using The Fader, a Lightroom plug-in that let’s you adjust the strength of the preset from 0% through 150% – major cool to use at times. A vignette was added and some colors were adjusted in the Saturation section of the HSL panel. Noise was removed and a little overall sharpening was applied. The butterfly was sharpened more using an Adjustment Brush. In Photoshop, Nik Viveza 2 was opened and three control points were placed – one on the butterfly and one each on the pink penta flowers to bring out exactly the correct detail and color. I love this plug-in! Next a Curves Adjustment Layer was opened to lighten up the butterfly and pentas. The Layer Mask was filled with black and a soft low opacity white brush was used to paint back the butterfly and flowers to get just the right amount of contrast. That was it. Very easy and I love the way this turned out!…..Digital Lady Syd
Digital Lady Syd Related Blogs:
Great Free Plug-in for Lightroom – The Fader!
A Little Hollywood for My Butterfly Model
Butterfly Beauty!
Feeling Butterflies!
Butterfly Season is Here!
Yellow Dogface Butterfly in her Glory!
Mushroom to “Mission Control”

Recently a few Meadow Mushrooms grew to a large size very quickly in my yard. (Here’s is another mushroom image I took.) They actually were quite pretty, especially when the morning dew was on them. It really reminded me of a strange moon’s terrestrial surface. This image used very little processing to get this final look. In Lightroom the most important step was the crop to bring in all the interesting dew drops – the image was cropped quite drastically! The White Balance was adjusted and it was opened in Photoshop. Next Nik’s Viveza 2 was selected from the Filters list and three control points were placed to emphasize the structure of the larger drops and also to brighten up the center of the mushroom. Back in Photoshop a Curves Adjustment Layer was added on top and a couple points added to the curve to get the contrast needed. The last step involved adding a Stroke Layer Style – used the Fill Type Gradient set to an angle of -60 degrees and Photoshop’s Rainforest gradient. The Size was set to 21 pixels. That was all the processing done. Love the results! (I guess it is a good thing that I like own work – LOL)…..Digital Lady Syd
Butterfly Season is Here!

The butterflies are going crazy around my house this week! They love all the penta flowers and Bottle Brush bushes I have. This beautiful little Monarch was very busy totally enjoying all the different flowers to try out – there was some sharing going on with a huge beautiful Swallowtail butterfly and several varieties of bees! Very busy place today. This image used Matt Kloskowski’s That 70’s Look preset (in NAPP Lightroom presets – not sure when I got these) in Lightroom, which gave a very pretty look. But I decided to go into Topaz (see sidebar for website link) ReStyle just to see what would happen. I had created a preset on a Scottish image done earlier that worked very nicely. Got a little more of a colorful result. Nik Viveza 2 plug-in was then added on another layer and some of the color was adjusted using a few control points. A Curves Adjustment Layer was added on top for contrast. The text is a really old font called Abigail. That was it and I really liked the results…..Digital Lady Syd
Using a Natural Texture for an Image

This little Hognose Snake fell out of a Palm Tree frond after my tree was trimmed recently and ended up on my porch. I love the natural texture of the stucco of the wall – this is the easiest way to apply a texture! This little guy was first processed in Topaz (see sidebar for website link) Clarity using the Natural Boost III preset. Then on a duplicate image, Nik Viveza 2 was used to sharpen his body and accentuate his face. There also is a rather ugly looking spider near the bend of his body that was also sharpened. The last step applied Kim Klassen’s Cloth & Paper Touch Texture that was turned into an overlay frame and set to Linear Dodge blend Mode at 61% layer opacity. (See my How to Create an Overlay Out of a Texture blog link.) A Layer Mask was added to paint out areas over the snake to make sure he was clear of texture from the overlay framing. Loved how this image turned out!…..Digital Lady Syd
Viveza 2 Does It Again!

This huge Barking Treefrog got thrown out of a Palm Tree frond that was being trimmed and ended up in my Cardboard Palm. The blooming plant in upper right is a Queen Emma Lily Crinum . The lawn guys said he was the biggest frog they had seen in Florida (he was at least 4 inches long). Anyway, the frong was gorgeous and very calm and let me take his photo. This image was processed a lot in Lightroom using a Jack Davis Bluish Split Toning preset. The frog was sharpened slightly using the Adjustment Brush. A Radial Gradient was added to darken down the outside edge and give a slight vignette. It was taken into Photoshop and a New Layer was created to clean up the leaves with the Spot Healing Tool. A Curves Adjustment Layer was added to add some tone to the image. The layer was duplicated and converted to a Smart Object. My favorite filter was applied – Nik Viveza 2 – to add highlights to the frog and the plant by adding control points to these areas. This really gave the image the final look it needed. In this case Viveza 2 really popped this image!…..Digital Lady Syd
Take the Time to Get the Fun Shots!

Going through my older photos I found this crazy image of an ostrich at The Old Village of Ayaymku outside Minsk in Belarus. (At this point I think I am the only person who has posted images on this charming place.) This was a totally fun place to visit – I am not sure they have had too many American tourists, but it is a very popular place for the locals, especial for bridal parties. In fact we saw two brides having photo-shoots while there! Here are a couple links to some of my other images posted on Flicker: The Old Village of Ayaymku and The Old Candy Shop at the Village. This is a replica of an old Belarusian village where there are many beautiful craft and food shops. And then they had this little zoo area with all kinds of animals, including this crazy guy! (Here is another Ostrich image from the Village.) He was mainly retouched in Lightroom 5 where David duChemin’s Toxic Warmth preset was applied. In Photoshop, Nik Viveza 2 was used to emphasize his eyes and tongue and downplay the background. Hope to present some more images from this Village in the future…..Digital Lady Syd
Digital Lady Syd Related Blogs:
Unexpected Humor in an Image
Windsor Castle
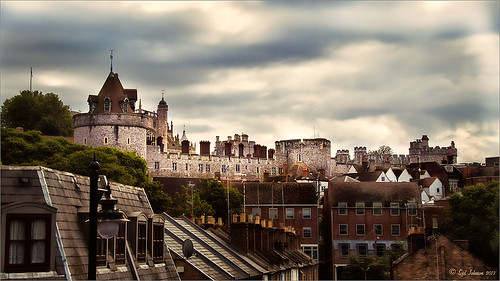
Here is another example of an image that used a Curves Adjustment Layer to adjust the color of the stone in this image of Windsor Castle in England. It turned too brown due to a filter treatment applied to the total image – Topaz (see sidebar for website link) Adjust 5’s French Countryside preset was applied to the image once it was brought into Photoshop – this preset is one of my very favorites but it definitely has a very brown tone to it. Nik Viveza 2 was applied next to selectively sharpen parts of the image. A regular Curves Adjustment Layer was added to increase the contrast in the image. Next another Curves Adjustment Layer was added and this time the Blue Channel Curve was adjusted to get rid of some of the yellow tones in the stone. The Layer Mask was filled with black and just the castle stonework was painted back in with a low opacity soft white brush. That is it! I love the final result – it really gives a different perspective on how large this castle really is!…..Digital Lady Syd
Digital Lady Syd’s Related Blogs:
Using Curves Adjustment Layers to Get Rid of Shadows and Highlights
I Didn’t Know That! Curves Adjustment Layers
A Fairytale Gazebo

As promised, here is a totally different rendition of the same image I posted earlier. (See Where Am I?) This was just plain fun to do. Below are the boring details – it actually took me along time and a lot of manipulating to get this result but I really love how it turned out. The soft diffused look really adds the fairytale quality to the image. Bottom line, just keep playing with an image and you can come up with some surprising results…..Digital Lady Syd
Basically I got the crazy pastel colors by applying Nik Viveza 2 (here are the settings which produced a rather green and pinkish layer: Brightness 86%, Contrast 100%, Saturation 86%, Structure 100%, Shadow Adjustments -100, Warmth -2%, Red 17%, Green -9%, Blue 22%, and Hue 39 degrees). Then Control Points were added in various areas to adjust tweak the color. A composite layer was created (CTRL+ALT+SHIFT+E) as the top layer. This layer was duplicated and Topaz (see sidebar for website link) photoFXlab was opened. What I listed in my Photoshop note attached to the image is in parentheses. (Duplicate layer. Plug-ins Tab was selected and Black & White Effects was opened. Used my SJ White Flower settings preset which has these settings: Basic Exposure – Contrast 0.16, Brightness -.04, Boost Blacks -.12, and Boost Whites .20; Adaptive Exposure – Adaptive Exposure 0.26, Regions 8, Protect Highlights .06, Protect Shadows .02, Detail 1.80, and Detail Boost .96; Color Sensitivity – Yellow .22, Green -.04, Cyan .01, and Blue .01; Quad Tone – Color Region 1 Black and slider at 0.00, Color Region 2 Red 23/Green 25/Blue 86 at 119.4, Color Region 3 Red 113/Green 150/Blue 170 at 187.8, and Color Region 4 White at 255.0; and Transparency 1.00. Diffusion section was checked and Softness was set to .75, Diffusion to .60, and Diffusion Transition to .50. Local Adjustments mask was set to Detail brush and the gazebo and columns were painted over. Then the B&W Effects plug-in was exited. Stamp From Stack button was pressed and in the Adjustments tab Dynamics slider was set to 29. Another From Stack button was created and from the Plug-ins Tab, Topaz Adjust 5 was opened where Painting Venice preset was applied with no changes. Once back in photoFXlab the Mask tab was opened and the effect was painted out once again from the gazebo and columns.) The changes were applied and the image was back in Photoshop. The yellows in the front bushes and trees was too bright, so a Image -> Adjustments -> Replace Color was selected using a light purple color. A Color Balance Adjustment Layer was clipped to the Replace Color layer and the purple colors were further enhanced. Next a brush was created to make purple to pink sparkles for the bushes and trees. (Brush settings were: Hard Round Brush – Size 20 px, Spacing 141, Shape Dynamics Size Jitter 25, Scattering 944%, and Color Dynamics Brightness Jitter 50%.) Used a light color (#917eb5) color and a darker color (#5e5098) of purple and painted around trees and bushes – then added a layer mask to remove from areas the lights got scattered over. A clean up layer was created to clean up some of the harsh that showed up in unexpected places. My SJ Snow1 Overlay was applied at 61% opacity. A composite layer was added on top and duplicated. The top layer was changed to Multiply. A layer mask was added and the cupola was painted back in white for emphasis. A Curves Adjustment Layer was added to add contrast to the cupola. The sky was selected and put on its own layer and converted to a bluish purple sky by clipping a light purple Color Fill Adjustment Layer to it. Next a Grunge Border line was applied around the image in a dark purple color.
Where Am I?

May have figured this out already since I have posted very similar photos – but this is at Fortunato Park in Ormond Beach, Florida – and is one of my favorite places. The above is the rooftop cupola from the old Hotel Ormond – the only remaining part from a beautiful old hotel that was torn down in 1992. It was in such a bad condition that it could be restored – what a shame!
Okay – I am a huge Photoshop plug-in fan – I love to be able to do something with a photo that I could not do just in Photoshop or Lightroom alone. Nik plug-ins really made this image! Basically Nik’s Viveza 2 (my very FAVORITE plug-in – can’t beat it for fixing any problem in an image) was applied to the image to add detail and contrast to localized areas of the image (detail in the orange roof, saturation and color to sky in middle of cupola, and detail to the interesting lines on the building). That in itself added a huge improvement to the image. Next Nik’s Color Efex Pro 4 was added and three filters stacked: Bleach Bypass, Detail Extractor, and Film Efex Vintage using Method 14 and setting the Overall Opacity slider to 52% – did not want to overdo the vintage feel. I use the Film Efex Vintage often – lots of versatility in just this one filter! (See related blog links below for other examples.) Next Shadowhouse Creations Scratch Box frame layer was applied – this is from the Scratch & Frame Box Overlay.PSD file he supplies. (Check these out – some great borders just in the PSD file!) I created a PNG file of just the frame by following the steps in my blog How To Make Frames or Borders – scroll down to the section called “To save the frame you created as an overlay to use again” and follow steps. I used an off white color sampled from the image in a Color Adjustment Layer clipped (ALT+click between layers) for the frame. That was all I did and I love the slightly vintage effect – goes nice with historic buildings. Next time I will show you a totally different look for this same image (see A Fairytale Gazebo)……Digital Lady Syd
Digital Lady Syd Related Blogs:
Digital Lady Syd Reviews Nik HDR Efex Pro 2
Little Red Corvette
Yellow Dogface Butterfly in her Glory!
The New Film Efex-Vintage Filter From NIK CEP 4
Fake Panoramic Effect
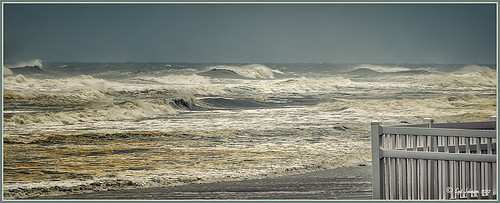 |
Taken the morning after Hurricane Sandy went past Ormond Beach in Florida, this image showed how strong the surf was and how gray the sky appeared even though the ferocious hurricane was not a direct hit. We were so fortunate that the storm did not hit Florida directly.
What I really like about the shot is how sharp the texture in the waves and beach surf is. To get this effect, the image was first processed in Lightroom where just basic slider corrections were made and a custom crop was created. I usually do not do this, but this image seemed to scream panorama to me as the sky was so plain and the main subject is the large expanse of water. Since everything was moving, a several shot panorama was out of the question, so it had to be faked. Click on image to see Lightroom version – it is very flat, not at all how I remember it. In Nik Color Efex Pro 4, a Cross Processing filter using Method C04 at 27% strength, Detail Extractor filter set to Normal (Detail Extractor at 64%, Contrast at 31%, and Saturation at16%) with 6 Control Points to restrict the filter effect to the sky area, and a Lens Vignette filter (Amount -9, toward Rectangle,Size 57% and Brightness -16%). In Nik Viveza 2 the Center was brightened. The Spot Healing Brush was used on a clean up layer, and Contrast was boosted with a Curves Adjustment Layer. The default preset in Imagenomics Noiseware was applied. When noiseware is applied, the image detail will usually get softer – therefore, in a white layer mask, I painted with a soft black brush the waves back so you can see the water mist detail. The last step was to apply my free SJ Thin Double Edge Frame layer style sampling colors from the image. Now I get the result I remember!…..Digital Lady Syd
Little Red Corvette

Just felt like using a couple of my old standby favorite plug-ins to create a vintage feel to this image. This old red corvette image was taken at the 39th Annual Daytona Turkey Run at the Daytona International Speedway infield. I love the way the raceway seats are in the background – it just seems to the be the right setting for this old girl – I love corvettes! It was processed first in Lightroom starting out with cropping and applying one of David duChemin’s Lightroom 4 presets called Warmer Sunset -.66 Grad – I was surprised it gave such a nice vintage feel for starting post-processing of the image. From there several adjustments basic Lightroom adjustments were done and the chrome was sharpened using an Adjustment Brush. In Photoshop Nik Viveza 2 was used with control points placed on the windshield to clean up some window glare (this plug-in does an amazing job with window glare) and on the detailing on the car. Then Nik Color Efex Pro 4 was applied and several of my favorite filters were stacked – Darken/Lighten Center, Detail Extractor, and my favorite for getting this vintage feel, Film Efex Vintage set to Film Type 14 with an overall opacity of 56%. A Curves Adjustment Layer was added and French Kiss free Glorious Grunge Edging Overlay with the lines inside removed was applied and set to a tan color. I wish I could fix up this car – she really was a beauty!…..Digital Lady Syd
Digital Lady Syd Related Blogs:
Yellow Dogface Butterfly in her Glory!
Soft and Sharp Image at the Same Time!
Vintage Toy Processing

This image is of a really cute 6-year old that I met at the 39th Annual Turkey Run at the Daytona International Speedway who graciously agreed to pose for me. These vintage toys bring back a jolt from years past! Amazing you can still buy them! This image was processed in Lightroom using a Gritty Preset by Michael Rather from the True Grit Video – I use this preset a lot for this type of look. Then I increased the orange and red saturation a little to get the colors to pop. An adjustment brush set to Sharpen and Clarity was added to sharpen the lettering and detail on the toys only. In Photoshop Topaz (see sidebar for website link) photoFXlab was opened and from the Effects tab, the Retro Style I from Topaz Adjust 5 was applied. My favorite Adjustment tab brush Dynamics was increased along with the Sharpness. Then using the Masks tab, the effect was removed from the boy’s face. The layer was then set to Darken blend mode at 88% opacity. Back in Photoshop a High Pass Filter set to 8 and Soft Light blend mode was used to sharpen the photo. The last step involved adding French Kiss’s Glorious Grunge Edging free overlay with some of the lines removed in the center so as not to be distracting. The last step was using Nik Viveza2 (all time favorite plug-in) to direct the eye to the cute kid and toys. That’s it!…..Digital Lady Syd
Digital Lady Syd Related Blogs:
Trying Out Some New Techniques!
Digital Lady Syd’s Review of Topaz photoFXlab v1.1
Using photoFXlab v1.1
Using Topaz photoFXlab to Replace Skies
Cold Dolphin Fountain in Florida

Sometimes I find I just need to do something sort of funny and just play around in Photoshop. That is how I got this crazy image of my cold dolphins instead of the warm Florida dolphin fountain in my front yard – actually it really was raining at the time I took this picture from the front porch. Essentially this image was just color corrected in Lightroom and brought into Photoshop where four textures were stacked using Dr. Brown’s Paper Texture panel (Ash texture 30, a bluish texture which is no long available, set to Hue at 74%; Bittbox Grunge Ice Texture set to Linear Dodge at 15%; Florabella Snow 3 texture, which may not be available anymore, set to Lighten at 15%; and ShadowHouse Creations Old Photo 6 texture set to Hard Light at 100% (see sidebar for blog link) – all are free except the Ash texture). Several Curves Layers were created to isolate and enhance parts of the image by filling the layer mask with black (CTRL+I on mask) and painting back using a low opacity brush. Not sure it is something I would put up on my wall, but it was a lot of fun to do!…..Digital Lady Syd
Digital Lady Syd Related Blogs:
Russell Brown’s Paper Texture Panel Updated!
Creating That Vintage Texture Feel
Click on Textures on right in Categories for more blogs
Clowning Around with Topaz!
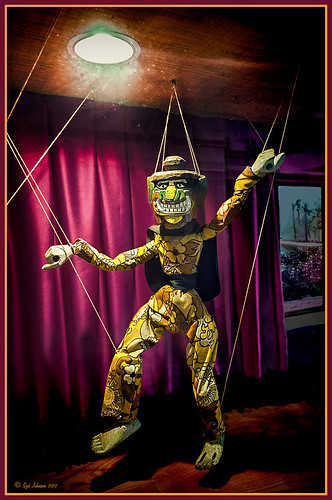 |
Here is another one of the beautiful puppets that lined the one-mile walkway between hotel accommodations and restaurants at the Hilton Waikaloa Village on the Big Island in Hawaii. To see original unprocessed raw file, hover over image. The image was first processed in Lightroom and opened up directly into the new Topaz photoFXlab (see sidebar for website link). Inside the plug-in the layer was duplicated and Adjustment tab sliders set using the wonderful Dynamics slider at 34. A stamped layer was created and the Plugin tab Black and White Effects preset (see my blog Hibiscus Flowers – I Love to Photograph Them! for settings) was applied to get a more calm darker feeling to the image. Back in photoFXlab the layer was set to the Darken blend mode. Another stamped layer was created and the Detail brush set to maximum strength was used to sharpen up the puppet only. Exit and the changes appeared on a TIFF copy back in Lightroom. Since I now had two Tiff files, they were highlighted to Edit In – > Open as Layers in Photoshop. The Topaz adjusted layer on top was set to 89% opacity. The difficulty with processing this image involved the terrible glass reflections. I decided that I needed something more so I opened up just Topaz Adjust and added a vignette effect just on the upper clown and light area – a little detail was added overall also. Back in Photoshop the image definitely need some noise reduction so Topaz DeNoise 5 was opened and the Overall Strength set to .18 – that’s all it needed! Next a Curves Adjustment Layer was added to darken some of the reflection – the clown was painted out to give more of a spotlight effect to it. A vignette was created around the image and selectively painted areas to further distract from the glass issue. A High Pass filter set to Overlay blend mode was used to sharpen the image – a black mask was added and the clown painted back to just sharpen that area. The last step was adding my Layer Style frame (see my blog Digital Lady Syd’s Free Layer Style Frames). There was also a lot of clean up on this image – more than I normally do. It amazes me how a pretty plain image can be brought to life by using several of Topaz’s wonderful plug-ins!…..Digital Lady Syd
Digital Lady Syd Related Blogs:
Using photoFXlab v1.1
InstaTone in photoFXlabs – Great Fun and Great Results!


