
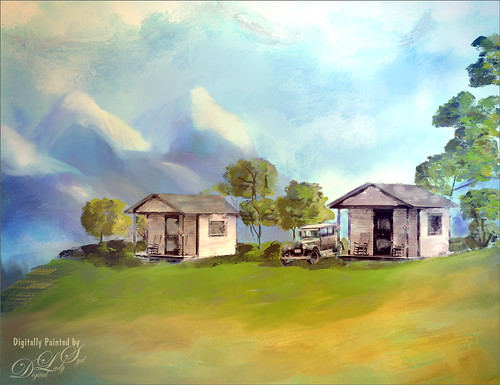
Enjoying the View!
 \
\
This is an image from a black and white photo that I found on Shorpy‘s, one of my favorite websites of old-time photos. These are tourist cabins in Georgia from March of 1936. I spent a lot of time painting this image – used lots of Fay Sirkis’s mixers from her Four Seasons set and used several regular brushes. One of my textures created in Corel Painter was used for the background. Topaz (see sidebar for website link) Lens Effects Toy Camera Filter was applied using the Awesomeness I with the camera shake turned off. Otherwise that was about it. Just lots of fun to do!…..Digital Lady Syd
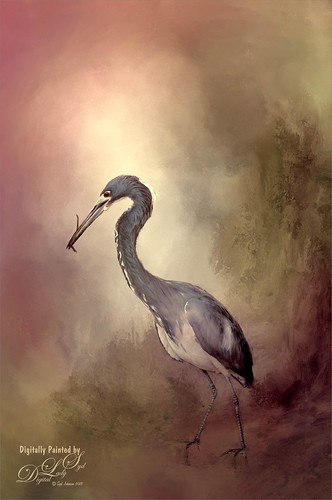
Looking for Dinner
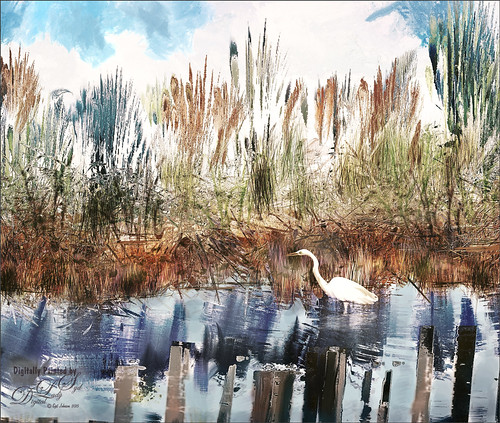
This is an image I created mainly in Corel Painter using John Lowther’s Landscape brushes – still learning how to use them but they are beautiful brushes! I have done a couple different iterations of this image, but I think I like this one the best. My birds are always my favorite subjects so here is another one. I did have to use Photoshop to add the egret (in the set called rEgrets I’ve Had A Few by Midnight Touch that are really nice egret brushes). Once the bird was added, used the Mixer brush to add detail and color to the face and body. Frostbo Grass Set 2 brushes (my favorite Photoshop grass and reed brushes!) were used on individual layers and a Gaussian Blur filter set to a Radius of 3 was used to soften the strokes to fit in with Painter reeds and grasses. Topaz (see sidebar for website link) Lens Effects was opened and the Single Tone Filter set to Morning preset was applied to warm it up. Topaz ReStyle was opened and the Zambezi Zest preset was used to bring out some more autumn looks – in ReStyle the Color Style was set to Soft Light Blend Mode and then back in Photoshop the layer was set to 65% opacity. A Solid Color Adjustment Layer was set to medium gray, Color blend mode, and 55% layer opacity -the areas I wanted to appear a little more vivid was painted back in the layer mask. That was it! It took a while to get this the way I wanted it. Just takes some experimentation. Lots of fun!…..Digital Lady Syd
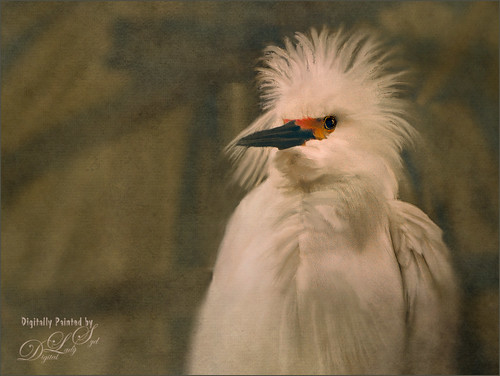
Showing Off My New Hairdo
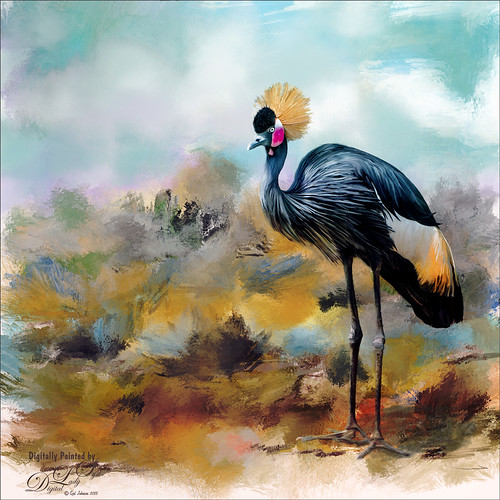
Just enjoying painting another beautiful bird. They are so much fun to do! This is a West African Crowned Crane taken a while ago at the St. Augustine Alligator Farm and is one of the regular exhibits so he can be seen anytime. He just sort of match this Corel Painter texture I had made, so there he is. In his document Topaz (see website link in sidebar) Clarity, Detail, and ReMask were used to adjust the bird itself. Then the ReMask layer was moved into the texture to place it where I wanted him to be. After that just painted the bird on several different layers using the Mixer Brush. Used two different Exposure Adjustment Layers, one for the eye and one for the beak to bring out some sharpness. Then duplicated the original texture twice and set on top – set one to Color Burn at 46% layer opacity and the other to Soft Light at 32%. Created a stamped layer (CTLR+ALT+SHIFT+E) on top and added the Topaz Lens Effects’ Toy Camera filter set to Awesomeness I preset with changes. Back in Photoshop that was set to 39% layer opacity. The last step was to add Nik Viveza 2 to really drill in on the birds face and head feathers. Hope you enjoyed my little bird painting…..Digital Lady Syd
Red Fish Taking a Break from Universal Studios
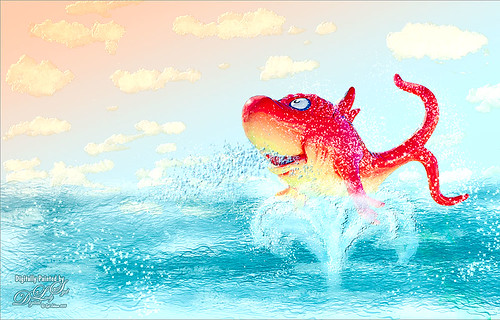
Just another image taken at the Universal Studios-Orlando, this time featuring the Red Fish at one of the Seuss Landing rides. Got a little carried here but it was a lot of fun! Basically all I did was extract the fish from the original image and paint in some elements to make him look like he was swimming in the water. Actually there were several paint layers to get the effect and Topaz (see sidebar for website link) Simplify’s Cartoon preset was applied to just the fish. Also, when done painting, a stamped layer was placed on top and Topaz Lens Effects was opened. The Toy Camera Awesomeness II was applied with the Toy Camera Aberrations sliders turned off. Adjusted some of the other sliders a little. That was it! Love how happy this guy looks!…..Digital Lady Syd
Rookery Security Guard
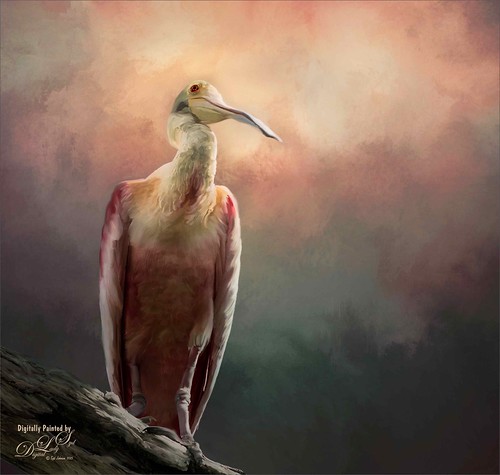
Just another one of the beautiful birds at the St. Augustine Alligator Farm Rookery – this time a rather elderly looking Roseate Spoonbill who seems to be keeping a careful watch over everything going on. I love the color in this type of bird. Pretty much my standard workflow – using Topaz (see sidebar for website link) ReMask to cut out the bird from its original surrounding; then placing a texture underneath; adding a New Layer on top and painting over the bird with a Mixer Brush; stacking more texture on top trying different blend modes; adding an Exposure Adjustment Layer to sharpen up the eye; applying Nik Viveza 2 to get the correct tone in the sky around his head; and finally adding a Curves Adjustment Layer for contrast. I never seem to get tired of painting my bird buddies!…..Digital Lady Syd
Beetle Bailey Taking a Snooze!
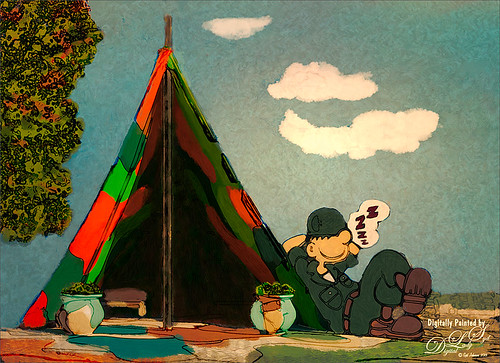
Just a loosely painted image of a photo I took at Universal Studios-Orlando a while back. One of the brushes had some great texture effects that can be painted right onto the sky instead of adding a texture and painting it away in a layer mask where you do not want it. There were several painted layers in a group underneath a sketch of the image. I did use one of my smooth Corel Painter textures set to Linear Light blend mode at 61% layer opacity to add a small spotlight on Beetle. That was it – lots of fun to paint!…..Digital Lady Syd
Hey Tiger!
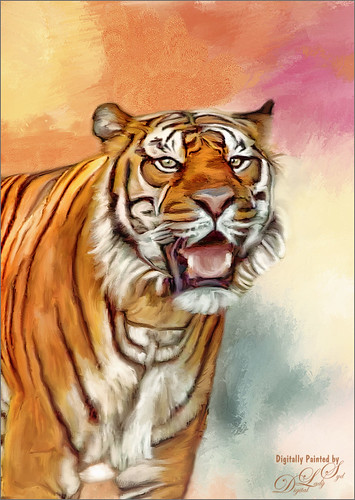
This beautiful image of a Bengal Tiger is a stock image from FreeImages.com. Wish I had taken the image. This image had lots of green leaves behind him. Topaz (see sidebar for website link) DeNoise 5 was used to remove lots of grain and color noise in this image. I used a texture I had created in Corel Painter with oil brushes. It was Free Transformed to make it fit the way I wanted it to look. Topaz Adjust and several mixer brush layers were used to paint the image. Nik Viveza 2 was used on just his face to get the nice sharp effect. That was it. This took probably around 4 hours to complete. Good thing I like to paint!…..Digital Lady Syd
So What Are You Looking At!
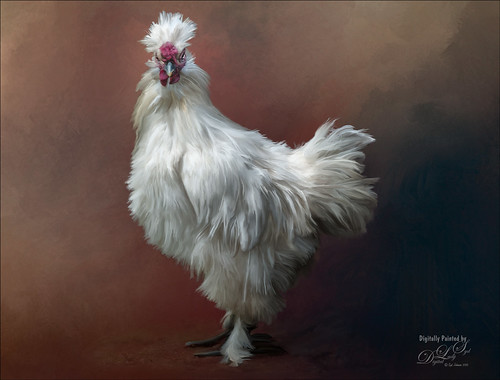
This image is of a White Silkie Rooster was photographed at The Old Village of Ayaymku in Belarus some time ago. (See my Center Stage – Introducing the Wild Turkey Tidbits Blog for another unusual bird image from the same place.) Used my regular Photoshop painting workflow. Selected the bird using Topaz (see sidebar for website link) ReMask 5, then placing Jai Johnson’s Filly in the Field texture underneath the bird. The edges were blended with one of Fay Sirkis’s Pet Mixer Brushes on a New Layer above. (Can download at KelbyOne if you are a member.) This image used a Topaz Lens Effects Neutral Density filter applied (Brightness -0.19, Amount 0.13, Transition 0.11, Angle 180.0, and Effect Position: (1824,2687) ) to even out the bottom and give him a defined area for standing. I also added two Exposure Adjustments Layers, one for the eyes and one for beak area. A Curves Adjustment Layer was used to add a little contrast back into the image. The workflow is pretty consistent but the results are always a surprise. These birds all have such personality!…..Digital Lady Syd
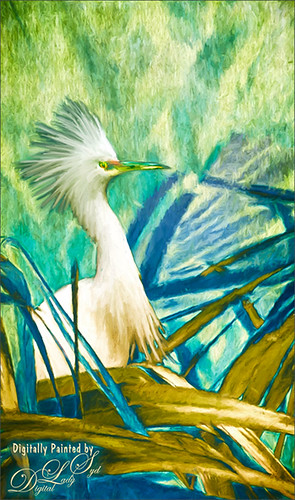
Singing for Her Adoring Fans
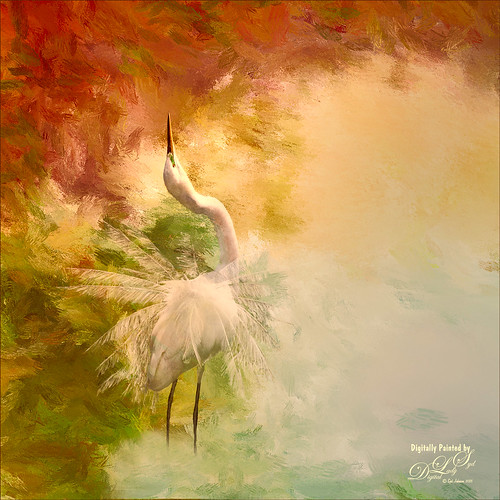
I just love painting birds and this Snowy Egret was once again a lot of fun to do. This bird was a bit of challenge as there were tree branches in front of her body and feathers. I was able to clean the image up pretty good with clone stamping and then separated the bird from the background using Topaz (see sidebar for website link) ReMask 5. It was not perfect but since I was painting the bird, I could smooth out the feathers and blend them into the background, which I did in Painter. Exposure Adjustment Layers were used for the eye, green around eye, and beak. The texture was duplicated twice and place on top, one set to Multiply blend mode at 23% layer opacity and the other Overlay blend mode at 51% layer opacity. On a stamped layer (CTRL+ALT+SHIFT+E) on top, Topaz Lens Effect was opened and the Dual Tone filter was used to enhance the reddish fall colors on top and greenish-blue on the bottom. The the Graduated Color filter using the Graduated Green 1 preset as a start to emphasize the green color more in the bottom of the image. That was basically all that was done. Love these birds!…..Digital Lady Syd
Old Comfort Point
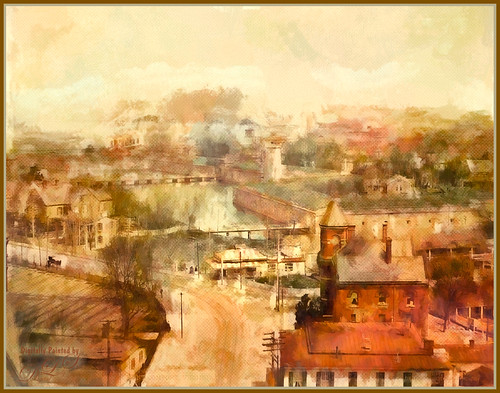
Loved the original Pubic Domain postcard image (cc 1900) of Old Comfort Point which is now part of Hampton, Virginia, and shown in the link. There is a huge amount of history connected with this place. To process this image, one of my warm colored smooth Painter textures was placed above the original image and set to Hard Light blend mode. In its Layer Style, the Blend If This Layer white tab was split (ALT+drag) and set to 228/255 and Underlying black tab split to 0/123 which gives a nice texture effect. A Hue/Saturation Adjustment Layer was placed on top and these Master slider settings were used: Hue -26, Saturation -71, and Lightness -29. A stamped layer was placed top (CTRL+ALT+SHIFT+E) and Topaz (see sidebar for website link) Impression was opened. I created a preset to give a nice painterly result based on the Abstract Settings by Blake Rudis preset (changes made: Type 04, Brush Size 0.65, Stroke Color Variation 0.10, and Stroke Length 0.22). Created two New Layers and painted in some color and clouds in the sky using Kyle’s Real Watercolor Big Wash brush. Created another stamped layer on top and applied Photoshop’s Halftone Pattern Filter (Size 2, Contrast 50 and Pattern Type Dot), which was set to Color Burn blend mode and 14% layer opacity. A New Layer was set to Overlay blend mode and painted with a black brush set to 12% brush opacity to burn in a little to emphasize the tower in foreground. The layer was then reduced to 61% layer opacity. The last steps was just adjusting the color in the image as the yellow and green colors were over-whelming the image. Used Selective Color and Color Balance Adjustment Layers to do the color correction. It did take a lot of steps, but it was really fun to do. Try taking some of these images that are now Pubic Domain and see what you can do with them……Digital Lady Syd
Center Stage – Introducing the Wild Turkey

Just another one of my crazy bird pix. This guy was definitely strutting his stuff around the visitors at The Old Village of Ayaymku in Belarus. His feathers and colors were so perfect that I did not need to paint them. I still did a little clean up on the tips of his feathers. Also did some localized dodging and burning to get the contrast. The background is one created in Corel Painter 2015. Overall very little touch up was needed. Totally loved this bird!…..Digital Lady Syd
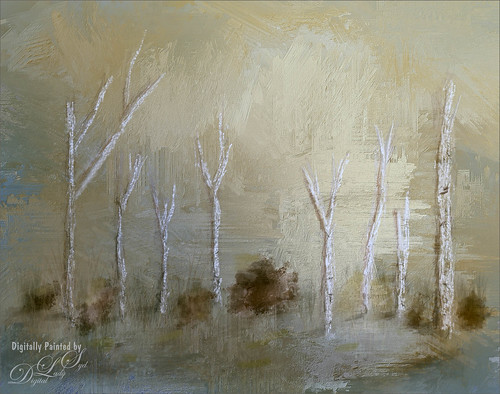
A Wintry Scene
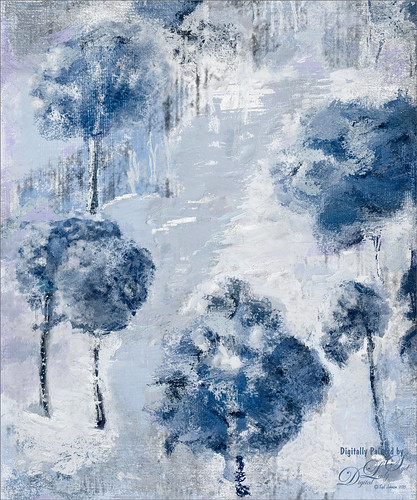
Just practicing my painting some more. Love painting these wintry scenes even though it is so hot outside. Not too much to this image other than it was first painted in Painter, then taken back into Photoshop, taken back to Painter, and ended up in Photoshop. Phew! Used several brushes in each program. Two textures, each with a Hue/Saturation Adjustments Level clipped to it, with the Saturation slider set to -100 so no color was added, only texture. Just fun to paint!…..Digital Lady Syd
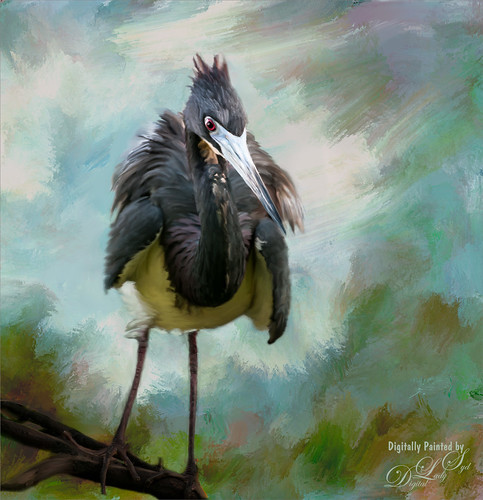
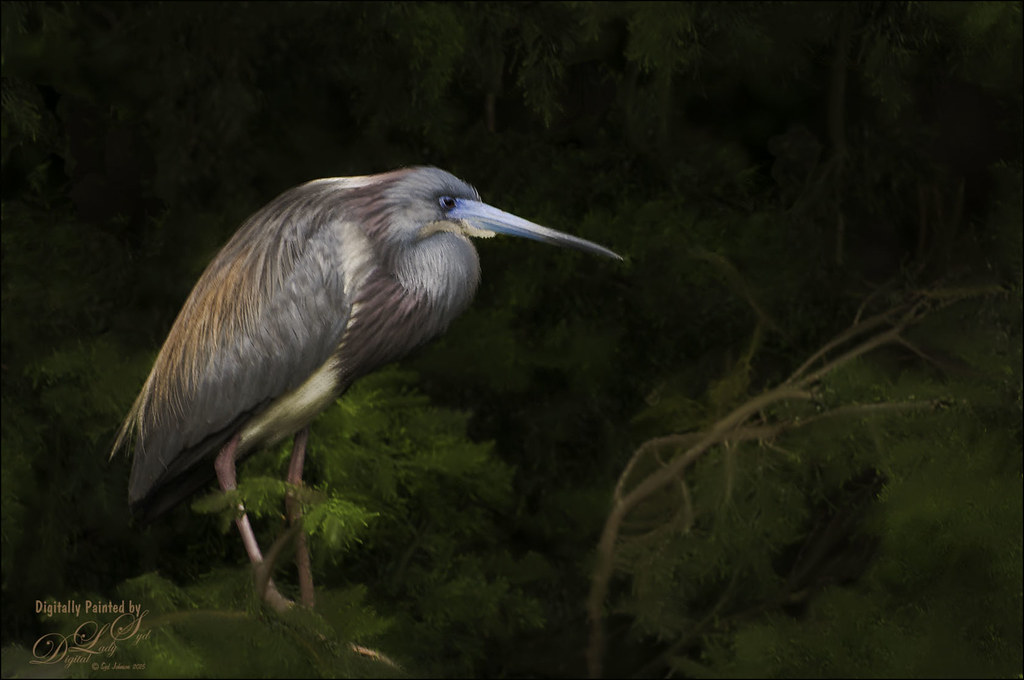
Testing the Water
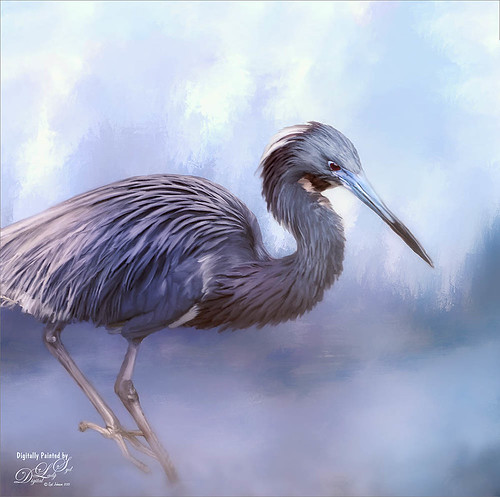
This is a sleepy Tricolored Heron reluctantly taking a step into the water on a beautiful hazy morning. Okay, he was really in a very cluttered background and I had to use Topaz (see sidebar for website link) ReMask 5 to cut him out. Then he was placed on one of my Corel Painter textures whose colors were changed using Topaz ReStyle’s Ice Cool and Fresh preset to match the bird colors and Free Transformed (CTRL+T) to fit the bird perfectly. I then proceeded to paint the bird with a Mixer brush to smooth out the grainy feathers. A duplicated copy of the texture was added on top and set to Multiply blend mode at 50% layer opacity. On a stamped layer (CTRL+ALT+SHIFT+E) on top, Topaz Lens Effects Fog (Fog Ground Fog IV preset – Amount 0.20, Region Size 0.10, Transition 0.20, Angle 138.1, and Diffusion 0.40) was added to give a sort of early morning mist in the water. Next the Reflector filter was applied (Golden Left, then Strength 0.20, Transition 0.40, Position 0.59, and Angle 76.63) before going back into PS. The eyes and beak were sharpened using the Exposure Adjustment Layer. On another stamped layer, Topaz Adjust’s Brilliant Warm preset was applied to get the nice gray color back on the bird. A little Curves Adjustment Layer was added and he was done! Still loving my birds!…..Digital Lady Syd
Macaws Being Macaws
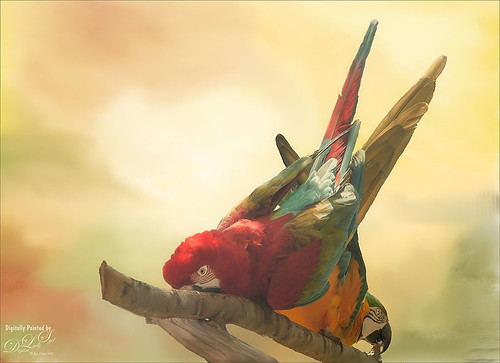
This rather unique image of these two Macaws, a Scarlet and a Blue and Yellow, was taken at the St. Augustine Alligator Farm a while ago. Not sure how I get such funny pictures of birds! I really wanted to take Topaz (see sidebar for website link) ReMask 5 through its paces and it worked really great on this image. (See my Digital Lady Syd Reviews Topaz ReMask 5 blog.) After creating a layer mask in ReMask, one of my Painter backgrounds was placed underneath the birds. A Regular brush layer and a Mixer brush layer were used to paint some of the feathers and the branch they were on. Then the texture was duplicated twice and placed above the birds. One was set to Multiply blend mode at 59% layer opacity and one to Overlay blend mode at 60% layer opacity. A stamped layer was placed on top. I felt the birds looked too bright before this was done. Therefore Topaz Lens Effect’s Fog I preset was applied (Amount 0.19, Angle 135.4, and Diffusion 0.14) to get the softer color effect, especially in the lower part of the image. That is all that was done to get this soft feel to these interesting birds…..Digital Lady Syd
Building a Home
This beautiful Tri-Colored Heron was posing at the St. Augustine Alligator Farm Rookery, where he was actually building a nest as seen by the twig in his mouth. These birds are all over Florida and I probably see one at least once a day. This image used the same techniques from my recent blog called How to Get a Painterly Effect for Wildlife and Birds, especially as done with the Wood Stork image. This time two of my Painter textures were combined to get the sort of magical background effect. Topaz (see sidebar for website link) Adjust’s Summer preset was applied to a stamped (CTRL+ALT+SHIFT+E) version on top and on another stamped version Topaz Lens Effects Toy Camera Memories preset was applied. The Saturation was actually reduced a little in this section. It was pretty much the same workflow, just trying different textures and painting the bird on several layers. I really love my birds!…..Digital Lady Syd
A Tricolored Heron That Fell in a Painting!
I seem to have an endless supply of these bird images from the St. Augustine Alligator Farm Rookery. It is such an incredible place to get bird images in the Spring. This is just another example of one of the magnificent birds hanging out looking for a mate. This time I actually used a layer mask to separate most of the bird from the tree limbs behind him. Since I was going to paint him, it did not have to be perfect. The bird was painted using Fay Sirkis’s (from KelbyOne) Precious Diamond Blender brush (her Mixer brushes are wonderful), then changing to it to add color when needed. This is my favorite brush for painting birds and has been used on most of my bird paintings. The texture is made up of two textures I created in Corel Painter 2015. Both textures used Quick Fix Color Brushes from Karen Sperling’s Artistry Quick Fix Video (#4 in this case) Series (check them out-and inexpensive way to learn Painter and she provides some of the best Painter brushes!), and the second also used a blender I created, and the other used Karen’s . They were placed underneath the bird and on a New Layer on top, the edges of the bird were blended into the texture. An Exposure Adjustment Layer (see my How To Do a Quick Eye Sharpening in Photoshop blog) was used to sharpen the eye. On a stamped layer on top, PS Camera Raw’s Radial Filter was used to add focus to the face and beak – painted out with the brush parts of body not to be emphasized. A Selective Color Adjustment Layer’s White Color was selected to make the white color behind the bird stand out just a little more – set Black slider to -37. That was it. I was pleased how the texture fits with the bird……Digital Lady Syd
Soaring Spoonbill

Still enjoying the bird images I took at the St. Augustine Alligator Farm Rookery this Spring. The original image was captured with a totally light blue sky behind this Roseate Spoonbill. This made it easy to add a texture underneath the image (my painted texture created in Corel Painter called Seashore) and changing the blend mode of the bird layer to Multiply. Topaz (see sidebar for settings) Clarity and DeNoise 5 were applied to cleanup the the bird layer. On a stamped layer (CTRL+ALT+SHIFT+E), Topaz Glow’s Room Glow Blake Rudis preset was applied (check out Integrating Topaz Glow into Your Workflow for info on this). Next on a New Layer Fay Sirkis’s (from KelbyOne) Precious Oil Diamond Mixer was used to clean up the feathers and beak a little. Topaz Impression Watercolor II preset with no spill was applied. Nik Viveza 2 was used to bring out the color of the bird just perfectly and a Curves Adjustment Layer was used as a last step for overall contrast. I love my bird pix!…..Digital Lady Syd
Hiding Out in the Wetlands
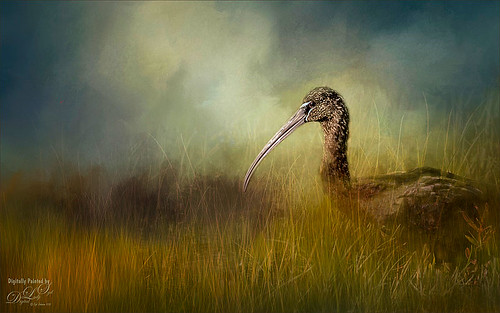
Took this image of a Limpkin bird a while back when photographing at the Ritch Grissom Memorial Wetlands in Brevard, Florida (also known as the Viera Wetlands) with my photo club. This was not actually how the bird appeared – he was trying to hide from all the tourists taking his picture by standing in a batch of grass and reeds. That was the challenge. I had heard that CC2015 had updated their Spot Healing Brush and it worked nicely on this image. I tried it in CS6 first and got marginal results. I have heard that a lot of people are having trouble with the update Healing Brush and Adobe is looking into it. So do watch the results if you are using it. Like I said, I had no problems in this image. Otherwise on a New Layer just added in some of my favorite and free Frostbo Set 2 Grass brushes 009 and 005 strokes to fill in some grass – need to lock the layer and paint over with Color Dodge and Multiply to get the natural feel. Set layer opacity to Color Dodge, duplicated layer, and adjusted opacities of both layers. Jai Johnson’s beautiful Clouds Over the Pasture texture was used and Nik Viveza 2 to add sharpness to the birds eye and beak. That was it. Love playing in Photoshop!…..Digital Lady Syd
Cattle Egret Looking for Love

Loved this beautiful Cattle Egret who was checking out a group of egret ladies (they are more colorful during this time of year) at the St. Augustine Alligator Farm. Jai Johnson’s free texture called antiquebrownlight-canvas was used on this image. Lots of painting, Topaz (see sidebar for website link) Lens Effect and Topaz Impression were used to get this final image. I really love the mystical result……Digital Lady Syd
Digital Lady Syd’s Rule No. 13: Paint Something Everyday
Have not done a rule in a long time, but if you are learning to paint, many of the really good digital painters are saying to “paint something everyday.” This will definitely help you improve your painting technique, and if you already have a technique, it will keep your skill level at a high level.
This guy was totally into looking around at the happenings at the St. Augustine Alligator Farm Rookery on this very busy day. When mating and building nests, the birds just do not even know you are there – it is truly amazing! For some reason, I just do not get tired of painting these guys! Just using the same Mixer Brushes that work with my style of painting. Still loving Fay Sirkis‘s (the Corel Master who makes fabulous Photoshop brushes also) Precious Oil Diamond Blender brush and a Pete Collins Portrait Smeary Mixer for the background (from KelbyOne Mixer Brush training by Pete). Used an Exposure Adjustment Layer for the eyes (see my How To Do a Quick Eye Sharpening in Photoshop ), a Color Lookup Adjustment Layer Gold Blue Abstract preset and Lighten layer blend mode, add Jai Johnson Brown-Gray canvas texture, and Nik Viveza 2 on stamped layer on top to emphasize his face. Is this guy awesome or what!…..Digital Lady Syd
Waiting For Spring
Just doing some practicing in Corel Painter. I do not do this enough, but the experts say that to actually be good you should paint every day. This image used three of the original Corel Masters brushes – Melissa Gallo, Karen Sperling and Marilyn Sholen brushes. If you get any of their brushes, you cannot go wrong. In Photoshop on a New Layer the brush I created in my Fun Photoshop Blog How To Use Photoshop’s Brush Texture Section for Painting Clean-up was used to clean up messy areas. (I really do use the techniques I present. HaHa!) Painted Textures Mist on the Lake texture was placed on top and set to Multiply blend mode. Then because I could, Topaz (see sidebar for website link) ReStyle was opened and a different color palette was selected. Sorry I do not have the settings but I think it involved the Peppermint Green preset. A Curves Adjustment Layer was added on top to add back contrast. Finally a little Nik Viveza 2 magic. That was it…..Digital Lady Syd
I See You! Checking Out a Snowy Egret
Another shot of a beautiful Snowy Egret from the St. Augustine Alligator Farm Rookery. This time it was painted twice – once using Mixer Brushes and once applying Topaz (see sidebar for website link) Impression Cezanne II preset. Photoshop’s Flat Angle Mixer was used to do a lot of the paint clean up……Digital Lady Syd
A Photoshop Still Life
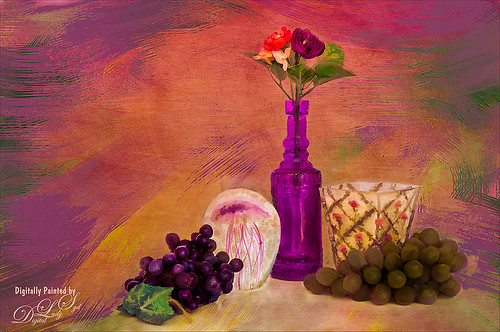
Enjoyed painting in Photoshop this set up still life I put together. Topaz (see sidebar for website link) photoFXLabs was used to add the Painted Works Texture and on separate layers above, the mixer brushes were used. The final texture was placed on top and was Jai Johnson ‘s watermelon-wall set to Soft Light. In the Layer Styles dialog, the Blend If Underlying Layer black tab was set to 88 to get the glowing effect. Nik Viveza 2 was used to direct the focal point, a Levels Adjustment Layer and Curves Adjustment Layer were used to finish it off. I really enjoyed painting this image…..Digital Lady Syd
Heron Checking Out the Gathering Crowds
This beautiful bird was standing watch at the St. Augustine Alligator Farm Rookery recently. Had to paint him. Been experimenting with the Photoshop Mixer brushes recently. What was more important than painting the bird was toning down the background so a very basic type Mixer brush was used to smooth out all the patterning behind the bird. The bird was also smoothed out a little, but the feather and face detail was painted back slightly so you can see the detail in them. A Levels Adjustment Layer was the last step to add contrast back into the more flat looking painted version. I love painting the birds from the Rookery!…..Digital Lady Syd
Digital Lady Syd Related Blogs:
How to Use Texture to Remove Distracting Nature Backgrounds


