
The Red Bromeliad
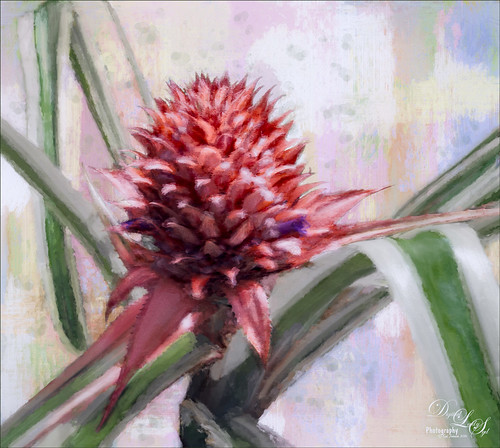
This is a red Bromeliad taken at the Harry P. Leu Gardens in Orlando, Florida. In Lightroom just basic adjustments were done on the RAW file. In Photoshop, the plant was selected using the Quick Selection Tool and then the Select and Mask Panel was used to clean up the selection. This is a wonderful addition to the latest version of CC. One of my Corel Painter textures was placed behind the the selection. Topaz (see sidebar for website link) Impression 2 was opened one of my Impressionistic textures was applied. A Brightness/Contrast and Curves Adjustment Layers were placed on top and the layer mask converted to black by CTRL+I inside the mask. Then just areas I wanted brightened or more contrast added into were painted back. On a New Layer above, a lot of painting using a regular brush to smooth out rough edges from the plug-in was used. Nik Viveza 2 was used to set the focal point in the flower and the last step was to add Topaz ReStyle to get a nice pleasing color palette. Love the final effect!…..Digital Lady Syd
Fantasy Flowers

This image was painted in both Paintstorm Studio and Photoshop. The flowers and part of the background was created using brushes on separate layers in Paintstorm Studio (see my Paintstorm Studio Fun! Fun Photoshop blog for more info on this inexpensive program). Then the PSD file was brought into Photoshop and more tweaking was done. Reflections in the water was made by creating a group of the flowers, duplicating and merging it, and then Free Transforming by dragging straight down. Then the opacity was lowered quite a bit. Used 2 Lil Owls (see sidebar for website link) After the Rain 41 texture set to 23% layer opacity and with a blue to white to blue Gradient Adjustment Layer on top. Used a painting layer to added some plant effects on the water and Obsidian Dawn’s Bird Grouping 2 was placed on top. The birds were selected using the Color Range Command and setting to Shadows – then applied the layer mask to get just the birds in the image. Next a Pattern Gradient Adjustment Layer and a Solid Color Adjustment Layer were clipped (ALT+Click between the layers) to give the birds the color. On a stamped layer (CTRL+ALT+SHIFT+E) Topaz (see sidebar for website link) Lens Effects was opened and the Diffusion filter applied. Back in PS, a black layer mask was added (ALT+click on layer mask icon at bottom of Layer Panel) and just the reflections were painted back – this is where I wanted a softer look. On another stamped layer Nik Viveza 2 was applied to drive the eye more to the focal point, the purple flowers. On a couple of new layers a little cross hatching was painted in the corners and some clean up on some of the flowers that were too bright. A splatter layer was created around the flowers – I just like the effect! The last step was to add a Curves Adjustment Layer. Just lots of fun to create!…..Digital Lady Syd
My, What Big Eyes You Have!
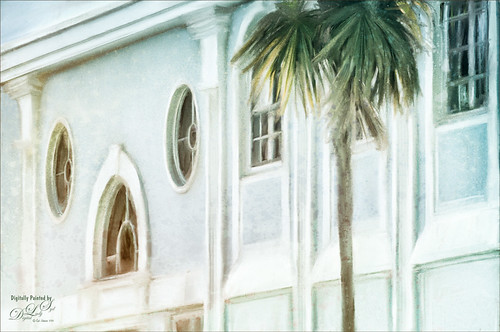
This image was taken from my car – I just loved the color of the building. Who knew it actually looks like a bird face in the windows. I actually thought it would make a nice image to paint, so I did. This time it was painted in Photoshop using Lori Jill’s class called Turn Your Photos Into Paintings Using Photoshop, which uses Photoshop’s default action called Mixer Brush Cloning Paint Setup and her brushes. Lori is the only person I know teaching how to really use this action effectively. For finishing steps, 2 Lil’ Owls (see sidebar for website link) After the Rain texture was applied and Topaz Lens Effects (see sidebar for website link) Gold Reflector filters was added. It was a lot of fun to paint again……Digital Lady Syd
Just a Little Flower
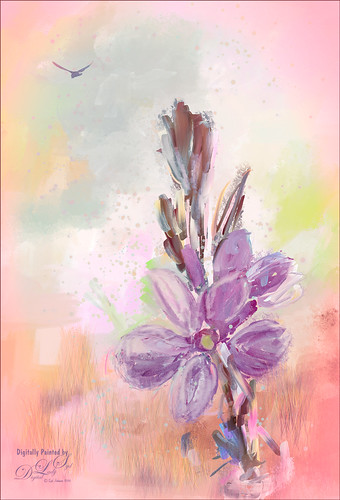
This image was created by painting over a flower taken at the Harry P. Leu Gardens in Orlando, Florida. The flower was actually selected from its background with Topaz (see sidebar for website link) ReMask 5 and saved as a PSD file to take into Paintstorm Studio. This program has some beautiful paint brushes at a very reasonable price. Several different layers were painted with different brushes including the watercolor spots before saving as a PSD and re-opened into PS. A bird was added and my Corel Painter Fresh Air texture was used behind the flower. Added a little grass using Frostbo Set 2 Grass 005 brush to add some ground. Used Kyle T. Webster’s free Animator Pencil to draw around the petals a little and the free Nik Viveza 2 to adjust the focal point. It was a lot of fun to paint!…..Digital Lady Syd
White Ibises Playing at the Sea
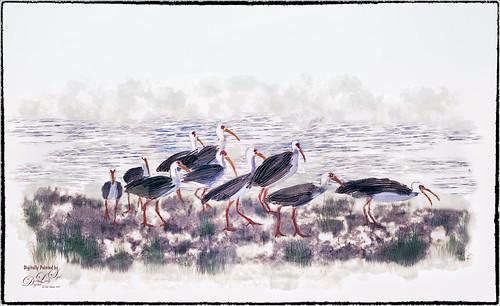
This image is of a group of White Ibis at the West Palm Beach Zoo – when someone threw out some treats, the whole exhibit sort of “flew the coop” and came out with everybody walking around on the sidewalks. Totally funny! I decided to make it a more interesting get-away area! Basically just sharpened the birds in Topaz (see sidebar for website link) Detail 3. Then selected the birds from their background – I used Topaz ReMask 5. With a layer mask several birds were removed where they were partly hidden by other birds. Several layers were added for painting – used Grut’s FX Cloud brushes (love these brushes) for clouds and ground areas, Grut’s Dusky Covert brush for color on birds, Kyle T. Websters Sparse Bristle Watercolor brush for lines on body, Aaron Blaise’s water brush sb 46 10, and Frostbo’s Grass Set 2 brushes 005 and 009. The newly free Nik Color Efex Pro 4 was used to create the final effect (Filters used: Tonal Contrast, Brilliance/Warmth, Vignette: Lens, Remove Color Cast, Graduated Filters, and Image Borders) – I like to just play around with the different filters to see what happens! This was just a lot of fun to paint – and not that difficult!…..Digital Lady Syd
Get the Boy Something He Wants!
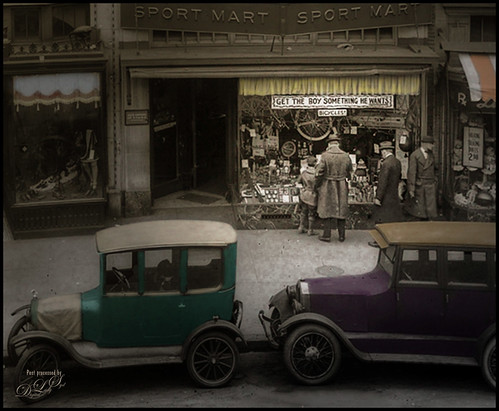
This image was downloaded from Shorpy.com of the Sport Mart on F Street NW in Washington. DC around 1922. I had originally started tinting the whole image as I thought the old cars were quite interesting. Once zoomed into the people, the image took on a whole different perspective! Therefore it was cropped tight to see the boy and his father and/or grandfather looking at the bicycles and other items in the store window. The sign sort of capped off what I consider a great story! All I could think about is what the little boy wanted.
The tinting was done using the technique and brush in my How to Hand Tint a Vintage Image and Create a Brush to Do This blog. After resizing and cleaning up the image a little, several layers were painted with the Tint Brush created in the linked blog. Then image was cropped as the cars looked good still in front of the store. On a stamped layer (CTRL+ALT+SHIFT+E), Nik Color Efex Pro 4 (now free) was used to create the rather dewy soft vintage feel in the image. (These filters were used: Glamour Glow, Midnight with Blur turned off and set to 52% opacity, Reflector Efex, Vignette Filter and Image Borders.) Nik Viveza 2 (also free) was used to focus on the store window a little more. On another stamped layer Photoshop’s Camera Raw filter was opened and using the Detail section, some color noise was removed in the coats of the people. Adding a black layer mask (CTLR+I in white mask) to the layer, just the coats and any colored noise areas were painted over with a white brush to remove the noise. On another stamped layer the Camera Raw Radial Filter was used to lighten just the people and sign using the Brush in the filter to pinpoint just them. This layer was set to 55% layer opacity. Next a Red Channel Curves Adjustment Layer was used to brighten up the luminous areas just slightly. (See my How to Use a Red Channel to Create a Nice Blended Imaged Effect blog.) That was all that was done. I am really enjoying this technique!…..Digital Lady Syd
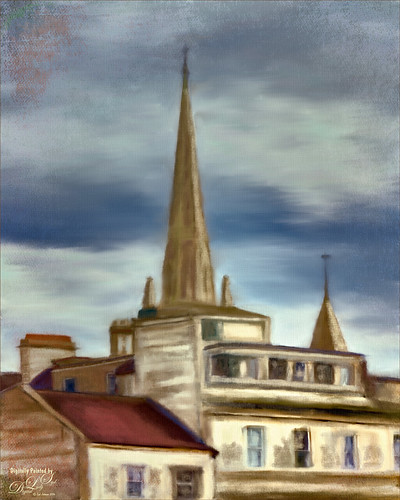
Spooky Old Building!
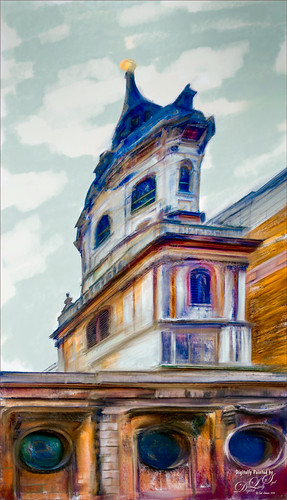
Had some fun today painting this unusual building that was taken in London several years ago. This time the building was actually distorted in Lightroom using the Lens Correction section and the Manual tab before bringing the image into Photoshop to paint. Used Lori Jill’s Photoshop technique on Udemy and her rushes to paint with the mixers. GrutBrushes.com ‘s special effect Cloud Kewm was used to paint in some clouds since no blue or clouds were in the sky. Topaz (see sidebar for website link) ReStyle’s Tierra Frost preset was applied with adjustments. Last step was to use Nik Viveza 2 (now free) to emphasize the upper two stories for the focal point. That was it – definitely a bit spooky looking!…..Digital Lady Syd
Spring Is in the Air!
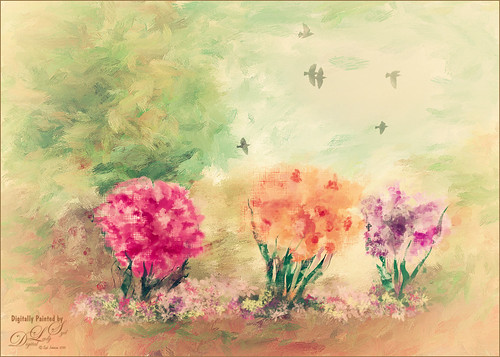
I really love painting flowers in Paintstorm Studio as the colors look so wonderful. Therefore the three pretty blossoms were painted using several Paintstorm brushes – a watercolor brush, a cross hatch brush, and two manga hair brushes for the leaves. Then in Photoshop a brush from Ruan Jia called Leaf 5 with some hatching texture added and color to create the flowers on the ground – scroll down to find download and check out all the other sources of some wonderful brushes. The birds are from a Lost & Taken set photo IMG 4721 set to Multiply blend mode at 33% layer opacity (not sure these are still available) and a Pattern Fill Adjustment Layer with a watercolor pattern was clipped to it to give a little texture to the birds. The background texture is one I created in Painter a while back. Topaz (see sidebar for website link) Lens Effects Graduated Neutral Density filter using 1 Stop Bottom preset. Finally Nik Color Efex Pro 4 (now free) was added using these filters: Darken/Lighten Center, Film Efex Vintage, White Neutralized, and Vignette Filter. That was it. I really like the results!…..Digital Lady Syd
Meet the Super-Model Parrot
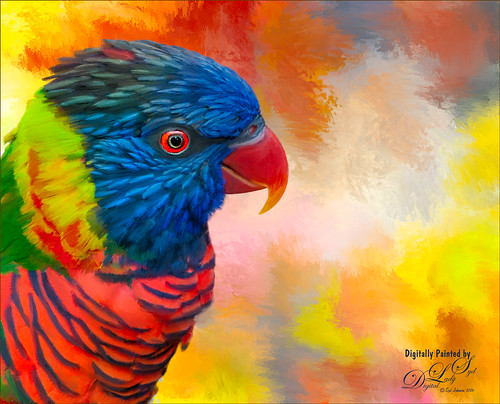
Just a simple little painting of a Rainbow Lorikeet (parrot) taken at the Jacksonville Zoo a few months ago. These little birds were so tame and would let you get so close to take pix – real-life bird super-models! I really enjoyed painting this happy little guy and I tried out a new Photoshop brush to paint him. The background is one I painted in Painter to match the colors in his plumage…you have to consider these kind of things when working with super-models! Used Topaz (see sidebar for website link) ReMask to select and then applied the mask once happy with the selection in PS. It was found in a large free set of brushes from Alex and this brush was named 扇形扁平混合器 (which means Flat Fan Mixer). Unfortunately I cannot find the batch of brushes to share. Just changed the Angle in the Shape Dynamics section of the brush to paint with the brush and change the size to fit. The duplicate texture was added on top and set to Multiply at 53% layer opacity. An Exposure Adjustment Layer was used to create sharp looking painted eyes. And that was it. Try out the brush – you will really like it as a nice blending mixer!…..Digital Lady Syd
Hanging Out with the Family
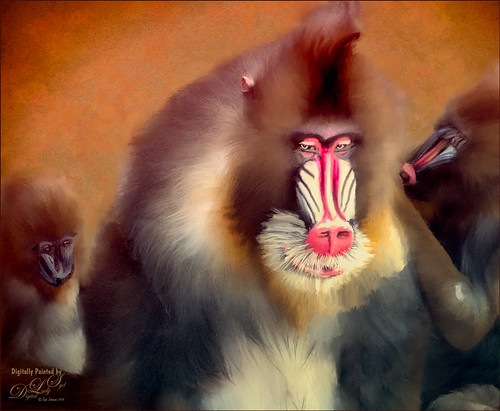
I decided to see if I could paint this interesting Mandrill family image a taken at the Jacksonville Zoo a few months ago. I wish I had had time to watch them for a little longer – the center monkey is a male with a female and male on the sides.
I was not sure how the fur would turn out painted, but with a little experimenting it can be done. I first separated the monkeys from their really dark busy background using Topaz (see sidebar for website link) ReMask 5 – still the best in my mind for doing this type of selection. Next a texture was added that I had created a long time ago – rather plain but with lots of texture in it. A Hue/Saturation Adjustment Layer was placed above the texture to make a pleasing color to match with the monkeys. The monkey ReMask layer mask was applied to the image so painting could begin – I always duplicate this layer and then turn off the original in case something was missed and the mask needs to be redone. Ten layers of painting were used to get the effect needed – all brushes were Fay Sirkis (it’s a shame but I do not think her Child Portrait or Pet Brushes are available anymore even from KelbyOne). Her Palette Knife Soft Blender was used to get the nice fur fluff look – moved the Shape of the brush to match the direction I was painting. Her Portrait Child Blender was used to get the detail areas for the faces. And her Portrait Children Single Hair Blender to add some individual hairs. On a stamped layer Topaz Lens Effects’s Toy Camera Awesomeness I preset with the Camera Shake set to 0 was applied. Last step was to use Nik Viveza 2 (now a free to download) to emphasize his eyes and get a soft overall vignette effect around the edges. Hope you enjoyed…..Digital Lady Syd
Painting the Town
Just having some fun painting and seeing what effects I can achieve. Following Lori Jill’s Photoshop technique on Udemy. Used some of her brushes to do the underpainting and painting in some of the details. I decided it needed a little more of a painterly look, so a brush I created using my Pastel 3 brush and adding the Gauze texture to it to get the nice soft cross hatching brush effect to paint on the image. (See my How to Use Photoshop’s Brush Texture Section for Painting Clean-up to create basic brush – then change Texture to Gauze, Scale 123%, Brightness -75, Contrast 50, Mode Multiply, Depth 86%, Min Depth 100%, and Depth Jitter 50%.) A Bevel and Emboss layer style was added to the whole image and the Texture was also set to Gauze, Scale 221% and Depth +51 to get the same effect on the whole image. That was basically it. It is fun to try and paint different types of images. Last 3 Lil’ Owls (see sidebar for website link) overlay called Color Bokeh Grunge Set – #5 was added on top and set to Overlay blend mode. Still learning, but it is coming along…..Digital Lady Syd
A Little Birdie Told Me So
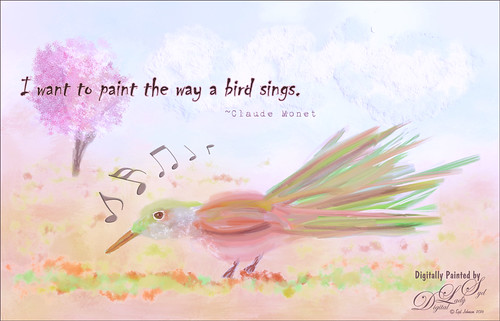
Just having some fun today creating this little bird. The bird, tree, and background were done in Painter. In Photoshop some Impasto effect was added to the some feathers, the music notes and clouds using a layer style. The free font is called Chiller and the wonderful Musical Note brushes are by Coby 17. It was fun to try out some different brushes in Painter ……Digital Lady Syd
Standing Guard
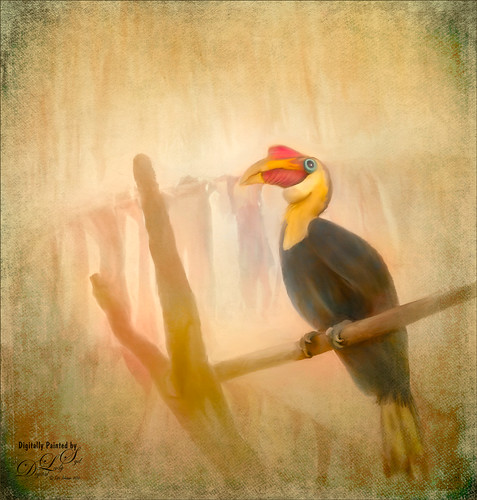
This Wrinkled Hornbill bird was taken at the Jacksonville Zoo. These birds looked like they were having so much fun flying across their enclosure and trading places on the various tree branches. Looked like a marvelous game from my childhood! This image took a long time to paint. Just followed my normal process of selecting the bird and in this case some branches in Topaz (see sidebar for website link) ReMask 5. Underneath he original background was actually kept, but one of my Corel Painter backgrounds was added above and set to Darken blend mode at 82% layer opacity. The background details are actually a large plant that was hanging across the back. The texture changed how they look. Lots of painting layers and Topaz Lens Effects was used to add some golden reflector effect. Nik Viveza 2 was used to adjust the focal point. 2 Lil’ Owls (see sidebar for website link) overlay texture Color Bokeh Grunge Set 3 was used on top and a layer mask was used to bring back the bird. That was it – pretty standard. These birds are so much fun to paint!…..Digital Lady Syd
A Spring Scene
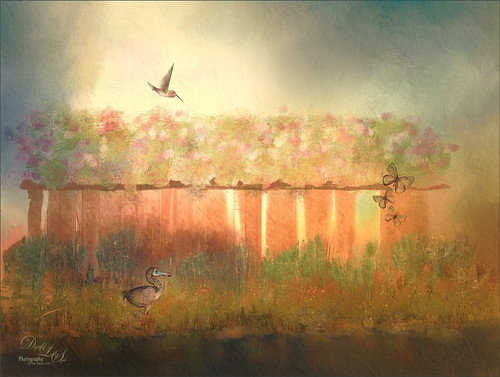
Just having some fun here. Created the original image in Corel Painter – got stuck and came into Photoshop to finish up the image. The basic structure, flowers and plants were created in Painter using various brushes. In Photoshop the DoDo bird Hummingbird were from a scrapbook set called HappyUnBday by Mischief Circus (this is one of my favorite sets) and the Butterflies are from a set called Intermixture Elements & Papers by Algera Designs. A texture called Clouds Over the Pasture from Jai Johnson was added underneath and set to Hard Light blend mode – it gives the beautiful light around the bird. Several layers were added where some texture was added in using plant brushes and texture brushes. Nik Viveza 2 was used twice and Topaz (see sidebar for website link) Lens Effects three times to get this final result. Also some Impasto layers were used on the plants to give a little 3-D effect to the image. This actually took quite a while as I just could not get the feel I liked. I think it is now complete!…..Digital Lady Syd
In the Country
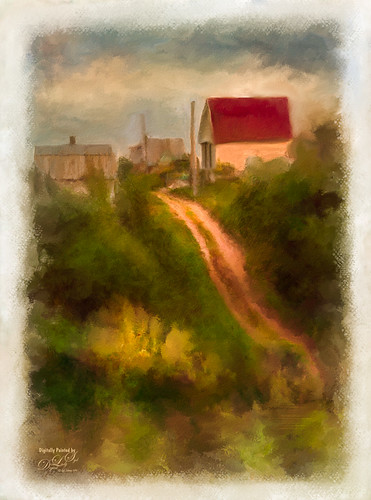
This is an image taken several years ago of the Belarusian countryside. I just watched on the Corel Painter website an older set of videos by John Derry (see Workflow 1, Workflow 2 and Workflow 3 videos) and decided to try his technique. It involves using several layers of auto-painting with different brush sizes and then adding layer masks to target your focus area. I had a little trouble following all the steps at the end, so I went into Photoshop to use my favorite brushes for cleaning up paintings. Overall I liked the final effect but I am not too sure if I liked the auto-paint results. This is definitely one you need to play with the different Painter brushes to get a pleasing effect. …..Digital Lady Syd
Looking Glamorous!
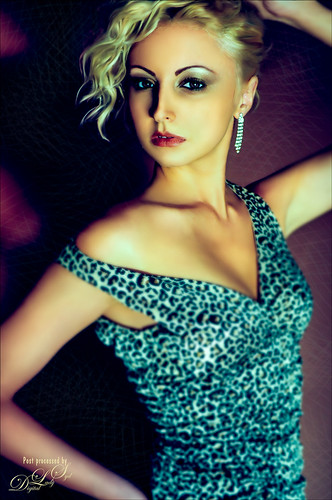
Just practicing a little light face painting – this time giving a bit of a glamour look to the image. Lots of liquify and dodging and burning to get the effect besides blending skin with mixer blenders in Photoshop. The original image had a brownish tone to it, but I changed it with a Color Balance Adjustment Layer to get this blue and pinkish effect. Not a whole lot to this, just some light painting fun…..Digital Lady Syd
The Hidden Boat
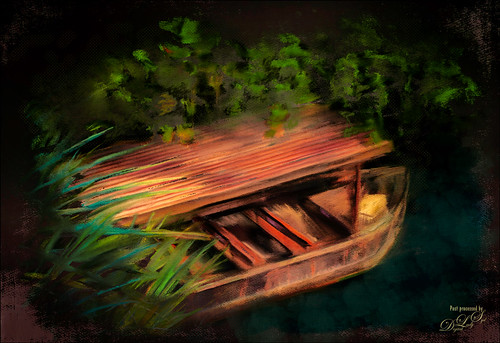
Loved this stock photo I found on pixabay.com of this boat hidden in the shade. Decided it would be a good practice painting so that is what I did. Use Topaz (see sidebar for website link) Simplify’s BuzSim preset to start as an underpainting. Still using Lori Jill’s instructions from her Turn Photographs Into Digital Paintings Using Photoshop videos and using the PS Mixer Brush Cloning Paint Setup action. A lot of painting, 3 textures and some brush clean up layers. Just a lot of fun to paint – very relaxing! …..Digital Lady Syd
The Mighty Jaguar
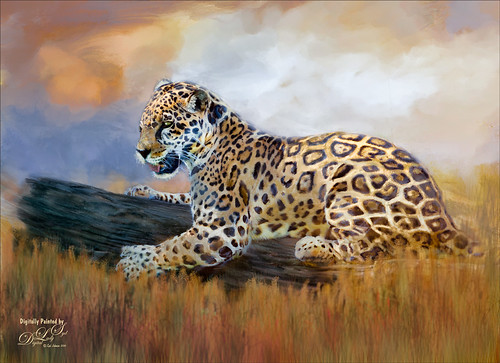
Took this image at the Jacksonville Zoo a couple days ago – the original is totally unremarkable and I did not think it would turn out nice at all. Just thought it would be a good challenge to see what I could do with it. I will actually post some much better pictures of these beautiful cats later. Normally I would give you step-by-step, but this was a pretty heavy workflow so I will just tell you what all it took. The biggest problem was the chain-length fence that went through his body. Since I could not get close enough to the fence to get rid of the distortion, I had to paint it away. The fence was selected and a Curves Adjustment Layer was used to reduce the effect. Then three more Curves Adjustment Layers before I was ready to paint him. Topaz (see sidebar for website link) Adjust using French Countryside (my favorite) preset and several slider adjustments to get the color in the cat that I liked. Then I went into Corel Painter and painted a background that matched his colors. Put the background on top of the cat and painted the cat in with a layer mask. Next painted using 7 layers and both mixers and regular brushes (my SJ Pastel 3 painting brush mainly – do a search at my Fun Photoshop Blog for settings). Used Nik Viveza 2 to emphasize his face. Used Blur Gallery to soften the foreground, Liquify Filter to make his eye a little larger, Topaz Lens Effects for some special reflector and graduated filter effects, and Camera Raw Filter to bring out the orange effect just a bit more. Last step, Topaz Restyle using the Tawny Tint. That about did it but it was a pretty big process. I just love painting the big cats!…..Digital Lady Syd
An Old Victorian House
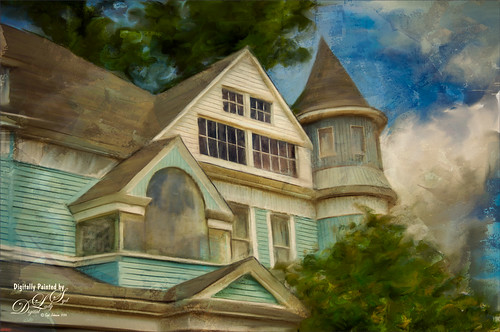
I recently bought a set of videos from Udemy called “Turn Photographs Into Digital Paintings Using Photoshop” by Lori Jill. If you watch their sales, you can get all kinds of videos on photography for a very reasonable amount. The above is my first image created following her instructions – she instructs on how to create Mixer (cloner) brushes to get effects you like. She also uses the Photoshop action called Mixer Brush Cloning Paint Setup. This appears to be very similar to the original Dr. Brown’s Painting Assistant Extension for CS5 and CS6. Anyway, I was very pleased with my first attempt. I also used one of Melissa Gallo’s beautiful textures, Pilgrims Journey, twice to get the vintage feel to the strokes. I still have a few lessons to go, so hopefully I will post a new image soon using this technique……Digital Lady Syd
Digital Lady Syd’s Related Blogs:
Dr. Brown’s Painting Assistant Panel for CS6 and CS5!
Jack Davis Painting Action Really Works!
Happy New Year!
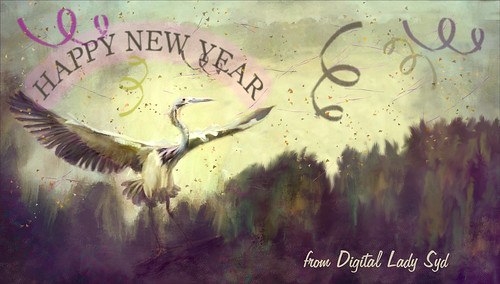
Just one of my favorite birds, the Great Blue Heron, celebrating along with everyone the coming new year. Actually a lot of was done to this image that was taken at the St. Augustine Alligator Farm. He was painted in Photoshop with mixers and regular brushes and the background was painted in Corel Painter. Just my basic painting workflow. Separate layers used Confetti and Streamer brushes from Morgan BW on Deviant Art. The last step used Nik Viveza 2 – always the perfect final touch. Happy New Year from Digital Lady Syd…..See ya next year!
Merry Christmas!

Merry Christmas and hope everyone is having a wonderful holiday! Enjoy the season!…..Digital Lady Syd
Visiting with a Friend
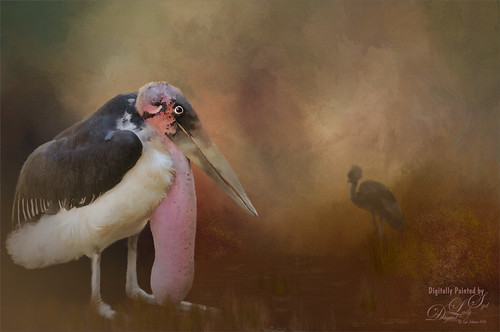
This Marabou Stork resides at the St. Augustine Alligator Farm in Florida. He and the West African Crowned Crane are there to greet you when you visit the Birds of Africa section. I so enjoy painting the birds that do not have a very distinguished look about them and give them a more beautiful place to enjoy. I get the sense this guy is totally content living in St. Augustine although far away from his normal habitat.
Just followed my regular painting workflow from previous blogs. This time added some grain in Topaz (see sidebar for website link) as it gave it sort of a magical old feel. The hardest part about this image was how sharp he appears – very hard to soften his edges and look natural, especially his feet. Topped off the image using my favorite plug-in of all time – Nik Viveza 2……Digital Lady Syd
Living the Good Life
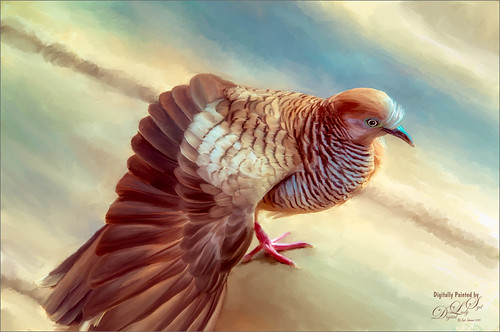
Just enjoyed painting this lovely pigeon, or if you prefer dove, from an image taken in Hawaii at the Hilton Waikoloa Village on the Hawaiian Island. Not much new here in the workflow, except that Nik Color Efex Pro was opened and the Detail Extractor, Bi-Color Filters, Sunlight, and Film Efex Nostalgic filters were used to get the color effect I liked. Otherwise several of Fay Sirkis’s Pet Photoshop Brushes were used to get the final result. Just love painting birds!…..Digital Lady Syd
Wading in the Water
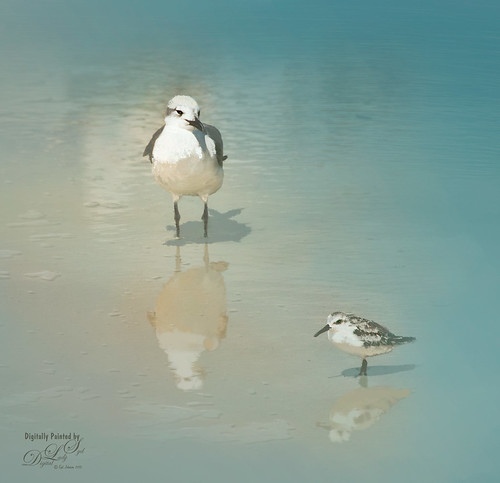
These little guys were enjoying the tidal waters at Daytona Beach, Florida. I believe the bigger bird is a Laughing Gull and smaller one a Sanderling from the Sandpiper family. These birds were all over the place and seemed quite tame on the beach. These birds were painted in Photoshop. Added a solid color turquoise layer and in a layer mask painted back area to be seen. Used one of my Corel Painter textures that was a very smooth beige tone. Then used Fay Sirkis’s Photoshop Erodible Tip Pastels to paint the birds and reflections. Used Topaz (see sidebar for website link) Lens Effects Reflector Filter to add some directed light and warm up the scene. The beaks and eyes were sharpened. A little Nik Viveza 2 to finish up so the focus is on the birds and less on the reflections. Very simple process but fun to do!…..Digital Lady Syd


