
Abandoned Texaco Station
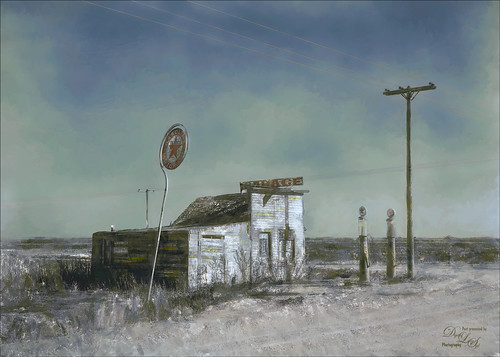
I found this image of an abandoned gas station in 1937 on Highway No. 2 in western North Dakota at Shorpy’s Historic Photo Archive but downloaded the original as a tif file from the Library of Congress. Seemed like a perfect candidate for colorizing in the new Topaz (see sidebar for website link) Studio. When working with these vintage black and white images, you always need to first adjust the resolution and resize it in Photoshop by going to Image -> Image Size command – set to a resolution of 300 by unchecking the Resample button, inserting 300, then rechecking the button to change the size. Next duplicated the layer in PS and opened up Topaz (see sidebar for website link) Studio and selected my SJ Colorize Black and White Image preset (it is up on the Community Site). Then added: Reduce Noise Adjustment and painted out the foreground in a mask so it only affected the sky; Dehaze Adjustment set to a Strength of 0.39 and Suppress Artifacts to 0.82; and Impression Adjustment using the Default settings changing the Stroke type to Stroke 09 and set the Painting Progress slider to 0.27. Back in Photoshop just did my normal workflow although it took a little more work. Used Nik Viveza 2 to adjust the overall image and several painting layers to smooth out the sky. Lots of fun here!…..Digital Lady Syd
Flowers Enjoying a Planetary Twilight Sky
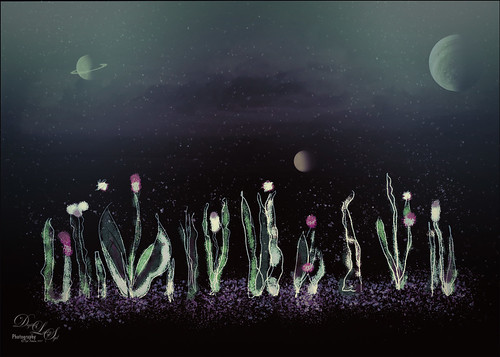
This is just a fun blog. I was doodling with some of Brush Guru Grut’s fabulous brushes (see sidebar for website link and get a free weekly brush to download) and ended up with the flowers looking skyward at an interesting twilight sky. Two layers were painted in a New Document – used one of my favorite drawing brush called Grut-I Qwillo brush. On individual layers, the ground was painted with Grut’s FX IL Bad Mower brush, the flowers and leaves used Grut OI Hip Twitch, and some flower spatters. The Star Field02 is from Frostbo and set to 34% layer opacity. The cloud effect is a cloud brush I created and set to 17% layer opacity. I added Saturn and the moonlet using some brushes I had created a long time ago. Jupiter was created using actual images from NASA’s Mission Juno Project and following a short video by Howard Pinsky called Processing Jupiter in Adobe Photoshop – this was so much fun! It was moved into the sky and that is about all that was done. Last step involved using Topaz (see sidebar for website link) Texture Effects preset called Crisp Morning Run. Lots of fun here!…..Digital Lady Syd
Feeling Happy
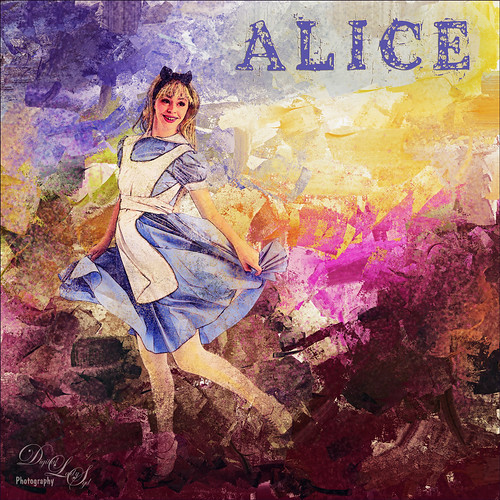
This is a composite image that I created using stock images and a texture I had created in Corel Painter. The beautiful Alice is from Faestock on DeviantArt. The first step was to create a New Document set to 8 inches X 8 inches at 300 dpi. Next the stock image of Alice was added and the girl was selected and removed from the white background. On this cut out image, an effect used by Corey Barker at Creative Live during the 2017 Photoshop Week was applied. I cannot seem to find another source for this effect but Corey has used similar effects in Photoshop User Magazine and a Kelby One blog. Anyway, the basic effect gave Alice a rather gungy look using different brushes in layer masks. The Alice layers were put in a group. Then the texture was added underneath the group. Selective Color Adjustment Layers and a Curves Adjustment Layer were used to blend this all together. Nik Viveza 2 was added to draw focus to her face. The font is the Old Printing Press Free Version. It is fun to make just a care-free image that makes you smile!…..Digital Lady Syd
Checking Out the Buds
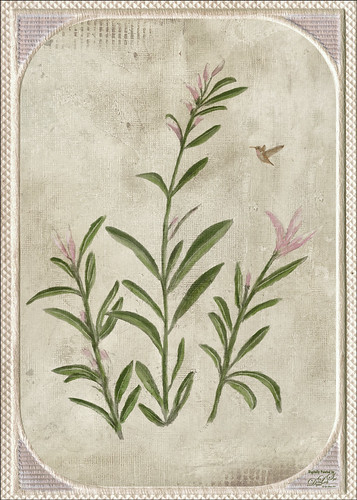
Still practicing drawing and painting. This image I just followed the same workflow from my Some Flower Power blog which created an original sketch layer and several painting layers for the flowers. Next the Hummingbird was painted on a layer using a bird brush created by just turning an old bird image into a black and white and defining as a brush preset – actually used two different colors and softened the edges a little. Kim Kassen’s Stay texture (not sure it is still available) was placed on top and really gives the vintage feel to the image. A Hue/Saturation Adjustment Layer was clipped to it (ALT+click between layers) to desaturate the texture color a little. The border is from On1 Hundred Borders set. The three final steps were performed that I almost always use at the end of my workflow: a Red Channel Luminosity Adjustment Layer, Nik Viveza 2, and a Black and White Adjustment Layer. I am starting to enjoy creating the flower paintings……Digital Lady Syd
Smiling Wolf
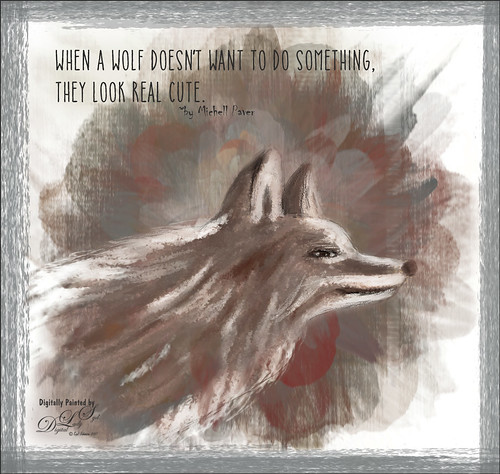
This is my attempt at drawing a wolf. It actually looks a lot like a dog so I am not sure what I was really drawing here. Used a tutorial in the Digital Painting Techniques book on Painting Fur by Richard Tilbury. First a thin black brush was used to the original sketch of the wolf on it own layer to begin the drawing. On layers underneath, the wolf was painted using the Pastel Scratchy Photoshop brush from Corel Painter Master Melissa Gallo’s Painting with Photoshop class to paint the hair. (Her class and PS brushes are terrific even though it is a few years old.) A couple of Fay Sirkis’s (another great painter and Corel Painter Master) Pet PS brushes were also used but they are hard to run down now – these are still some of the best around. (KelbyOne has her very good Four Seasons PS Painting tutorials with brushes to download if you are a member.) Topaz (see sidebar for website link) Impressions was opened and a preset created using the steps in a great video by Topaz Labs called RAW to Envisioned with Bobbie Goodrich (third example). The main text is Catalina Anacapa Sans from Creative Market and by Kimmy Design – a really nice clean font. The small text is in called Chiller. The last step was creating a border using a my Pencil Thin Vertical Lines brush (pencil lines were scanned and a brush was created – then in Brush Panel set the Angle to 90 degrees and Roundness to 12%) by changing the Angle and adding around the edges in a brown color. I will be practicing more animal drawings so look out!…..Digital Lady Syd
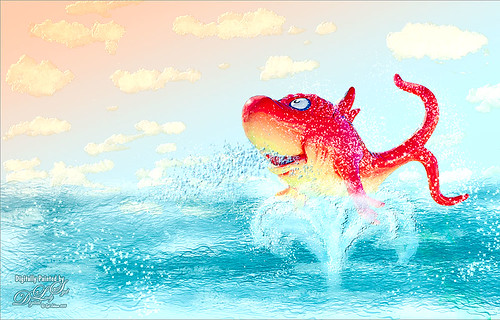
Danger – Gang of Ferocious Fish

Just had some fun making this poster from fish that were in one of the old volumes from 1754 volume Poissons Ecrevisses et Crabes by Louis Renard. These fish apparently are all examples of fish in the Indian Ocean. I personally thought they looked a little ferocious. Not sure what came over me to create this but once again it was fun. It was all part of the experimenting I was doing for my How to Create Vintage Text for Images Fun Photoshop Blog. These fish were copied from a page in the old volume and converted to a black and white image. An abstract pattern from Deal Jumbo was used in a Pattern Fill Adjustment Layer to add the different colors. Just dragged around on the image and adjusted the Scale to make it look interesting. On a separate layer bubbles were painted on the image by using Grut’s (see sidebar for website link) FX IL Flick Tub brush (in the Inky Leaks Splatter Brush set) and turning on a Bevel & Emboss Layer Style. All fish eyes were turned to blue on another layer. Some text was added. A frame by Rotfuschs was added. It really was just a fun image to play with…..Digital Lady Syd
Happy 4th of July!

Just a quick Happy 4th of July blog – hope everyone in the US are enjoying the fireworks. I created a similar image in a blog from several years ago. (See my Faking Fireworks Fun Photoshop Blog – some good fireworks resources in this blog.) The fireworks are from freeimages.com and Jai Johnson’s Fireworks Overlay Collection. The letters were scanned using some inexpensive letter templates and then layer styles using Shadowhouse Creations free Patriotic Pattern set. Used a different one for each letter by placing each letter on a different layer first. A Levels Adjustment Layer was used to add some contrast back. Then it seemed like there was not enough smoke in the background that fireworks always generate. Therefore Phlearn’s free Fog Brush set to light blue and 11% opacity was applied. A Gaussian Blur was then applied to the layer to soften the edges of the fog a little.
Hope everyone has been having a wonderful holiday! Happy Birthday America!…..Digital Lady Syd
Looking for Love
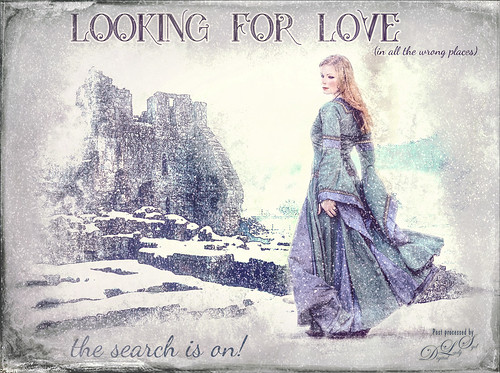
Sometimes it fun to just do something different! This actually took a lot of tweaking to get that romance novel or poster effect. Corey Barker offered one of his tutorials, Quick Hollywood – Inspired Illustrated Effect, for free so off I went. This is not quite what Corey’s poster looked like, but it still has a bit of that old movie magic. Several of the tips from his video were used which is how the illustrative look was created. The girl is called Wayra 11 from Liam Stock and the castle in ruins is called Winter Wonder stock 36 by Tigg, both at DeviantArt – must thank them for allowing the use of their images. Actually used Topaz Studio’s Basic Adjustment and Bloom Adjustment. Nik Viveza 2 was used to adjust the focal points in the image. Love the font called Star Full Inline which has eyeballs in it. The other font is called Dancing Script OT. Had to paint the face a little and added light fog on castle from Topaz Lens Effects. Used my snow effect called Snow1 Overlay and painted it off the foreground. On another layer, used Corey’s Particle Universal brush for snow on the girl and throughout. Last step was Topaz Texture Effects were the border was added. I think it is too hot right now and I am thinking of winter!…..Digital Lady Syd
Summertime!
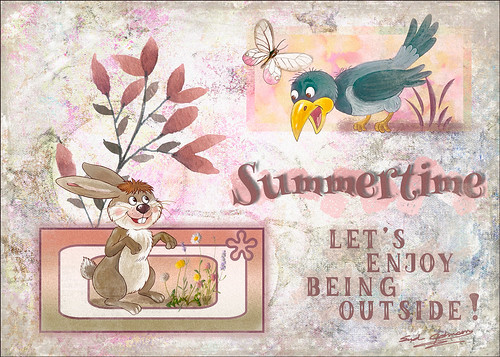
Just enjoying doing something a little different in Photoshop. I have not created a design effect in a long time. Can’t begin to thank all the people who have provided the large group of free resources that went into this image, but I will make an attempt. The first texture is one I created that is basically a bluish/gray painted effect. Then French Kiss’s (see sidebar for website link) Jubilant texture was placed on top for the colorful background effect and set to Linear Light at 76% layer opacity – a layer mask was used to remove part of the color in places that interfered with the text. Julia Mead’s Artistic Photo Overlays 8 was place on top and set to Hard Light – the Blur Tool was used to soften some of the black spots in texture. Next Lisa Glanz’s Magical Watercolor Graphics Vol 1 Sample Pink Bunch – this was duplicated twice to show up better and the top set to Multiply at 37% layer opacity. Two pink Vector blocks were created in Photoshop for both the characters to stand in. Layers styles were added to give the different edge effects. The bottom block also used a custom vector object from PS. Both the crow and hare are from the Cute Woodland Animals Bundle by Hasop. Both animals were paint to give a less graphic effect by painting over them using my SJ Pastel 3-painting Texture adder brush that I have talked about lots in my blogs. The Butterfly was from a Creative Live release called Aloha. The flowers in the hare box are called Clover 10 by Peolia. The Summertime font is Henny Penny and the other font is called LK Better Days.
Next step was to create a stamped layer (CTRL+ALT+SHIFT+E) to add noise (Tip 1 in my 10 Not So Well Known Photoshop Tips blog). Topaz (see sidebar for website link) ReStyle was opened and a preset from one of my other images was applied. What was done different is that the image was adjusted just for the animals and the Mask in ReStyle was used so that only the animals and reddish plant were affected. A frame from 2 Lil Owls Studio (see sidebar for website link) was created using a bonus texture and removing the white area – then saving as a PNG file. At the end a Blue Channel Luminosity Curves Adjustment Layer was applied. It is fun to try out different elements in a document just to see what you can get……Digital Lady Syd
The Pond Fairy…is always watching you
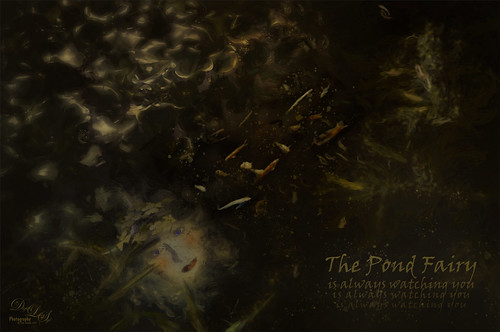
The Pond Fairy was a lot of fun to create. The original image was a lily pad pond image taken at the Ormond Memorial Art Museum and Gardens. The sun appeared in the water as a brilliant white glare where the face is located. The fairy face is made from a brush I created from a model’s face. Corel Painter’s ParticleShop Photoshop plug-in was opened and the Cluster brush set to a bright yellow with the Glow checked and was painted on the plant on the left side and little on the tips of the lily pads. A texture from 2 Lil Owl (see sidebar for website link) called Mosaic Set Aqua Grunge – this is one of her best sets in my opinion – was applied and set to Subtract blend mode at 19%layer opacity. Topaz (see sidebar for website link) Lens Effects was opened and the Diffusion filter was applied to really soften up her face and some of the sharp lily lines. Then it was removed in part of the image with a layer mask. Topaz Restyle was opened and a preset was made of the image at this point. Then the actual image sliders were changed to get a little bit different color palette. This is a great way to get the colors just like you want them, especially if they are pretty close to what you like. The other presets just did not work with this image. (See my How to Use a Topaz ReStyle Trick for Improving Your Image blog for how to do this.) A few splats were placed on a New Layer to give a little fairy dust and water bubble look. On a composite layer on top (CTRL+ALT+SHIFT+E) and opened Nik Color Efex Pro 4 – used Detail Extractor, Glamour Glow and Midnight filters. This layer was set to Multiply blend mode and 24% layer opacity. A group was created for the face layers where the eyes, cheeks and lips were painted. Also the clover hat was added to her image here. This was from my favorite object site – PixelSquid. The fish are from an image taken in Hawaii at the Hilton Waikoloa Village. It was layered on top of the water lily image, then free transformed to fit the pond area. A Black and White Adjustment Layer and Levels Adjustment Layer were set to get the correct tone and color in them. A layer mask was used to fine tune the fish into the area. Nik Viveza 2 was opened to adjust the focus. The text is a free font called Viner Hand ITC. Quite a few steps but lots of fun. So next time you look into a pond, check out The Pond Fairy who will be watching you…..Digital Lady Syd
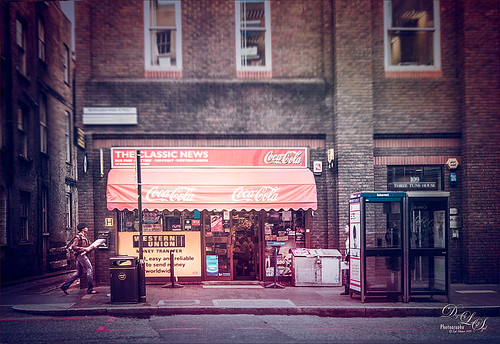
Soaring into Summer
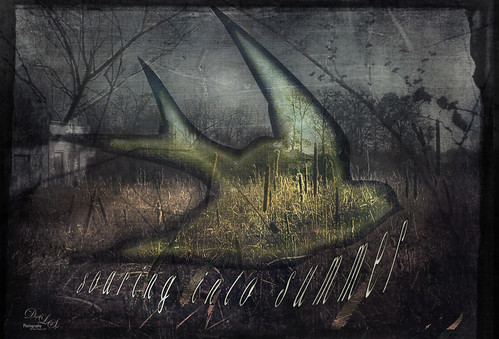
This image is a composite from a couple different photos and several textures. I have never tried any real grunge effect so this is quite a change for me. Basically lots of layering and adjustment layers to pull this together. The original image was taken across the street from my old home on Lake Wawasee (click to see the webcam) in Indiana and was a huge marsh of Pussy Willows at this time. Two 2 Lil Owls (see sidebar for website link) – Ancient 1 and Jewel Chalks 19. The font is Nomah Script and was warped to fit the bird. The bird is from Photoshop Creative magazine No. 12, and the foreground contains Midnightstouch Grasslands 3. Topaz (see sidebar for website link) ReStyle to get a better color adjustment. From Shorpy’s (my favorite vintage image site) an Abandoned Garage on Highway No. 2 in western North Dakota in October 1937. A layer mask was used to blend it in the background. A dark border was added and Nik Viveza 2 was used to adjust the final lighting effect. Lots of work on this one and I hope it conveys the effect I wanted of a bird soaring over the field and adding an element of warmth to the rather drab image……Digital Lady Syd
Have a Good Day!

Spent a good part of Sunday going through the wonderful videos by Sebastian Michaels on Typography. They are available when you buy the Somerset Digital Studio magazine for Spring 2017 and there is lots of info on this tricky subject. The above is what I created after listening to a couple hours on how to do this – lots of fun. The number of fonts is a bit excessive but many belong to a similar class of fonts. I was mainly practicing how to incorporate different fonts with different techniques. (Some of the fonts were free and a few I own and are as listed: CF Anarchy, Dancing Script OT, Mistral, Fuse, 1942 report, DomCasual BT, Angelic War, Naive Deco Sans, Blackoak Std, Catalina Avalon Sans, Blackboard, and Trajan Pro in case you might want to download one of them.) The tree on the side is Tree-169 brush by Midnightstouch. The really nice swirl is from missm-flourishes-sample brush 2/312 size. I believe there are 37 Layers and 5 Groups in this little creation using lots of layer styles, colors, and adjustments layers, and even Topaz (see sidebar for website link) Impression 2 (Cartoon Your Critter preset). The original background texture is one I created in Photoshop using a beautiful cross-hatching effect with a brush from Just Jamee Summertime 2012 Brush Sampler 4 brush and a Bevel & Emboss layer style and using two different colors, then smoothing out parts with Gruts FX Cloud Billoway brush. Most of the fonts were obtained for free on the internet. Overall a very interesting way to spend a day!…..Digital Lady Syd
Just Being a Little Abstract
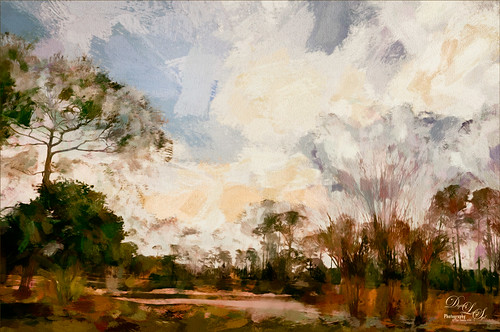
This image shows a local golf course view seen when playing. I had some fun with a couple of Topaz (Stroke: Brush Type 04, Brush Size 0.91, Paint Volume 0.42, Paint Opacity 0.87, Stroke Rotation 0, Stroke Color Variation 0, Stroke Width 0.33, Stroke Length 0.89, Spill 0.23, Smudge 0.26, and Coverage 1.00; Color: Overall Hue 0.15, St -0.20, and Lightness 0.06; Red Sat 0.47 and Lightness 0.14; Orange Sat 0.60 and Lightness -0.42; Yellow Sat -0.33 and Lightness 0.13; Green Sat 0.20 and Lightness -0.32; and Blue Sat 0.36; Lighting: Brightness -0.04, Contrast 0.39, and Light Direction x0.33 and y0.06; and Texture: Strength 0.78, Size 0.30, Canvas IV, Background Type Solid, and Background #d38967 (soft melon color).)
see sidebar for website link) Labs newer plug-ins. The initial layer was duplicated and Topaz Impression was added using my SJ WC like effect on bldgs preset. This preset is sort of crazy but gives some wonderful results at time. (Settings for preset: On a New Layer, some clean up was done where the paint went that did not look good. On a stamped layer (CTRL+ALT+SHIFT+E) Nik Analog Efex Pro 2 was applied using just the Basic Adjustments 5 control points were added to adjust the Detail in different parts of the image. Also Film Type Warm (Row 2 Col 2) was added to the stack. Now the image was brightened up quite a bit. Last step using Topaz ReStyle’s Warm Tones Contrasted preset. That was it. I just liked the rather abstract feel that Impression gave to the image……Digital Lady Syd
A Little Birdie Told Me So!
Just having some fun with this image – wanted to try out the technique I am seeing everywhere of taking an object and putting some kind of image inside it. This little bird I got from a Design Cuts deal with a shape from Nicky Laatz. These people have such good deals for creatives and graphics folks – I could spend all my time just doing this type of thing! What I did was use a Pattern Fill Adjustment Layer using a pretty watercolor pattern and just clipped it to the bird form (ALT+click between the layers to clip). Then you can drag around the pattern in your image to get the effect just the way you want it. Otherwise just using my Frostbo Grass Set 2 brush 009 to put in some grass and Aaron Blaise Water brushes to create the water. The background are some clouds I painted a long time ago in Painter. Through in some spatter brushes on a different layer. On top of the image 2 Lil’ Owls Workshop 5 – tex 2 (see sidebar for website link) overlay on top. Last step was a Canvas Vignette from John Derry. Just lots of fun!…..Digital Lady Syd
Full Moon Rising
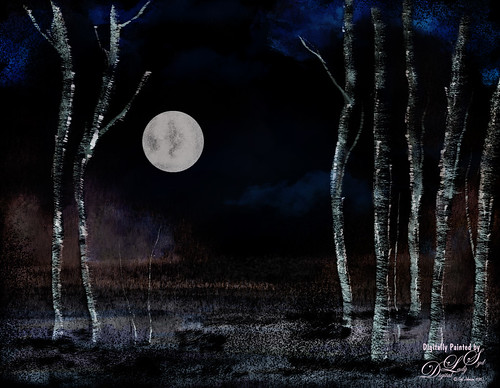
This image was painted using some of Karen Bonaker’s Painter 2016 Holiday brushes that she is graciously giving away to us Corel Painter lovers! I have to be honest and say I had to tweak the brushes quite a bit to get the correct effect (in her downloaded brush she had the Damping set to 60%, not 33% like the default in the Options Bar) – mainly changed in the Liquid Ink panel the Ink Type to Ink Plus Color from Ink Only and tried different settings for the various slider like the Volume and Jitter sliders. Also unchecked Continuous Time Deposition box and set the Boost to 38%. Went into the Particles-Common panel and tried different settings for the Chaos, Smoothness and Damping sliders. Several brushes were created using different settings and I think I finally got some decent trees! A background I had created in Painter was added behind the image. The image was saved as a psd file and taken into Photoshop where I got this night effect – set an adjustment curve to the Negative (RGB) preset. The moon was stamped in using Fantasy Brushes Moon 2 brush. Did a lot of manipulation to get the moon to look correct. Some clone clean up and that was it. Lots of fun to do and I wish to thank Karen for always giving us the most fun brushes during the holidays!…..Digital Lady Syd
Red Fish Taking a Break from Universal Studios
Just another image taken at the Universal Studios-Orlando, this time featuring the Red Fish at one of the Seuss Landing rides. Got a little carried here but it was a lot of fun! Basically all I did was extract the fish from the original image and paint in some elements to make him look like he was swimming in the water. Actually there were several paint layers to get the effect and Topaz (see sidebar for website link) Simplify’s Cartoon preset was applied to just the fish. Also, when done painting, a stamped layer was placed on top and Topaz Lens Effects was opened. The Toy Camera Awesomeness II was applied with the Toy Camera Aberrations sliders turned off. Adjusted some of the other sliders a little. That was it! Love how happy this guy looks!…..Digital Lady Syd
Some Texturing Fun!
This image started out being what I thought would be just simple little layering image and instead turned into this rather complicated final image. I basically got the idea from reading one of my favorite blogs, First Night Design, where Sarah shared where she gets some of her images for doing her marvelous texturing – Ida Rubinstein as Istar by L. Bakst from 1924 and Kai Outsuki no hara from 1858. Basically cut out the lovely lady and put her in the oriental image. Used 2 Lil Owls (see sidebar for website link) Mosaic Sets Darcel Grunge texture twice – one set to Linear Light using the Blend If sliders to get the effect I wanted, and the second time set to Linear Burn at 67% layer opacity using Blend If sliders again. The elegant lady (extracted from her image using Topaz ReMask 5) was set on top. On a stamped layer Topaz Lens Effects (see sidebar for website link) Generous Diffusion preset was applied, and then Flaming Pear’s Flood plugin was applied to give the reflection. On a New Layer a speckle regular brush was used to create the painterly snow look on the image. That was the major work done on this image. I really liked the feel in the image……Digital Lady Syd
First Signs of Winter
Totally enjoyed myself painting this little wintry scene. I think the recent hot weather in Florida has gotten to me! Used a very textured paper in Corel Painter 15 and mainly an Oil Brush and Blender that smeared some of the edges. In Photoshop used some of Grut’s brushes (these are a fabulous collection of brushes) to fill in where the trees did not look quite right. A texture was applied with no color (used a Hue/Saturation Adjustment Layer clipped to it and set Saturation slider to -100) to get even more texture. Last step was to add Topaz (see sidebar for website link) ReStyle Desaturated Warm III preset for the final color effect. It really is fun just to paint!…..Digital Lady Syd
A Victorian Visit
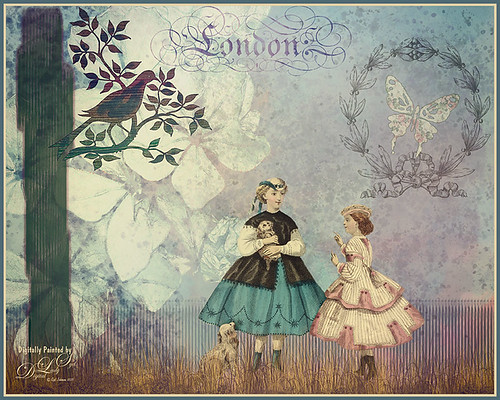
This is just a little composite of various elements that I put together for the fun of it. I love the little girl clip art that was from Mary Bailey, I believe as a magazine download – I could not find a link to her. Thought I would mention the use of Axeraider70 Edge Brushes to make the fence and tree trunk. Lots of splatters and one of my painted backgrounds were used. The butterfly shape was from Nicky Laatz and the wreath and London text were from Graphics Fairy. The bird was from the Old Design Shop. The flowers are from another one of my images. The foreground grass was from brushes by Aaron Blaise. Topaz (see sidebar for website info) Len Effects Toy Camera filter using the Memories preset with no vignette, than applying Polarization Filter set on High to brighten the image up. Nik Viveza 2 was used to direct focus to the girls. It was a lot of layers and step, but a lot of fun to do……Digital Lady Syd
London Back When????
Just having some fun here with a technique that I learned from Colin Smith (he is a regular on CreativeLive and Photoshop guru) at PhotoCAFE. He created Photoshop Secrets: Photographic Effects videos using CS5, but there are some very good techniques in them. This one is from his Toy Camera video where he teaches you how to add some very nice light leaks. Oh yes, these are free to watch. This image was taken in London Borough High Street – loved the images I took of this store – so British looking!
I added a bit of a vintage feel in Lightroom by applying 2 Lil’ Owls (see sidebar for website link) At the Vineyard 7 preset before going into Photoshop. Then just followed Colin’s instructions. This image used both reddish and light green light leaks. Used the Blur Gallery Tilt Shift filter in CC2014 (Blur set to 14 pixels, Distortion 100%, and Symmetry turned on) to get a more blurred effect on the top and in the foreground of the image. The layer was converted to a smart object and the Camera Raw filter was opened. Two Radial Filters were used to direct the eye more to the left side of the image and on the storefront as the primary focal point, and on the person as a secondary focal point. The signage was also blurred slightly using the Blur Tool at 75% Strength on a separate layer since text really draws the eye. A Blue Solid Color Fill Adjustment Layer set to Color blend mode and layer opacity of 25% – I decided it looked more vintage using the cooler tones. A Curves Adjustment Layer was added for contrast. I just did not like how these old buildings were standing so finally got the buildings straight using the Perspective Warp Command and then the Crop Tool to clean up edges. That was it. Loved the effect!…..Digital Lady Syd
Digital Lady Syd Related Blogs:
How To Create/Use a Light Leak
Topaz Lens Effects Plug-In
Digital Lady Syd Reviews Nik Analog Efex Pro
Taking Off From the Rookery Runway
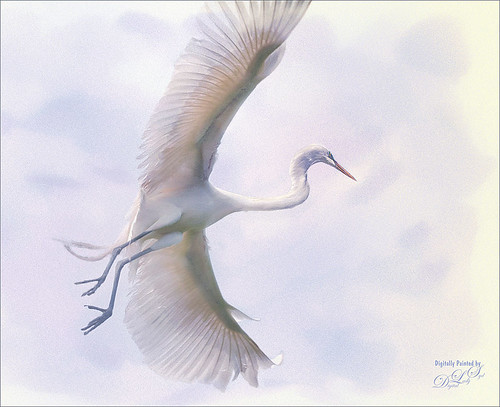
I have photographed similar images to this one of a Great Egret, but I never get tired of it. These birds are just beautiful, and in flight, even grander. This time I used a new technique from one of my favorite texture people and nature photographer. Jai Johnson recently created a video called Peach Blush Texture Demonstration on her techniques for getting her exquisite images. The one caveat is that she uses Topaz (see sidebar for website link) photoFXeffects, which I love, but does not work with CC2014 – therefore you must use CC or CS6 to use the PS interface. She also does not use Photoshop, but does all her work in the stand-alone of this interface. In Jai’s case, it does not matter as she has figured out some incredible ways to get a painterly effect by using basically the photoFX’s mask feature. I had a lot of fun doing this, but it took a while to get this correct effect. The background was one I created in Painter, and the overall grainy effect was created by setting the FX plug-in layer to Dissolve at 64% – it really give the painterly look. I used Nik Viveza 2 and a Curves Adjustment Layer to do final adjustments. Totally love the results I got using her technique. Thank you Jai!…..Digital Lady Syd
Digital Lady Syd Related Blogs:
Digital Lady Syd’s Review of Topaz photoFXlab v1.1
Springtime Wishes from Betsy
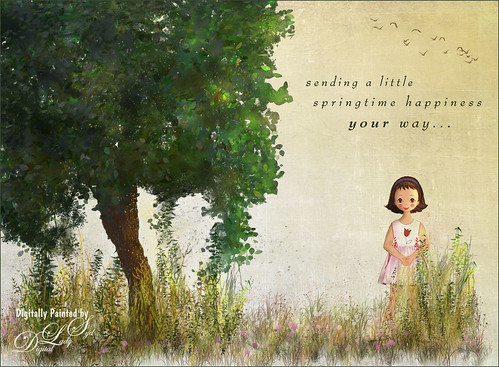
Was organizing the wonderful Photoshop Foliage Brushes from Aaron Blaise I recently purchased. I came up with this tree while checking out the different brushes and looked who popped up in the image! Why that is Betsy McCall of paper doll fame from 1958. She just looked like she belonged in this image. Basically just followed Aaron’s workflow and used his brushes to created the tree, reeds and flowers. Also added Frostbo Set 2 Grass (brush 010) for the front smaller grass. Used Kim Klassen’s December Collection Unexpected texture set to Multiply blend mode and 51% layer opacity. Used Bird Brushes II bylpdragonfly-brush bb114s2220.jpg and the was expression was included in a Design Cuts package (ldavi-sendingalittlehappinessyourway-wordarttitle1). Downloaded Betsy from the Betsy McCall website called Download and Print Vintage Betsy McCall Paper Dolls. Selected one of her dresses to pretty up the image. I am enjoying using these brushes so much!…..Digital Lady Syd
Wintry Scene

So how do you create this tree effect? About all I can say is by following Painter for Photographers videos from Melissa Gallo, a Corel Painter master who really knows how to paint. She supplies the brushes and and papers to get this result. It was a lot of fun to create this little image from scratch……Digital Lady Syd
Sunny Desert Day

Just went back and listenedd to Karen Bonaker’s wonderful Corel Webinar called Corel Painter Mixed Media Painting and thought I’d try some of her tips. Many of the steps and brushes used in her examples were used along with several brushes created by following Jason Moranto’s Brush Engine Essentials videos offered at Karen’s Digital Art Academy – this is a great way to learn Painter! Topaz (see sidebar for website link) ReStyle’s Desert Dust preset set to Soft Light blend mode was applied and set to 50% layer opacity. Nik Viveza 2 to draw out the focal point a little bit. Need to try this one if you like a watercolor look. Creating this image was totally fun!…..Digital Lady Syd


