
Sunny Florida
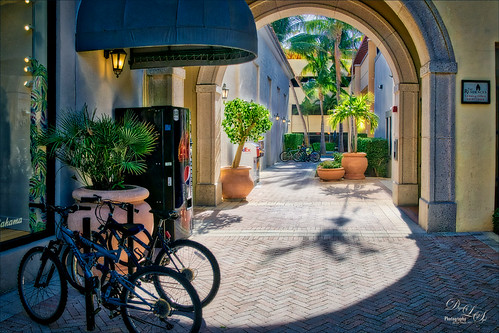
Image taken at City Block in West Palm Beach, Florida using 3 bracketed images and post-processed in Skylum’s Aurora HDR 2018 for Windows (see sidebar for website link). I really like the results I am getting with this program. I did a recent blog on this software (see my Checking Out Aurora HDR 2018 for Windows blog) where I got some similar great results. This image got really good results with the HDR Denoise filter, and a little of the Image Radiance filter which gave it a nice feel. In PS the Adaptive Wide Angle filter was used as the arch was off just a little (see my How to Use the Adaptive Wide Angle Filter blog). A Black and White Adjustment Layer was used set to Luminosity blend mode to adjust the colors (see my How to Use a Black and White Adjustment Layer to See Contrast in an Image blog). On a stamped layer Nik Viveza 2 was used to sharpen the bikes in the background. A Gradient Fill Adjustment Layer was used to create a slight vignette effect (see my Yet Another Great Way to Create a Vignette! blog) That was it……Digital Lady Syd
Night at the Museum
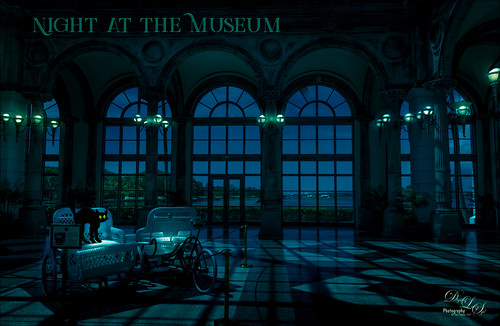
Had some fun creating a night scene out of this image. The image was darkened in Lightroom using Serge Ramelli’s American Night Darker preset to start and adding radial light effects on all the different lamps. Once in Photoshop the cat was added from an image by Graphics Fairy and then his outline was smudged to give it some hair effect. Some whiskers were drawn in and a shadow was added underneath his body. Some text was added using the Green Light Bold Inline Grunge font. A 50% gray layer was added and set to Overlay blend mode where the lights were painted in at 20% layer opacity to get the correct flare effect on the walls behind. That was it. A lot of fun to do!…..Digital Lady Syd
A Wintry Scene
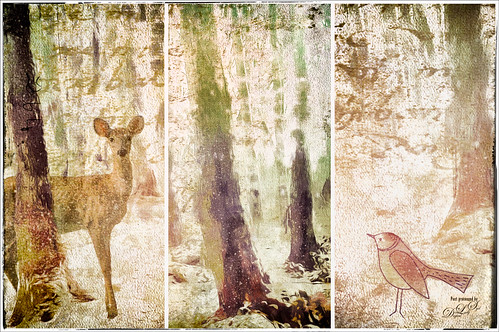
Just having some more fun here using a free wintry tree scene from stokpic and adding some of my own elements. In Lightroom Trey’s Free Packs A Marshmellow Happysmell preset was used. Then in Photoshop Topaz (see sidebar for website link) Impression was applied using an abstract effect. Added the deer, a bird and some snow. 2 Lil’ Owls (see sidebar for website link) Freebie Set 3 texture was added for the beautiful lettering in the background. Her Starry Night 5 was added on top and set to Overlay blend mode at 50% layer opacity. Next Nik Analog Efex Pro 2 was opened and the Multilens was used to get the three frames – really a fun effect! And there you have it, my wintry scene!…..Digital Lady Syd
Basking in the Sun
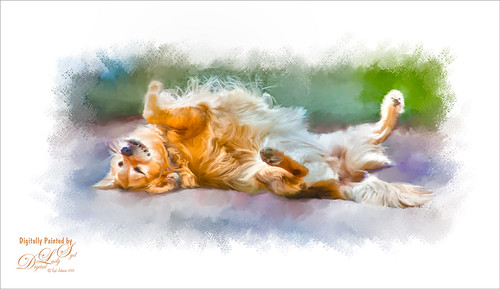
This beautiful golden retriever dog was totally enjoying the warm sun in a park in Savannah, Georgia. I had a very similar looking dog a long time ago so I just had to paint him as my first dog painting I have tried. It is hard to find people doing Photoshop training. I learned from Corel Master Fay Sirkis and her Photoshop Pet Portraits Webinar from several years ago. Since she was using CS6, the downloadable brushes and techniques worked out great! If you are a KelbyOne member, you have access to this webinar that is currently on the old NAPP website. (They will be closing this website at the end of the month so I am not sure if it will be available after that.) All the webinars in her Portrait Series a very good. As a final step, I used Nik Viveza 2 to direct the attention to the face just a bit more. This was a little more of a challenge than my bird images as the dog had a lot more hair and I did not extract him from his surroundings. Overall this was a lot of fun to do!…..Digital Lady Syd
A Little Watercolor Fun
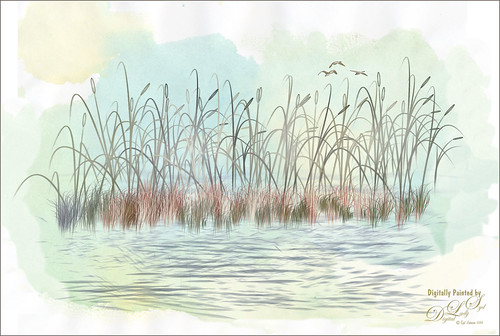
Just totally having some fun with this one. Used the brushes from my How to Create A Magical Feel in Photoshop blog – really enjoying both Aaron Blaise‘s brushes and Frostbo’s Brush Grass Set 2 brushes. The birds brush was from Obsidian Dawn and the background water is Sad Monkey Designs Watercolor 22. Just played around and ended up with a pretty little watercolor……Digital Lady Syd
Keeping an Eye on Things
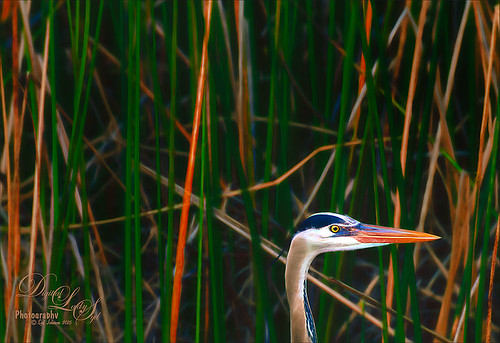
This was one of my crazy bird shots (Great Blue Heron) taken at the Ritch Grissom Viera Wetlands in Brevard County, Florida. Just had total fun working on this image! In Lightroom used Seim’s (see sidebar for website link) Ultra Color and Magic Ugly Shade Fixer presets before opening the photo in Photoshop. The layer was duplicated and Topaz (see sidebar for website link) Black and White Effects was applied. Mainly set the preset to a Transition of 100% so some color came through and used its layer mask to sharpen the bird and add some additional color. A stamped layer was created (CTRL+ALT+SHIFT_+E) and this layer was taken into Topaz Glow where Blake Rudis’ Animal preset was applied. Then the layer was set to Multiply blend mode at 88%. (See my How to Get the Soft Glow in Topaz Glow.) On yet another stamped layer, Nik Viveza 2 was used to really emphasize the beautiful bird head. That was it and I just loved the results!…..Digital Lady Syd
Thing One Thing Two – Hum!
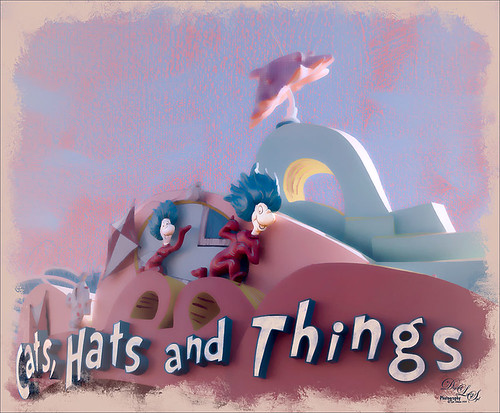
I just loved Thing One and Thing Two in The Cat in the Hat story and here they were on the building for the ride at Universal Studios Orlando‘s Seuss Landing – got a pretty cool abstract look totally by mistake! Love these kind of mistakes! In Lightroom used Seim’s (see sidebar for website link) Workflow Power 4 preset called Ugly Shade Fixer – I think one of his best presets since I seem to be always shooting in bright light and I either have too much shadow or darker areas in my images. Still applied a few Basic slider adjustments. In Photoshop the image was straightened, cropped, and content-aware filled using to give a nice presentation. Used a texture that actually looks like crayon coloring on the image that I made a long time ago – perfect for this type of image. There were painted touch ups all over the place, especially in the letters that were too drab – wanted them to match the face coloring. A stamped layer (CTRL+ALT+SHIFT+E) was created and Topaz (see sidebar for website link) Detail 3 was opened. One of the cool things about this plug-in is that they have in the Stylized Detail Collection some absolutely wonderful abstract presets. That is how I got this dreamy result – basically started looking at their presets and just liked how it looked. I have used these presets before on some butterflies to soften the colors in the wings – pretty nice set of presets. Changed a Color section settings to adjust the overall color and in the Effect Mask section, painted over the whole character bodies with a brush Strength set to 0.80, just a little more on the the faces painting with a Strength of 0.40 to draw the attention there. Last step was adding a painted border I created in Painter a while back and setting a Color Fill Adjustment Layer to sampled color. That was it and here is very magical, dreamy look at characters!…..Digital Lady Syd
Digital Lady Syd Related Blogs:
Digital Lady Syd Reviews Topaz Detail 3


