
Posing for my Portrait
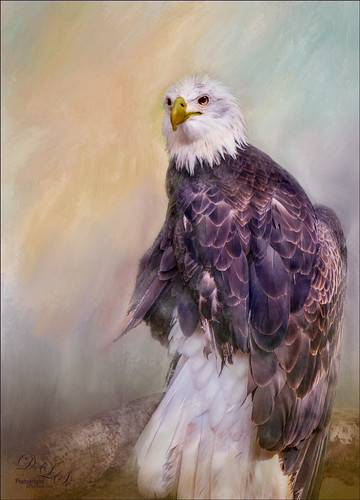
I love this shot of the Bald Eagle – he looks like a king posing for his portrait. I have no idea how he got his feathers this way – I took the image at the Jacksonville Zoo and he was sitting on an old tree stump I think. It is interesting to see his white feather plume. In Lightroom the Adobe Vivid profile was used. Then in Photoshop this guy was separated from the background using Topaz (see sidebar for website link) ReMask 5 as I could not get PS’s Select and Mask to give a good result. I usually can get a better result with ReMask if the selection is complicated. I used two of my own textures behind the eagle but could not quite get the look I wanted. So I took the Eagle layer into Corel Painter and created this soft version for a background. Back in PS the the other two textures were blended in. Used a couple Exposure Adjustment Layers for the eyes and the beak. Curves Adjustment Layers were clipped to each Exposure Adjustment Layer to get the right color in the eyes and beak. Several layers were created for painting out the edges a little with different mixer brushes. On a stamped layer Nik Viveza 2 was used to set the focus on the Eagle’s head and to clarify the feather detail. A Black and White Adjustment Layer set to Luminosity blend mode was used to further adjust the overall color. This is not really a painted image, but it has a painterly feel to it. …..Digital Lady Syd
Just a Little Flower
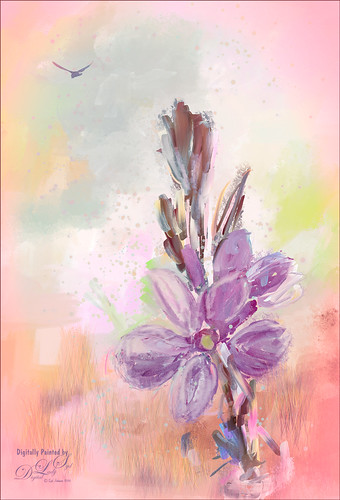
This image was created by painting over a flower taken at the Harry P. Leu Gardens in Orlando, Florida. The flower was actually selected from its background with Topaz (see sidebar for website link) ReMask 5 and saved as a PSD file to take into Paintstorm Studio. This program has some beautiful paint brushes at a very reasonable price. Several different layers were painted with different brushes including the watercolor spots before saving as a PSD and re-opened into PS. A bird was added and my Corel Painter Fresh Air texture was used behind the flower. Added a little grass using Frostbo Set 2 Grass 005 brush to add some ground. Used Kyle T. Webster’s free Animator Pencil to draw around the petals a little and the free Nik Viveza 2 to adjust the focal point. It was a lot of fun to paint!…..Digital Lady Syd
Coming At You!
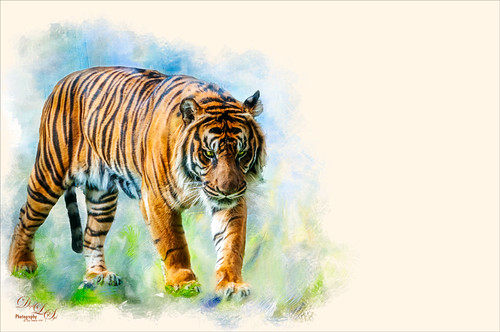
Below is an image of a Malayan Tiger taken at the Jacksonville Zoo earlier this year. JixiPix’s free Spectrel Art preset 10 was applied to the whole image. (See my How To Use the Free Spectrel Art Plug-in blog.) Next the tiger was selected using Topaz (see sidebar for website link) ReMask 5, then a white layer was placed underneath the tiger. One of my Corel Painter textures was added on top of the white layer and a layer mask was added. By painting with a soft black brush, just the parts of the painted texture wanted were left in the image. Lot of fun here!…..Digital Lady Syd
Meet the Super-Model Parrot
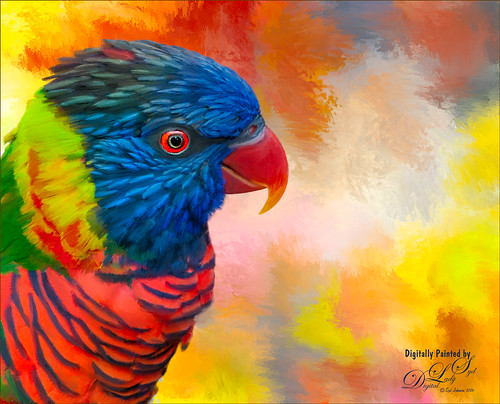
Just a simple little painting of a Rainbow Lorikeet (parrot) taken at the Jacksonville Zoo a few months ago. These little birds were so tame and would let you get so close to take pix – real-life bird super-models! I really enjoyed painting this happy little guy and I tried out a new Photoshop brush to paint him. The background is one I painted in Painter to match the colors in his plumage…you have to consider these kind of things when working with super-models! Used Topaz (see sidebar for website link) ReMask to select and then applied the mask once happy with the selection in PS. It was found in a large free set of brushes from Alex and this brush was named 扇形扁平混合器 (which means Flat Fan Mixer). Unfortunately I cannot find the batch of brushes to share. Just changed the Angle in the Shape Dynamics section of the brush to paint with the brush and change the size to fit. The duplicate texture was added on top and set to Multiply at 53% layer opacity. An Exposure Adjustment Layer was used to create sharp looking painted eyes. And that was it. Try out the brush – you will really like it as a nice blending mixer!…..Digital Lady Syd
Hanging Out with the Family
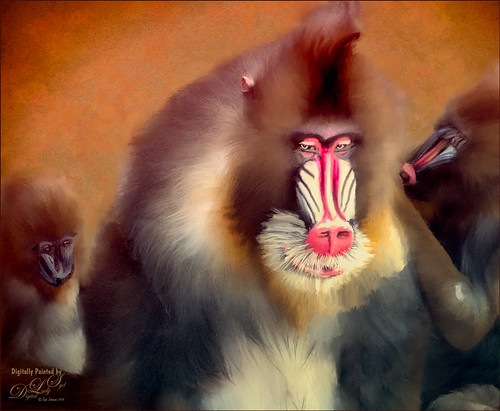
I decided to see if I could paint this interesting Mandrill family image a taken at the Jacksonville Zoo a few months ago. I wish I had had time to watch them for a little longer – the center monkey is a male with a female and male on the sides.
I was not sure how the fur would turn out painted, but with a little experimenting it can be done. I first separated the monkeys from their really dark busy background using Topaz (see sidebar for website link) ReMask 5 – still the best in my mind for doing this type of selection. Next a texture was added that I had created a long time ago – rather plain but with lots of texture in it. A Hue/Saturation Adjustment Layer was placed above the texture to make a pleasing color to match with the monkeys. The monkey ReMask layer mask was applied to the image so painting could begin – I always duplicate this layer and then turn off the original in case something was missed and the mask needs to be redone. Ten layers of painting were used to get the effect needed – all brushes were Fay Sirkis (it’s a shame but I do not think her Child Portrait or Pet Brushes are available anymore even from KelbyOne). Her Palette Knife Soft Blender was used to get the nice fur fluff look – moved the Shape of the brush to match the direction I was painting. Her Portrait Child Blender was used to get the detail areas for the faces. And her Portrait Children Single Hair Blender to add some individual hairs. On a stamped layer Topaz Lens Effects’s Toy Camera Awesomeness I preset with the Camera Shake set to 0 was applied. Last step was to use Nik Viveza 2 (now a free to download) to emphasize his eyes and get a soft overall vignette effect around the edges. Hope you enjoyed…..Digital Lady Syd
Some Blue Berries
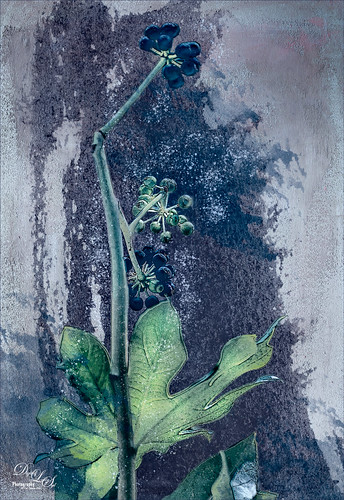
Just wanted to try something fun and creative. These beautiful blue berries were found growing at the Jacksonville Zoo a few months ago. The berries and leaves were selected in Topaz (see sidebar for website link) ReMask 5, mask was applied, and a French Kiss (see sidebar for website link) texture called Solstice Zenith was placed behind them. On the berries, a Photoshop Filter was used – Artistic -> Poster Edges set to 2/1/4 was applied. French Kiss Grunge Brush 15 was placed underneath the berries and Grunge Brush 14 was applied to add some texture. A spatter brush was used around the berries just to give a magical feel to the image and set to 67% layer opacity. Topaz ReStyle was used to give a slightly different color palette and finally Nik Viveza 2 (now free) was used to direct attention more fully to the green foreground leaf. Just a lot of fun!…..Digital Lady Syd
Heron on Watch Duty
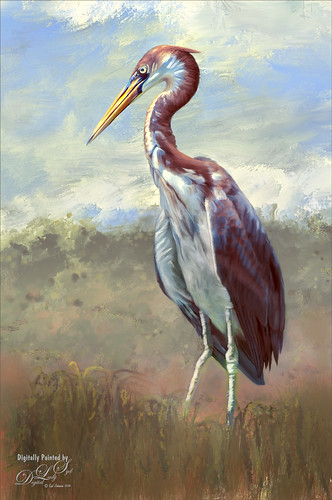
Just having fun painting yet another of my favorite subjects, the birds. This guy is a tri-colored heron taken at the St. Augustine Alligator Farm a few years ago and I just missed him. I loved all the beautiful colors of feathers he was displaying! This was done using my standard workflow where the bird is selected in Topaz (see sidebar for website link) ReMask 5, then the bird is painted on top of a new background texture, one I painted in Painter. Used Grut’s Photoshop mixer brush called Twig Scuffle for the fore grass plants. Topaz ReStyle’s Silver and Ivory Cloak preset was used to adjust the color palette a little. Last step was to apply Nik Viveza 2 to even out the focal point to his head. That was it – I just love to paint these birds!…..Digital Lady Syd
Standing Guard
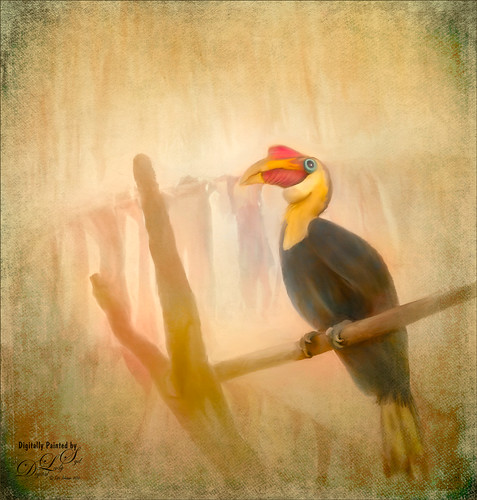
This Wrinkled Hornbill bird was taken at the Jacksonville Zoo. These birds looked like they were having so much fun flying across their enclosure and trading places on the various tree branches. Looked like a marvelous game from my childhood! This image took a long time to paint. Just followed my normal process of selecting the bird and in this case some branches in Topaz (see sidebar for website link) ReMask 5. Underneath he original background was actually kept, but one of my Corel Painter backgrounds was added above and set to Darken blend mode at 82% layer opacity. The background details are actually a large plant that was hanging across the back. The texture changed how they look. Lots of painting layers and Topaz Lens Effects was used to add some golden reflector effect. Nik Viveza 2 was used to adjust the focal point. 2 Lil’ Owls (see sidebar for website link) overlay texture Color Bokeh Grunge Set 3 was used on top and a layer mask was used to bring back the bird. That was it – pretty standard. These birds are so much fun to paint!…..Digital Lady Syd
Underwater Fantasy
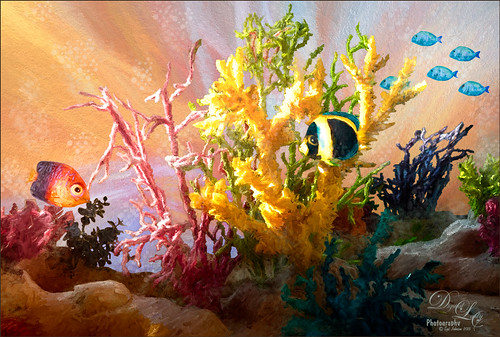
This image took a lot longer than I expected to complete – but still a lot of fun to do. I had the image of some coral in a case at a SeaWorld Orlando store and wanted to use it in an underwater adventure image. It turned out totally different from what I expected but that still is a lot of fun to just see what happens!
Basically the coral was cut from the image using Topaz (see sidebar for website link) ReMask 5. It did a fair job and a lot of touch up of the layer mask had to be done once back in Photoshop due to the complexity and similar background color to the coral in the image. My next step was to add a couple PixelSquid fish into the image (see my How To Use the PixelSquid Add-On in Photoshop blog). One of my spiral textures was used for the background and the layer was taken into Topaz Impression where the Turner Sunset II preset was applied. The fish and coral layers were grouped, duplicated and top group merged to create a single layer. This layer was then taken into Topaz Impression and Edward Hopper II preset was applied to it. Some bubbles were added using using the Glitter Brush created in my Some Christmas Cheer and Resources blog was used to add some softening effect around the coral, and on some separate layers, Fay Sirkis’s Bubble Wrap Highlights Mixer brush was used to add in the more obvious bubbles. Next the eyes were sharpened using the Exposure Adjustment Layers. On a stamped layer (CTRL+ALT+SHIFT+E), Topaz Lens Effects was opened and the Reflector filter brightening the left side of the image and the Graduated Neutral Density Filter to darken the bottom part of the image was applied. Last step used Nik Viveza 2 to direct focus to the main fish. Whew! Hope you have a wonderful holiday!…..Digital Lady Syd
Some Texturing Fun!
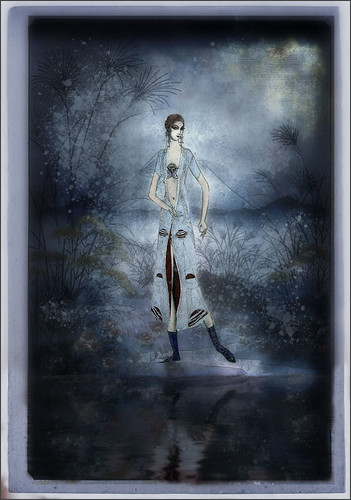
This image started out being what I thought would be just simple little layering image and instead turned into this rather complicated final image. I basically got the idea from reading one of my favorite blogs, First Night Design, where Sarah shared where she gets some of her images for doing her marvelous texturing – Ida Rubinstein as Istar by L. Bakst from 1924 and Kai Outsuki no hara from 1858. Basically cut out the lovely lady and put her in the oriental image. Used 2 Lil Owls (see sidebar for website link) Mosaic Sets Darcel Grunge texture twice – one set to Linear Light using the Blend If sliders to get the effect I wanted, and the second time set to Linear Burn at 67% layer opacity using Blend If sliders again. The elegant lady (extracted from her image using Topaz ReMask 5) was set on top. On a stamped layer Topaz Lens Effects (see sidebar for website link) Generous Diffusion preset was applied, and then Flaming Pear’s Flood plugin was applied to give the reflection. On a New Layer a speckle regular brush was used to create the painterly snow look on the image. That was the major work done on this image. I really liked the feel in the image……Digital Lady Syd
So What Are You Looking At!
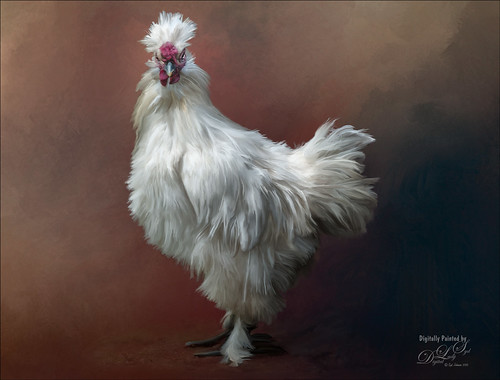
This image is of a White Silkie Rooster was photographed at The Old Village of Ayaymku in Belarus some time ago. (See my Center Stage – Introducing the Wild Turkey Tidbits Blog for another unusual bird image from the same place.) Used my regular Photoshop painting workflow. Selected the bird using Topaz (see sidebar for website link) ReMask 5, then placing Jai Johnson’s Filly in the Field texture underneath the bird. The edges were blended with one of Fay Sirkis’s Pet Mixer Brushes on a New Layer above. (Can download at KelbyOne if you are a member.) This image used a Topaz Lens Effects Neutral Density filter applied (Brightness -0.19, Amount 0.13, Transition 0.11, Angle 180.0, and Effect Position: (1824,2687) ) to even out the bottom and give him a defined area for standing. I also added two Exposure Adjustments Layers, one for the eyes and one for beak area. A Curves Adjustment Layer was used to add a little contrast back into the image. The workflow is pretty consistent but the results are always a surprise. These birds all have such personality!…..Digital Lady Syd
Sharing the Good News!
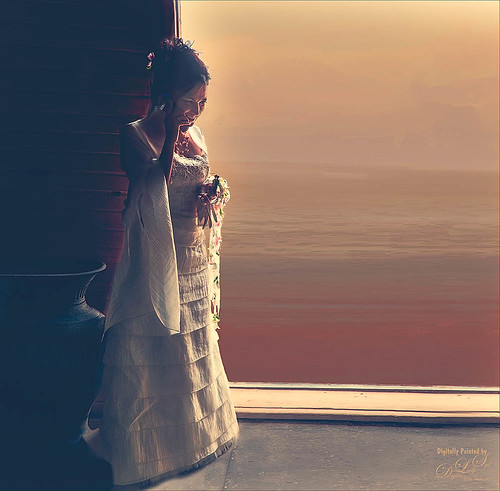
This image was taken at The Old Village of Ayaymku in Belarus on her wedding day. This image was just a snap that I had forgotten I had taken. The scenery from the doorway was changed to more of a seaside effect using one of the texture I created in Corel Painter. The door was first selected using Topaz (see sidebar for website link) ReMask 5 in the duplicated image, and the texture was placed behind the image. The Subtract blend mode was selected on a stamped (CTRL+ALT+SHIFT+E) layer at 51% layer opacity to get the nice light on her dress. A Gaussian Blur was applied to the layer and set to a Radius of 250 px – a layer mask was applied and the lighted edge of her dress was lightly painted back with a black brush. (See my How to Use the Subtract Blend Mode as a Spotlight). Topaz Lens Effects Toy Camera Memories preset was used to adjust the colors on duplicated layer. Then Topaz ReStyle’s Zambezi Zest preset was applied to get the overall warm tone. A little bit of a different look for me, but it is fun to try different effects……Digital Lady Syd
Testing the Water
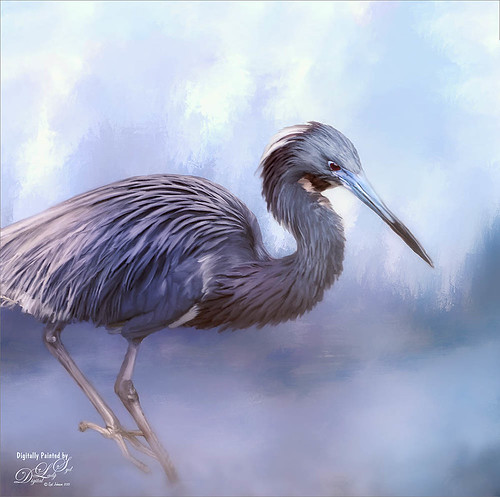
This is a sleepy Tricolored Heron reluctantly taking a step into the water on a beautiful hazy morning. Okay, he was really in a very cluttered background and I had to use Topaz (see sidebar for website link) ReMask 5 to cut him out. Then he was placed on one of my Corel Painter textures whose colors were changed using Topaz ReStyle’s Ice Cool and Fresh preset to match the bird colors and Free Transformed (CTRL+T) to fit the bird perfectly. I then proceeded to paint the bird with a Mixer brush to smooth out the grainy feathers. A duplicated copy of the texture was added on top and set to Multiply blend mode at 50% layer opacity. On a stamped layer (CTRL+ALT+SHIFT+E) on top, Topaz Lens Effects Fog (Fog Ground Fog IV preset – Amount 0.20, Region Size 0.10, Transition 0.20, Angle 138.1, and Diffusion 0.40) was added to give a sort of early morning mist in the water. Next the Reflector filter was applied (Golden Left, then Strength 0.20, Transition 0.40, Position 0.59, and Angle 76.63) before going back into PS. The eyes and beak were sharpened using the Exposure Adjustment Layer. On another stamped layer, Topaz Adjust’s Brilliant Warm preset was applied to get the nice gray color back on the bird. A little Curves Adjustment Layer was added and he was done! Still loving my birds!…..Digital Lady Syd


