
Some Pretty Flowers on an Old Vintage Building
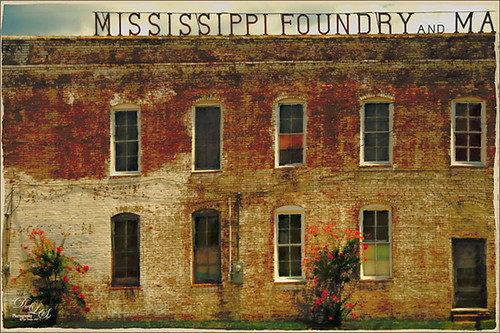
Just an old vintage photo I found that looked like fun to process. A lot of clean up was done on this image and it was straightened by selecting the whole image, then pressing CTRL+T, then the Warp Tool in the Options Bar. This made a huge difference! Don’t forget you can always straighten an image up with the Transform Command, not just Puppet Warp or Perspective Warp. I applied one of my presets in Topaz (see sidebar for website link) Black & White Effects and Topaz Restyle (not sure which preset). A little grunge border was added and that was it. Very simple!…..Digital Lady Syd
Feeling Peachy!

This image was taken at the Ormond Memorial Art Museum and Gardens in Ormond Beach, Florida. Very small park-like area with lots of little spots to take pictures – one of my favorite local places to practice a little photography. This is a 3-shot HDR tone-mapped image using Photomatix Pro’s Merge to 32 bit HDR so I could use the sliders in Lightroom to process the resulting TIFF file. Topaz (see sidebar for website link) Black & White Effects and Alien Skin’s Snap Art 3 were applied. An overlay I had created from Kim Klassen’s Cloth & Paper Touch 1 texture was placed on top and changed to a tangerine color. The text uses my favorite type text, Batik Regular. It was really just playing with the things I already had. I just love the warm tones in the image……Digital Lady Syd
Digital Lady Syd Related Blogs:
How to Create an Overlay Out of a Texture
Cleaning Up a Messed Up Photo
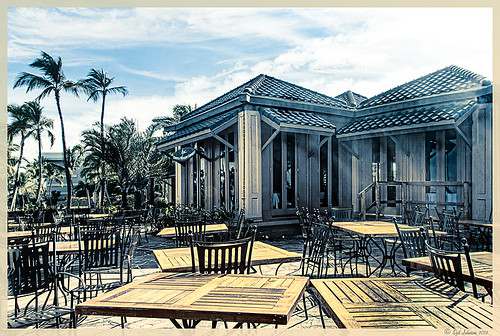 |
Here is another before and after for you. The image of the KPC Seafood Restaurant at the Hilton Waikoloa Village on the Big Island in Hawaii. At night it was wonderful to eat outside under the dark starlit sky with the ocean waves in the background. I wanted to add this image to a Hawaiian slideshow I am creating in Lightroom 4 and was really disappointed at how bad the original image appeared. I liked the tone in the wood and the sky was rally nice but otherwise, it was not too good an image. I tried several techniques, walked away from it for a day, and came back to it. I finally got the nice result shown above (hover over image to see the original). To get this result, I removed the palm tree going straight up to nowhere. Next I went into Nik’s Viveza 2 to get rid of the hazy feeling. I usually use this filter later in my workflow, but this image needed a quick tune-up before I could do anything else. Then I went into Topaz’s Black and White Effects (see sidebar for website link) and by playing with the Quad Tones, got this really nice result. (For settings, see below.) A Curves Adjustment Layer was added to enhance the contrast of the building, but the blue in the sky was painted black in the mask to keep it from being affected by the curve change – the blue of the sky competed too much with the blue tones in the restaurant. Noise was removed from the whole image (see Russell Brown ACR blog below to do this). Localized sharpening was done and Puppet Warp was used to straighten the vertical lines of the restaurant. I feel like I was able to save an otherwise very bad image by using these two plug-in filters, and I might add two of my very favorites. For information on how to do some of my workflow steps, see my blog links below. …..Digital Lady Syd
Digital Lady Syd Related Blogs:
Nik’s Viveza 2 Plug-In – A Hidden Gem!
Quad Tones in Topaz Black and White Effects Plug-in
I Didn’t Know That! Curves Adjustment Layers
Edit Layers with ACR (Adobe Camera Raw) Script
Straightening with Puppet Warp!
A preset was created in Topaz Black and White Effects using these settings as shown on the final version of image above: Conversion: Basic Exposure settings – Contrast 0.08, Brightness 0.05, Boost Blacks 0, and Boost Whites 0; Adaptive Exposure settings – Adaptive Exposure 0.56, Regions 7.06, Protect Highlights 0, Protect Shadows 0, Detail 2.17, and Detail Boost 1.04; and Color Sensitivity settings – Red (-0.15), Yellow (0.38), Green (-0.42), Cyan (0), Blue (-0.09), and Magenta (0). Finishing Touches: Silver and Paper Tone settings – Tonal Strength 0.63, Balance 0, Silver 32.00, Silver Tone Strength 0.50, Paper Tone 32.00, and Paper Tone Strength 0; Quad Tone settings: Color 1 Region (Color R0G0B0), 24.68, Color 2 Region (Color R86G102B136) 69.92, Color 3 Region (Color R229G223B164) 154.9, and Color 4 Region (Color R255G252B206) 255.0; Vignette settings – Center (2796,1607), Vignette Strength (-0.09), Vignette Size 0.53, Vignette Transition (0.63), and Vignette Curvature 0.75; and Transparency settings – Overall Transparency 0.59)


