
Cold Dolphin Fountain in Florida

Sometimes I find I just need to do something sort of funny and just play around in Photoshop. That is how I got this crazy image of my cold dolphins instead of the warm Florida dolphin fountain in my front yard – actually it really was raining at the time I took this picture from the front porch. Essentially this image was just color corrected in Lightroom and brought into Photoshop where four textures were stacked using Dr. Brown’s Paper Texture panel (Ash texture 30, a bluish texture which is no long available, set to Hue at 74%; Bittbox Grunge Ice Texture set to Linear Dodge at 15%; Florabella Snow 3 texture, which may not be available anymore, set to Lighten at 15%; and ShadowHouse Creations Old Photo 6 texture set to Hard Light at 100% (see sidebar for blog link) – all are free except the Ash texture). Several Curves Layers were created to isolate and enhance parts of the image by filling the layer mask with black (CTRL+I on mask) and painting back using a low opacity brush. Not sure it is something I would put up on my wall, but it was a lot of fun to do!…..Digital Lady Syd
Digital Lady Syd Related Blogs:
Russell Brown’s Paper Texture Panel Updated!
Creating That Vintage Texture Feel
Click on Textures on right in Categories for more blogs
Butterfly Beauty!

Today I had a chance to get some wonderful shots of one of the beautiful butterflies that are flying all around my neighborhood. This is a female Palamedes Swallowtail Butterfly and she is loving the pink pentas in my front yard (the males are smaller and more black in color). I was so surprised that she stayed around while I shot several pictures. The trick to getting the shot since her wings are flapping like crazy – set your ISO to 1600 and shot at F11 and higher. I was able to get many very clear shots. Three textures were applied using Russell Brown’s Paper Texture Panel: ShadowHouse Creations Scratched Overlay set to Hard Light blend mode at 100% layer opacity and Softly Blurred Edges set to Overlayat 100% opacity (see sidebar for website link), and Gavin Hoey’s Grunge Border set to Overlay at 100%. All had layer mask applied and the butterfly was painted out completely using a black brush in the mask. A Curves Adjustment Layer was created to adjust just the blue channel curve to bring out her blue spots, then the mask was filled with black (with white Foreground color, CTRL+BACKSPACE to fill with mask with black). Just painted back in the blue dots in the Curves Layer Mask with a white brush. That is all that was done to the image – what a showgirl!……Digital Lady Syd
Digital Lady Syd’s Related Blogs:
Digital Lady Syd’s Rule No. 5: Just Step Outside and Look Around!
The Art Corner: Poetry and Music by Clodion

This Carrara marble artwork is found in the East Sculpture Hall of the National Gallery of Art in Washington, DC, and was sculpted in 1774-1778 in Paris by Clodion. Metal Chris, a great local DC concert photographer and founder of the DC Heavy Metal website, took all these these images for me recently as I missed it on my last trip to the National Gallery. What I love about this sculpture is that by viewing it from the different angles, which Chris did, you get a very different expression and feel of the art. Poetry definitely takes on a very different look depending on the view.


The Gallery’s site says “Clodion prepared a terracotta model for Poetry and Music, which is in the National Gallery and frequently on view in the ground-floor sculpture galleries. It provides a rare chance to compare an artist’s model with the final version in stone. In this case, Clodion modified the figure of poetry, “correcting” it to adhere to traditional representations: the terracotta figure had rested his head in his hand, but here he holds a writing stylus.” I will try to find this on my next trip to the Gallery – I think it would be fun to see. This is one of four sculptures that were meant to bring to life the abstract concepts of the arts and sciences. I did a previous blog called The Art Corner: Painting and Sculpture by Tassaert if you are interested in more information on both sculpture pieces. The last two pieces, Geometry and Architecture by Jean-Jacques Caffieri created in 1776 and Astronomy and Geography by Felix Lecomte created in 1778 are located at the National Trust, Waddesdon Manor, Buckinghamshire, England.
The first image was processed using Russell Brown’s Paper Texture Panel (see Russell Brown’s Paper Texture Panel Updated! blog to download) and Flypaper Textures Creme Anglais Taster set to Overlay Blend Mode at 93% Opacity and Touchstone Taster set to Overlay Blend Mode at 100% Opacity. Layer masks were added to clean up the faces and shadows a little and a large shadow on the wall was removed as it was very distracting. What really made this image so beautiful was OnOne PhotoFrame (see sidebar for website link) Maivre Background set to Overlay Blend Mode at 80% Opacity while still in the plug-in. It was actually just like adding another layer of texture. Once back in Photoshop, a layer mask was added to softly clear the face area of the texture. The left image of Poetry was converted to a black and white using Nik’s Silver Efex Pro 2 starting with the High Contrast preset. A little localized sharpening was done to the his face using the LAB sharpening method (see my Fun Photoshop blog Unsharp Mask Filter in LAB Mode) and some noise was removed from his body using Imagenomics Noiseware that I am trying out. The right image was hardly touched (only slight noise removal due to the dark lighting effect) – just a beautiful image and very much how the sculpture looks at the Gallery.
If you get a chance to go to this wonderful Art Gallery in DC, you will should try to see one of these beautiful sculptures…..Digital Lady Syd
Lidden Urn from Carl Thieme

The above image is of a beautiful porcelain Lidden Urn by Carl Thieme of Potschappel, Saxony in Germany from the late 19th century. It is on display at the Lightner Museum in St. Augustine, Florida. I have to be honest and say I did not have a good appreciation for this type of art, but after researching a little on the internet, I am fascinated by the history. If you have an interest, here is a link on the interesting history of the area called Antique Lamps-Dresden, A History Lost, and links to Live Auctioneer showing two similar pieces: piece one and piece two. I am actually very glad to have learned something different in the art world! Actually, I guess that is what a museum is all about – introducing people to new things!
To process this image, I did not do that much to it. ShadowHouse Creations has issued a new free painterly pack of textures and I had to try them out! I put them in a folder and used them with Russell Brown’s Paper Texture Panel (see my blog Russell Brown’s Paper Texture Panel Updated! to download). This effect was created by stacking Painterly-6 (Overlay Blend Mode at 60%) and Painterly-1 (set to Overlay Blend Mode at 100%). I painted out the texture from the painting on the lower part of the urn using a white layer mask and soft black brush at a low opacity so it shows up very clearly. OnOne PhotoFrame (see sidebar for website link) acid burn 12 was added using a color sampled from the image.
Try shooting images in museums, you might get something really interesting. And be sure to shoot any information about the piece too!…..Digital Lady Syd
Digital Lady Syd’s Related Blogs: (All related Lightner Museum links)
The Art Corner: Little Girl Knitting – A Mystery Sculpture!
Black and White Photo or Not? Give It a Try on That Difficult Image
Where Am I?
Orchids with Russell Brown’s Paper Textures Panel

This was so easy and turned out so pretty. Need to darken the background of your image to get this effect. The the Flypaper Texture Creme Anglaise was added to give the painted look (in group of textures provided with Russell Brown’s Paper Texture Panel – see blog links below to download). A Hue/Saturation Adjustment Layer was added to darken the texture a bit more with Master set to Hue -146, Saturation -59, and Lightness -14. The flowers were painted out in the layer mask so they would not be affected by the color change, but it still did not have enough purple tone. Therefore a Color Fill Adjustment Layer was added with the color set to a deep blue (R101G33B227) set to 37% opacity. The flowers were once again painted out on the adjustment layer mask. The last step was OnOne PhotoFrame airbrush_06 (see sidebar for website link) and the color was sampled from the image to finish up. Very quick and easy effect…..Digital Lady Syd
Digital Lady Syd Related Blog:
Russell Brown’s Paper Texture Panel – A Real Winner!
Russell Brown’s Paper Texture Panel Updated!
Russell Brown Texture Panel Landscape Image
Using a Color Fill Adjustment Layer as a Spotlight

This image is of the Philippine Ground Orchid, a very dainty small pink flower. I am using this image as an example of how you can use a Color Fill Adjustment Layer as a subtle spotlight to direct the eye in the image but with a color vignette feel. I processed this image using Russell Brown’s Paper Texture Panel (I just love this panel and these textures – check out my blog Russell Brown’s Paper Texture Panel – A Real Winner! to download and use for free). Flypaper’s Apple Blush Texture was set to Hard Light Blend Mode at 71% Opacity and gave the image a very greenish look but with that great canvas texture. The Muscatel Texture was added next and set to Overlay Blend Mode at 29% Opacity to slightly darken the image and add some orange tones. Since I felt like the green was still a little overwhelming, a Color Fill Adjustment Layer was added – a royal blue color was selected and set to 54% Opacity. In the Color Fill Adjustment Layer’s white Layer Mask, a very soft large brush was set to 15% opacity and with black set as the color, the blue color was gently painted out to give the subtle spotlight effect from the light green tones underneath that will direct the eye. This is a great little trick if you need to draw the eye into a certain part of an image and works very well with flower images. I also like adding my own colors into an image. Have fun experimenting…..Digital Lady Syd
Digital Lady Syd’s Related Blogs:
That Soft, Dreamy Look
Russell Brown Texture Panel Landscape Image
Adding a Texture for Flair!
Keeping Focus Where You Want It Using Focal Point 2 and Color Fill Adjustment Layer
Topaz Simplify and Lens Effects Saves an Image!
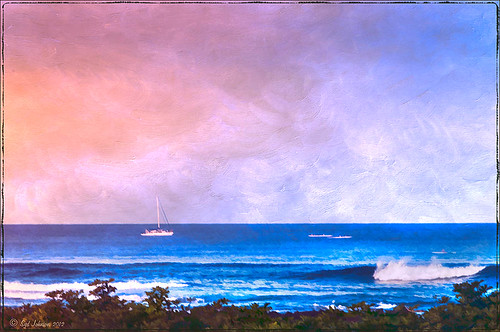 |
The catamaran is one of the whale watching boats you can take while on the Big Island in Hawaii (see Hawaii Ocean Sports for more information on this). This image was taken the day before my adventure and it was not a good at all (hover over image to see original RAW image) – but I really wanted a shot of the boat on the water. Therefore some improvisation had to be employed. After cropping and doing some RAW adjustments in Lightroom, Topaz (see sidebar for website link) came to the rescue. Topaz Simplify 3 was applied first to get rid of the focus issue – the BuzzSim preset was used as a starting point with these changes: Simplify Size slider was changed to 0.15, Brightness slider changed to 0.08, Saturation slider to 1.27, Edges: Color Edge Fine, and Edge Strength slider 1.50. Next Topaz Lens Effects was applied using the Filter Dual Tone Effect to create the warm feel in the sky with a preset I previously created called Sunrise Effect. (See below if you would like the settings for the preset.) Next Flypaper’s Paper Texture Creme Anglaise (one gorgeous texture!) was used via Russell Brown’s Paper Texture Panel for Photoshop CS5 and CS6 (see my blog Russell Brown’s Paper Texture Panel – A Real Winner!) and set to Divide Blend Mode at 100% opacity. A Curves Adjustment Layer was added to fix the contrast. Finally OnOne’s Photoframe grunge 09 was added (see sidebar for link). An image I would normally have trashed has now been turned into a beautiful picture that I really love. Give this technique a try if you own the Topaz plug-ins. The combination works great together, especially if you want to save an image!…..Digital Lady Syd
My Topaz Lens Effects Sunrise Preset contains these settings: Transition Adjustments – Region Size 0.45, Transition 0.35, and Angle 149.7; Region A Adjustments – Cyan Cast 0, Red Cast 0.20, Magenta Cast 0.01, Green Cast 0.03, Yellow Cast 0.70, and Blue Cast 0.24; Region B Adjustments – Cyan Cast 0.15, Red Cast 0.10, Magenta Cast 0.15, Green Cast 0.05, Yellow Cast 0, and Blue Cast 0.05; and Image Adjustments – Brightness 0.05, Contrast 0.08, and Saturation 0.07.
Digital Lady Syd Related Blogs:
Topaz Simplify and Topaz Detail Together
Simplifier and Simplify Filters
Russell Brown Texture Panel Landscape Image
Getting Rid of Those Blown Out Areas in Your Image
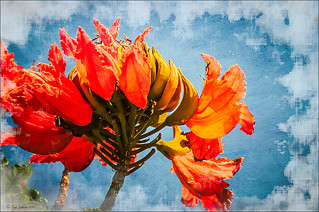 |
I thought I would give you a quick tip on how to get rid of those awful eye-drawing highlights on outdoor shots where you cannot control the light. Above are some beautiful African Tulip Tree flowers that I shot during the brightest time of day in Hawaii. It was so windy I felt lucky to get a fairly sharp shot much less control the light. Therefore, when the photo was opened up in Lightroom (or ACR), it became quickly apparent that there were several bright highlight areas that needed to be tamed. Hover over image to see original as brought into Photoshop. All my RAW adjustments were made before taking the image into Photoshop. (I used My Vivid Drawing Look preset which still works with Lightroom4 or ACR/Photoshop CS6 (note: change file extension to .xmp in zip folder to get file to work) – just be sure to adjust your new Highlights and Shadows sliders and the old Exposure slider-all other settings are the same.)
TIP: A New Layer was created right above the Background layer. Using a very soft round brush set to no more than 20% opacity, sample (ALT-Clicking the color right next to the blown out areas) and then gently paint over the white parts. Build up the color – if you overdo it, the layer opacity can be lowered or just add a Layer Mask to your painting layer and paint in white to remove or adjust the paint strokes.
Next Russell Brown’s Paper Texture Panel was opened and Flypaper Texture Dawn Grunge was added as a layer in Overlay Blend Mode at 100% opacity to give a very painterly feel to the image background. (See my Fun Photoshop Blog Russell Brown’s Paper Texture Panel – A Real Winner! for information on how to add this free panel to your program.) The turquoise and orange always makes a great combination for flower shots. Next a Curves Adjustment Layer was added to make the blue color pop in the background – by painting in the layer mask, the yellow fruit and green stalk color was brought back as it had become too dark. Finally OnOne PhotoFrame “napp frame 14” was added.
This is a great technique when you have a few distracting highlights and I find I use it a lot, but it won’t fix an overexposed image. Hope this helps you out a little…..Digital Lady Syd
Hyacinths and OnOne PhotoFrames

I recently did a blog called My Favorite Photo Frame Plug-In – OnOne PhotoFrames (hum!) on the really nice OnOne PhotoFrames (see sidebar for website link) that I use on many of my images. Here is another nice example of their beautiful frames. (This frame is the Taufer Frame 08 using a light beige color – Russell Brown’s Paper Texture Panel was used on this image – see my Fun Photoshop Blog Russell Brown’s Paper Texture Panel – A Real Winner!)
Give these frames a try – they are easy to use and can really enhance your final image. You can download a 30-day free trial at their website or while in website go to the Products header -> Free Products and select Edge and Framing Effects where you can download 30 frames to use for free! Give it a try! ….Digital Lady Syd
Russell Brown Texture Panel Landscape Image

I call this photo Hawaiian Horses Chatting – they look deep in conversation. Hum?? Anyway, this weekend I did a Fun Photoshop Blog called “Russell Brown’s Paper Texture Panel – A Real Winner!” (I seem to like real winners!) This is another one of his great free Photoshop panels that creates texturized images very quickly and allows you to experiment easily to get an interesting effect. Check out my other blog for the download links and details on how this panel works. I will say that Flypaper Textures has given you several beautiful textures to play with in the panel until Russell gets an update to include other textures. This image used three Flypaper textures stacked: Texture Aquarius set to Soft Light Blend Mode at 84% layer opacity, Texture Creme Anglaise set to Multiply Blend Mode at 100%, and Texture Colosseum Sienna set to Vivid Light Blend Mode at 46%. I had been having a hard time getting a look I liked for this image until I tried the texture panel – it really surprised me how beautiful the effect ended up. Give this panel a try if you have Photoshop CS5 or CS6 and you love textures like I do. Definitely worth the effort!…..Digital Lady Syd


