
Savannah Home

Just enjoyed painting an image I took quite a while ago in Savannah, Georgia. These type of homes are everywhere in the historic district. In Photoshop used the Fan-Flat Blender that Photoshop provides in their Legacy set. Also used a couple others to get the smooth effect I wanted on the steps. In Corel Painter, used one of the newer Thick Paint Brushes to add texture and lighting to the ferns which were quite flat in the original image. Then brought the image back into PS to finish up. Actually ended up using a really old Topaz (see sidebar for website link) program called photoFXLabs and the Instatone effect since I could not get an the correct palette for the image. It worked great!…..Digital Lady Syd
Digital Lady Syd’s Rule No. 13: Paint Something Everyday
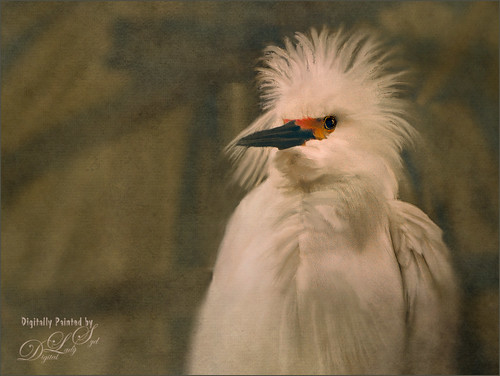
Have not done a rule in a long time, but if you are learning to paint, many of the really good digital painters are saying to “paint something everyday.” This will definitely help you improve your painting technique, and if you already have a technique, it will keep your skill level at a high level.
This guy was totally into looking around at the happenings at the St. Augustine Alligator Farm Rookery on this very busy day. When mating and building nests, the birds just do not even know you are there – it is truly amazing! For some reason, I just do not get tired of painting these guys! Just using the same Mixer Brushes that work with my style of painting. Still loving Fay Sirkis‘s (the Corel Master who makes fabulous Photoshop brushes also) Precious Oil Diamond Blender brush and a Pete Collins Portrait Smeary Mixer for the background (from KelbyOne Mixer Brush training by Pete). Used an Exposure Adjustment Layer for the eyes (see my How To Do a Quick Eye Sharpening in Photoshop ), a Color Lookup Adjustment Layer Gold Blue Abstract preset and Lighten layer blend mode, add Jai Johnson Brown-Gray canvas texture, and Nik Viveza 2 on stamped layer on top to emphasize his face. Is this guy awesome or what!…..Digital Lady Syd
A Little More Painting with a Texture Brush from Your Image

Wanted to show you how I completed the image that I began in my You Tube Texture Video for my Fun Photoshop Blog How to Paint with a Texture Brush from Your Image. By creating a different brush and changing up my technique just a little, a totally different feel was given to the same image. So what did I do to get this totally different result from the same image?
The brush I created in the video I did save down as a “New with my settings” brush – I forgot to remind everyone of this rather vital step. You need to resave and rename your brush to keep the additional slider changes made from the initial brush created. A New Layer was added above and this time it was converted to a Mixer Brush – in the Options Bar turn off the “Load the brush after each stroke” icon and in the drop down, choose Very Wet, Heavy Mix. Now just make sure Sample All Layers is checked and you are ready to paint using this same brush as a Mixer “Blender” brush (see my Photoshop Blog How to Easily Create a Photoshop Brush for Painting for more info on this.) On a couple of layers, I just smoothed out edges and dabbed and then would go back to the regular brush with the same settings. Just went back and forth smoothing and adding a little texture and color. By doing that on this brush, the texture effect is not so over-the-top as it looked in the video and the rough edges were softened with the Mixer Brush. A Curves Adjustment Layer was added to increase the brightness since the painting darkened it down some. If you look closely, the pattern is over the objects just like the background – by adding the Pattern Fill Adjustment Layer on top and choosing this same texture set to 60% Scale, it blended beautifully with the texture – the layer opacity was set to just 26% for the blend. Then a Levels Adjustment Layer was added and the in the Output Levels, set the first number to 24 to take out the total black pixels which often darkens an image too much in paintings. I thought I was done but I tried a layer style called BMU_SSStyles_UltArtist_Watercolor-Dark from Scrap Girls packet which added a Pattern Overlay that resulted in the rather foggy spooky feel on the whole image – it felt so Harry Potterish! (See my Fun Photoshop Blog How to Get Painting Effects from Actions-Part 2 for info on this.) I was thinking I could have just used a fog brush at a low opacity and painted on a New Layer to get the same effect. I really liked how this version turned out – love the triangular shapes and still like my owl! Anyway wanted to show you how using this different texture, crop, and brush gives a totally different result! Hope you give this a try!…..Digital Lady Syd
What Happened to My Yellow Rose?
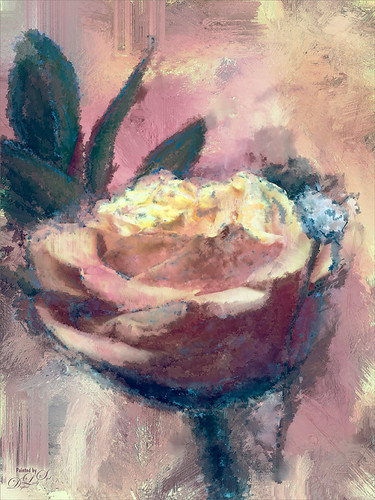
This is an alternate image of the yellow rose posted last week – see Mid-Year – Painting Project Progressing! I just wanted to let you see what using the wonderful Topaz (see sidebar for website link) ReStyle can do to an image – not sure which image I like best since I love the pink tones. Basically the yellow rose was opened into ReStyle and the Cream and Plum preset was selected. I use this preset a lot since it does have the color palette I love. The changed settings were: Hue Secondary -0.44 and Third -0.28; Sat Fifth -0.25; and Lum Primary 0.15, Third 0.03, Fourth 0.41, and Fifth -0.53; Basic Tone Black Level 0.03, Midtones -0.12, and White Level 0.41; and Detail Structure 0.45 and Sharpness 0.56. In Basic Mask painted in this effect in a black mask at the top of flower with Brush Strength 0.42, Brush Size 0.10 and Hardness 0.30. A New Layer was added above and the Mixer Brush was used to clean up the petals, but I did not like the way it looked, so I turned it off. The grungy look seems appropriate with this image and the blue specs look nice. The last step was adding a Curves Adjustment Layer to add more contrast. Not sure but I think I like it better than the yellow one. Decisions! Decisions!…..Digital Lady Syd
Mid-Year – Painting Project Progressing!
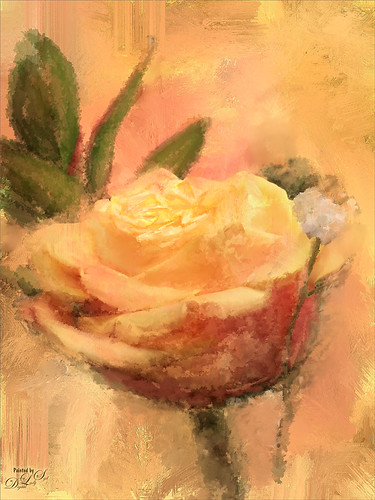
I am over halfway on my journey to achieving my New Years Resolution of learning to paint and here is an example of where I am at. This image was taken at the grocery store on my cell phone. Therefore I had a little sharpness issue, but with painting, you can do a little improvising. The texture was from Melissa Gallo at Painted Textures called Sunrise Canvas. This beautiful texture is one of several provided in her Painting with Photoshop workshop – this workshop is the first time it has really “sunk in” on how to do this. Melissa is an artist and Corel Master, but she teaches the Photoshop painting techniques very thoroughly. This image used her brushes. Anyway, I really am getting into this painting thing and it is totally fun! Oh yes, and how did I improvise that little bit of detail I wanted in the top of the flower? Well I used a technique covered in my blog called The Best Dodging and Burning Technique! and created a burn layer set to Overlay to sketch in a few lines with a small round brush at 12% brush opacity. Very subtle!…..Digital Lady Syd


