
A Distinguished Forefather Lemur
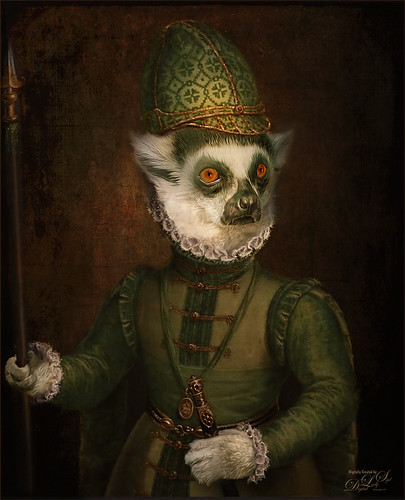
I have always wanted to try this and I finally found a really great Photoshop tutorial on how to do it. This image started with a wonderful painting by Sofonsiba Anguissola called Portrait of a Spanish Prince from 1567 (it is probably an image of Prince Phillip III – the link gives some interesting perspective on this guy). Anyway, I will not go into all the steps since I pretty much just followed the steps presented in Chris Spooner’s video called How to Make a Fun Oil Painting Pet Portrait in Photoshop. This effect is especially popular with people’s pet images. The trick is to find an image that works with your pet image. It took a lot of manipulation using the Free Transform Tool with the Warp in the Options Bar to get it looking correct. And in this case, I had to use two other images of lemurs for the hands. The colors can be matched using the video after the images are combined. 2 Little Owl’s Carnevala 23 texture was added on top and set to Vivid Light at 65% layer opacity to get the illuminated effect in the background. If you want to have some fun, give this a try……Digital Lady Syd
Hibiscus Flowers – I Love to Photograph Them!

These beautiful Red Chinese Hibiscus blooms appeared on Mothers Day last week so I had to take their picture! Used my favorite artistic plug-in – Topaz Black and White Effects (see sidebar for website link) – and applied a preset I had created earlier called Water Landscape Sunny (Adaptive Exposure section – Adaptive Exposure 0.18, Region as 26.10, Detail 1.11, and Detail Boost 1.09; Quad Tones which creates the interesting effect used Color 1 Region set to R1G1B12 and 9.60, Color 2 Region set to R63G78B85 and 95.97, Color 3 Region set to R216G211B129 at 141.2, and Color 4 Region set to R255G254B237 and 255.0; Edge Exposure set to Edge Size 0.19, Edge Exposure -0.43, and Edge Transition 0.27 for all sides; and Transparency set to 1.00.) While in the plug-in, the Detail brush was used to sharpen the center of the flowers and to go around the petal edges where they overlap each other. Next ShadowHouse Creations Marshmellow Skies texture set to Overlay at 100% opacity was added to give the soft green-turquoise feel to the background – a white layer mask and a soft black brush was used to take the texture effect off the flowers. A Curves Adjustment Layer was added and OnOne PhotoFrame (see sidebar for website link) grunge 04 set to 75% opacity was also added. Not hard and once again a really beautiful effect. I love Black and White Effects! I could do this all day! As you can see by the number of related blogs below, this is definitely one of my favorite plug-ins – check them out for several other examples on how to use it!…..Digital Lady Syd
Digital Lady Syd Related Blogs:
Black and White Effects on Outside Art
Cleaning Up a Messed Up Photo
Topaz Black and White Effects Quad Tones Are Great!
Sunny Preset for Topaz Black and White Effects
My Office Friend Ted
Loving Both Filters!
The Art Corner: Painting and Sculpture by Tassaert
Quad Tones in Topaz Black and White Effects Plug-in
Get Rid of Those Power Lines Fast – with Paths and Spot Healing Tool!
Topaz B&W Effects vs. Nik’s Silver Efex Pro
Just Another Topaz Black and White Effect Example
Topaz B&W Effects Plug-In-A Real Winner!
Topaz Simplify and Lens Effects Saves an Image!
 |
The catamaran is one of the whale watching boats you can take while on the Big Island in Hawaii (see Hawaii Ocean Sports for more information on this). This image was taken the day before my adventure and it was not a good at all (hover over image to see original RAW image) – but I really wanted a shot of the boat on the water. Therefore some improvisation had to be employed. After cropping and doing some RAW adjustments in Lightroom, Topaz (see sidebar for website link) came to the rescue. Topaz Simplify 3 was applied first to get rid of the focus issue – the BuzzSim preset was used as a starting point with these changes: Simplify Size slider was changed to 0.15, Brightness slider changed to 0.08, Saturation slider to 1.27, Edges: Color Edge Fine, and Edge Strength slider 1.50. Next Topaz Lens Effects was applied using the Filter Dual Tone Effect to create the warm feel in the sky with a preset I previously created called Sunrise Effect. (See below if you would like the settings for the preset.) Next Flypaper’s Paper Texture Creme Anglaise (one gorgeous texture!) was used via Russell Brown’s Paper Texture Panel for Photoshop CS5 and CS6 (see my blog Russell Brown’s Paper Texture Panel – A Real Winner!) and set to Divide Blend Mode at 100% opacity. A Curves Adjustment Layer was added to fix the contrast. Finally OnOne’s Photoframe grunge 09 was added (see sidebar for link). An image I would normally have trashed has now been turned into a beautiful picture that I really love. Give this technique a try if you own the Topaz plug-ins. The combination works great together, especially if you want to save an image!…..Digital Lady Syd
My Topaz Lens Effects Sunrise Preset contains these settings: Transition Adjustments – Region Size 0.45, Transition 0.35, and Angle 149.7; Region A Adjustments – Cyan Cast 0, Red Cast 0.20, Magenta Cast 0.01, Green Cast 0.03, Yellow Cast 0.70, and Blue Cast 0.24; Region B Adjustments – Cyan Cast 0.15, Red Cast 0.10, Magenta Cast 0.15, Green Cast 0.05, Yellow Cast 0, and Blue Cast 0.05; and Image Adjustments – Brightness 0.05, Contrast 0.08, and Saturation 0.07.
Digital Lady Syd Related Blogs:
Topaz Simplify and Topaz Detail Together
Simplifier and Simplify Filters
Russell Brown Texture Panel Landscape Image


