
Backwater in St. Augustine
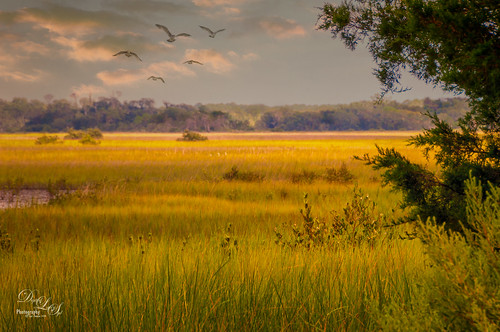
This is an image of the backwater area behind the ICW (Intracoastal Waterway) in St. Augustine and taken from the back side of Camachee Cove. Just had fun creating this image. Added a new sky from KelbyOne to the plain sky and a Curve Adjustment Layer to get the lighting just right. Also added some seagulls birds from a Pixabay image and softened them so they were not so sharp edged using the Blur Tool set to 30% Strength. Two Curves Adjustment Layers were added – one for darkening and one for lightening the image (filled masks with black and painted back where it needed to be adjusted). On a New Layer added a yellow light effect by setting the layer to Overlay blend mode and brush to 9% opacity. On a stamped layer (CTRL+ALT+SHIFT+E) applied Nik Analog Efex Pro 2 (Basic Adjustment, Lens Vignette, and Levels & Curves, especially the Luminosity Curve. It was set to 59%. The last step was to use Nik Viveza 2 to further sharpen the focal point of the flower-weeds sticking up. I love the warm feeling of this image…..Digital Lady Syd
Just Being a Little Abstract
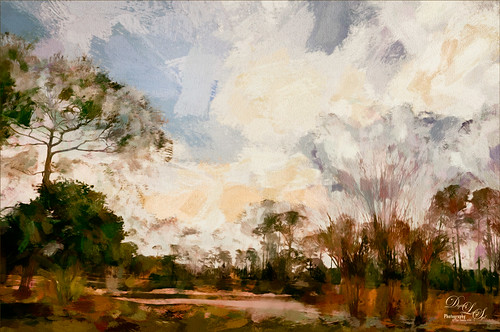
This image shows a local golf course view seen when playing. I had some fun with a couple of Topaz (Stroke: Brush Type 04, Brush Size 0.91, Paint Volume 0.42, Paint Opacity 0.87, Stroke Rotation 0, Stroke Color Variation 0, Stroke Width 0.33, Stroke Length 0.89, Spill 0.23, Smudge 0.26, and Coverage 1.00; Color: Overall Hue 0.15, St -0.20, and Lightness 0.06; Red Sat 0.47 and Lightness 0.14; Orange Sat 0.60 and Lightness -0.42; Yellow Sat -0.33 and Lightness 0.13; Green Sat 0.20 and Lightness -0.32; and Blue Sat 0.36; Lighting: Brightness -0.04, Contrast 0.39, and Light Direction x0.33 and y0.06; and Texture: Strength 0.78, Size 0.30, Canvas IV, Background Type Solid, and Background #d38967 (soft melon color).)
see sidebar for website link) Labs newer plug-ins. The initial layer was duplicated and Topaz Impression was added using my SJ WC like effect on bldgs preset. This preset is sort of crazy but gives some wonderful results at time. (Settings for preset: On a New Layer, some clean up was done where the paint went that did not look good. On a stamped layer (CTRL+ALT+SHIFT+E) Nik Analog Efex Pro 2 was applied using just the Basic Adjustments 5 control points were added to adjust the Detail in different parts of the image. Also Film Type Warm (Row 2 Col 2) was added to the stack. Now the image was brightened up quite a bit. Last step using Topaz ReStyle’s Warm Tones Contrasted preset. That was it. I just liked the rather abstract feel that Impression gave to the image……Digital Lady Syd
Simply Glowing!
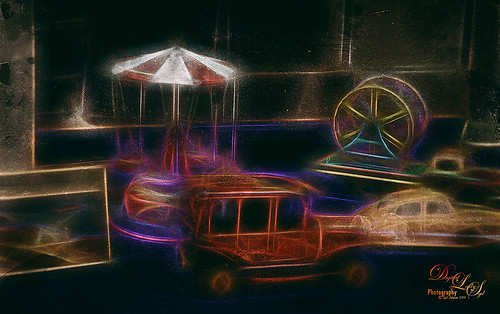
This an image of some vintage toys taken at a local antique show. The new Topaz (see sidebar for website link) Glow plug-in was applied to get this rather classic application of the plug-in. In Lightroom Seim’s (see sidebar for website link) Crosslight Warm preset was applied before bringing the photo into Photoshop. The layer was duplicated and Photoshop’s Shake Reduction filter was applied. This layer was duplicated and this time Topaz Glow’s filter was opened and Fractals II preset was used. Next Nik’s Analog Efex Pro 2 was applied and my SJ Wet Plate preset was selected. (Settings for this plug-in included: Basic Adjustments with 6 individual control points placed on each item to set the Detail Extraction, Brightness, Contrast and Saturation for each – this creates the darker background in the image; Photo Plate Strength 82% set to Corroded using the middle plate; Lens Vignette Amount -22, Middle between Circle and Rectangle, and Size 83%; Film Type Subtle 1st row/4th down set toward Faded, Strength 89%, Grain per pixel 500, and Soft/Hard in the middle; and Levels & Curves slight S-curve in Luminosity channel.) This is the really interesting final look that happened by combining these plug-ins. I do like the new Glow filter and am still learning how to use it to get some new effects. Just love trying new filters out – totally fun!…..Digital Lady Syd
Vintage Post Card
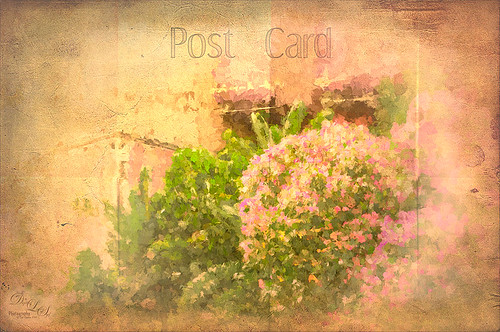
This image was taken at Epcot, Disney World, Florida. This is an example of just trying different effects to get a different look. Recently I have done several blogs on Photoshop plug-ins that give some wonderful results. Here is another example of using them together. First in Lightroom Seim’s (see sidebar for website link) Super Her X and Warm Classic presets were applied along with Delnea’s Backlight Vertical Left preset. Topaz (see sidebar for website link) Star Effect was applied and it place bright dots along the flowers to emphasize this area (Started with Jewel Sparkle I preset with these settings: Star Settings Combined, Burst Star, and Brush Size 99; Main Adjustments Threshold 0.13, Luminance 0.51, Size 0.50, Angle 70.40, Number of Points 8, and Spread 0.07; Color Adjustments Sat 0.64, Temp 0.54, Rainbow Strength 0.25, Rainbow Freq 0; and Additional Effects Secondary Points 0.01, Glow 0.26, and Ring Flare 0.) On a duplicated layer Nik’s Analog Efex Pro 2 was applied. (These are the settings for the preset I created: a Vintage Camera preset and the Basic Adjustments Detail Extraction 17%, Brightness 35%, Contrast -21% and Saturation 19%; Bokeh at 88% blur strength and Boost Highlights at 84%; Dirt & Scratches at 82% strength and 1st row/2nd texture; Photo Plate at 20% strength using 2nd row/2nd over texture; Lens Vignette set to Amount 37%, Rectangle and Size 77%; Film Type Warm 2nd line/2nd over with center Neutral to Faded, 52% strength, Grain per pixel 429 and center Soft to Hard; and Levels & Curves dragging RGB curve down in midtones were added.) Topaz Impression was applied. (Monet II preset: Paint Opacity 1.00, Stroke Width 0.14; Color Overall Lightness 0, Yellow Sat -0.50, Green Sat 0.27, and Magenta Sat 0.39; Lighting Light Direction x 0.84 and y 0.34.) On a duplicate layer Smart Photo Editor was applied. (Settings applied were: Folded paper texture by Andrew 2012 – set Master fade back just a little bit; next Vignette fade edges by Tony – Reduce Fade set a little left of center, Brightness 1.015, Contrast -0.247, Linear Contrast -0.258, and Radius 1757.) A New Layer was added and some clean up was done. Next Viveza 2 was applied with emphasis on the focal point. A Curves Adjustment Layer was added to add contrast back into the image. The last step added Shadowhouse Creations vintage postcard texture set to Hard Light at 85% layer opacity. A layer mask was added and the center was painted out so the image was not too dark in the focal point area. Whew! But overall it does have a distinct look and I really like it……Digital Lady Syd
Painting a Painter
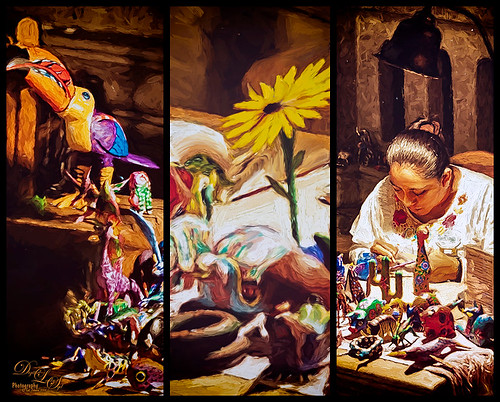 This wonderful lady was diligently painting away on the gorgeous wooden figures in her display at the Mexico Pavilion in The World Showcase at Epcot, Disney World Orlando. Seim’s (see sidebar for website link) Magic Ugly Shade Fixer was used in Lightroom on the image and set to 46% opacity by using The Fader Lightroom add on. (Can download for free to use on the packaged Lightroom presets, and for a $25 registration fee it will work on all presets – I find it very handy at times.) Then in Photoshop Topaz (see sidebar for website link) Detail 3 was applied only adjusting the medium and large details a little bit (Detail Overall Medium Details 0.38 and Large Details 0.16 and Tone Contrast 0.30 and Shadows -0.01). The new Topaz Impression plug-in was opened and the Oil Painting II preset was applied with no changes. Then because I can, Nik’s Analog Pro 2 plug-in was opened and Detail Adjustments, Light Leaks, Film Type and Multilens were applied. Just thought the Multilens was interesting for a change. A Color Balance Adjustment Layer was added and a 2 Lil’ Owls Studio (see sidebar for website link) texture Confetti 13 was added and set to Color blend mode at 32% layer opacity – just needed to counteract the overwhelming yellow tones naturally. Some Mixer Brush clean up was done on a New Layer using my Chalk Brush as a mixer. And that was it. Not really that difficult – I liked the Oil Painting II preset from Impression. By just painting over some of the rough edges with a Mixer, I got the look I wanted. Anyway, it was fun to do!…..Digital Lady Syd
Universal Family Fun!
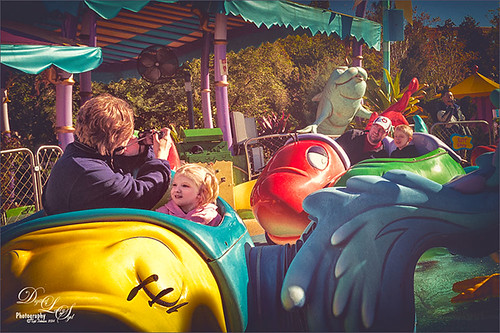
Just a quick fun picture taken at Universal Studios, Orlando, Florida, earlier this year. This is the Caro-Seuss-el ride, similar to the Flying Elephants at the Magic Kingdom. Added Seim’s (see sidebar for website link) Crosslight Warm preset in Lightroom. In Photoshop rand the Shake Reduction filter – seem to work really well on hand-held images. Next the Mixer Brush was used to remove the heavy shading on the children’s faces. Since I felt like doing a vintage image, ran Nik’s Analog Efex Pro 2 filter using a preset I created called Flat Vintage Look – used Basic Adjustments and two control points were placed on the kids; Light Leaks using the Soft leak 1st column and 2nd row – gave a really bleached out look coming from the right so the Strength was set way down to 28%; Lens Vignette – just a little setting Amount t0 -53% to slightly darken down the corners; Film Type Warm Nikko 2 set to a Strength of 24% and no grand (set to 470); and Levels and Curves adding some Luminosity and blue tones. Little more clean up on the faces and a Curves Adjustment Layer. Last step was Nik’s Viveza 2 with control points on the children’s faces to draw attention, especially to the little girl. That was it! ….. Digital Lady Syd
A Little Vintage Dr. Seuss
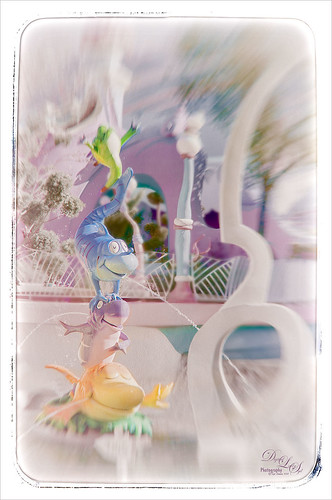
Just another fun shot from Universal Studios-Orlando in Orlando. Apparently I got a lot of what I call “fun” shots and they are fun to process! This image has 2 Lil’ Owl Studios (see sidebar for website link) Transfer Texture 10 added and the main characters painted by on a white layer mask. It was set to Saturation Blend Mode at 100% layer opacity. On a stamped layer (CTRL+ALT+SHIFT+E) above, one of my favorite creative plug-ins, Nik’s Analog Efex Pro 2, was applied – the Zoom feature was used to get the cool blurred background effect. Back in Photoshop on a New Layer, the Sharpen Tool was used to sharpen the faces just a little. That was basically all that was done but I think it turned out really cute!……Digital Lady Syd
Where Am I?

OK – the owls in the birdcages should be the big clue if you are a Harry Potter fan! Just another shot taken at the Wizarding World of Harry Potter in Universal Studios Orlando, Florida. Even though this window shot of the owl and school supply store was not the greatest, I really liked it. Some of the reflections in the panes actually show the high tops of the buildings on the other side of the street – so Harry Potterish! Felt this image needed a quick fix with the newly updated Nik Analog Efex Pro 2 since the whole Harry Potter feel is rather dark and vintage. In Lightroom just some basic adjustments and Seim Effects PW4 (see sidebar for website link) Sampler Magic Shade Fixer preset – a free download of some marvelous presets. Since I was going to use the Adaptive Wide Angle Filter in Photoshop, the Lens Profile was turned off. In Photoshop my go-to filter, Topaz (see sidebar for website link) Detail 3 was used and then the Adaptive Wide Angle filter was opened to straighten up all the unsquare window panes – did a pretty good job I think. Next Nik’s Analog Efex Pro 2 was applied using Basic Adjustments, Light Leaks, Lens Vignette, Film Type, Frames, and Levels & Curves which really gave the image the real vintage feel. Back in Photoshop a vignette was created by using a Curves Adjustment Layer to darken the image overall and then paint back with a large soft white brush the lower center focal point to direct the eye. The last step involved using the Sharpen Tool on a New Layer to sharpen up the owls just a little. Done! Love this new update from Nik!…..Digital Lady Syd
Digital Lady Syd Related Blogs:
How to Use the Adaptive Wide Angle Filter
How About That Update to Nik Analog Efex Pro 2?


