
How to Pop a Picture in Lightroom 5

This image of a pretty cupola taken in London uses several of the new Lightroom 5 features. In fact nothing was done in Photoshop to this image. First it was cropped down – only had the very top as shown but it needed to be composed. Then the basic sliders were set just like in previous versions of Photoshop (see my How to Use Adobe Camera Raw (ACR) or Lightroom 4 Quickly blog for tips on this). The HSL panel was used to set the color. Two Graduated Filters were added – one for the blue sky (Temp -22 and Exposure -1.18) and one to bring out the pretty sky and cloud effect (Exposure -0.42, Highlights -60, Shadows 87, Clarity 55 and a light orange color Hue 28/Sat 59). Some Sharpening was done with an Adjustment Brush (Sharpness 100, Shadows -68, and Clarity 100) and the detail painted over. A Radial Filter was applied to just the the cupola – used -1.18 Exposure with the Invert Mask checked. A Post-Crop Vignetting was added using Highlight Priority Style, Amount +100, Midpoint 18, Roundness -100, and Feather 0 – this gives the nice white frame. That was all that was done – a very plain image turned out to be quite striking!…..Digital Lady Syd
Digital Lady Syd Related Blogs:
Lightroom 5′s New Upright Adjustments Section
My Favorite Adobe Lightroom 5 Features
Lightroom 5’s New Upright Adjustment Feature
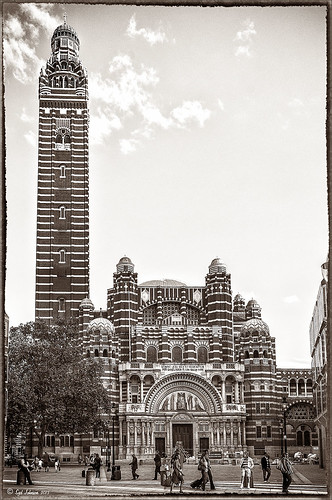
Hover over the above image of Westminster Cathedral to see what the original RAW image looked like or (here to see on flickr)- pretty awful! Wanted to show you what Lightroom 5 did with one click of the Lens Correction section’s new Auto button in the Basic Upright area. I was blown away! I did not adjust it any more – it is not perfect but much faster than anything I could get by using Photoshop’s Puppet Warp or filter tools. Check out a short blog by Julianne Kost, one of the Adobe Photoshop Evangelist, that gives some good info on when to use the Reanalyze button. In Photoshop a couple little items were cloned out on a separate New Layer. Nik’s Sharpener Pro 3’s Raw Presharpener was used at default values on a duplicate layer. A Hue/Saturation Adjustment Layer was added to get rid of a little yellow cast the sharpener filter gave to the top of the tower – used a black layer mask and painted back the correct color where needed in white on the mask. Next Nik Silver Efex Pro 2 was used and the custom preset called Sepia Grain Border was applied. Just a few little changes were done on the sliders to make the image sharper, but that was all that was done. Pretty nice sepia tone image!…..Digital Lady Syd


