
Flowers on an Old Spanish Home
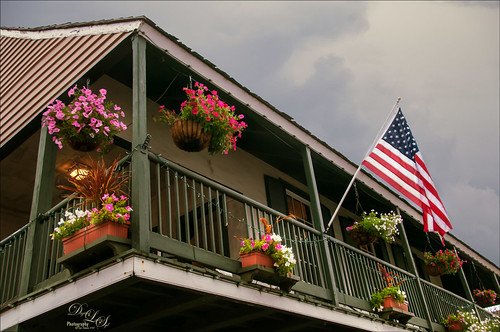
This is the Arrivas House located at 46 St. George Street in St. Augustine, Florida and was built cc 1760. (Click on link for some interesting history on this site). It is now home of the Panama Hat Company store. Used the HDR command in Lightroom to create an image from three images exposed at -1 1/2, -1/2, and +1/2. The sky was totally washed out so had to bring in a sky image taken from my backyard – it was so overcast a sky with similar attributes had to be selected. Then two Curves Adjustment layers were added, one for tone and one for color. A Dodge & Burn layer using a 50% gray layer was created – painted with white and black at low opacity to sharpen up the blues in the flag and color on the flowers. A New Layer set to Overlay blend mode was used for a little spotlight effect placed on the little flowers to brighten them up a bit more. Last step was using Nik Viveza 2 to pull the whole image together. St. Augustine is a great place to visit if you get a chance…..Digital Lady Syd
Vintage Effect on Hanging Pots

The image was taken at the 24th Annual Native American Festival in Ormond Beach, Florida recently. I just loved the way this image turned out since it started out with a very cluttered background. It was an three image HDR image that was processed using Photomatix Pro’s Merge to 32-bit HDR in Lightroom. The resulting TIFF file was adjusted and Matt’s 70’s preset was applied before taking the image into Photoshop. Some background clean-up was done and the Kim Klassen cafe simplicity texture (sign up to get several beautiful free textures including this one) at 55% opacity was added to the image – really gives it that vintage feel. The pots were painted out with a low opacity black brush on a white layer mask. A Curves Adjustment Layer was added to give just a little more contrast in the image. That was it – very simple processing but one of my favorite images from the event.
It is amazing how pretty the results can be by trying different textures on an image. Really loved this one….Digital Lady Syd
Digital Lady Syd Related Blogs:
Check out my Textures category in the sidebar for more Tidbits Blogs
Check out my Fun Photoshop Blog (link at top of page) and click Textures category in the sidebar
When Was the Last Time You Saw a Phillips 66 Gas Pump?

Really loved how this 3 image HDR turned out. Who knew you could actually buy old gas pumps! They were being sold at the 38th Annual Turkey Run located in the Daytona International Speedway infield last month. The three images were stacked using the free Lightroom Photomatix Merge to 32-bit HDR if you own Photomatix HDR Pro. My duChemin Maasai Chocolate split tone preset (that I created from settings in David duChemin’s Vision & Voice: Refining Your Vision in Adobe Photoshop Lightroom book) was also applied. In Photoshop 2 Lil Owls texture 6 (see sidebar for website link) was set to Vivid Light at 45% opacity. A Levels Adjustment Layer was added, some clean up done, and French Kiss Glorious Grunge Edging overlay border was added and changed to a dark brown color using a Solid Color Fill Layer clicked to the overlay. That was it.
Nik HDR Efex Pro Example

The above image was taken at the Hilton Waikoloa Village on the Big Island in Hawaii. They have a lot of unusual sculptures located throughout the whole resort and this one is full sized. I used Katrin Eisman’s workflow to process this image without using Silver Efex Pro (see my blog HDR Using Photoshop Merge to HDR and Nik HDR Efex Pro and Silver Efex Pro? Wow!). This image used five images stacked in Merge to HDR in Photoshop. Then it was taken into Nik HDR Efex Pro and the Grannys Attic preset was used that gives a more cross processed vintage look. Viveza 2 was applied, then clean up and selective sharpening was done. I am starting to like this workflow a lot!
If you are interested in using HDR programs, check out RC Concepcion’s book called “The HDR Book: Unlocking the Pros’ Hottest Post-Processing Techniques” that covers them all and shows you how to get a similar look from each. I have found it to be the most helpful of all the books out there when it comes to understanding what each slider is doing – and he gives you some presets that are pretty nice too!
Digital Lady Syd Related Blogs:
Palace Tower Art at Hilton Waikoloa Village
Different Images – Same Look Using HDR!
Where Am I?
Using the Hue/Saturation Adjustment Layer Temperature Slider for Color Change
 |
I tend to shoot HDR when I am at home photographing my flowers. I like having the different exposure options to choose from even if I do not create an HDR image. In this case an AF Micro Nikkor 60 mm lens at F/3.2, 180 sec, ISO 200 with a Bower 0.5 x High Resolution Digital Lens with Macro was used to shoot 5 exposures set to exposure compensations of -2, -1, 0, +1, +2. These five images were processed in CS5 using Photoshop’s Merge to HDR program – click on the image to see the original Photoshop HDR composite. (Here are the HDR settings used: Radius 350, Strength 1.86, Gamma 2.03, Exposure -0.45, Details 228, Shadow 100, Highlight -86, Vibrance 75, and Saturation -26 – a curve was created with points at Input 25 Output 43 and Input 58 and Output 65. I saved this down as a preset to use again.)
To get a little different look, I decided to use the red-green dynamic color combination. A Hue/Saturation Adjustment Layer was used to change the Reds to Hue +32, Saturation +33 and Lightness -7. To get the center green, while still in the Reds, I moved the temperature tabs on the slider at the bottom of the adjustment layer – see settings below. The center color totally popped! In Magentas the Saturation was set to +14. That was all it took change the colors to something really dynamic!

The final steps involved adding a few control points in Nik’s Viveza 2 for contrast and detail and a Sharpen Tool layer to emphasize the center. OnOne PhotoFrame Taufer Texture 07 was applied (see sidebar for website link). The background was changed to a darkish green to give more color contrast.
Once again, by just playing around in Photoshop and trying a few filters and different colors, you can make an ordinary image into something quite spectacular. Go try out the Hue/Saturation Adjustment Layer temperature slider too – it gives some very interesting results…..Digital Lady Syd
Getting That Vintage Look!

I had not done an HDR image or post in a long time so I pulled out NIK’s HDR Efex Pro, which usually gives me the look I want. Personally, I think it is a little harder to use than Photomatix Pro and Photoshop CS5’s Merge to HDR, but the results can be spectacular if done correctly. This image is of an Ice Cream Shop on St. George Street in St. Augustine, Florida. This is a great example of the typical Spanish home that was built back in the early 1800’s. The texture in the building came out really nice. What I like about this program is on the right side of the program, there is a drop-down menu called HDR Method where a lot of different looks can be tried out. The basic global adjustment sliders and the U-Point controls are still available so control points can be placed where needed and the strength adjusted to fit the location. In this case, the Fresco method was chosen at 70% strength. I did bring the image into Photoshop to clean up some of the distracting items and to sharpen the lettering in the signage with the Sharpen Tool. The edges were treated with OnOne’s PhotoFrame Taufer Texture 12 in dark black (see sidebar for link to website). Overall it gives a pretty convincing vintage look.
Another great program from NIK!…..Digital Lady Syd
Digital Lady Syd Related Posts:
Different Images-Same Look Using HDR!
Where Am I?
Where Am I?

This image was processed as an HDR image in Photoshop CS5 using five images. I used Scott 5 preset (see my Fun Photoshop Blog “With One Good Photo – Try the Pseudo HDR Effect“) as a starting point and adjusted to my taste. I also changed out the sky as the day was very overcast when this image was taken and the HDR effect looked terrible in this area. The Puppet Warp Tool was used to straighten the left tower (see my Tidbits Blog “Straightening with Puppet Warp“).
So where am I?
If you have been to Washington, DC and spent any time on The Mall, you would have seen this very distinctive building called the Smithsonian Castle. I was interested in checking it out as the DC area experienced a 5.8 magnitude earthquake on August 23, 2011 and five decorative turrets on the east side of the Castle sustained damage. I did not take pictures on the east side of the building, but as far as I could tell, the building looked in good shape. The Castle was built and finished in 1855 by Mr. James Renwick, Jr. Apparently the museum did not expand beyond this building until the 1960s. I wish I could go back a 100 years in time for a few hours and see what was going on in this building. If you get a chance to visit this area, go check it out…..Digital Lady Syd
Like a Chameleon – The Color Replacement Tool!
Below is a 7-image Camera Raw HDR file (using Merge to Photoshop Pro in CS5) where just one color was changed very quickly but created a big impact. Hover over the image to see the original image.
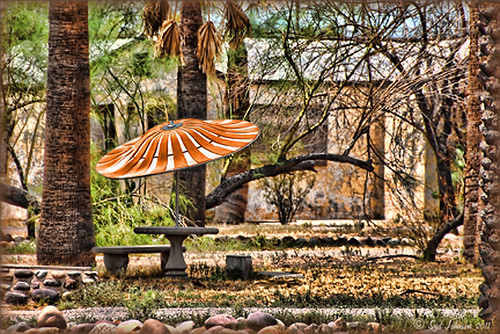 |
I used a little known tool, the Color Replacement Tool, which is hidden in the toolbox with the Brush Tool. It has been in Photoshop since CS but over the different versions, it has been placed with different tools. Not sure why it is not used more as I found it very easy to make this change.
Do your original clean up to the image. The last thing to do is use the Color Replacement Tool on the umbrella. Using the Color Replacement Tool, create a brush in the drop-down box. My settings were: Brush size 33 pixels, Hardness 0, Spacing 1%, Angle 0, Roundness 100%, and since I use a Wacom tablet, I set Size and Tolerance to pen pressure. Other settings in the Options Bar were Mode – Color, Sampling – Continuous icon pressed, Limits – Find Edges, Tolerance 30% and Anti-alias checked. Set Foreground color in the color picker to the new color and drag/paint away. Remember the brush only changes the pixels you drag over – try using a selection of the area you are changing to keep the brush from spilling over into other parts of the image if adjusting the Tolerance does notwork. It is amazing how it turns out!
I saved the brush settings as a Tool Preset (upper left icon on Options Bar) for the next time I want to replace a color quickly. (It is saved as a Tool Preset because of all the changes to be saved from the Options Bar that saving as a Brush preset will not retain.)
Try experimenting with some of the other settings. It is also used to get rid of red eye in images. I love it when I learn something new in Photoshop!…..Digital Lady Syd
Where Am I?

Have you ever been driving around and found a place that was begging to have it’s picture taken? This happened to me last week. I love that HDR look anyway, and am still struggling with which software to use. I tried Photoshop CS5’s Merge to HDR, Photomatix Pro, and Nik HDR Efex Pro before settling on the NIK HDR Efex Pro version. I wish someone would put all the good stuff together so I do not have to keep going through several iterations to get the best look.
All right, so where was I when I took this image? Right in the middle of Mesa, Arizona at Main Street and Recker Road. (Click image to see location at my Flickr account.) It is an old mineral spring motel (circa. 1930’s) whose owner died a few months ago and it is in a bit of disrepair. I loved the sign and got several other shots you will probably be seeing eventually. If you are in the area, it is really easy to find and will give you a great HDR opportunity.
To quote an article called the National Organization Announces Ten Most Endangered Roadside Places, “…..in the 1930s, the owners discovered a mineral well on the property, and constructed Roman-style bathhouses and guesthouses for visitors. In the 1940s the baths played a role in bringing the New York Giants spring training camp to Mesa, leading to the eventual establishment of Mesa as a center for baseball spring training. The resort remained open and operated by its original owner until 1999.” Here is a link on the efforts to preserve this interesting motel …..Digital Lady Syd


