
A Halloween AI Party

I have always loved doing Halloween images so it was a lot of fun to create this one after this rather weird AI generated background from the Photoshop Beta software was produced. The prompt used on this one was “flowers and river oil painting” – see my AI Digital Oil Painting – How To Do This Fun Photoshop Blog for more on how this was done (used Method 2 by Brian Mataish called Photoshop Generative Fill AI Can Turn Photos into Paintings. This Tidbits Blog is on just the post-processing steps used after the AI background was created.
The original AI background had this pretty scary vampire looking guy on the right, so that felt very much like Halloween. A Halloween theme was created using a free Color Lookup Adjustment Layer called SS Vieru 02 for the basic color that I thought looked really good (to download click Sparkle Stock Canyon Film). On a New Layer the Vampire was painted in using my SJ-Pastel-3 Painting Brush (see my How to Create My Favorite Brush Fun Photoshop Blog for the settings) and some cloning was done on another layer. The Remove Tool/Spot Healing Brush layer was created to remove some bad looking areas – I am finding I do switch between them (see center of my Photoshop Beta AI with Fenced Zoo Images Fun Photoshop Blog for more on this). The Pot and Fire were both generated in two different generation layer prompts and read “Halloween black witches pot” and “flames” – then smoke was added on layer above using some really old smoke brushes. The bat was generated using “Halloween bat” in the prompt. The cat is from a Halloween Obsidian Dawn vectors set ($4 set) which had the cat brush, skeleton brush and the raven brush. The cat was painted with a Cheetah Fur brush that the great Aaron Blaise taught how to make (see How to Make a Digital Brush using a Photo) and the tail was flared out to look scary (used Coyote Mange Rough Tough brush for this – still the best animal fur brushes around!). The Dark Skin Cobra Attacking Pose Snake is from PixelSquid, the greatest object resource item around – hopefully even after AI – it is a pay-to-use site. (For more info on them, check out my Some Compositing Tips and Resources Fun Photoshop Blog halfway down.) A sampled light orange was used on a New Layer to add some Fog (used Grut-I Fixray brush – he has the best brushes around – and a free brush weekly!) and then on another New Layer used the same brush with a darker sampled color for a slight vignette effect. Two layers were added as Darken and Highlight layers using Sam Peterson’s brush and colors – see my A Few Photoshop and Lightroom Tips and Tricks Fun Photoshop Blog – Tip 2 – use this for pinpointing light and shadows on an object. A Black and White Adjustment Layer set to Luminosity (because it always looks good) was added next. Used Pratik Naik’s technique Tip 2 for lightening and darkening parts of image (on new layers above set to Overlay blend mode – use at least a 100 px soft round brush set to Airbrush in the Options Bar and Flow at 9% and use white or light color to lighten image or black or darker color to darken image – different colors give some great results – use layer opacity to lower effect). This enhanced the light at the top coming and the dark in areas for more of a cave feel. Last step involved adding a New Layer on top with a few little sprinklers to add some texture in the lighted areas. Phew! That was it – took a while to complete!…..Digital Lady Syd
Happy Halloween!

I wasn’t going to do one this year, but I just love make Halloween pix so here it. These are the resources used in case you want to make one next year. Thanks to PixelSquid who has such fabulous objects to using for compositing on their site – the tomb, skeleton and both trees are from the site. Just used mainly a little Layer Style wizardry on them. The Cat and Bats from Deviant Arts mutato-nomine were custom shapes loaded into Photoshop. The Milky Way was from a Serge Ramelli video download and the moon from a free set called from Design Cuts called Planet Space Explosion Background and Ancient Texture. The text is called East Liberty Signature. Totally fun to do!…..Digital Lady Syd
Happy Halloween!
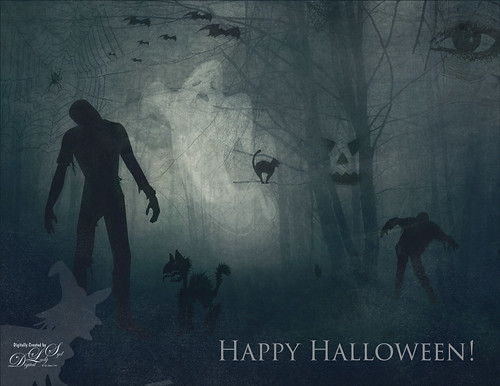
Happy Halloween! Had to do my annual post – they are so much fun to create! And had to do a post to thank all the various people who take the effort to create these wonderful Halloween objects. I would never be able to do these images without them!
So the create this image the base image is from a Creative Market Mysterious Forest Halloween Pack-01. The zombies are vector elements from Ben Blogged Zombieai – even though they are vectors, they will opened in PS – were copied over into the image on their own layers. The cats are all different: I love the foreground scary cat – he is a Halloween_Cat__s_Brush_by_altergromit, the cat in the tree is from a shape set of Halloween items, and the little cat way in the background is a brush from pureanodyne halloween-ciruelo cabral blackcat. Several cobweb and bat layers from the same set were also created. More spider and web layers, and a witch layer, were created using Obsidian Dawn’s Halloween brushes. The ghost was from Creative Market’s Halloween Illustrations – an Inner Glow layer style was used to give the transparent look. Two 2 Lil’ Owls Studio (see sidebar for website link) textures were used: Crackle 13 set to Hard Light at 81% layer opacity and texture 4 from the Artisan Collection Big Set 2, which was set to Linear Burn blend mode and 23% layer opacity. PS’s Foggy Night Color Lookup preset was set to 74% layer opacity to further darken down the image. The eye is one of I created in Photoshop. On another layer Function Subtle Grunge 6 brush by Liam McKay was added. The font is Trajan Pro 3, always a favorite. That was it. Lots of fun and lots of references – thanks creators for sharing!…..Digital Lady Syd
Trick or Treat!

Happy Halloween to everyone! Just thought I would post a little Halloween cheer using a photo taken at the local Lowe’s Garden Center. Sometimes the displays are more creative than what you see in the neighborhood! I am not sure what this little guy is but he sure is scary! So had some fun with this image. Started by selecting the subject and putting him on his own layer. Then underneath used Shadowhouse Creations Halloween Pattern 3 HP3 and topped it with Julia Dreams Halloween icons Pattern 1 – actually used the Blend If slider to get the strips to show up underneath by setting This Layer black tabs split to 131/174. It gave a really nice effect. Add the Machovka_bat and text – the Adrenaline Brush font with a Stroke Layer Style- were added. Color was added to the letters by clipping Pattern Fill Adjustment Layers to the three text files. Had to replace the font on the bowl as it was not very sharp and added the Old English Text MT font – a layer style was added using a Stroke, Inner Shadow and Outer Glow effects. On a Stamped Layer (CTRL+ALT+SHIFT+E), Nik Viveza 2 was applied to adjust the focal point of the image. Then a 50% Gray Fill Layer was used to Dodge and Burn with just a black or white brush. The cobwebs were placed in the subject’s eyes – Obsidian Dawn’s Halloween Vector Cobweb 10 brush was used. Last step involved add Halloween Cats Brush by altergromit (love this cat) – added a mask to pop him out of the bowl and added an orange Outer Glow Layer Style around him. That was it – check out some of these resources for other interesting Halloween items…..Digital Lady Syd
Happy Halloween
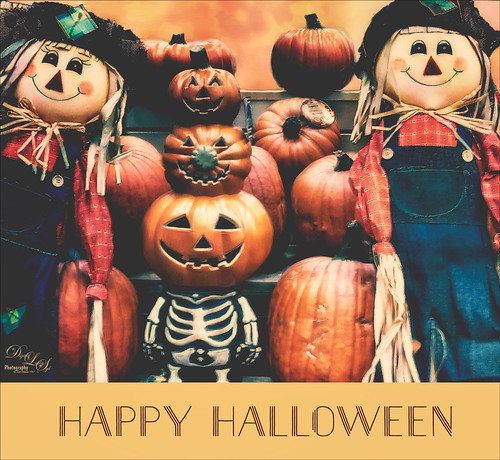
This Halloween grouping was taken at a local Lowe’s Garden Center on my Android – just could not resist the cuteness of these guys. I would love to have one of those straw looking characters but we do not get many Trick-or-Treaters here so no need to put outside. Anyway, since it was just a JPEG taken on the fly, the image itself needed some work. Only basic adjustments were done in LR, then in Photoshop the first thing done was to run the Shake Reduction Filter to try and sharpen up the edges a little. Next the background was removed using the Quick Selection Tool and Mask and Select command. One of my textures was placed underneath for a background. To further sharpen the image, it was taken into Lucis Pro (no longer available) and it really helped. On a stamped layer, Nik Color Efex Pro 4 using one of the Flypaper recipes presets to get this overall vintage feel – I forgot to write down which preset. So many of them looked good. Two inches were added to the bottom of the image and the Naive Deco Sans font was selected for type. On a New Layer a Mixer blender brush was used to smooth edges. Nik Viveza 2 was applied on a stamped layer to draw focus to the center pumpkin. Last step was to add a Curves Adjustment Layer for a little vintage feel to the overall image. Happy Halloween Everyone!…..Digital Lady Syd
Happy Halloween!
 It seems like I always have to do a Halloween image every year – they are so much fun to do! This year was no exception. The background on this image was a totally blown image taken on one of the rides at Epcot but the colors were so striking, I kept it. Perfect for a Halloween creation! I just listened to Terry White’s video called Check Out 3 New Filters in Adobe Photoshop CC and applied a couple of his clever techniques. That is why there is a Tree in the image and some flames around my type layer of lettering – had to rasterize the lettering to get it line up right though, then added the Pen Path and Flames. I started my Halloween theme starting with my friend Carol at Graphix1’s Halloween Clipart PSD – these are really nice objects that can be moved into your document (check out her blog too – lots of nice free goodies there!) Lots of layer styles and some painting were added to image along with French Kiss’s (see sidebar for website link) Spatter 4-14 brush and 2 Lil’ Owls (see sidebar for website link) Texture called Sweet Musing 11 set to Color Dodge blend mode. The frame is from a new Photoshop plug-in I just got called Smart Photo Editor that does some very interesting things to an image beside making great borders! Happy Halloween everybody!…..Digital Lady Syd
Spooky Halloween Fun!

A little Halloween fun here. Basically using the Halloween brushes I listed in my “Halloween Resources – Time to Go Batty!” blog of a few days ago. The same two sets of Halloween brushes were used (Obsidian Dawn’s Halloween Vector Photoshop brushes and Halloween Brush Set by anodyne at Deviant Art), the orange sky was Obsidian Dawn’s Clouds 16 and 17, the beige background texture is from ShadowHouse Creation – Assorted Paper TS-P-6, my favorite font Fantaisie Artistique font, and a grunge background (acid burn controlled 11) from OnOne PhotoFrames (see sidebar for link to OnOne Software website) was used. Some background grunge was added and that is about it.
It is pretty easy to get a nice effect – just use lots of layer masks and brushes – it really is fun to put it all together.
Hope everyone has a great Halloween! …… Digital Lady Syd
Halloween Resources – Time To Go Batty!

Not sure how everyone elses kids are or were, but I think mine liked Halloween as much as Christmas! So to kick off this (at least 2nd biggest) holiday season, I created the above image.
Only a few resources were used and they are provided free for our use. All the objects were from Obsidian Dawn’s SS-Halloween-Vectors brushes (and include a lot more than what is used above) and are definitely of the high quality you expect from this site. The cobweb in the upper right corner was provided from a nice set of brushes called pureanodyne_halloween at Deviant Art – these are actually from a set created in 2004. The Happy Halloween font is called Groovy Ghosties and can be downloaded from DaFont.com. And my signature font is my favorite fun font – Fantaisie Artistique from DaFont. The white cracks and grungy textures are from OnOne PhotoFrames (see sidebar for link to site) called Taufer Texture 01 and Grunge 05. Now this effect could very easily be done in Photoshop using a few creative brushes on a couple layers, but the plug-in was really fast and I could experiment with different colors and textures very quickly. I guess that is the main reason why you buy Photoshop plug-ins – they all have to be based on some form of Photoshop technique.
Try out a few of these Halloween brushes – they do a really nice job for this time of year! Have fun experimenting and look out for low flying bats!…..Digital Lady Syd


