
I Didn’t Know That! Converting Lightroom Preset to Adobe Camera Raw Preset
 |
I occasionally come across a need to take a Lightroom preset and use it as a preset in Adobe Camera Raw. This is not as complicated as it seems. Below are the steps required to accomplish this task.
1. Apply the preset in Lightroom and make sure you know which panels and sliders you used. (If preset not already created, to save preset in Lightroom, on left side of Presets line, click (+) for “Create New Preset.” Name preset.)
2. Right click on image in Lightroom and select Edit in -> Open as Smart Object in Photoshop. The image is opened in Photoshop with the Smart Object icon on bottom right of thumbnail in Layers Panel.
3. Double click on thumbnail and it opens up into Adobe Camera Raw. Go to Presets panel (9th icon over on righthand side under the histogram) and the click folder icon at the bottom of the panel to open the New Preset dialog. Name and click the items you want included in the preset, then click OK. Your new preset shows up in the Presets panel.
You can now use your Lightroom preset anytime you want in Adobe Camera Raw also. I usually start my personal preset names off with an SJ so I know they are mine. It is easy to get presets from many different sources as time goes on so it helps to know which are yours.
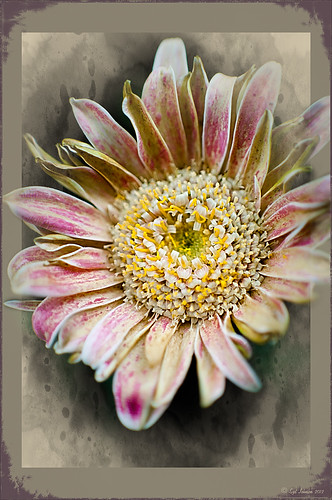
The image above is of a miniature mum in my yard. Hover over the image to see how the image looked with just a Lightroom preset I created called Dark Vignette – it makes the background very dark behind the flower. For information on how to create this preset and how the image was finished, see bottom of blog for details.
Hope this helped you get a little more organized…..Digital Lady Syd
To create this preset, changes were made to: the Tone Curve set to Highlights -24, Lights +41, Darks -56, and Shadows -54; HSL – Luminance sliders set to Red -41, Orange -9, Purple -2, Magenta -50 and all others 0, and Saturation sliders set to Red -2, Purple +32, Magenta +59 and all others set to 0; Effects Post-Crop Vignetting Style set to Highlight Priority with Amount -61, Midpoint 33 Feather 0 and others set to 0. To finish, image was sharpened and OnOne PhotoFrames (see sidebar for website link) acid burn controlled 15 was added and reduced in size in the plug in, and then grunge 12 was added on top – in Photoshop petals were painted over frame edge using a layer mask on first acid burn frame.
Digital Lady Syd Related Blogs:
Colorful Blown Out Look Lightroom and Adobe Camera Raw Preset
Settings for Vivid Drawing Look ACR/Lightroom Preset and NIK Color Efex Pro 4 Pseudo HDR Recipe
Adobe Camera Raw – Not So Obvious in Photoshop Elements 10

Accessing Adobe Camera Raw (ACR) in Photoshop Elements is not that obvious. I decided to write a quick post here on how to accomplish this without too much stress and show the results you can get with just a few adjustments to the sliders. Usually you use ACR for processing RAW files, but a JPG can also be opened up in ACR following the same steps.
To access ACR in Elements, first go to File -> Open As and click on the drop down arrow on the left of the bottom box that by default shows Photoshop (*PSD, *PDD) where a long list of file formats is displayed. Select Camera Raw (with a whole bunch RAW formats listed). Now you are in the basic ACR plug-in. This dialog is composed of three panels – Basic, Detail and Camera Calibration. There is a Straightening Tool and Crop Tool at top of dialog that should be used now if image needs to be straightened or cropped.
When I work in Camera Raw, I use the histogram as a basic guide for enhancing an image. Watch the edges and move the sliders so that the ends just touch the sides on both ends. Below is my workflow for processing an image before taking it into Photoshop Elements.
BASIC Panel:
White Balance drop-down – Click on the eyedropper icon on top and run over areas that are of a neutral gray content – the RGB numbers will show under the left side of the histogram. When numbers are all pretty close in range, click on that place in image to adjust color cast. (Usually never touch this unless there is an obvious color cast in the image.)
Exposure slider – slowly move the slider until the white line stretches to the right edge of the histogram. (For this image, exposure slider was set to -0.35)
Blacks slider – slowly move the slider left until the white line stretches to the left edge of the histogram. (Blacks slider set to 0)
Recovery slider – move right until you get a pleasing look to the colors. It darkens the the brightest areas. (Recovery set to 99 – usually I do not use this much, but the histogram required it.)
Fill Light slider – this slider may not need to be moved at all – each image is different so give it a try. It opens up detail in the shadow areas. (This slider was left to 0.)
Temperature and Tint – these are not moved much if at all – use if you think there is a color cast in the image. Add a little yellow if the image seems too cool and you want to warm up the feel of the image. (In this case, the Temp slider was set to 7150 and the Tine was set to +4.)
Brightness slider – do not use this slider too much – it can tend to wash out colors. (Set to +53)
Contrast slider – don’t overdo using this but it can make an image pop. (Set to +63)
Clarity slider – add some but not more than +75 to add a bit of sharpness to the image but watch out for haloing if too much is used. I always use this slider. (Set to +63)
Vibrance slider – use if the colors need to pop just a bit more – it makes the colors that are not so bright a little more colorful. (Set to +28)
Saturation slider – usually do this adjustment in Photoshop.
DETAIL Panel:
Sharpening Section – I use this at the default – Amount 25%; Radius 1.0; Detail 25; and Masking 0. If noise in image, set Amount to 0 and do localized sharpening in Photoshop using the Sharpen Tool. (The default was used on this image.)
Noise Reduction Section – Use if any noise is apparent in the image – look at the image at 100% to find it. (Did not use on this image as there was no noise but I do not hesitate to use it if any is present.)
The Luminance slider can be very helpful in keeping the noise under control but you must find it at this early point in the image adjustment since you cannot come back into Camera Raw in Elements to fix.
Color slider – you may not need it if no color pixels in the dark areas.
CAMERA CALIBRATION Panel:
Adobe Standard is the default. In the drop-down, try some of the other choices. Camera Vivid gives some really bright colors. (For this bright colorful image, Camera Vivid was used.)
Click Open Image button and it now opens into the Editing Screen in Elements.
There is a lot of information on how to do this but once you get a workflow you are comfortable using, the image can be adjusted very quickly and results are definitely worth it.
Hope this workflow helps when trying to sort through the sliders. Have fun experimenting…..Digital Lady Syd
PS: This same workflow is a great starting point for ACR in CS5 – do open as a Smart Object so you can get back to the settings if needed.
Defringe that Nasty Blue Edge from Trees On a Bright Blue Sky!
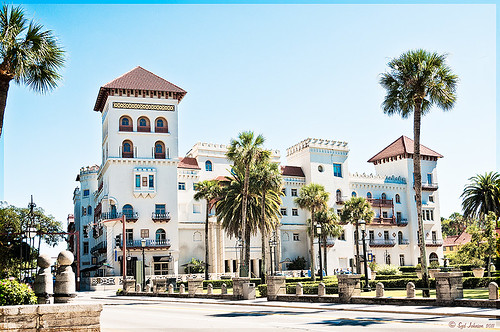 |
This is a short but sweet way to get rid of most of those blue and cyan edges on trees shot in bright light against a blue sky. There are just times you have to take that image in the bright light of day and the fringe occurs frequently. These tips also work when you have a horizon line in a landscape shot that has similar issues.
Hue/Saturation Adjustment Layer: The image above has that very problem and this method was used to get rid of most of the fringe. Hover the above image to see the before defringing image.
1. Simply add a Hue/Sat Adjustment Layer in Photoshop and in the Master field drop-down, adjust the Saturation slider left quite a bit and possibly the Hue slider a little until the blue edging disappears. For the above both Blue (Saturation set to -50 and Hue set to -8) and Cyan (Saturation set to -64).
2. Then Fill the attached adjustment layer mask with black (click on mask and CTRL+Backspace).
3. Click on the black layer mask and use a white brush to paint around the edges at roughly 40% opacity to remove the fringe color. You may have to go over it a couple of times but it will look more natural than setting the brush to 100% and painting over just once. You may need to adjust the opacity of the brush down more so the desaturation is not so noticeable.
Sponge Tool Method: Perhaps the easiest way to get rid of any extra fringe that might still be lurking in the image is to select the Sponge Tool and set it to Mode Desaturate. Turn off Vibrance in the Options Bar since that will only work on the more or less saturated colors and not the already saturated colors which we want to get rid of. Brushed over the fringe areas but try not to discolor too much of the neighboring sky also – it will look white and not the natural blue sky color.
Camera Raw Method: Open image in Lightroom or ACR and go to the Lens Correction Panel Manual Tab in the Chromatic Aberration section, set the Defringe to All Edges and adjust the Red/Cyan slider to the left and Blue/Yellow slider to the right to get the best result. This may take a bit of adjusting to get the right balance and watch out for any color shifts in the sky area around the leaves. There is no way to use a Saturation Adjustment Brush effectively to paint out the fringe as it does not have the choice of colors to remove – it desaturates everything you paint over – and it is hard to just pinpoint the fringe.
Saturation Layer: Digital Lady Syd’s Favorite way to eliminate a slight fringe edge is with a tip I presented a while back in a Tidbits Blog called “Selective Desaturation – the Easy Way!” This is a very simple technique – simply add a New Layer on top of your image and set the blend mode to Saturation, select the Brush Tool, set color to black (white or gray will also work) and 15% opacity in the Options Bar. Paint over the area you want to desaturate several times until you get the look you are after. If too much desaturation occurs, add a layer mask back and use a black brush to paint back any areas that you did not mean to desaturate. I think this gives as good a result as the first method so give it a try if you do not like the results using any of the other methods. I would post the image again but it is very similar to after image above.
Here are four options to try: Bottom line, try it and if you don’t like the results, don’t use it and try something else!
The final thought is a great quote I found from TWCDM’s Blog: “While these tricks are fine and dandy the best way to fix purple fringing to is avoid it in the first place. You can prevent purple fringing by using high quality lenses, stopping down your lens (shooting at an aperature of f8-f22), and if you are using a zoom lens avoid using the maximum and minimum focal range. A lenses “sweet spot” is usually somewhere in the middle focal lengths.” If you shoot it right to begin with you will not have this problem. (That apparently is my problem – hum!)
Hope these tips help you on those bright outdoor daytime images…..Digital Lady Syd


