
Mom and Baby Giraffe Looking for a Snack
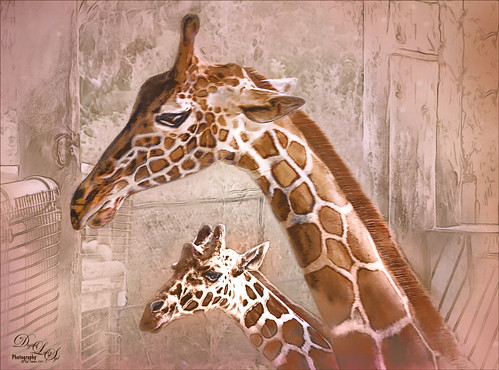
These giraffes are living at the Jacksonville Zoo in Florida. I am a big fan of the sketch effect and this time I added the MixArt – Sketch Photoshop Action to add the sketch effect. (For more info on the action, see my Trying Out the MixArt Action blog.) It is a long action and there are lots of options once it has been run. It is a really nice and inexpensive action which I use quite a bit. Several layers were added on top of the action to give it the look that I like: mainly Topaz (see sidebar for website link) Texture Effects 2 and Nik Viveza 2. Hope you enjoy!…..Digital Lady Syd
Rainbow over Arizona
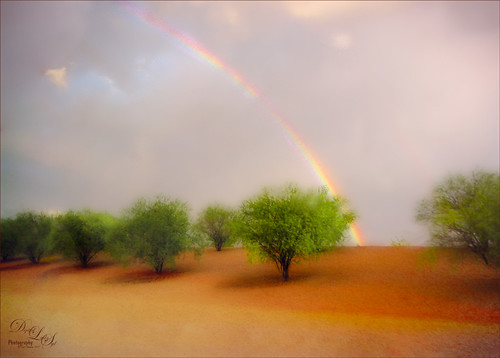
This was a snapshot taken with an old camera several years ago when in Arizona. Just had some fun with it as I loved the way the trees looked and wanted to see if I could get a nice effect with them. Applied Topaz (see sidebar for website link) Impression 2 and used a preset created from watching Jai Johnson’s Topaz Impression Oil Glaze Preset for Noise Removal video – adjusted the Red, Orange and Yellow colors in the plug-in and added a Vignette to it. The preset was not used for noise removal – just liked the effect on the image. Some clean up was done on a layer. On a stamped layer (CTRL+ALT+SHIFT+E) on top, applied Topaz Texture Effects 2 – started a new preset with the Diffusion section (set Diffusion Strength to 1.00, Softness 0.49 and Blur 0.27); Basic Adjustments section to adjust the color in the rainbow with Enabled Mask turned and inverted the mask to just paint back the rainbow; Light Leaks section using the first leak to add a little foreground color; and finally the Masking section using the Brush tab to paint out some of the effect on the foreground tree. On a new stamped layer a little Nik Viveza 2 magic was used to drive the eye to the focal point. That was it!…..Digital Lady Syd
A Surreal New York New York Hotel
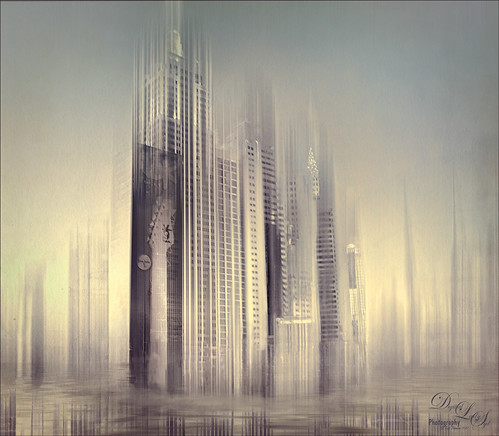
Not sure what possessed me to create this, but it was a lot of fun. This is not really a hard effect to achieve. Just made some basic Lightroom adjustments so my image had nice tones and detail. In Photoshop, added a little Lucis Pro (no longer available) to sharpen it just a little more – could have used Topaz (see sidebar for website link) Detail or Clarity to do this. Had to do quite a bit of clean up since there is there is a roller coaster running in front of the New York New York Hotel in Las Vegas. On a stamped layer (CTRL+ALT+SHIFT+E), added a pretty severe motion blur by going to Filter -> Blur -> Motion Bur and setting the Angle to -90 (vertical effect for this image) and the Distance to 687. Added a duplicate layer of the Lucis Pro layer on top of the blur layer and a Black Layer Mask – the buildings were lightly painted back to give some building effect but still left it really vague. Another stamped layer was used and the now free Nik Silver Efex Pro 2 was opened. Started with a preset and tweaked the sliders to get a pleasing effect. On a duplicate layer, the Flaming Pear Flood filter was added that gave a bit more of an eerie look – the lines in the bottom foreground came by selecting a Glue called spin light – thought it was an interesting effect. On another stamped layer used Topaz Texture Effects 2 using the Crisp Morning Run – did a lot of adjustments and used the Spot Mask a couple times, once on the Texture section and another in the Masking section. Added a Red Channel Luminosity Curve Adjustment Layer. On another stamped layer above used Nik Viveza 2 to add focus to the guitar on the building. Used a Selective Color Adjustment Layer to give that final color look to get the sort of soft abstract effect. This was a lot of fun to try something different……Digital Lady Syd
Magic Kingdom Snow
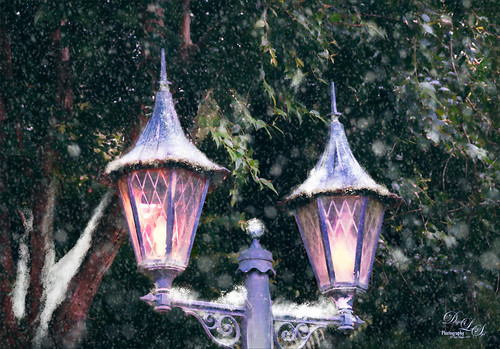
This image is of a pair of lanterns taken at the Magic Kingdom although they look like they are from Hogwarts and the Harry Potter movies. Most processing was done with Lucis Pro (which is no longer available), Topaz (see sidebar for website link) Glow 2 and Nik Viveza 2. Many painting snow layers as shown in my How to Paint in a Snow Storm blog. It is really fun to add snow into images to get a little different look……Digital Lady Syd
The Valentine Trees

Happy Valentines Day! Just had some fun painting my Valentine Trees – started in Corel Painted and ended up in Photoshop. Lots of layers here a few filters – used Topaz (see sidebar for website link) Impression (true – used after painting the image), Topaz ReStyle, Topaz Lens Effects Reflector, and Nik Viveza 2. Lots of layers for the grass and valentines added. Overall lots of fun to do. Have a great day!…..Digital Lady Syd
An Interesting Pink Flower
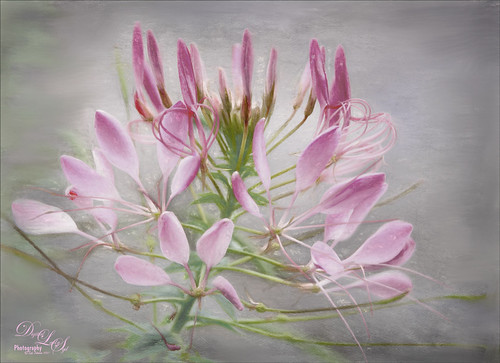
This image is of an interesting pink flower that was growing in the countryside of Belarus. Update: Someone on my Flickr account told me it is a Cleome Flower native to South America. The original image is beautiful, but this time I decided to add some new filter effects to get a totally different look. Lucis Pro (no longer available) was used to sharpen the actual petals, a Mixer brush by David Belliveau of Paintable was used to smooth the background and remove distracting items (this is the best brush for smoothing large areas and it can downloaded at the link), 2 Lil’ Owls’s Color Bokeh Grunge Set Texture 2 (see sidebar for website link) was applied and set to Luminosity blend mode, the free Nik Viveza 2 plug-in was used to adjust the focal point, a darken/lighten layer was applied to dodge and burn some of the edges, and finally Topaz (see sidebar for website link) was applied using the Charcoal I Slight Color preset (only adjusted the Color Magenta, Green and Orange Lightness sliders). On a New Layer did a final clean up with the same Mixer on the background. I really like the different result from the original…..Digital Lady Syd
The Spring in the Desert
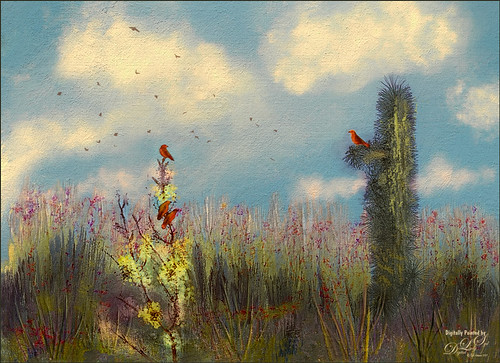
Image of what I imagine the Arizona desert looks like in the Spring after a bit of rain and before the sun gets too hot during the day for flowers to bloom on the plants. Painted the basic layout in Corel Painter and 4 layers for this. The clouds were blocked in and the plants and a few flowers using mainly Karen Bonaker’s brushes. In Photoshop created several different layers to add more plant details. Tried out the new inexpensive Flypaper Bird Brush set in this image – used the bush with the three birds on it, a single bird sitting on the cactus and the birds flying in the background. Grut 50 Photoshop Cloud brushes were used to embellish the sky more. Topaz (see sidebar) ReStyle’s silver and ivory cloak preset was added to adjust out the color a little. Nik Viveza 2 was used to add focal point emphasis. Topaz Lens Effects Graduated Neutral Density filter set to Bottom Quarter 2 stops was applied. On a New Layer above John Derry’s Impasto Smooth Light layer style was applied and with the Fill set to 0, used Grut’s OI Gypsum Slate brush painted over plants. French Kiss (see sidebar for website link) Atelier Canvas texture was added on top. A Hue/Saturation Adjustment Layer was clipped to the texture and Saturation was set to -100. Then on the texture layer, the blend mode was changed to Multiply and the layer opacity was set to 73%. A Levels Adjustment Layer was added on top to bring back the contrast. That was it……Digital Lady Syd
Bamboo Trees
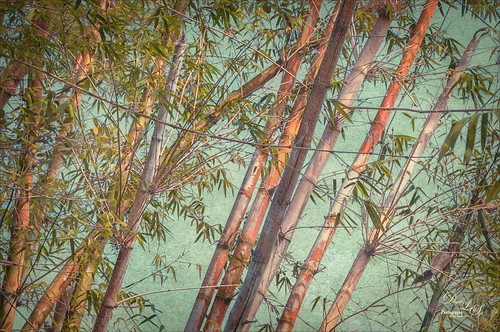
These beautiful trees are part of the Ormond Beach Memorial Art Museum and Gardens here in Florida. The blue sky was a perfect match for the colors in the tree trunks. I really wanted an oriental feel to the image. The first step was working on the RAW file in Lightroom. A free preset obtained from Allen Mowrery called Allen’s Vintage Retro achieved a bit of a sketch feel to the image and really softened the image. In Photoshop Lucis Pro (unfortunately no longer available) was applied using both the Enhance Detail and Smooth Detail sliders on all three channels to get a slight painterly effect in the image. Then Levels, Color Balance, and Selective Color Adjustment Layers were applied. On a stamped layer, Topaz Texture Effects 2 was opened and this is were the bluish texture became more obvious on the background. The texture used is one of the Topaz pinkish textures with darker edges. (Settings used: In Texture Section, selected texture that is a pinkish color with darken edges (in my All, 6th row down and first column), Size 1.00 and Rotation 0 – Keep Aspect Ration; Brightness -0.43, Contrast -0.14, Detail 0.79, Saturation -0.49, Color Strength 0; Opacity 0.33 set to Normal blend mode; and Enabled Masking and set the Color tab to Hue 0.12 and Range 0.09, which blacked out most of the trees and leaves leaving the white sky for the area the texture would be applied. Next Vignette section Strength 0.40, Size 0.70, Transition 0.53, Roundness 0.61, Color Black and center in middle, Opacity 0.90 set to Normal. Basic Adjustments Brightness -0.08, Shadow 0.11, Highlight 0.12, Clarity 0.24, Saturation -0.12, Temp -0.10, Tint 0, Opacity 0.43 set to Soft Light. Overall Opacity set to 0.62 and Luminosity blend mode.) My regular workflow was done next with a Black and White Adjustment Layer set to Luminosity blend mode, Nik Viveza 2 to emphasize the focal point, and a Red Channel Luminosity Curves Adjustment Layer. (Search on my Fun Photoshop Blog for info on these techniques.) The last step involved adding a Layer Style for a little Impasto texture effect on the tree bark. Used John Derry’s Impasto Smooth Light layer style and Grut’s IO (Impasto Oil) Gypsum Slate brush to paint in some of the tree trunks on a New Layer with a Fill set to 0. In areas that still needed a little texture, used the same brush on a New Layer just sampling nearby colors. Grut’s Impasto Oil brushes are great for just adding a bit of texture and depth here and there without going to the trouble of using a layer style. This was a lot of fun to do and I like the oriental color palette which bamboo always reminds of using……Digital Lady Syd


