
The Perfect Plant
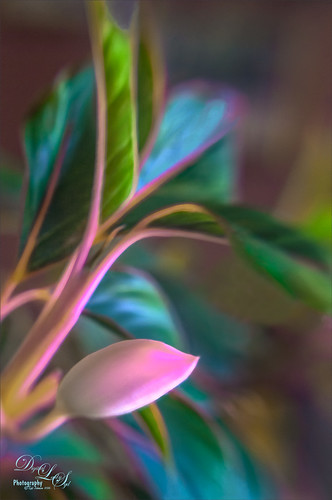
This pretty plant sits on my kitchen table and I am not sure what kind of plant it is, possibly a Sherbert Ti. It creates pod looking objects that open up into leaves. This image was taken with my old Lensbaby Composer and was set to F/4 with the +10 Macro Lens attached. On a duplicate layer in Photoshop, Topaz (see sidebar for website link) DeNoise was opened and the Overall slider was set to 0.10 and Shadows to 0.20 – not much adjustment at all. Topaz Glow 2 was applied on a stamped layer (CTRL+ALT+SHIFT+E) using Blake Rudis’s Glow for Animals Settings preset and set to Color Dodge blend mode. (To download the presets that were for Glow but work fine in Glow 2, click on his Topaz Glow Webinar.) The now free Nik Viveza 2 was opened on a stamped layer and two control points were used – one to sharpen the pod as the main focal point and one to soften the blue in the background leaf. A Luminosity Red Channel Curve Adjustment Layer was added on top. (See my How To Use a Red Channel to Create a Nice Blended Image Effect blog for more info on this.) A little clean up layer and that was about it. Love what this Lensbaby does for a macro effect!…..Digital Lady Syd
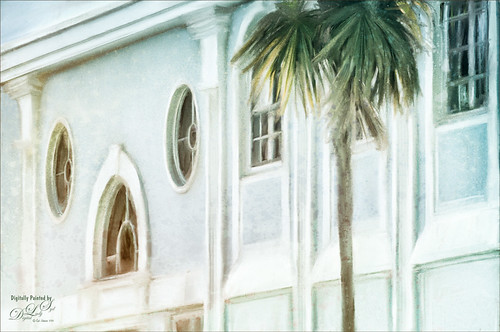
Flagler Museum
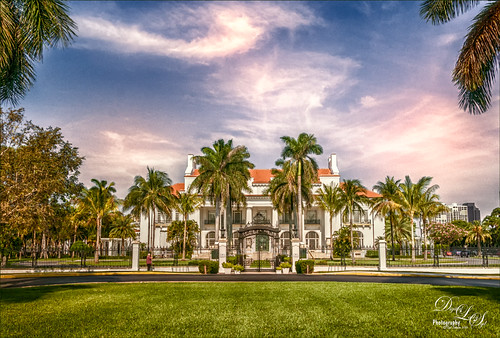
This is the outside of the magnificent Flagler Museum, also called Whitehall, last home of Henry Flagler in Palm Beach, Florida. It is one of the images used in my Fun Photoshop How To Create a Quick Montage blog. This is a great place to take images if you are in the area and has wonderful history! Nik’s free plug-ins HDR Efex Pro 2, Viveza 2, and Color Efex Pro 4 using Midnight filter at 51% and Detail Extractor filter on just the foreground and museum were applied all in one Smart Object. Nik Define was used at default for a little noise removal and that was it. …..Digital Lady Syd
Fantasy Flowers

This image was painted in both Paintstorm Studio and Photoshop. The flowers and part of the background was created using brushes on separate layers in Paintstorm Studio (see my Paintstorm Studio Fun! Fun Photoshop blog for more info on this inexpensive program). Then the PSD file was brought into Photoshop and more tweaking was done. Reflections in the water was made by creating a group of the flowers, duplicating and merging it, and then Free Transforming by dragging straight down. Then the opacity was lowered quite a bit. Used 2 Lil Owls (see sidebar for website link) After the Rain 41 texture set to 23% layer opacity and with a blue to white to blue Gradient Adjustment Layer on top. Used a painting layer to added some plant effects on the water and Obsidian Dawn’s Bird Grouping 2 was placed on top. The birds were selected using the Color Range Command and setting to Shadows – then applied the layer mask to get just the birds in the image. Next a Pattern Gradient Adjustment Layer and a Solid Color Adjustment Layer were clipped (ALT+Click between the layers) to give the birds the color. On a stamped layer (CTRL+ALT+SHIFT+E) Topaz (see sidebar for website link) Lens Effects was opened and the Diffusion filter applied. Back in PS, a black layer mask was added (ALT+click on layer mask icon at bottom of Layer Panel) and just the reflections were painted back – this is where I wanted a softer look. On another stamped layer Nik Viveza 2 was applied to drive the eye more to the focal point, the purple flowers. On a couple of new layers a little cross hatching was painted in the corners and some clean up on some of the flowers that were too bright. A splatter layer was created around the flowers – I just like the effect! The last step was to add a Curves Adjustment Layer. Just lots of fun to create!…..Digital Lady Syd
Screaming On the Coaster!

This image definitely represents that so recognizable Lucis Pro look. Loved all the expressions on the riders – the older group on the top row and youngsters having a blast below! This was taken a few years ago of the Manta Roller Coaster at SeaWorld, Orlando, Florida – short video of actual ride. Lots of filters here – Topaz (see sidebar for website link) Adjust on just the sky edge, Topaz Clarity on the people, Lucis Pro 6.0.9 for overall sharpness, Topaz Detail for a final sharpening, and the now free Nik Viveza 2 to reinforce the focal point. Lots of fun here!…..Digital Lady Syd
The Dressing Table
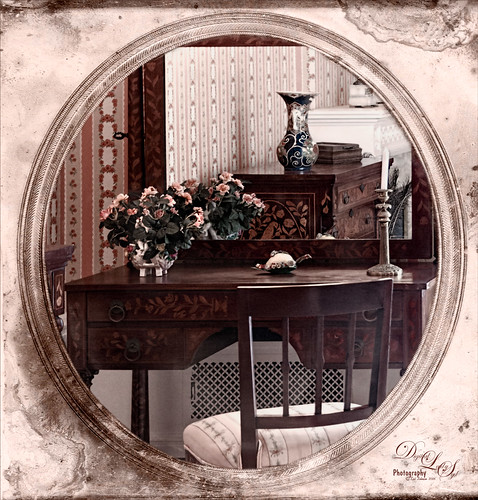
This is an image of a dressing table in one of several bedrooms at the Flagler Museum (Whitehall) in Palm Beach Florida. I really loved the effect of the furniture in the mirror – real vintage flavor here! Basically this image used several filters to get this result. Started with Lucis Pro 6.0.1 (AOIC 0/100; Red 207, Green 207, and Blue 79) (See my Fun Photoshop Digital Lady Syd Reviews Lucis Pro 6.0.9 (Now Affordable!) blog.); Topaz Detail 3 to sharpen it up a bit; the now free Nik Color Efex Pro 4 using Film Efex Vintage Film Type 11, Pro Contrast, and Midnight using Color Set Neutral and overall opacity at 64%. Darken and Lighten Curves Adjustment Layers were added. (See my Fun Photoshop How To use Curves Adjustment Layers to Dodge and Burn an Image blog.) Then on top a Vintage Film was used for the old frame opening. A Pattern Adjustment Layer was clipped to the frame (ALT+click between layers) and set to Color blend mode and a Solid Color Fill Adjustment Layer set to a brown tone was also clipped. Last step was to add a Luminosity Curves Adjustment Layer. (See my Fun Photoshop How To use a Red Channel to Create a Nice Blended Image Effect blog.) That was it – it was a lot of fun to do!…..Digital Lady Syd
Spotlight on the Canna Lily
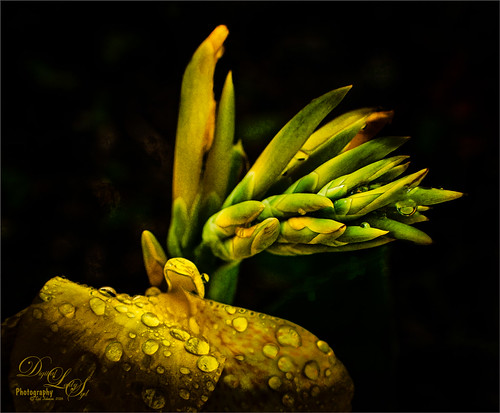
This is a macro image of a Canna Lily in my front yard taken after a recent rain. It was taken at F/2.8 with my Nikon 60 mm Macro Lens with a Bower 0.5 x High Resolution Digital Lens with Macro added to the lens.In Photoshop Topaz (see sidebar for website link) Simplify using BuzSim preset, the currently free JixiPix Spectral Art Dark Lines preset, and free Nik Viveza 2 to drive the focal point home. Last step was to add my free Cat Painting Canvas set to Overlay blend mode on top. That was it. Really simple image but I love the water drops!…..Digital Lady Syd
My, What Big Eyes You Have!
This image was taken from my car – I just loved the color of the building. Who knew it actually looks like a bird face in the windows. I actually thought it would make a nice image to paint, so I did. This time it was painted in Photoshop using Lori Jill’s class called Turn Your Photos Into Paintings Using Photoshop, which uses Photoshop’s default action called Mixer Brush Cloning Paint Setup and her brushes. Lori is the only person I know teaching how to really use this action effectively. For finishing steps, 2 Lil’ Owls (see sidebar for website link) After the Rain texture was applied and Topaz Lens Effects (see sidebar for website link) Gold Reflector filters was added. It was a lot of fun to paint again……Digital Lady Syd
Fountain Grass
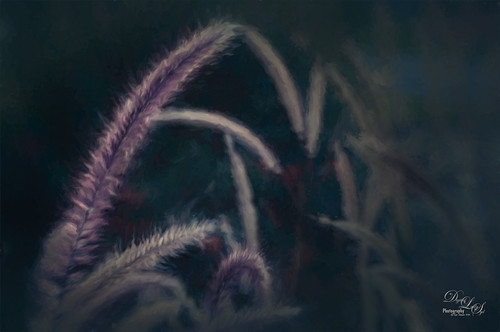
This image is of Hameln Fountain Grass that is growing in my front yard around my, of all things, dolphin fountain! This image was taken with my older Lensbaby Composer at F/4. Kim Klassen’s free Truegrit Lightroom preset was applied before bringing image into Photoshop. The Background was duplicated and Topaz (see sidebar for website link) Impression 2’s Cezanne II preset was applied as is. A layer mask was added and parts of the grass were lightly painted back to bring in some detail on the stalks. On a stamped layer, the now free Nik Color Efex Pro 4 was opened and three filters were stacked. First the Darken/Lighten Center filter, Monday Morning filter set to Color Set Neutral and overall opacity at 53%, and the Vignette Filter and sampling a darker color in the image to blend nicely. The last step involved adding a Black and White Adjustment Layer set to Luminosity to bring out the colors just right. I really like how Impression 2 is worked so well with this image!…..Digital Lady Syd
Ghostly Dandelion
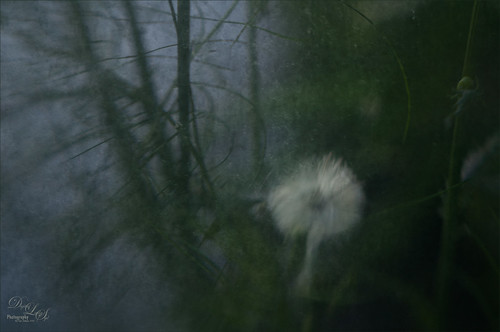
This is another in a series of Dandelion images I took of this humongous weed growing by my front door???? This time my old Lensbaby Composer was set it to F/4 with the +10 Macro Lens attached. In Photoshop all that was done was to add two free rust textures which can give an almost wintry feel to an image when the blend mode is changed. The first was called Texturez Rust Texture 3559 and set using Soft Light blend mode at 28% layer opacity – then a Hue Saturation Adjustment Layer was clipped to the texture (ALT+click between the layers to clip) and the Saturation slider was set to -100 to remove all the color of the texture, just leaving the pattern. A layer mask was added to the texture layer and just the Dandelion was painted out so it was no texture covered it. Next another texture called Hrt Rust Metal 7 was added on top and set to Hard Light at 31% layer opacity. Another Hue/Saturation Adjustment Layer was clipped to it and the Saturation slider was also set to -100. A Layer Mask was also set on this texture layer. The last step was to use the now free Nik Viveza 2 plug-in to further drive the focal point to the dandelion. The flower was brightened and structure increased while the corners of the image were slightly darkened to give a gentle vignette effect and drive the eye to the dandelion. That was it. I really like the moody feel to the image…..Digital Lady Syd


