
A Little Dreamy Auto FX
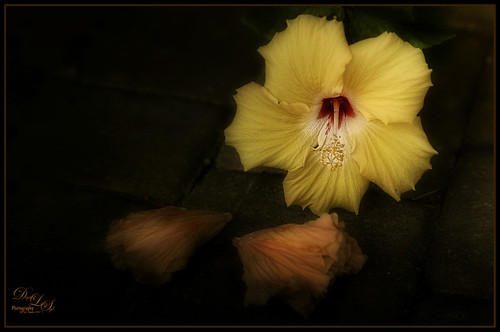
This simple yellow hibiscus flower image was taken on my back porch. When opened in Auto FX Software’s Free Sampler, I got a very nice sort of dreamy effect. (These were the settings used in the plug-in: First Layer – Mystical Tint Tone and Color – Soften Details – Used paintbrush and painted paver bkgd lines using Size 66, Opacity 70, Feather 100, and these Soften Details – Mode Brush On, Opacity 40, Vibrancy 20, Softness 20, Saturation -42, Brightness -18, and Contrast 0. Second Layer – Mystical Tint Tone and Color – Lighten and Sharpen – Used Mode Brush On and painted in center of yellow hibiscus to sharpen the stamen and red color using Size 65, Opacity 62, and Feather 69, and Lighten & Sharpen Opacity 84, Lighten 60, Tonal Range 84, Fuzziness 5 and Sharpen Details 76. Third Layer – Mystical Tint Tone and Color – Vitality Mode Global using these settings: Midtone Softness 71, MidTone Strength 40, Highlight Softness 52, Highlight Strength 17, Saturation 30, Brightness -1, and Contrast 20. Was able to brush on center to make white stand out more using Brush Palette Size 200, Opacity 97, and Feather 100. Fourth Layer – Dreamy Photo – Ghost Type Soft, Blur 10, Blend 70, Ghosting 2, Tint Color 25 (r229/g186/b160), Soften Mask 5, and Zoom offset 0.) Then Nik Viveza 2 was opened and four control points were used to get the correct brightness in each of the objects. Last step was added my free B&W Border Frame layer style – sampled the peach color for the Inner Glow color. Overall I think the image turned out to be very pretty!…..Digital Lady Syd
Painting a Painter
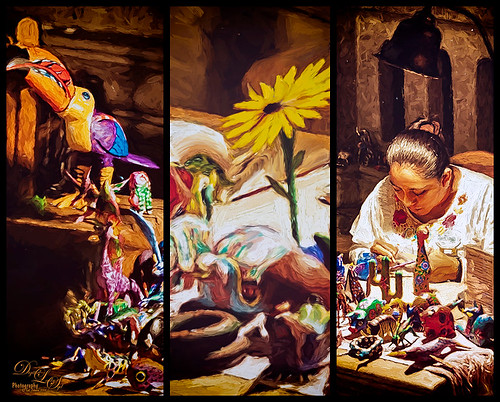 This wonderful lady was diligently painting away on the gorgeous wooden figures in her display at the Mexico Pavilion in The World Showcase at Epcot, Disney World Orlando. Seim’s (see sidebar for website link) Magic Ugly Shade Fixer was used in Lightroom on the image and set to 46% opacity by using The Fader Lightroom add on. (Can download for free to use on the packaged Lightroom presets, and for a $25 registration fee it will work on all presets – I find it very handy at times.) Then in Photoshop Topaz (see sidebar for website link) Detail 3 was applied only adjusting the medium and large details a little bit (Detail Overall Medium Details 0.38 and Large Details 0.16 and Tone Contrast 0.30 and Shadows -0.01). The new Topaz Impression plug-in was opened and the Oil Painting II preset was applied with no changes. Then because I can, Nik’s Analog Pro 2 plug-in was opened and Detail Adjustments, Light Leaks, Film Type and Multilens were applied. Just thought the Multilens was interesting for a change. A Color Balance Adjustment Layer was added and a 2 Lil’ Owls Studio (see sidebar for website link) texture Confetti 13 was added and set to Color blend mode at 32% layer opacity – just needed to counteract the overwhelming yellow tones naturally. Some Mixer Brush clean up was done on a New Layer using my Chalk Brush as a mixer. And that was it. Not really that difficult – I liked the Oil Painting II preset from Impression. By just painting over some of the rough edges with a Mixer, I got the look I wanted. Anyway, it was fun to do!…..Digital Lady Syd
New Impression of Octopus and Seahorse
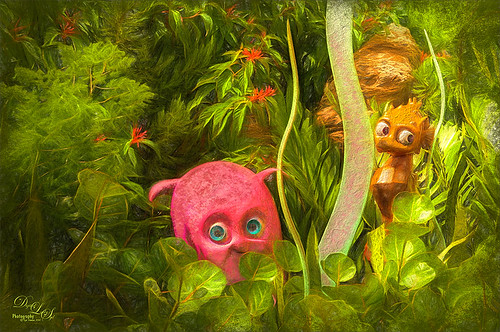
These cute octopus and seahorse were located at the The Seas with Nemo and Friends Pavilion in Epcot, Disney World Orlando. Been having fun trying out Topaz (see sidebar for website link) Impression so thought I would try the plug-in out on a different type of image. This turned out to be a lot of fun to do! In Lightroom Seim’s (see sidebar for website link) Power Workflow 4 Harsh Sun Fixer and Tint Golden Sepia presets were applied, then one by CV Delnea called Backlit Horizontal Right. In Photoshop a New Layer was added and some clean up was done. On a stamped layer (CTRL+ALT+SHIFT+E) Topaz Detail 3 was opened to apply just a little sharpening to the medium and large size details. A New Stamped Layer was created on top and duplicated (CTRL+J). The bottom new stamped layer was highlighted and Topaz Impression was opened. The Cave Dweller II preset was applied with no changes. On the top stamped layer, my SJ Colored Pencil preset was applied. (What’s in my SJ Colored Pencil preset? It was based on the Colored Pencil II preset and these are my settings: Stroke: Type 07, Brush Size 0.90, Paint Volume 0.77, Paint Opacity 0.20, Stroke Width -0.82, Stroke Length -0.25, Spill 0.26, Smudge 0.16, and Coverage 1.00; Color: Overall Saturation 0.37, Red Hue 0.70, Red Saturation 0.32, and Red Lightness 0.00 – this turns the reds cyan and gives the preset an ugly color so don’t change these sliders if it is not a look you need; Lighting Brightness 0.21, Contrast -0.40, and Light Direction x1.00 y1.00; and Texture: Strength 0.33 Size 0.00, Texture Paper I, and Background color white. For this image these changes were made my preset: only Color Section changes to Red sliders all set back to 0; Orange Saturation to 0.27; and Aqua Hue -0.37.) A layer mask was added to this layer and areas I wanted showing from the layer below were painted in with a soft round black brush set to 30% brush opacity (mainly the eyes and the seahorse needed some additional definition and extra texture to the leg in the air). Three New Layers were added above. With my regular chalk brush (Photoshop’s Chalk 60 with Shape Dynamics Angle Jitter at 19%), the octopus body was clean up with a pink color. Then on the next layer the same brush as a Mixer to add some color to the octopus head. (These settings were used in the Mixer to get the effect shown on the octopus head – in the Brush Panel the Scatter section was turned on and Scatter set to 133%, check both axis, and Count 1; Texture turned on and a Canvas texture set to 160% and inverted with Mode set to Color Burn, Depth 100 and Jitter Depth 59%; and Wet Edges turned on.) and on top layer painted in some color to the octopus leg in the air and reduced the layer opacity to 61%. A Sponged Edge border from French Kiss (see sidebar for website link) with a green Solid Color Adjustment Layer clipped to it (ALT+click between the layers) and a Curves Adjustment Layer were added. That was it and I really liked the results. I especially liked the way the background greenery came out. Give this plug-in a try if you have a minute……Digital Lady Syd
Digital Lady Syd Related Blogs:
Digital Lady Syd Speaks Out on Topaz Impression
Checking Out the Feathers
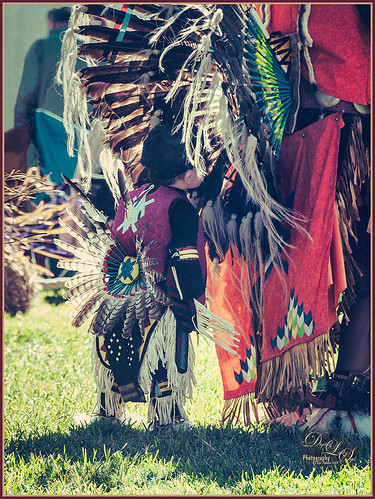
I am apparently going through a vintage feel period. Loved this little boy at the Native American Festival held in Ormond Beach, Florida, each year. He was extremely intrigued by the feathers in the beautiful costume the older man was wearing. Totally loved this shot! Not much to the post-processing in this image – in Lightroom applied Seim’s (see sidebar for website link) Magic Ugly Shade Fixer and Dave Delnea’s C+V Washed Vintage 001 preset. In Photoshop ran the Shake Reduction filter. Then Topaz (see sidebar for website link) DeNoise 5 due to the added artifacts from the Shake Reduction filter – set Overall to 0.31. A black layer mask was added to the layer (hold the ALT button while clicking on the Layer Mask icon at the bottom of the Layers Panel) and just painted back his face, hat and sleeve areas as I liked the grainy feel in the rest of the image. Added a Curves Adjustment Layer to add some contrast to the image. Nik’s Viveza 2 was opened and a control point was added to his face to lighten and direct attention to that area. Back in Photoshop a New Layer was added and some clean up was done. A Selective Color Adjustment Layer was added and some of the bright orange in the background was softened so it was not so distracting. Filled the layer mask black by CTRL+I in the mask to invert it and painted back just the distracting areas to soften. Created a Stamped layer on top (CTRL+ALT+SHIFT+E) and my free SJ Mid Size Double Edge Frame was applied using colors from the image. Lots of fun just to play with an image!…..Digital Lady Syd
Universal Family Fun!
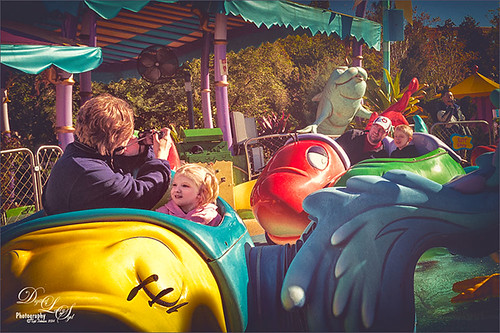
Just a quick fun picture taken at Universal Studios, Orlando, Florida, earlier this year. This is the Caro-Seuss-el ride, similar to the Flying Elephants at the Magic Kingdom. Added Seim’s (see sidebar for website link) Crosslight Warm preset in Lightroom. In Photoshop rand the Shake Reduction filter – seem to work really well on hand-held images. Next the Mixer Brush was used to remove the heavy shading on the children’s faces. Since I felt like doing a vintage image, ran Nik’s Analog Efex Pro 2 filter using a preset I created called Flat Vintage Look – used Basic Adjustments and two control points were placed on the kids; Light Leaks using the Soft leak 1st column and 2nd row – gave a really bleached out look coming from the right so the Strength was set way down to 28%; Lens Vignette – just a little setting Amount t0 -53% to slightly darken down the corners; Film Type Warm Nikko 2 set to a Strength of 24% and no grand (set to 470); and Levels and Curves adding some Luminosity and blue tones. Little more clean up on the faces and a Curves Adjustment Layer. Last step was Nik’s Viveza 2 with control points on the children’s faces to draw attention, especially to the little girl. That was it! ….. Digital Lady Syd
A Quiet Evening At the Marina
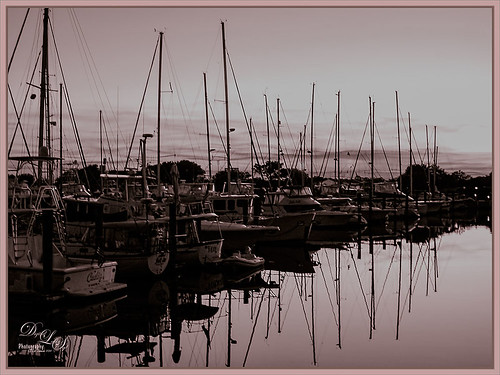
This is a beautiful image of the boats in Camanchee Cove in St. Augustine, Florida, at sunset. In Lightroom I applied David duChemin’s B-W Kathmandu Neutral preset, and then adjusted the HSL tweaking and some slight Split Toning to get this look. Opened in Photoshop and Topaz (see sidebar for website link) Detail 3 was applied using my Small Medium Large Detail preset (Medium Details 0.38, Large Details 0.16, and Contrast 0.30), and then in a layer mask the sky was painted out so that the clouds did not look too crisp. On a New Layer there were a few highlight areas that needed to be painted over. A Levels Adjustment Layer was added on top and set the Output Levels to 0 and 165 – first time I have ever moved the white tab left on this slider, but it just slightly darkened down the image the way I wanted it to look. A stamped layer was created (CTRL+ALT+SHIFT+E) and SJ B&W Border Frame from my free Double Edge Frames Photoshop Layer Style was added with colors sampled from the image. Hope you enjoy the photo!…..Digital Lady Syd
There’s a Leopard on the Floor!

Just having fun here. Took this image of a Snow Leopard Rug at the Native American Festival in Ormond Beach, Florida. No, I do not believe it was a real snow leopard skin, but it caught my eye so I snapped a shot. In Lightroom just used Seim’s (see sidebar for website link) Power Workflow 4 Super Hero X WhiBal and Tint 82A Cooling presets. Next in Photoshop I applied the Shake Reduction filter – seem to be getting good results with this. On a duplicate layer, the image was opened up in Topaz (see sidebar for website link) Black & White Effects and a preset I had created a while back was applied (settings for my SJ Sky and Green Preset are: Conversion section Basic Exposure Contrast 0.02, Brightness 0.02, Boost Blacks 0.71 and Boost Whites 0.25; Adaptive Exposure 0.62, Regions 34, Protect Highlights and Shadows 0.01, Detail 2.47, Detail Boost 1.04, and check Process Details Independently; Creative Effects Diffusion Softness 0.17, Diffusion 0.69, and Diffusion Transition 0.50; Local Adjustments Detail Brush (Brush Size 110, Opacity 0.45, Hardness 0.01 and Edge Aware 1.00) and painted over eyes and some of the facial features in the face; with Burn brush painted in (using a small Brush Size 10, Opacity 0.23, Hardness 0, and Edge Aware 1.00) some of the hairs around the face and up to the ear; and using the Color Brush with the same settings painted in the eyes and a bit of the nose; Finishing Touches Silver and Paper Tone set to Tonal Strength 0.19, Balance 0, Silver Hue 42.58, Silver Tone Strength 0.46, Paper Hue 46.48, and Paper Tone Strength 0.48; Quad Tone Color 1 Region (black) set to 0.00, Color 2 Region (R3/G36/B22) set to 67.18, Color 3 Region (R214/G223/B238) set to 146.6, and Color 4 Region Set (white) set to 255.0; Vignette Center – had to center on the right eye since clicking on the image in a whitish area left a noticeable white blog – think it is a glitch in the plug-in, Vignette Strength -0.25, Vignette Size 0.01, Vignette Transition 0.17, and Vignette Curvature 0.50; and Transparency slider set to 0.89). On a New Layer some clean up was done to remove distracting objects. On a stamped layer on top (CTRL+ALT+SHIFT+E), Nik Analog Efex Pro 2 was applied (settings for my preset SJ Blown Out Beach: Basic Adjustment Detail Extractor 18%, Brightness -10%, Contrast 13%, and Saturation 0%; Light Leaks Strength 13% and Soft First leak upper left with control point placed in upper right to darken down the corner showing Texture Strength set to 68%; Lens Vignette Amount 36%, Circle under ct in Rectangle, and Size 72% with the vignette set over the left eye; and Levels & Curves Opacity set to 70% and just bumping up the end of right bottom curve to 0/2 in the RGB curve, and dragged down the curve in the middle of the Luminosity slider to pop the picture a little). Nik Viveza 2 was added on another stamped layer and 6 control points were added – each corner was darkened down a little and softened by moving the Structure slider to the negative side, and a control point was placed on his face to brighten it up to draw the eye. Back in Photoshop a New Layer was created and just the eyes and nose were sharpened. On a final stamped layer my free SJ Thin Double Edge Frame layer style was added and colors sampled from the image. That was all that was done – just basically followed my Plug-in Workflow (see Digital Lady Syd’s Plug-in Workflow)…..Digital Lady Syd
Fall Is In the Sky!
This is an oldie-but-goodie created in 2011 but I like the fall colors. Since I am into so much painting, this one was done with 11 layers using different brushes, one free texture, Shadowhouse Creations Oil Painting 5, one of my favorite textures, set to Overlay at 59% layer opacity just below a Nik Color Efex Pro Graduated Neutral Filter layer (don’t have settings – before I was saving that info). First a new document was created at 8 inches x 10 inches at 240 pp. Here are all the free brushes (thanks to the wonderful Deviant Art artists) used in this image, each on a different layer. On New Layer it looks like a large soft round brush was used to created the strong orange and reddish effect for the background just painting over the image at a lower opacity and building up a little. Glitter & Lines by Madeliniz gr set to 31% layer opacity; Glitter & Lines by Mandeliniz-g1 warped – brown lines; Texturemate swirls 35 png – green circles; grunge brushes by lydia -bright yellow on lower left; Another layer of grunge brushes by lydia – pink splotch lower right and set to 62% layer opacity; yet another layer of grunge brushes by lydia – blue object; Dollfie-Chan snowflake; Arsgrafik Snowflake Brushes 364 snowflake lower right yellow; another of the same brush that used pink and the Color Replacement Tool to add the color; Space by JaneDoeStock Space#2 – upper white galaxy spiral; and Space #4 – lower orange comet. Looks like a little white grunge was spread around to look outer spacey but not sure what brush. These type of images are so much fun to create. Give it a try if you get bored and want a change!…..Digital Lady Syd
Squirrel Resident at Universal Studios

This was probably not the greatest image but I loved the way the squirrel’s tail looked so I had to do some processing on this photo. This shot was actually taken once again at Universal Studios Orlando. I wanted a painterly look, but I did not want to spend a lot of time painting it since it was not the best original image. Trey Radcliff‘s Gradient Endless Weekend Lightroom preset was applied. The photo was opened in Photoshop CC and the Shake Reduction Filter was used. Next Topaz (see sidebar for website link) Detail 3 was used to overall sharpen the image. A black layer mask was added and just the squirrel and the closer plants were painted back. A stamped layer (CTRL+ALT+SHIFT+E) was created and turned into a Smart Object where Alien Skin’s Snap Art 4 was opened. I used a preset I had created in Snap Art 3 based on the Historic Oil Paint preset (settings were Background – Brush Size 14, Photorealism 23, Paint Thickness 77, Stroke Length 63, Color Variation 0, and Bristle Brush Brush Style; Detail Masking – on Squirrel, Effect Detail, Brush Size -10, Photorealism 100, Paint Thickness -40, Stroke Length -49, Color Variation 36 and Brush Style Bristle Brush; and on mid-back leaves, Effect Detail Brush Size 23, Photorealism -59, Paint Thickness 73, Stroke Length 79, Color Variation 85, and Brush Style Bristle Brush; and Colors Brightness -38, Contrast -14, Saturation 33, and Temperature 36; Lighting – Default; and no other settings used). Using Photoshop’s Flat Fan Single Bristle Wet Edge brush as a Mixer, the overly bright spots were blended in on a separate layer. Next Topaz ReStyle Rustic Red and Orange preset was used (the settings used are ReStyle Color Style Lum Third -0.48 and Fifth -0.39; Texture Strength 1.00; Basic Tone Black Level 0.11, Midtones -0.31, and White Level 0.30; and Detail Structure 0.11 and Sharpness 0.73). This turned the image color palette into a bit warmer feel. Nik Viveza 2 was added to add a little more tonality to just the squirrel and add some blue into the sky. The last step was to use Photoshop’s Radial Filter in Camera Raw on just the squirre to draw further attention to him. It was a lot of steps but always fun to do……Digital Lady Syd


