
Happy New Year!

Happy New Year! Hope you all have some New Year’s Resolutions for next year, or at least one like me. I do not do well with this sort of thing so I try to keep myself focused on maybe just one or two goals for each year. This year my major digital goal is to learn Corel Painter better and try to understand the program so I can pop in and out of it like I do Photoshop. Above is just a little image I created in Corel Painter and Photoshop wishing you the best of times for the coming year. It was a lot of fun to create. The path, trees, and much of the snow were all painted in Painter using several of Karen Bonaker’s various snow brushes and David Gel’s Snow Time 2009 brushes (both of them have all kinds of fabulous free brushes). Then I popped into Photoshop and created layers for each of the following image elements. The cabin, foreground trees, deer and moose were all from my favorite Shadowhouse Creations Rural Objects and Tree Brush Set 2 – I use them all the time! Kim Klassen‘s Let Go texture was set to Darker Color to get a more textured and nicer color of green for the background color. Also my free SJ Snow 2 Overlay slight blur was added at 86% layer opacity. The font is Tramyad. Once again, I hope you all have a great New Year!…..Digital Lady Syd
Wintry Dahlia

Loved how this beautiful white dahlia bloom came out – and once again it used two of my favorite Photoshop plug-ins. First applied Trey Radcliff’s Yesterepoch preset to flower in Lightroom. In Photoshop sharpened up the image using Topaz (see sidebar for website link) Detail 3 using these settings: Detail Panel: Highlight – Small Details 0.42, Small Details Boost 0.45, Medium Details 0.54, Medium Details Boost 0.40, Large Details 0.48, and Large Details Boost 0.44. Back in Photoshop filled a layer mask with black and painted back just the edges of the flower that I wanted emphasized – this kept the petals in back less in focus. Added one of my textures that I made in Corel Painter with a layer mask so the flower did not have texture applied, and set the layer to 32% layer opacity. Next opened Nik’s Analog Efex Pro plug-in and used a preset I created called Very Basic Set up. It contains just the Basic Adjustments panel (Detail Extraction 30%, Brightness 35%, Contrast 25% and Saturation -30%), Bokeh filter (Blur Strength 24%, Boost Highlights 94%, and centered on middle of flower), and Lens Vignette filter (Amount -33%, slider set under R in Rectangle, Size 77%, and also centered on flower middle). Back in Photoshop added a Levels Adjustment Layer to give just a little more contrast. I really liked the soft textured feel to the flower…..Digital Lady Syd
Snowmen Passing Through!

I guess I just like to make holiday cards – they are so much fun to do. These three snowmen are one of my favorite holiday brushes from Christmas Brushes by Flina. I actually painted the background in Corel Painter using various Karen Bonaker brushes (her Painter brushes are some of the best and she gives many away) – just playing around and it turned out nice and wintry. In Photoshop Painted Textures Thanksgiving Winter Marsh texture was added and set to Linear Light at 55% layer opacity. My free SJ Holiday Greeting PNG Overlay was used for the greetings and set to a darkish turquoise color. The snowmen were added and then on a layer underneath, I painted in the color. On separate layers footsteps were created and snow was stacked. The lights on the tree were from Dirt2 Fantasy Light brushes. My SJ Snow2 Overlay slight blur (in with Overlay set above) was added and set to 30% opacity. This is way too much fun! Happy Holidays!…..Digital Lady Syd
Christmas Flowers!
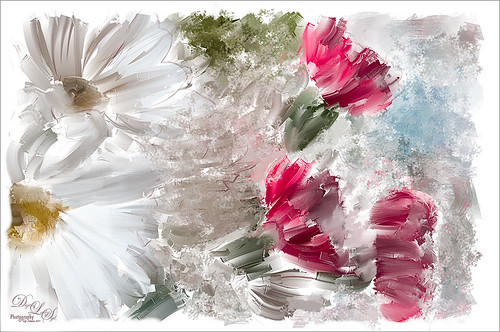
Recently I set a goal to learn how to use Corel Painter. These Christmas flowers were a perfect choice for me to practice some of my newly developing skills. I love the colors that the brushes created although I am not sure exactly which brushes I used, but several blending brushes were used. I have learned to keep a custom panel of my favorite brushes set up so I do not have to keep searching for them. (Not unlike setting up your own panels in Photoshop.) After I finished painting it, I wanted to show a few outlines for emphasizing certain area. The original image into Topaz (see sidebar for website link) Simplify and a sketch with black lines on a white background was created. Back in Photoshop, the white was removed using Color Range, and then the layer was moved into the Painter image. A layer mask was added and lines I did not like were removed and the layer was set to 51% opacity. A dark brown Solid Color Fill Adjustment Layer was clipped (ALT+click between the layers) to the lines layer. A Hue/Sat Adjustment Layer was added to make the flowers the perfect color of red. Some localized contrast was added by selecting a Curves Adjustment Layer and filling the layer mask with black. Just the areas where I wanted contrast was painted back, which was mainly the red flowers. I love the way Painter and Photoshop work together! Hope everyone is having a wonderful Holiday Season!…..Digital Lady Syd
Some Floral Holiday Cheer!

Happy Holidays to everyone! Had to post my beautiful gerberas that look so Christmasy (is that a word?). This was so easy to do. Started with my flowers in Lightroom – just the basic slider changes were done. In Photoshop the first step was to add Isabelle Lafrance‘s Fairytale Winter 2 overlay (apparently this overlay is no longer available which is a shame since it is so pretty) – she makes some of the best overlays available. A layer mask was added and the flowers were gently painted back. A stamped layer (CTRL+ALT+SHIFT+E) was created on top and desaturated (CTRL+SHIFT+U). To sharpen the image the layer was changed to Overlay blend mode and the Filter -> Other -> High Pass was opened using a setting of 7, just until I started seeing a little crispness without haloing. Now the Aaron Nace trick is to add a black layer mask and just paint back where the sharpening should be applied – just the parts of the flowers closest to the viewer. On a new layer Kim Klassen’s free Mini Sampler Holiday Brush holiday 10 was applied – I love everything Kim creates – textures, brushes, videos. I added my own text layer using the Bambino font. Then I remember I had been playing around in Corel Painter and created this little fur tree that looks like it was blowing in the wind on a white canvas. Therefore I added to my image and set it to Linear Burn blend mode at 61% – loved the final look. I am still loving Painter! Hope you have a wonderful Holiday Season!…..Digital Lady Syd
Digital Lady Syd Related Blogs:
Trying Out Some Aaron Nace Techniques
A Secret Garden
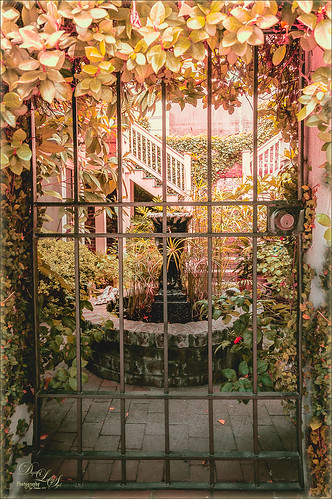
This was one of my favorite images from Savannah, Georgia, when visiting last month. Not a lot was done to this image although the Puppet Warp command had to be used to straighten out the walls due to the lens distortion. Also Topaz (see sidebar for website link) ReStyle was applied to get the pretty soft light effect – the settings were from a Test Preset when I first got the program so I am not sure where I started. Finished up with a little Nik Viveza 2 to direct the eye to the stairs. This image uses some of my favorite colors……Digital Lady Syd
Just Painting!
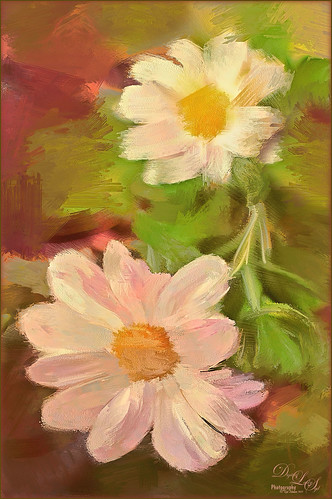
This is one of my first recent major efforts using Corel Painter – I am still trying to understand this program. Basically I painted this image using a brush I created after listening to Melissa Gallo‘s video on the Corel Painter website – her video is Reason #2 – Cloning Feature. Since Melissa is absolutely one of my favorite texture people, I was totally absorbed with what she did. This image of my miniature mums is pretty basic, but I thought it turned out nice. I created the Luscious Oil Paint brush she used and find I am it a lot on other images. Then I took the image back into Photoshop where I added Topaz (see sidebar for website link) ReStyle to really get a pop in the colors. (Here are the settings if you are interested: Sandy Butterflies preset. ReStyle Opacity 55%; Color Style Hue Fifth 0.13; Sat Primary 0.50, Secondary -0.37, Third 0.38, and Fourth 0.78; and Lum Primary 1.00, Secondary 0.30, Third -0.25, and Fifth -0.30; Texture Strength -0.66; Basic Opacity 55%; Color Temperature 0.19, Tint 0.17, and Sat 0.02; Tone Black Level 0.53, Midtones 0.14, and White Level -0.16; and Details Structure 0.25 and Sharpness 0.36.) A little clean up and a Layers Adjustment Layer was done and that was it. Painter really is a lot of fun!…..Digital Lady Syd
Digital Lady Syd Related Blogs:
Topaz ReStyle with Corel Painter and Nik Analog Efex Pro
Surprising Results with Nik Analog Efex Pro

I really love how the light was playing through these beautiful huge philodendron leaves – bright sunlight was shining on them near a pond at the Ormond Memorial Art Museum and Gardens in Ormond Beach, Florida. By applying Nik’s new Analog Efex Pro Photoshop plug-in to the image, I was able to make the background slightly blurred while maintaining the striking light on the leaves. I really like this plug-in as it can be used without getting too much of that vintage effect on the image but yet you can still use some of the tools that can really localize an effect in an image. I think what really added to the image is that there are some unusual patterns in the leaves the misty water effect is interesting. Anyway, turned out to be a surprise which is what is so much fun about Photoshop and all the plug-ins available for it!…..Digital Lady Syd
Rural Church in Belarus

Just another pretty picture of a church in the Belarusian countryside. I wish we had stopped so I could set up the picture, but the trees are so pretty it does not seem to matter that the church is partially hidden from view. Once again in Lightroom I started with a Trey Radcliff preset – this time I used . In Photoshop Nik’s Analog Efex Pro was applied – it really lightened up the image. Therefore a Curves Adjustment Layer was added above the plug-in layer to add back just a little bit more contrast. That was it! I really like what the Nik plug-in does on images – it takes a while to work with the settings, but once you figure them out, it can add interesting and beautiful effects…..Digital Lady Syd


