Valentine Mandala
Today I found this really cute element that I decided might make a nice mandala. I painted it will some colors, took it into Topaz (see sidebar for website link) Studio 2 and applied the Broken Bits Look. Then just followed the instructions that Leslie Nicole, of French Kiss textures fame, gave in her How to Create a 4 Way Mandala in Photoshop video she did for Design Cuts recently. This is a very simple process to follow. I actually flipped the design 45 degrees 4 times! Then painted in the hearts, add some heart background with a brush, some text, and two of my own textures underneath. For more examples, check out my Happy Valentines Day Fun Photoshop blog. Have a great day!…..Digital Lady Syd
Looking for his Valentine
My Valentine Jaguar buddy from the Jacksonville Zoo was caught looking into what looked like a little window is all dressed up in his holiday pajamas. I thought this image would make a nice Valentine’s Day card so that is what I did. He was actually turned into a sketch using a tutorial called 5 Easy Steps to Create a Realistic Little Drawing from a Photo in Photoshop by Jesus Ramirez. Just followed the steps and painted in some heart shapes on the rocks using a Color blend mode to give the painted effect. Painted the heart pattern out of his spots using an 8-pixel soft round brush and Gruts H Hatch Wren brush (if you have not checked out Gruts brush website, take a look-it’s great). It took awhile but was lots of fun to do. Happy Valentine’s Day!…..Digital Lady Syd
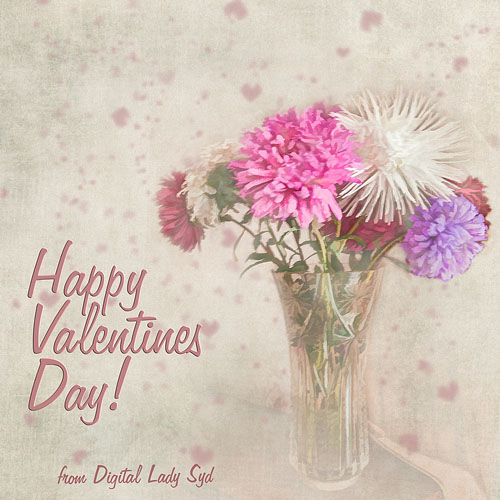
Happy Valentines Day!

These flowers were growing in the countryside in Belarus several years ago. I am not sure what kind they are, but the blooms were huge! And the colors are incredible! Not a lot of processing here. After some basic slider adjustments in Lightroom 4, the image was opened up in Photoshop and three inches were added the left side of the image to create an area to add type by going to Image -> Canvas Size. The image was sharpened using Topaz (see sidebar for website link) Detail 3 and the Feature Contrast II preset. Some of the contrast was removed from the image by duplicating the top layer and setting it to Screen blend mode. A black layer mask was added and the high contrast areas were painted back in so they were not so obvious. (See a wonderful video by Melissa Gallo of Painted Textures called Turn Your Photo into a Pastel Painting, Pencil Drawing or Pen and Ink on how to do this.) A New Layer was created and some of the too bright highlights on the pink and purple flowers were lightly painted out. (See my Tidbits Blog Getting Rid of Those Blown Out Areas in Your Image.) Added a Levels Adjustment Layer per Melissa’s suggestion and then Topaz Simplify 4 was opened and the Painting II preset applied. The centers of the large blooms were brushed out to bring back the detail a little using a brush set to 33% opacity in the Local Adjustments section, the Dynamics slider in the Adjust section was set to 0.38, and Tone in Finishing Touches was checked. Back in Photoshop Kim Klassen’s Reentry Texture was added – beautiful texture that was free by signing up for her newsletter. On a white layer mask the flowers were lightly painted out to reveal the flowers just enough. Next on another New Layer some pink hearts were added to the background using Obsidian Dawn’s hearts-glitter brush set’s Glitter Brush set to 4100 px. Once again a white layer mask was added and the flower painted out so the hearts do not cover them. This layer was set to 68% opacity. The text was added using my favorite Freehand575 BT font set to a default setting of the Bevel & Emboss layer style. A basic texture image turned into a Valentine for you!…..Digital Lady Syd
Happy Valentines from Digital Lady Syd

Hope you all have a wonderful day!
A little background information on this Valentine. To create the following card, these steps and resources were used:
1. Started on a New Layer with Spatter Heart Frame from PS Brushes. A Layer Style was added – Outer Glow set to a soft yellow and Linear Dodge (Add) at 75% and a Spread of 21; and a Gradient Overlay adjusting Graphix1 Muted 8 for a gold tone.
2. Next a background was added underneath using Colored Vintage Paper by Ciara Panacchia.
3. Another texture was added above this one – Vintage Valentine Paper by Aramisdream. It was set to 59% and a layer mask was used to brush out the center and to create a vignette effect around the edges.
4. A layer was placed on top that used Obsidian Dawn’s Glitter set-hearts-glitter brush in a soft beige at 43% opacity.
5. Glass Prism’s cupid brush was placed in the center on it’s own layer.
6. The red valentines were placed on their own layer – Hearts by King Billy was used. A Layer Style was added using a red Color Overlay and a small 1 pixel Stroke.
7. Two Text Layers were created using the font Precious, a perfect Valentine font. A Layer Style was added using: Inner Shadow set to Distance of 21 and Size of 21; Outer Glow set to Linear Dodge (Add) at 45% opacity and Size of 24 pixels with a light yellow color; and Bevel and Emboss set to Inner Bevel, Smooth, Depth 103, Size 10 and the rest default settings.
That is how I made my vintage look Valentine. It was a lot of fun to try out the different effects on the brushes – the layer styles really made a difference. When you have a minute, try a layer style on some of your brush strokes – you may get some surprising results!…..Digital Lady Syd
Digital Lady Syd Related Blogs:
Where To Get Those Free Valentine Templates
Create a Valentine
Creating Your Own Art (and Cards) While You Are At It!

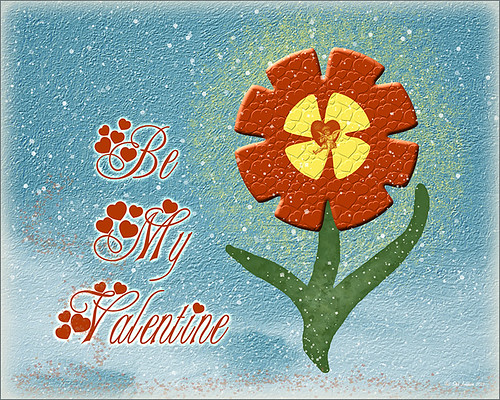
More Valentine resources if you are feeling in that creative mood and want to make your own. Here is how I created this funny little valentine.
1. I created a New Document and then added a New Layer on top where a red circle was painted and then a yellow circle was painted inside it.
2. Next this layer was taken into Photoshop’s Liquify Filter and where I came up with this funny looking flower. This is a fun filter that can give some really interesting results if you take the time to learn what the various tools do. A Layer Style (double click on the layer in the Layers Palette) was added to create this nifty embossed heart look – by adding a Bevel and Emboss Layer Style and checking Texture. Now the trick is to double click on the word Texture on the left, and you get a new dialog where you can change the Pattern you use for the texture. In this case, the San Valentine Pattern by succo-design was used with the Scale set to 69% and Depth to +6. These are the same patterns you will see in the Pattern Overlay section, except they are embossed and have not color! This is really a great way to use patterns!
3. On a separate layer I painted a stem and a few leaves. Add a Layer Style to this layer and select Pattern Overlay from the left side. To show you the different from step 2, choose a pattern to add some texture to your stem. In this case I choose Obsidian Dawn’s Dirty Patterns-Texture 1 set to Scale 31% and Opacity 36%. Then an Inner Glow was set using a dark green color set to Size 125 pixels to add a little shading to the outside shape of the leaves and stem. You can see how this pattern was applied differently from the pattern in Step 2.
4. I was not really sure what to do next so I decided to add a colored background. I choose ShadowHouse Creations Raised Textured Effect 2 to give some interest to the background. All the textures in this group are beautiful.
5. On a New Layer ShadowHouse Creations Assorted Brush Pack 2 Soft Clouds-NewBrush 18 was used to for a soft white background.
6. On another New Layer, Obsidian Dawns Glitter Set-Random Swirls 2 was used for the slight yellow glow behind the flower.
7. Above that on another New Layer I used SJ Basic Star Scatter Brush to drop some large white flakes on the background for a bit of a wintry addition. (I set up a star scatter brush using the soft brush set to 30 pixels and spacing 1000%. In the Scatter dialog, set the Jitter to 1000% both axis and the Jitter Count to 100. I saved the settings to use the brush again. This brush is used in my Fun Photoshop Blog “Trying Out Topaz Star Effects” but it creates a nice snowing effect also.)
8. Above the flower, a New Layer was created and the little cupid painted in red (click twice to get dark enough) using Glass Prism CupidReq09 brush.
9. Under this layer, create a New Layer and paint all over image with Snow Drops by FrostBo to finish the snowy feel. You do not want snow on the cupid as it will blur the cupid so this is why the layer is under the snow drop one.
10. A Text Layer was created using the font MC Sweetie Hearts and a white Outer Glow Layer Style set to 21 pixels was used to make the letters stand out.
11. On top of the font a New Layer was created and small hearts using the Valentine Brush by digitalTouch with a white as foreground color and red as background color was painted along the bottom leaving a small heart trail along where the ground would be.
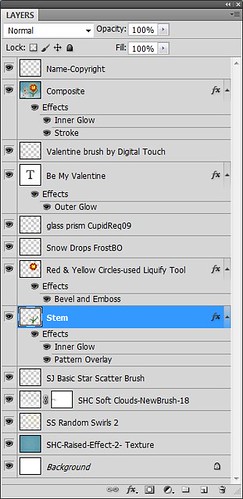
12. A composite layer was created on top (CTRL+ALT+SHIFT+E) and a Layer Style was created to frame the image Stroke set to a gray 4 pixels inside stroke, and a Inner Glow style set to light gray and 125 strokes.
Here is what the layer structure looks like in case you got lost.

It sounds like it is hard to do, but I wanted to show how easy it is to construct some very creative cards with nothing but Photoshop and some nice resources. The trick is to add each element on individual layers and make sure they re named so you know what you did. Much of the home art you see in Wal-Mart or TJ Maxx is basically just doing exactly what I did here. Check out my blogs below for other ideas just using Photoshop. Take some time to play around with some of the resources available for download and see if you don’t get some really nice art…..Digital Lady Syd
Digital Lady Syd Related Blogs:
Just Plain Fun Brush Effects!
Tree Brushes with a Little Grunge
Just a Tree
Brushing Up on Circles!


