
Another OnOne Perfect Effects Pix – Got to Love It!
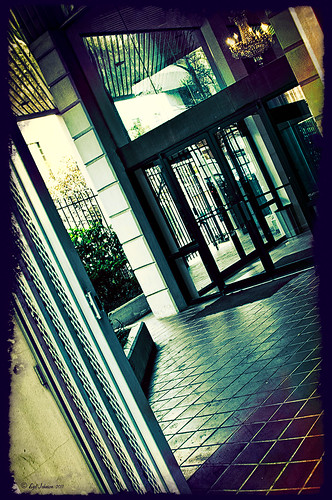 |
I discovered I really liked this image of an entryway into a building in Jackson, Mississippi, that was completely empty. Really sad to see such a nice space and nothing in it. Anyway, when I took the picture there was some vertical distortion (hover over image to see original) that I was not able to get rid of easily. While inside the Lens Correction Filter trying to straighten up these bowing lines, I discovered that the image looked really neat twisted – so that is how this picture started out.
The image was still a little flat so I decided to experiment some more in the updated plug-in from OnOne called Perfect Effects (see sidebar for website link). This image has three effects stacked – in Black & White tab, Roadie filter was chosen and set to Overlay blend mode at 73%; in Movie Looks, Urban Sickness set to Color blend mode at 78%; and in Vintage, Nicely Toasted set to Darken blend mode at 100%. The layer was duplicated and rasterized (right click layer and select rasterize to get rid of smart object) and the Sponge Tool was applied to the yellow leaves in the background to color them a bit more. On a duplicate layer a High Pass filter set to 9.1 was to sharpen the image and set to Soft blend mode. A final Curves Adjustment Layer was added for contrast and OnOne.s PhotoFilter acid burn controlled frame. That is it and I love the results!
This is how I like to experiment – just try different things as you go into the various parts of Photoshop – it can be amazing what you come up with. I did not imagine this image as a diagonal, but it really does the image justice. I hope this will give you some inspiration to try this technique on some of your pictures – it can be quite interesting…..Digital Lady Syd
Digital Lady Syd’s Related Blogs:
Digital Lady Syd’s Review of OnOne Perfect Effects
Pseudo HDR in OnOne Perfect Effects
First Try – OnOne’s Perfect Effects 3
Elements or CS5: Stacking the Same Image for Effect

This image was created in Photoshop Elements 10 – it is of an old abandoned gas station not too far from the airport in Jackson, Mississippi. I am still figuring out this program so this was definitely just playing around and getting used to what the program can do. To create this optical illusion, follow these steps.
1. Open up image into Elements (or CS) and duplicate the layer (click OK in the dialog that opens).
2. In this case the top layer was taken into Nik Color Efex Pro 4 and an HDR preset was added to create the HDR effect. (If you have the plug-in or are using it as a trial version, my blog “Settings for Vivid Drawing Look ACR/Lightroom Preset and NIK Color Efex Pro 4 Pseudo HDR Recipe” has the preset settings you can enter manually or download already as a preset.) Any effect can be applied here.
3. After coming back into Elements (or CS), add a Layer Style was added – used an inner Glow using the default color at 114 pixels and opacity at 75%, and a black Stroke set to 18 pixels at 100% opacity. At this point the image can be transformed and rotated like the image above.
4. Next the bottom layer was highlighted and a New Layer was added below (ALT+click on the New Layer Icon) and filled with a beige color (CTRL+Backspace).
5. Set the image layer to Multiply blend mode at 88% opacity to make the bottom image much softer.
6. Go to the Adjustment Layers (third icon at bottom of Layers Palette) and select Gradient Map – the Light Brown gradient was chosen and the Layer was set to Soft Light blend mode to make image even softer.
7. Finally add a Levels Adjustment Layer to bring back a little contrast of the whole image.
8. The Sharpen Tool or Unsharp Mask filter can be added at this point if you want to sharpen the top layer image but since the Pseudo HDR preset was applied in NIK, it oversharpened the above image.
9. I created a Text Layer with my name and the copyright symbol was added using the Custom Shape Tool.
I was really pleased with the results and it gives an interesting effect. Try experimenting with the different layer combinations and see what you can get. It could turn out to be unexpectedly interesting!…..Digital Lady Syd
Elements & CS5 Friday: Adding a Texture for a Totally New Look to an Image
Friday blogs are going to be for Adobe Photoshop Elements along with some techniques crossing over with Adobe Photoshop CS5. I realize there is a huge group of digital fanatics out there using the quite capable little sister to CS5. So let’s start.
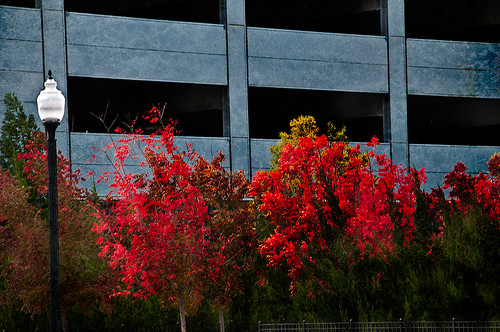 |
Unfortunately these beautiful trees are in a very run-down part of the city and located in front of a parking garage. I guess my point is that just because something is not in a gorgeous settng, it can make a really nice image with just a little effort. Hover over the image to see what the original image looked like.
To achieve this nice effect, all that was done is to add an interesting texture image as a layer on top of your basic picture. In this case, a really grungy looking texture creates this wonderful effect on the building and in the tree colors. This free texture is from Shadowhouse Creations and is called You’d Be Surprised – download it here. This is one of the best texture sites I have found on the internet – beautiful textures all for free!
Here are the steps required to create this look:
1. Open your image in Photoshop Elements (or CS5).
2. Clean up any areas that need to be touched up using the Clone Stamp Tool or Content Aware Healing Brush.
3. Go to File -> Open and navigate to the downloaded texture, in this case You’d Be Surprised, to open in Elements (or CS5) as a separate image.
4. Select image (CTRL + A), copy (CTRL + C) and then go to the original image and paste (CTRL +V) into the file which now puts the new image on top of your image. Close the texture image without saving.
5. Since the texture is probably too small to cover your image, we will use a Free Transform (CTRL+T) to expand the image – just drag the corners out to completely cover the original layer underneath.
6. Change the texture layer to Overlay Blend Mode at the top of the Layers Panel (click on down arrow to the right of Normal).
7. (Optional Step) If certain areas would look better without the texture, highlight this layer and click the Add a Mask icon (2nd icon over from left at bottom of the Layers Panel). This adds a white layer mask – click on it in the Layers Panel and paint with a black soft brush set to 50% opacity. Paint into areas you do not want the texture affecting.
For this image, the lamppost and light were painted out in black along with a little bit of the red leaves in the trees to increase the color range in the leaves, and some of the dark green bushes to add some lighter highlights for interest.
8. (Optional Step) To sharpen parts of the image to make certain areas stand out, click on the Create a New Layer icon (1st icon at the bottom of the Layers Panel and 6th icon from left for CS5). Select the Sharpen Tool (it is nested with the Blur Tool and Smudge Tool – 3rd icon from the bottom on the Tool Bar or 11 from bottom for CS5) and leave the top options set to the default settings except check Sample All Layers. On this new layer, with a soft edged brush paint over the objects you want to sharpen – since the brush is set to a default Strength of 50%, go over the object a few times to build up a really sharp effect. Watch out for artifacts if too much is applied. The nice thing is, since this sharpening is on its own layer, it can be deleted and started over or the opacity can be reduced if too much is added.
In the image above, just the lamppost and light and a few of the top red and yellow leaves were sharpened.
You are done! And this texture creates a very beautiful look. Look at some of the other images Shadowhouse Creations used with this texture at the download site link above.
Well I hope you enjoyed this blog – I did. I love working with textures and this workflow can be used over and over again to achieve some beautiful results using any texture. Have Fun Creating!…..Digital Lady Syd


